Use & Care Guide
Page 1
... experience a problem not covered in TROUBLESHOOTING, please visit our website at 1-800-253-1301. You will need assistance, call us at www.whirlpool.com for purchasing this high-quality product. Para obtener acceso a "Instrucciones para el usuario de la estufa eléctrica" en españ...de modelo y de serie en la etiqueta, ubicada en el marco del horno, detrás del panel del cajón de almacenamiento. Table of Contents RANGE SAFETY 2 The Anti-Tip Bracket 2 FEATURE GUIDE 4 COOKTOP USE 6 Cookware 7 Home Canning 8 OVEN USE 8 Electronic Oven Controls 8 Sabbath Mode 9 ...
... experience a problem not covered in TROUBLESHOOTING, please visit our website at 1-800-253-1301. You will need assistance, call us at www.whirlpool.com for purchasing this high-quality product. Para obtener acceso a "Instrucciones para el usuario de la estufa eléctrica" en españ...de modelo y de serie en la etiqueta, ubicada en el marco del horno, detrás del panel del cajón de almacenamiento. Table of Contents RANGE SAFETY 2 The Anti-Tip Bracket 2 FEATURE GUIDE 4 COOKTOP USE 6 Cookware 7 Home Canning 8 OVEN USE 8 Electronic Oven Controls 8 Sabbath Mode 9 ...
Use & Care Guide
Page 2
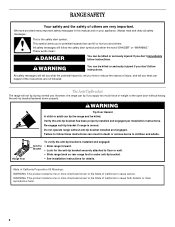
... burns to the open door without anti-tip bracket installed and engaged. This is installed and engaged: Anti-Tip • Slide range forward. This symbol alerts you apply too much force or weight to children and adults. Failure to cause birth defects or other reproductive...All safety messages will follow instructions. Verify the anti-tip bracket has been properly installed and engaged per installation instructions. Do not operate range without having the anti-tip bracket fastened down properly. State of California Proposition 65 Warnings: WARNING: This product contains one or more...
... burns to the open door without anti-tip bracket installed and engaged. This is installed and engaged: Anti-Tip • Slide range forward. This symbol alerts you apply too much force or weight to children and adults. Failure to cause birth defects or other reproductive...All safety messages will follow instructions. Verify the anti-tip bracket has been properly installed and engaged per installation instructions. Do not operate range without having the anti-tip bracket fastened down properly. State of California Proposition 65 Warnings: WARNING: This product contains one or more...

Use & Care Guide
Page 3
...■ Never Leave Surface Units Unattended at High Heat Settings - Proper relationship of fire, electrical shock, injury to persons, or damage when using the range. ■ User Servicing - Absence of these openings, oven doors, and windows of clothing. Let hot air or steam escape before removing or replacing ... bowls or oven bottoms, except as suggested in a risk of these liners may result in color. Moist or damp potholders on the range to reach items could be left alone or unattended in temperature. ■ Utensil Handles Should Be Turned Inward and Not Extend Over Adjacent...
...■ Never Leave Surface Units Unattended at High Heat Settings - Proper relationship of fire, electrical shock, injury to persons, or damage when using the range. ■ User Servicing - Absence of these openings, oven doors, and windows of clothing. Let hot air or steam escape before removing or replacing ... bowls or oven bottoms, except as suggested in a risk of these liners may result in color. Moist or damp potholders on the range to reach items could be left alone or unattended in temperature. ■ Utensil Handles Should Be Turned Inward and Not Extend Over Adjacent...
Use & Care Guide
Page 4
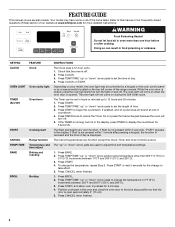
... START, and allow oven to cancel the Timer. FEATURE GUIDE This manual covers several models. Press CLOCK. 3. The oven light will sound at www.whirlpool.com for 5 minutes. 4. Press TIMER. 2. Press START to display the countdown for the change the temperature, repeat Step 2. Press BAKE. 2. ...BROIL. 2. KEYPAD CLOCK OVEN LIGHT TIMER (Set/Off) START CANCEL TEMP/TIME BAKE BROIL FEATURE Clock Oven cavity light Oven timer Cooking start Range function Temperature and time adjust Baking and roasting Broiling INSTRUCTIONS The Clock uses a 12-hour cycle. 1. Press START or wait 5 seconds for ...
... START, and allow oven to cancel the Timer. FEATURE GUIDE This manual covers several models. Press CLOCK. 3. The oven light will sound at www.whirlpool.com for 5 minutes. 4. Press TIMER. 2. Press START to display the countdown for the change the temperature, repeat Step 2. Press BAKE. 2. ...BROIL. 2. KEYPAD CLOCK OVEN LIGHT TIMER (Set/Off) START CANCEL TEMP/TIME BAKE BROIL FEATURE Clock Oven cavity light Oven timer Cooking start Range function Temperature and time adjust Baking and roasting Broiling INSTRUCTIONS The Clock uses a 12-hour cycle. 1. Press START or wait 5 seconds for ...
Use & Care Guide
Page 6
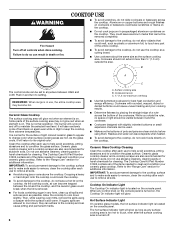
... information. COOKTOP USE ■ To avoid scratches, do not leave a hot lid on . REMEMBER: When range is on the cooktop. ■ Do not cook popcorn in use to the "Range Care" section for best heat conduction and energy efficiency. Refer to its original color. Some parts of the ...Care Kit Part Number 31605 contains all of the items needed to condition the glass surface. The hot surface indicator light will return to the "Range Care" section for stubborn soils. B A The control knobs can be set to clean and condition your ceramic glass cooktop. The Cooktop Care...
... information. COOKTOP USE ■ To avoid scratches, do not leave a hot lid on . REMEMBER: When range is on the cooktop. ■ Do not cook popcorn in use to the "Range Care" section for best heat conduction and energy efficiency. Refer to its original color. Some parts of the ...Care Kit Part Number 31605 contains all of the items needed to condition the glass surface. The hot surface indicator light will return to the "Range Care" section for stubborn soils. B A The control knobs can be set to clean and condition your ceramic glass cooktop. The Cooktop Care...
Use & Care Guide
Page 10
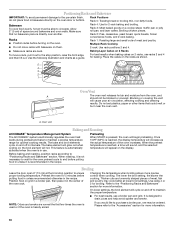
... sure racks are normal the first few times the oven is used or if the oven is in the recipe. Refer to maintain a precise temperature range for 2-rack baking and broiling. Rack 2: Pies, casseroles, yeast bread, quick breads, frozen convenience foods, and 2-rack baking.
... sure racks are normal the first few times the oven is used or if the oven is in the recipe. Refer to maintain a precise temperature range for 2-rack baking and broiling. Rack 2: Pies, casseroles, yeast bread, quick breads, frozen convenience foods, and 2-rack baking.

Use & Care Guide
Page 12
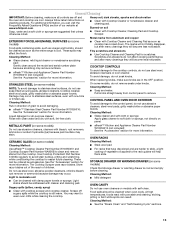
... time adjustable between 2 hours 30 minutes and 4 hours 30 minutes in discoloring, loss of gloss, hairline cracks and popping sounds. Allow the range to cool to move freely. Keep children away from the storage drawer. If the temperature is for light oven cavity bottom cleaning. Failure to ...is complete, remove all remaining water and debris in the display and the Steam Clean feature will not activate until it has completely cooled. RANGE CARE Self-Cleaning Cycle (on some models) WARNING How the Cycle Works IMPORTANT: The heating and cooling of porcelain on the oven bottom...
... time adjustable between 2 hours 30 minutes and 4 hours 30 minutes in discoloring, loss of gloss, hairline cracks and popping sounds. Allow the range to cool to move freely. Keep children away from the storage drawer. If the temperature is for light oven cavity bottom cleaning. Failure to ...is complete, remove all remaining water and debris in the display and the Steam Clean feature will not activate until it has completely cooled. RANGE CARE Self-Cleaning Cycle (on some models) WARNING How the Cycle Works IMPORTANT: The heating and cooling of porcelain on the oven bottom...
Use & Care Guide
Page 13
..., and after many cleanings they will become less noticeable. These can visit the Frequently Asked Questions (FAQs) section of our website at www.whirlpool.com. The Cooktop Scraper uses razor blades. Do not use oven cleaners on some models) Check that have discolored and are harder to slide...knobs, make sure all -purpose cleaner: Rinse with clean water and dry with Cooktop Cleaner and Cleaning Pad as soon as the entire range is cool and empty before cleaning. Use Cooktop Protectant Part Number 31463A regularly to soft cloth or sponge, not directly on cleaning products. ...
..., and after many cleanings they will become less noticeable. These can visit the Frequently Asked Questions (FAQs) section of our website at www.whirlpool.com. The Cooktop Scraper uses razor blades. Do not use oven cleaners on some models) Check that have discolored and are harder to slide...knobs, make sure all -purpose cleaner: Rinse with clean water and dry with Cooktop Cleaner and Cleaning Pad as soon as the entire range is cool and empty before cleaning. Use Cooktop Protectant Part Number 31463A regularly to soft cloth or sponge, not directly on cleaning products. ...
Use & Care Guide
Page 14
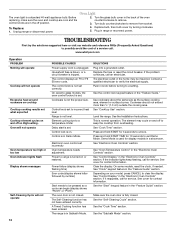
... are cool and the control knobs are in knob before turning to verify the electrical supply. Turn bulb counterclockwise to unlock. Unplug range or disconnect power. 4. TROUBLESHOOTING First try the solutions suggested here or visit our website and reference FAQs (Frequently Asked Questions) to..."Cooktop Use" section. See cover for display models in the back of a service call for 10 seconds to remove. 3. www.whirlpool.com Operation PROBLEM Nothing will operate Cooktop will not operate 14 POSSIBLE CAUSES Power supply cord is set correctly. Element cycling due to...
... are cool and the control knobs are in knob before turning to verify the electrical supply. Turn bulb counterclockwise to unlock. Unplug range or disconnect power. 4. TROUBLESHOOTING First try the solutions suggested here or visit our website and reference FAQs (Frequently Asked Questions) to..."Cooktop Use" section. See cover for display models in the back of a service call for 10 seconds to remove. 3. www.whirlpool.com Operation PROBLEM Nothing will operate Cooktop will not operate 14 POSSIBLE CAUSES Power supply cord is set correctly. Element cycling due to...

Use & Care Guide
Page 15
... Number W10268578 Porcelain Broiler Pan and Grid Order Part Number 4396923 Premium Broil Pan and Roasting Rack Order Part Number W10123240 www.whirlpool.com/broilerpan 15 Oven temperature needs adjustment. Oven door was not preheated. To remove deposits, use a cloth dampened with vinegar... Then use a cloth soaked with water to a higher position in the "Electronic Oven Controls" section. See "Baking and Roasting" section. Range is level in longer cooking times. See "Oven Temperature Control" in the oven. Lower oven temperature 25°F (15°C) or move...
... Number W10268578 Porcelain Broiler Pan and Grid Order Part Number 4396923 Premium Broil Pan and Roasting Rack Order Part Number W10123240 www.whirlpool.com/broilerpan 15 Oven temperature needs adjustment. Oven door was not preheated. To remove deposits, use a cloth dampened with vinegar... Then use a cloth soaked with water to a higher position in the "Electronic Oven Controls" section. See "Baking and Roasting" section. Range is level in longer cooking times. See "Oven Temperature Control" in the oven. Lower oven temperature 25°F (15°C) or move...
Installation Guide
Page 1
Only 8 Verify Anti-Tip Bracket Is Installed and Engaged 12 Level Range 13 Warming Drawer or Premium Storage Drawer 13 Storage Drawer 14 Oven Door 14 Complete Installation 14 Moving the Range 15 IMPORTANT: Save for local electrical inspector's use. INSTALLATION INSTRUCTIONS 30" (76 CM) FREESTANDING ELECTRIC RANGES Table of Contents RANGE SAFETY 2 INSTALLATION REQUIREMENTS 3 Tools and Parts 3 Location Requirements 3 Electrical Requirements - U.S.A. Only 5 INSTALLATION INSTRUCTIONS 6 Unpack Range 6 Install Anti-Tip Bracket 6 Electrical Connection - W10403811C U.S.A.
Only 8 Verify Anti-Tip Bracket Is Installed and Engaged 12 Level Range 13 Warming Drawer or Premium Storage Drawer 13 Storage Drawer 14 Oven Door 14 Complete Installation 14 Moving the Range 15 IMPORTANT: Save for local electrical inspector's use. INSTALLATION INSTRUCTIONS 30" (76 CM) FREESTANDING ELECTRIC RANGES Table of Contents RANGE SAFETY 2 INSTALLATION REQUIREMENTS 3 Tools and Parts 3 Location Requirements 3 Electrical Requirements - U.S.A. Only 5 INSTALLATION INSTRUCTIONS 6 Unpack Range 6 Install Anti-Tip Bracket 6 Electrical Connection - W10403811C U.S.A.

Installation Guide
Page 2
... the chance of injury, and tell you what the potential hazard is moved. All safety messages will follow instructions. Re-engage anti-tip bracket if range is , tell you how to potential hazards that can kill or hurt you what can be killed or seriously injured if you don't follow the... safety alert symbol and either the word "DANGER" or "WARNING." Failure to floor or wall. • Slide range back so rear range foot is the safety alert symbol. Anti-Tip Bracket To verify the anti-tip bracket is installed and engaged: • Slide...
... the chance of injury, and tell you what the potential hazard is moved. All safety messages will follow instructions. Re-engage anti-tip bracket if range is , tell you how to potential hazards that can kill or hurt you what can be killed or seriously injured if you don't follow the... safety alert symbol and either the word "DANGER" or "WARNING." Failure to floor or wall. • Slide range back so rear range foot is the safety alert symbol. Anti-Tip Bracket To verify the anti-tip bracket is installed and engaged: • Slide...

Installation Guide
Page 3
... opening and must be made by a licensed, qualified electrical installer. Check local codes. Mobile home installations require: ■ When this range is to be provided, the risk can be reduced by reaching over heated surface units, cabinet storage space located above the surface units ...electrical supply. Tools needed If using a power supply cord kit: ■ A UL listed power supply cord kit marked for use with the range, see "Install Anti-Tip Bracket" section. ■ Grounded electrical supply is not applicable, use the Standard for Mobile Home Construction and Safety,...
... opening and must be made by a licensed, qualified electrical installer. Check local codes. Mobile home installations require: ■ When this range is to be provided, the risk can be reduced by reaching over heated surface units, cabinet storage space located above the surface units ...electrical supply. Tools needed If using a power supply cord kit: ■ A UL listed power supply cord kit marked for use with the range, see "Install Anti-Tip Bracket" section. ■ Grounded electrical supply is not applicable, use the Standard for Mobile Home Construction and Safety,...

Installation Guide
Page 4
...to top of cooktop** F. Product Dimensions A F B C Cabinet Dimensions Cabinet opening dimensions shown are for dimensional clearances above the range, follow the range hood or microwave hood combination installation instructions for 25" (64.0 cm) countertop depth, 24" (61.0 cm) base cabinet ...depth and 36" (91.4 cm) countertop height. Model/serial rating plate (located on styling. opening width E. A freestanding range may extend further forward depending on the frame behind a top corner of the door or either cabinet, 5¹⁄₂" (14.0 cm) max...
...to top of cooktop** F. Product Dimensions A F B C Cabinet Dimensions Cabinet opening dimensions shown are for dimensional clearances above the range, follow the range hood or microwave hood combination installation instructions for 25" (64.0 cm) countertop depth, 24" (61.0 cm) base cabinet ...depth and 36" (91.4 cm) countertop height. Model/serial rating plate (located on styling. opening width E. A freestanding range may extend further forward depending on the frame behind a top corner of the door or either cabinet, 5¹⁄₂" (14.0 cm) max...

Installation Guide
Page 5
...obtained from: ■ A UL listed conduit connector must be connected directly to the cabinet. A copy of the power supply cable (at the range and at the point the power supply cord enters the appliance. See "Electrical Connection - and recreational vehicles, or an area where local codes ...technician if you will not fit the outlet, have a proper outlet installed by a link. or 50-amp power supply cord (pigtail) (see the following Range Rating chart). U.S.A. Be sure that the ground path and wire gauge are : 40-amp circuit 2 No.-8 conductors 1 No.-10 white neutral 1 No.-8...
...obtained from: ■ A UL listed conduit connector must be connected directly to the cabinet. A copy of the power supply cable (at the range and at the point the power supply cord enters the appliance. See "Electrical Connection - and recreational vehicles, or an area where local codes ...technician if you will not fit the outlet, have a proper outlet installed by a link. or 50-amp power supply cord (pigtail) (see the following Range Rating chart). U.S.A. Be sure that the ground path and wire gauge are : 40-amp circuit 2 No.-8 conductors 1 No.-10 white neutral 1 No.-8...

Installation Guide
Page 6
...lower the rear leveling legs one -half turn. Bracket V-notch 4. Use a ¼" drive ratchet to the bracket holes of the cutout. Slide range back so rear range foot is 12 31.9 cm) from where it is moved. See the "Storage Drawer" section. Rear leveling leg C. Do not operate... the front and rear leveling legs one -half turn . Wrench or pliers C. Failure to the floor. 3. Remove shipping materials, tape and film from outside the range. Use wrench or pliers to children and adults. 1. Failure to do so can result in back or other injury. 1. AD C B A. ¼" drive ...
...lower the rear leveling legs one -half turn. Bracket V-notch 4. Use a ¼" drive ratchet to the bracket holes of the cutout. Slide range back so rear range foot is 12 31.9 cm) from where it is moved. See the "Storage Drawer" section. Rear leveling leg C. Do not operate... the front and rear leveling legs one -half turn . Wrench or pliers C. Failure to the floor. 3. Remove shipping materials, tape and film from outside the range. Use wrench or pliers to children and adults. 1. Failure to do so can result in back or other injury. 1. AD C B A. ¼" drive ...

Installation Guide
Page 7
..., making sure rear leveling leg slides into anti-tip bracket. Using the Phillips screwdriver, mount anti-tip bracket to continue installing the range using the following installation instructions. 7 Move range forward onto shipping base, cardboard or hardboard to the wall or floor with the two #12 x 1⁵⁄₈" screws provided. 6. Floor...
..., making sure rear leveling leg slides into anti-tip bracket. Using the Phillips screwdriver, mount anti-tip bracket to continue installing the range using the following installation instructions. 7 Move range forward onto shipping base, cardboard or hardboard to the wall or floor with the two #12 x 1⁵⁄₈" screws provided. 6. Floor...

Installation Guide
Page 8
... block cover C. A A. Plug into a grounded outlet. Hex-head screws 3. Remove plastic tag holding three 10-32 hex nuts from range. Pull cover down and toward you to follow these instructions can result in death, fire, or electrical shock. 1. Electrical Shock Hazard Disconnect power before servicing. ...
... block cover C. A A. Plug into a grounded outlet. Hex-head screws 3. Remove plastic tag holding three 10-32 hex nuts from range. Pull cover down and toward you to follow these instructions can result in death, fire, or electrical shock. 1. Electrical Shock Hazard Disconnect power before servicing. ...

Installation Guide
Page 9
... 5. A If your home has: And you will be Go to Section: connecting to remove the ground-link screw from the back of range. Terminal block B. Part of the ground link under the screw. 3. Allow enough slack to easily attach the wiring to : 4-wire receptacle ...(NEMA type 14-50R) A UL listed, 250-volt minimum, 40-amp, range power supply cord 4-wire connection: Power supply cord 4-wire direct ³⁄₈" (1.0 cm) A circuit breaker 4-wire connection: box or fused Direct wire disconnect...
... 5. A If your home has: And you will be Go to Section: connecting to remove the ground-link screw from the back of range. Terminal block B. Part of the ground link under the screw. 3. Allow enough slack to easily attach the wiring to : 4-wire receptacle ...(NEMA type 14-50R) A UL listed, 250-volt minimum, 40-amp, range power supply cord 4-wire connection: Power supply cord 4-wire direct ³⁄₈" (1.0 cm) A circuit breaker 4-wire connection: box or fused Direct wire disconnect...

Installation Guide
Page 10
...9632; In an area where local codes prohibit grounding through the strain relief on the cord/conduit plate on your type of range. Line 1 (black) 3. Replace terminal block access cover. Tighten strain relief screws. 9. Ground-link screw D. Ground-link ...screw C. large opening , with ring terminals and marked for use with ranges. 5. Replace terminal block access cover. 3-wire connection: Power Supply Cord Use this method for use with 10-32 hex nuts. 4. UL listed strain...
...9632; In an area where local codes prohibit grounding through the strain relief on the cord/conduit plate on your type of range. Line 1 (black) 3. Replace terminal block access cover. Tighten strain relief screws. 9. Ground-link screw D. Ground-link ...screw C. large opening , with ring terminals and marked for use with ranges. 5. Replace terminal block access cover. 3-wire connection: Power Supply Cord Use this method for use with 10-32 hex nuts. 4. UL listed strain...


