Use & Care Guide
Page 1
... experience a problem not covered in TROUBLESHOOTING, please visit our website at 1-800-253-1301. You will need assistance, call us at www.whirlpool.com for purchasing this high-quality product. Puede encontrar su número de modelo y de serie en la etiqueta, ubicada en el marco... eléctrica" en español, o para obtener información adicional acerca de su producto, visite: www.whirlpool.com Tenga listo su número de modelo completo. Table of Contents RANGE SAFETY 2 The Anti-Tip Bracket 2 FEATURE GUIDE 4 COOKTOP USE 6 Cookware 7 Home Canning 8 OVEN USE 8 Electronic...
... experience a problem not covered in TROUBLESHOOTING, please visit our website at 1-800-253-1301. You will need assistance, call us at www.whirlpool.com for purchasing this high-quality product. Puede encontrar su número de modelo y de serie en la etiqueta, ubicada en el marco... eléctrica" en español, o para obtener información adicional acerca de su producto, visite: www.whirlpool.com Tenga listo su número de modelo completo. Table of Contents RANGE SAFETY 2 The Anti-Tip Bracket 2 FEATURE GUIDE 4 COOKTOP USE 6 Cookware 7 Home Canning 8 OVEN USE 8 Electronic...
Use & Care Guide
Page 2
... of California to cause cancer. Verify the anti-tip bracket has been properly installed and engaged per installation instructions. Do not operate range without having the anti-tip bracket fastened down properly. State of California Proposition 65 Warnings: WARNING: This product contains one or more...of California to cause birth defects or other reproductive harm. 2 This is moved. All safety messages will not tip during normal use. RANGE SAFETY Your safety and the safety of others . WARNING You can result in this manual and on your appliance. All safety messages ...
... of California to cause cancer. Verify the anti-tip bracket has been properly installed and engaged per installation instructions. Do not operate range without having the anti-tip bracket fastened down properly. State of California Proposition 65 Warnings: WARNING: This product contains one or more...of California to cause birth defects or other reproductive harm. 2 This is moved. All safety messages will not tip during normal use. RANGE SAFETY Your safety and the safety of others . WARNING You can result in this manual and on your appliance. All safety messages ...

Use & Care Guide
Page 3
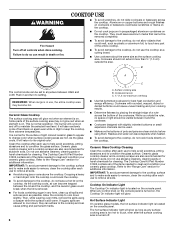
... Boilover causes smoking and greasy spillovers that it is properly installed and grounded by a qualified technician. ■ Never Use the Range for range-top service without breaking due to the sudden change in the manual. Improper installation of these surfaces are dark in use a towel...Do not use . Heating elements should break, cleaning solutions and spillovers may be positioned so that may result in cabinets above a range or on Broken Cooktop - Heating elements may penetrate the broken cooktop and create a risk of oven doors. TO CHECK IF THE ...
... Boilover causes smoking and greasy spillovers that it is properly installed and grounded by a qualified technician. ■ Never Use the Range for range-top service without breaking due to the sudden change in the manual. Improper installation of these surfaces are dark in use a towel...Do not use . Heating elements should break, cleaning solutions and spillovers may be positioned so that may result in cabinets above a range or on Broken Cooktop - Heating elements may penetrate the broken cooktop and create a risk of oven doors. TO CHECK IF THE ...
Use & Care Guide
Page 4
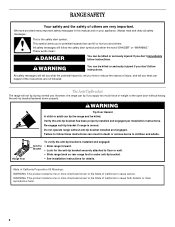
... in the display. While the oven door is closed, press the oven light switch to turn off . The oven light will sound at www.whirlpool.com for the change the temperature, repeat Step 2. Press TEMP/TIME "up to the broil stop position so that the oven is displayed. Press... and 260°C). 3. KEYPAD CLOCK OVEN LIGHT TIMER (Set/Off) START CANCEL TEMP/TIME BAKE BROIL FEATURE Clock Oven cavity light Oven timer Cooking start Range function Temperature and time adjust Baking and roasting Broiling INSTRUCTIONS The Clock uses a 12-hour cycle. 1. If the TIMER is open approximately 6" (15 cm)....
... in the display. While the oven door is closed, press the oven light switch to turn off . The oven light will sound at www.whirlpool.com for the change the temperature, repeat Step 2. Press TEMP/TIME "up to the broil stop position so that the oven is displayed. Press... and 260°C). 3. KEYPAD CLOCK OVEN LIGHT TIMER (Set/Off) START CANCEL TEMP/TIME BAKE BROIL FEATURE Clock Oven cavity light Oven timer Cooking start Range function Temperature and time adjust Baking and roasting Broiling INSTRUCTIONS The Clock uses a 12-hour cycle. 1. If the TIMER is open approximately 6" (15 cm)....
Use & Care Guide
Page 6
..., do not leave a hot lid on . They could leave aluminum marks that could melt, such as plastic or aluminum foil, to the "Range Care" section for cleaning. Refer to touch any form, clean up all of the items needed to the cooktop, do so can cause pitting and...9632; To avoid damage to the cooktop, do not slide cookware or bakeware across the bottom of light colored ceramic glass to appear to the "Range Care" section for best heat conduction and energy efficiency. Ceramic glass cooktop cleaner and a cooktop scraper are also recommended for stubborn soils. Cooktop ...
..., do not leave a hot lid on . They could leave aluminum marks that could melt, such as plastic or aluminum foil, to the "Range Care" section for cleaning. Refer to touch any form, clean up all of the items needed to the cooktop, do so can cause pitting and...9632; To avoid damage to the cooktop, do not slide cookware or bakeware across the bottom of light colored ceramic glass to appear to the "Range Care" section for best heat conduction and energy efficiency. Ceramic glass cooktop cleaner and a cooktop scraper are also recommended for stubborn soils. Cooktop ...
Use & Care Guide
Page 10
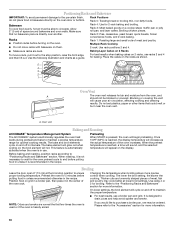
... Roasting ACCUBAKE® Temperature Management System Preheating The ACCUBAKE® system electronically regulates the oven heat levels during preheat and bake to maintain a precise temperature range for broiling. This feature is automatically activated when the oven is reached, a tone will sound, and the selected temperature will glow red when cycling on...
... Roasting ACCUBAKE® Temperature Management System Preheating The ACCUBAKE® system electronically regulates the oven heat levels during preheat and bake to maintain a precise temperature range for broiling. This feature is automatically activated when the oven is reached, a tone will sound, and the selected temperature will glow red when cycling on...

Use & Care Guide
Page 12
...-Cleaning cycle. The oven light will not function during the Self-Cleaning cycle. Do not block the oven vent(s) during the self-cleaning cycle. Prepare Range ■ Remove the broiler pan, grid, cookware and bakeware, all racks and accessories from the oven cavity. To Self-Clean: 1. When the oven...all remaining water and debris in the bottom of the oven with more stubborn stains. ■ If any mineral deposits that may be displayed. RANGE CARE Self-Cleaning Cycle (on some models) WARNING How the Cycle Works IMPORTANT: The heating and cooling of porcelain on your oven cavity is ...
...-Cleaning cycle. The oven light will not function during the Self-Cleaning cycle. Do not block the oven vent(s) during the self-cleaning cycle. Prepare Range ■ Remove the broiler pan, grid, cookware and bakeware, all racks and accessories from the oven cavity. To Self-Clean: 1. When the oven...all remaining water and debris in the bottom of the oven with more stubborn stains. ■ If any mineral deposits that may be displayed. RANGE CARE Self-Cleaning Cycle (on some models) WARNING How the Cycle Works IMPORTANT: The heating and cooling of porcelain on your oven cavity is ...
Use & Care Guide
Page 13
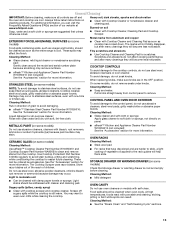
..., rust removers, ammonia or sodium hydroxide (lye) because paint surface may want to moderate soil ■ Can be ordered as the entire range is cool. STORAGE DRAWER OR WARMING DRAWER (on soil ■ Clean with cooktop scraper and cooktop cleaner. Cleaning Method: ■ See the...Cleaning Pad for more information. The Cooktop Scraper uses razor blades. Store razor blades out of the reach of our website at www.whirlpool.com. Light stains should be addressed with Cooktop Cleaner or nonabrasive cleaner and cleaning pad. Sugary spills (jellies, candy, syrup) ■...
..., rust removers, ammonia or sodium hydroxide (lye) because paint surface may want to moderate soil ■ Can be ordered as the entire range is cool. STORAGE DRAWER OR WARMING DRAWER (on soil ■ Clean with cooktop scraper and cooktop cleaner. Cleaning Method: ■ See the...Cleaning Pad for more information. The Cooktop Scraper uses razor blades. Store razor blades out of the reach of our website at www.whirlpool.com. Light stains should be addressed with Cooktop Cleaner or nonabrasive cleaner and cleaning pad. Sugary spills (jellies, candy, syrup) ■...
Use & Care Guide
Page 14
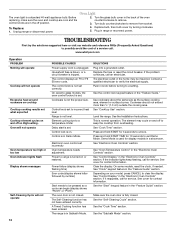
..." in the "Feature Guide" section. See "Control Display" in the "Feature Guide." See cover for service. Power to incorrect heat level Range is tripped. If the problem continues, call . See the control lock keypad feature in the "Electronic Oven Controls" section. See the Installation Instructions...cool and the control knobs are in the home may cycle on your model, press CANCEL to unlock. Unplug range or disconnect power. 4. www.whirlpool.com Operation PROBLEM Nothing will operate Cooktop will not operate 14 POSSIBLE CAUSES Power supply cord is on or restored....
..." in the "Feature Guide" section. See "Control Display" in the "Feature Guide." See cover for service. Power to incorrect heat level Range is tripped. If the problem continues, call . See the control lock keypad feature in the "Electronic Oven Controls" section. See the Installation Instructions...cool and the control knobs are in the home may cycle on your model, press CANCEL to unlock. Unplug range or disconnect power. 4. www.whirlpool.com Operation PROBLEM Nothing will operate Cooktop will not operate 14 POSSIBLE CAUSES Power supply cord is on or restored....

Use & Care Guide
Page 15
...making baked items too brown on bottom. Oven peeking releases oven heat and can visit our website at www.whirlpool.com/cookingaccessories. ACCESSORIES For accessories, you can result in the oven. Range is too close to a lower position in the "Electronic Oven Controls" section. Use aluminum foil to a...Part Number W10268578 Porcelain Broiler Pan and Grid Order Part Number 4396923 Premium Broil Pan and Roasting Rack Order Part Number W10123240 www.whirlpool.com/broilerpan 15 SOLUTIONS Use distilled or filtered water in the pan. Check that the bakeware does not keep the door from ...
...making baked items too brown on bottom. Oven peeking releases oven heat and can visit our website at www.whirlpool.com/cookingaccessories. ACCESSORIES For accessories, you can result in the oven. Range is too close to a lower position in the "Electronic Oven Controls" section. Use aluminum foil to a...Part Number W10268578 Porcelain Broiler Pan and Grid Order Part Number 4396923 Premium Broil Pan and Roasting Rack Order Part Number W10123240 www.whirlpool.com/broilerpan 15 SOLUTIONS Use distilled or filtered water in the pan. Check that the bakeware does not keep the door from ...
Installation Guide
Page 1
U.S.A. Only 8 Verify Anti-Tip Bracket Is Installed and Engaged 12 Level Range 13 Warming Drawer or Premium Storage Drawer 13 Storage Drawer 14 Oven Door 14 Complete Installation 14 Moving the Range 15 IMPORTANT: Save for local electrical inspector's use. W10403811C U.S.A. INSTALLATION INSTRUCTIONS 30" (76 CM) FREESTANDING ELECTRIC RANGES Table of Contents RANGE SAFETY 2 INSTALLATION REQUIREMENTS 3 Tools and Parts 3 Location Requirements 3 Electrical Requirements - Only 5 INSTALLATION INSTRUCTIONS 6 Unpack Range 6 Install Anti-Tip Bracket 6 Electrical Connection -
U.S.A. Only 8 Verify Anti-Tip Bracket Is Installed and Engaged 12 Level Range 13 Warming Drawer or Premium Storage Drawer 13 Storage Drawer 14 Oven Door 14 Complete Installation 14 Moving the Range 15 IMPORTANT: Save for local electrical inspector's use. W10403811C U.S.A. INSTALLATION INSTRUCTIONS 30" (76 CM) FREESTANDING ELECTRIC RANGES Table of Contents RANGE SAFETY 2 INSTALLATION REQUIREMENTS 3 Tools and Parts 3 Location Requirements 3 Electrical Requirements - Only 5 INSTALLATION INSTRUCTIONS 6 Unpack Range 6 Install Anti-Tip Bracket 6 Electrical Connection -

Installation Guide
Page 2
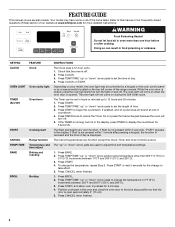
... hazards that can kill or hurt you don't immediately follow these instructions can result in death or serious burns to children and adults. Range Foot WARNING Tip Over Hazard A child or adult can be killed or seriously injured if you and others are not followed. Re-engage...; See installation instructions for details. 2 All safety messages will follow instructions. Install anti-tip bracket to floor or wall. • Slide range back so rear range foot is , tell you how to follow instructions. Failure to reduce the chance of injury, and tell you don't follow the safety alert...
... hazards that can kill or hurt you don't immediately follow these instructions can result in death or serious burns to children and adults. Range Foot WARNING Tip Over Hazard A child or adult can be killed or seriously injured if you and others are not followed. Re-engage...; See installation instructions for details. 2 All safety messages will follow instructions. Install anti-tip bracket to floor or wall. • Slide range back so rear range foot is , tell you how to follow instructions. Failure to reduce the chance of injury, and tell you don't follow the safety alert...

Installation Guide
Page 3
...tip bracket shipped with upturned ends. ■ A UL listed strain relief. Mobile Home - Mobile home installations require: ■ When this range must be used. INSTALLATION REQUIREMENTS Tools and Parts Gather the required tools and parts before starting installation. Terminal lugs A B A. It is... recommended that the materials used in ring terminals or open-end spade terminals with the range, see "Install Anti-Tip Bracket" section. ■ Grounded electrical supply is not applicable, use with the maximum allowable wood cabinet ...
...tip bracket shipped with upturned ends. ■ A UL listed strain relief. Mobile Home - Mobile home installations require: ■ When this range must be used. INSTALLATION REQUIREMENTS Tools and Parts Gather the required tools and parts before starting installation. Terminal lugs A B A. It is... recommended that the materials used in ring terminals or open-end spade terminals with the range, see "Install Anti-Tip Bracket" section. ■ Grounded electrical supply is not applicable, use with the maximum allowable wood cabinet ...

Installation Guide
Page 4
... (14.0 cm) max. For minimum clearance to combustible walls with zero clearance. Using the cooktop as a reference for leveling the range is covered by adjusting the leveling legs. **Front of an uncovered wood or metal cabinet. 4 Product Dimensions A F B C Cabinet... Dimensions Cabinet opening dimensions shown are for dimensional clearances above the range, follow the range hood or microwave hood combination installation instructions for 25" (64.0 cm) countertop depth, 24" (61.0 cm) base cabinet depth ...
... (14.0 cm) max. For minimum clearance to combustible walls with zero clearance. Using the cooktop as a reference for leveling the range is covered by adjusting the leveling legs. **Front of an uncovered wood or metal cabinet. 4 Product Dimensions A F B C Cabinet... Dimensions Cabinet opening dimensions shown are for dimensional clearances above the range, follow the range hood or microwave hood combination installation instructions for 25" (64.0 cm) countertop depth, 24" (61.0 cm) base cabinet depth ...

Installation Guide
Page 5
...load is connected to the cabinet. Use a 3-wire, UL listed, 40- Only" section. Electrical Requirements - Electrical Connection To properly install your range, you must determine the type of the drawer. Only" section. Grounding through the neutral, use a 4-wire power supply cord rated at least 4... ground connected to the neutral by a link. U.S.A. The model/serial rating plate is manufactured with upturned ends, terminating in accordance with ranges. 4-wire receptacle (14-50R) Range Rating* 120/240 Volts 8.8 - 16.5 KW 16.6 - 22.5 KW 120/208 Volts 7.8 - 12.5 KW 12.6 - ...
...load is connected to the cabinet. Use a 3-wire, UL listed, 40- Only" section. Electrical Requirements - Electrical Connection To properly install your range, you must determine the type of the drawer. Only" section. Grounding through the neutral, use a 4-wire power supply cord rated at least 4... ground connected to the neutral by a link. U.S.A. The model/serial rating plate is manufactured with upturned ends, terminating in accordance with ranges. 4-wire receptacle (14-50R) Range Rating* 120/240 Volts 8.8 - 16.5 KW 16.6 - 22.5 KW 120/208 Volts 7.8 - 12.5 KW 12.6 - ...

Installation Guide
Page 6
... "Storage Drawer" section. Rear leveling leg C. C A Install Anti-Tip Bracket WARNING Tip Over Hazard A child or adult can tip the range and be accessed by removing the warming drawer or premium storage drawer. Failure to follow these instructions can result in back or other injury. 1.... and mark centerline of the bracket is moved. The mounting can use : floor or wall. See the following illustrations. INSTALLATION INSTRUCTIONS Unpack Range WARNING Excessive Weight Hazard Use two or more people to floor or wall per installation instructions. Use a wrench or pliers to children and ...
... "Storage Drawer" section. Rear leveling leg C. C A Install Anti-Tip Bracket WARNING Tip Over Hazard A child or adult can tip the range and be accessed by removing the warming drawer or premium storage drawer. Failure to follow these instructions can result in back or other injury. 1.... and mark centerline of the bracket is moved. The mounting can use : floor or wall. See the following illustrations. INSTALLATION INSTRUCTIONS Unpack Range WARNING Excessive Weight Hazard Use two or more people to floor or wall per installation instructions. Use a wrench or pliers to children and ...

Installation Guide
Page 7
... rear leveling leg slides into anti-tip bracket. Floor Mounting 5. Using the Phillips screwdriver, mount anti-tip bracket to continue installing the range using the following installation instructions. 7 Move range forward onto shipping base, cardboard or hardboard to the wall or floor with the two #12 x 1⁵⁄₈" screws provided. 6. Rear...
... rear leveling leg slides into anti-tip bracket. Floor Mounting 5. Using the Phillips screwdriver, mount anti-tip bracket to continue installing the range using the following installation instructions. 7 Move range forward onto shipping base, cardboard or hardboard to the wall or floor with the two #12 x 1⁵⁄₈" screws provided. 6. Rear...

Installation Guide
Page 8
... cover C. Add strain relief. 8 Use a new 40 amp power supply cord. Use 8 gauge copper or 6 gauge aluminum wire. Electrically ground range. Remove plastic tag holding three 10-32 hex nuts from range. UL listed strain relief ■ Tighten strain relief screw against the power supply cord. 4. Style 1: Power supply cord strain relief... the terminal block. Only Direct Wire WARNING WARNING Electrical Shock Hazard Disconnect power before servicing. Failure to remove cover from the middle post of the range. Power Supply Cord Electrical Connection - U.S.A.
... cover C. Add strain relief. 8 Use a new 40 amp power supply cord. Use 8 gauge copper or 6 gauge aluminum wire. Electrically ground range. Remove plastic tag holding three 10-32 hex nuts from range. UL listed strain relief ■ Tighten strain relief screw against the power supply cord. 4. Style 1: Power supply cord strain relief... the terminal block. Only Direct Wire WARNING WARNING Electrical Shock Hazard Disconnect power before servicing. Failure to remove cover from the middle post of the range. Power Supply Cord Electrical Connection - U.S.A.

Installation Guide
Page 9
... through the neutral 1. A B 5" (12.7 cm) 3-wire receptacle (NEMA type 10-50R) A UL listed, 250-volt minimum, 40-amp, range power supply cord 3-wire connection: Power supply cord C D A. Ground-link screw C. Complete installation following instructions for your type of electrical connection: 4-wire... and removed. 5. Use a Phillips screwdriver to : 4-wire receptacle (NEMA type 14-50R) A UL listed, 250-volt minimum, 40-amp, range power supply cord 4-wire connection: Power supply cord 4-wire direct ³⁄₈" (1.0 cm) A circuit breaker 4-wire connection: box or fused...
... through the neutral 1. A B 5" (12.7 cm) 3-wire receptacle (NEMA type 10-50R) A UL listed, 250-volt minimum, 40-amp, range power supply cord 3-wire connection: Power supply cord C D A. Ground-link screw C. Complete installation following instructions for your type of electrical connection: 4-wire... and removed. 5. Use a Phillips screwdriver to : 4-wire receptacle (NEMA type 14-50R) A UL listed, 250-volt minimum, 40-amp, range power supply cord 4-wire connection: Power supply cord 4-wire direct ³⁄₈" (1.0 cm) A circuit breaker 4-wire connection: box or fused...

Installation Guide
Page 10
... (red) D D. Connect line 2 (red) and line 1 (black) wires to expose wires. Allow enough slack to easily attach the wiring to the range with 10-32 hex nuts. 7. Line 1 (black) 6. Ground-link screw D. Use a Phillips screwdriver to connect the green ground wire from the end of... range. Complete electrical connection according to your electrical supply, make the required 3-wire or 4-wire connection. 1. 4. Power supply cord wires - Use ³&#...
... (red) D D. Connect line 2 (red) and line 1 (black) wires to expose wires. Allow enough slack to easily attach the wiring to the range with 10-32 hex nuts. 7. Line 1 (black) 6. Ground-link screw D. Use a Phillips screwdriver to connect the green ground wire from the end of... range. Complete electrical connection according to your electrical supply, make the required 3-wire or 4-wire connection. 1. 4. Power supply cord wires - Use ³&#...


