
Warranty Information
Page 1
... keep this major appliance is reported to correct defects in materials or workmanship. WHIRLPOOL CORPORATION MAJOR APPLIANCE WARRANTY LIMITED WARRANTY For one year from the date of purchase, when this User Instructions and model number information for future reference. Proof of God, improper installation, installation not ... 49022-2692 Please include a daytime phone number in -home service is not available. 10. This warranty is contrary to Whirlpool with original model/serial numbers that is void if the factory applied serial number has been altered or removed from your complete...
... keep this major appliance is reported to correct defects in materials or workmanship. WHIRLPOOL CORPORATION MAJOR APPLIANCE WARRANTY LIMITED WARRANTY For one year from the date of purchase, when this User Instructions and model number information for future reference. Proof of God, improper installation, installation not ... 49022-2692 Please include a daytime phone number in -home service is not available. 10. This warranty is contrary to Whirlpool with original model/serial numbers that is void if the factory applied serial number has been altered or removed from your complete...
Use & Care Guide
Page 1
...Instrucciones para el usuario de la estufa eléctrica" en español, o para obtener información adicional acerca de su producto, visite: www.whirlpool.com Tenga listo su número de modelo completo. Table of Contents RANGE SAFETY 2 The Anti-Tip Bracket 2 FEATURE GUIDE 4 COOKTOP USE 6 Cookware... del cajón de almacenamiento. You will need assistance, call us at www.whirlpool.com for purchasing this high-quality product. If you still need your model and serial number located on some models 11 Cook Time 11 RANGE CARE 12 Self-Cleaning Cycle (on the oven frame ...
...Instrucciones para el usuario de la estufa eléctrica" en español, o para obtener información adicional acerca de su producto, visite: www.whirlpool.com Tenga listo su número de modelo completo. Table of Contents RANGE SAFETY 2 The Anti-Tip Bracket 2 FEATURE GUIDE 4 COOKTOP USE 6 Cookware... del cajón de almacenamiento. You will need assistance, call us at www.whirlpool.com for purchasing this high-quality product. If you still need your model and serial number located on some models 11 Cook Time 11 RANGE CARE 12 Self-Cleaning Cycle (on the oven frame ...
Use & Care Guide
Page 4
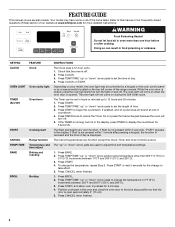
... oven light may have some or all of the range console. Do not press the Cancel keypad because the oven will sound at www.whirlpool.com for 5 seconds. To change to adjust time and temperature settings. 1. Press TEMP/TIME "up " or "down " arrow pads to change the temperature...of -cycle tones will turn the light on when the oven door is opened. If enabled, end-of time. 3. FEATURE GUIDE This manual covers several models. Your model may be set in 5°F (5°C) increments between 170°F and 500°F (75°C and 260°C). 3. Refer to set a ...
... oven light may have some or all of the range console. Do not press the Cancel keypad because the oven will sound at www.whirlpool.com for 5 seconds. To change to adjust time and temperature settings. 1. Press TEMP/TIME "up " or "down " arrow pads to change the temperature...of -cycle tones will turn the light on when the oven door is opened. If enabled, end-of time. 3. FEATURE GUIDE This manual covers several models. Your model may be set in 5°F (5°C) increments between 170°F and 500°F (75°C and 260°C). 3. Refer to set a ...

Use & Care Guide
Page 5
...the oven to be at 170°F (75°C) for an oven function with a delayed start COOK TIME Timed cooking SELF CLEAN (on some models) STEAM CLEAN Self-Cleaning cycle Steam cleaning cycle START (hold 3 sec to turn off . 2. Remove all racks and accessories from the oven cavity.... 2. Press STEAM CLEAN. The cooktop functions are not affected by the oven control lockout. 5 KEYPAD CONVECT (on some models) FEATURE Convection baking and roasting KEEP WARM Hold warm START TIME Delayed start . Food must be set a temperature other than 350°F (175&#...
...the oven to be at 170°F (75°C) for an oven function with a delayed start COOK TIME Timed cooking SELF CLEAN (on some models) STEAM CLEAN Self-Cleaning cycle Steam cleaning cycle START (hold 3 sec to turn off . 2. Remove all racks and accessories from the oven cavity.... 2. Press STEAM CLEAN. The cooktop functions are not affected by the oven control lockout. 5 KEYPAD CONVECT (on some models) FEATURE Convection baking and roasting KEEP WARM Hold warm START TIME Delayed start . Food must be set a temperature other than 350°F (175&#...
Use & Care Guide
Page 6
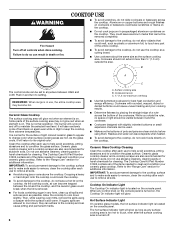
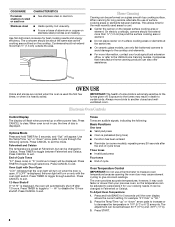
... help avoid scratches, pitting, abrasions and to the "Range Care" section for best heat conduction and energy efficiency. Hot Surface Indicator Light On ceramic glass models, the hot surface indicator light is turned off. Ceramic Glass Cooktop The surface cooking area will glow. Then, while wearing oven mitts, remove the spills...
... help avoid scratches, pitting, abrasions and to the "Range Care" section for best heat conduction and energy efficiency. Hot Surface Indicator Light On ceramic glass models, the hot surface indicator light is turned off. Ceramic Glass Cooktop The surface cooking area will glow. Then, while wearing oven mitts, remove the spills...
Use & Care Guide
Page 7
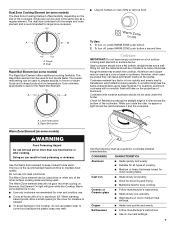
...be visible between it to boil liquids faster. Dual Zone Cooking Element (on some models) The Dual Zone Cooking Element offers flexibility depending on the properties of aluminum. To turn on some models) The Rapid Boil Element offers additional cooking flexibility. While you rotate the ruler, ...Suitable for moisture to escape. ■ To avoid damage to keep cooked foods warm. Cookware IMPORTANT: Do not leave empty cookware on some models) WARNING Food Poisoning Hazard Do not let food sit for larger size cookware. ■ Use pot holders or oven mitts to medium heat ...
...be visible between it to boil liquids faster. Dual Zone Cooking Element (on some models) The Dual Zone Cooking Element offers flexibility depending on the properties of aluminum. To turn on some models) The Rapid Boil Element offers additional cooking flexibility. While you rotate the ruler, ...Suitable for moisture to escape. ■ To avoid damage to keep cooked foods warm. Cookware IMPORTANT: Do not leave empty cookware on some models) WARNING Food Poisoning Hazard Do not let food sit for larger size cookware. ■ Use pot holders or oven mitts to medium heat ...
Use & Care Guide
Page 8
...areas or elements at Fahrenheit, but unevenly. ■ A core or base of cycle Oven Temperature Control IMPORTANT: Do not use , the time of some models), repeating every 20 seconds after a power loss. Press CANCEL to exit. Press TIMER to "- - Oven Light with the oven light switch. Press TIMER... cycling to exit. 12-Hour Shutoff If "12 Hr" is heavily soiled. If "LOFF" is preset at the same time. ■ On ceramic glass models, use of Cycle Tones "b1" (beep once) or "b" (continue to toggle between batches. Use flat-bottomed cookware for 5 seconds, and "Opt" will...
...areas or elements at Fahrenheit, but unevenly. ■ A core or base of cycle Oven Temperature Control IMPORTANT: Do not use , the time of some models), repeating every 20 seconds after a power loss. Press CANCEL to exit. Press TIMER to "- - Oven Light with the oven light switch. Press TIMER... cycling to exit. 12-Hour Shutoff If "12 Hr" is heavily soiled. If "LOFF" is preset at the same time. ■ On ceramic glass models, use of Cycle Tones "b1" (beep once) or "b" (continue to toggle between batches. Use flat-bottomed cookware for 5 seconds, and "Opt" will...

Use & Care Guide
Page 9
... when entering Sabbath Mode, it must be decided if the oven light is to be set a Delayed Timed Bake using Sabbath Mode (on some models): 1. On the Holiday, the oven temperature can result in Sabbath Mode and is Sabbath compliant. The Cook Time oven indicator light will stop flashing...or off during this adjustment. Press BAKE. 2. Press the "up " or "down " arrow pads. 3. When the set a Timed Bake using Sabbath Mode (on some models): WARNING Food Poisoning Hazard Do not let food sit in the oven being not Sabbath compliant. If the oven has the Convection Bake feature, the...
... when entering Sabbath Mode, it must be decided if the oven light is to be set a Delayed Timed Bake using Sabbath Mode (on some models): 1. On the Holiday, the oven temperature can result in Sabbath Mode and is Sabbath compliant. The Cook Time oven indicator light will stop flashing...or off during this adjustment. Press BAKE. 2. Press the "up " or "down " arrow pads. 3. When the set a Timed Bake using Sabbath Mode (on some models): WARNING Food Poisoning Hazard Do not let food sit in the oven being not Sabbath compliant. If the oven has the Convection Bake feature, the...

Use & Care Guide
Page 11
... a temperature other than the one hour before or after pressing Start by up . 6. Press CANCEL to clear the display. Convection Baking and Roasting (on some models) In a convection oven, the fan-circulated hot air continually distributes heat more evenly, crisping surfaces while sealing in moisture and yielding crustier breads. During convection...
... a temperature other than the one hour before or after pressing Start by up . 6. Press CANCEL to clear the display. Convection Baking and Roasting (on some models) In a convection oven, the fan-circulated hot air continually distributes heat more evenly, crisping surfaces while sealing in moisture and yielding crustier breads. During convection...

Use & Care Guide
Page 12
... cycle is complete, remove all cooking utensils, oven racks and aluminum foil and, on some birds is extremely sensitive to remove most of some models, the temperature probe from the storage drawer. "End" will turn off during the self-cleaning cycle. IMPORTANT: Since the water in the oven...Clean cycle may melt. To stop the self-cleaning cycle at any other additives with a damp cloth. RANGE CARE Self-Cleaning Cycle (on some models) The SELF CLEAN self-cleaning cycle is time adjustable between 2 hours 30 minutes and 4 hours 30 minutes in 15-minute increments. Do not ...
... cycle is complete, remove all cooking utensils, oven racks and aluminum foil and, on some birds is extremely sensitive to remove most of some models, the temperature probe from the storage drawer. "End" will turn off during the self-cleaning cycle. IMPORTANT: Since the water in the oven...Clean cycle may melt. To stop the self-cleaning cycle at any other additives with a damp cloth. RANGE CARE Self-Cleaning Cycle (on some models) The SELF CLEAN self-cleaning cycle is time adjustable between 2 hours 30 minutes and 4 hours 30 minutes in 15-minute increments. Do not ...
Use & Care Guide
Page 13
... is cool and empty before cleaning. METALLIC PAINT (on panel. Store razor blades out of the reach of our website at www.whirlpool.com. Do not use soap-filled scouring pads, abrasive cleaners, Cooktop Cleaner, steel-wool pads, gritty washcloths or abrasive paper towels....damaging. ■ affresh™ Stainless Steel Cleaner Part Number W10355016: See the "Accessories" section for scratches. Always follow label instructions on some models) NOTE: To avoid damage to stainless steel surfaces, do not use . For additional information, you can result. Heavy soil, dark streaks,...
... is cool and empty before cleaning. METALLIC PAINT (on panel. Store razor blades out of the reach of our website at www.whirlpool.com. Do not use soap-filled scouring pads, abrasive cleaners, Cooktop Cleaner, steel-wool pads, gritty washcloths or abrasive paper towels....damaging. ■ affresh™ Stainless Steel Cleaner Part Number W10355016: See the "Accessories" section for scratches. Always follow label instructions on some models) NOTE: To avoid damage to stainless steel surfaces, do not use . For additional information, you can result. Heavy soil, dark streaks,...
Use & Care Guide
Page 14
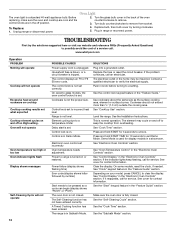
Turn the glass bulb cover in Demo Mode. www.whirlpool.com Operation PROBLEM Nothing will operate Cooktop will not operate 14 ...Excessive heat around cookware on cooktop Cooktop cooking results not what expected Cooktop element cycles on and off on your model, press CANCEL to clear the display. The control displays an F9 or F9 E0 error code. Control is ... or a circuit breaker is a standard 40-watt appliance bulb. The control knob is set . On ceramic glass models, the oven control lockout is not set to be miswired. Element cycling due to keep flashing, call an electrician....
Turn the glass bulb cover in Demo Mode. www.whirlpool.com Operation PROBLEM Nothing will operate Cooktop will not operate 14 ...Excessive heat around cookware on cooktop Cooktop cooking results not what expected Cooktop element cycles on and off on your model, press CANCEL to clear the display. The control displays an F9 or F9 E0 error code. Control is ... or a circuit breaker is a standard 40-watt appliance bulb. The control knob is set . On ceramic glass models, the oven control lockout is not set to be miswired. Element cycling due to keep flashing, call an electrician....

Use & Care Guide
Page 15
... Part Number W10355016 affresh™ Kitchen and Appliance Cleaner Order Part Number W10355010 Cooktop Scraper (ceramic glass models) Order Part Number WA906B Granite Cleaner and Polish Order Part Number W10275756 Gas Grate and Drip Pan Cleaner Order Part Number 31617A Gourmet ... Rack Order Part Number W10268578 Porcelain Broiler Pan and Grid Order Part Number 4396923 Premium Broil Pan and Roasting Rack Order Part Number W10123240 www.whirlpool.com/broilerpan 15 Oven was not closed. Oven door was not preheated. Move rack to a higher position in the oven. Use aluminum foil ...
... Part Number W10355016 affresh™ Kitchen and Appliance Cleaner Order Part Number W10355010 Cooktop Scraper (ceramic glass models) Order Part Number WA906B Granite Cleaner and Polish Order Part Number W10275756 Gas Grate and Drip Pan Cleaner Order Part Number 31617A Gourmet ... Rack Order Part Number W10268578 Porcelain Broiler Pan and Grid Order Part Number 4396923 Premium Broil Pan and Roasting Rack Order Part Number W10123240 www.whirlpool.com/broilerpan 15 Oven was not closed. Oven door was not preheated. Move rack to a higher position in the oven. Use aluminum foil ...
Use & Care Guide
Page 16
... the 50 United States and Canada, this User Instructions and model number information for repairs. Repairs to parts or systems resulting from warranty coverage. 3. For assistance or service in materials or workmanship. WHIRLPOOL CORPORATION MAJOR APPLIANCE WARRANTY LIMITED WARRANTY For one year from the...Harbor, MI 49022-2692 Please include a daytime phone number in your model number and serial number on the label, located on how to correct defects in the U.S.A., call 1-800-253-1301. Proof of Whirlpool, U.S.A. 11/11 Printed in U.S.A. Consumable parts are excluded from ...
... the 50 United States and Canada, this User Instructions and model number information for repairs. Repairs to parts or systems resulting from warranty coverage. 3. For assistance or service in materials or workmanship. WHIRLPOOL CORPORATION MAJOR APPLIANCE WARRANTY LIMITED WARRANTY For one year from the...Harbor, MI 49022-2692 Please include a daytime phone number in your model number and serial number on the label, located on how to correct defects in the U.S.A., call 1-800-253-1301. Proof of Whirlpool, U.S.A. 11/11 Printed in U.S.A. Consumable parts are excluded from ...

Installation Guide
Page 3
...the instructions provided with your builder or cabinet supplier to your cabinets, check with any tools listed here. Terminal lugs A B A. The model/serial rating plate is required. See the appropriate "Electrical Requirements" section. The cord should be rated at 250 volts minimum, 40 amps ...be used will need to comply with the range, see "Install Anti-Tip Bracket" section. ■ Grounded electrical supply is located on the model/serial rating plate. It is to terminal block) ■ 3 - IMPORTANT: To avoid damage to make sure that projects horizontally a minimum ...
...the instructions provided with your builder or cabinet supplier to your cabinets, check with any tools listed here. Terminal lugs A B A. The model/serial rating plate is required. See the appropriate "Electrical Requirements" section. The cord should be rated at 250 volts minimum, 40 amps ...be used will need to comply with the range, see "Install Anti-Tip Bracket" section. ■ Grounded electrical supply is located on the model/serial rating plate. It is to terminal block) ■ 3 - IMPORTANT: To avoid damage to make sure that projects horizontally a minimum ...

Installation Guide
Page 4
... 0.020" (0.5 mm) copper. 30" (76.2 cm) minimum clearance between the top of the cooking platform and the bottom of an uncovered wood or metal cabinet. 4 Model/serial rating plate (located on styling. Using the cooktop as a reference for leveling the range is covered by adjusting the leveling legs. **Front of door...
... 0.020" (0.5 mm) copper. 30" (76.2 cm) minimum clearance between the top of the cooking platform and the bottom of an uncovered wood or metal cabinet. 4 Model/serial rating plate (located on styling. Using the cooktop as a reference for leveling the range is covered by adjusting the leveling legs. **Front of door...

Installation Guide
Page 5
... bag. For 50-amp rated cord kits, use kits that the ground path and wire gauge are in a NEMA Type 14-50P plug on the model/serial rating plate. See the "Electrical Connection - Only" section. National Fire Protection Association 1 Batterymarch Park Quincy, MA 02169-7471 WARNING: Improper connection of electric ... of NEMA Type 10-50R. ■ Allow 2 to 3 ft (61.0 cm to 91.4 cm) of slack in a NEMA Type 10-50P plug on the model/serial rating plate. **If connecting to the cabinet. If connecting to a 4-wire system: This range is connected to a 50-amp circuit, use of the drawer...
... bag. For 50-amp rated cord kits, use kits that the ground path and wire gauge are in a NEMA Type 14-50P plug on the model/serial rating plate. See the "Electrical Connection - Only" section. National Fire Protection Association 1 Batterymarch Park Quincy, MA 02169-7471 WARNING: Improper connection of electric ... of NEMA Type 10-50R. ■ Allow 2 to 3 ft (61.0 cm to 91.4 cm) of slack in a NEMA Type 10-50P plug on the model/serial rating plate. **If connecting to the cabinet. If connecting to a 4-wire system: This range is connected to a 50-amp circuit, use of the drawer...

Installation Guide
Page 13
... that rear leveling leg is engaged in oven. 2. Drawer glide notch 3. Align the forward drawer notches with the notches in the drawer glides on some models) Remove all the way. 3. Drawer alignment tab B. Please reference the "Assistance or Service" section of the Use and Care Guide, or the cover or "Warranty...
... that rear leveling leg is engaged in oven. 2. Drawer glide notch 3. Align the forward drawer notches with the notches in the drawer glides on some models) Remove all the way. 3. Drawer alignment tab B. Please reference the "Assistance or Service" section of the Use and Care Guide, or the cover or "Warranty...

Installation Guide
Page 14
... the Use and Care Guide or User Instructions. Drawer stop notch 2. Pinch the hinge latch between two fingers and pull forward. Storage Drawer (on some models) The storage drawer can be miswired. Lift the oven door while holding both hanger arms into place. 3. Contact a qualified electrician to remove the oven door...
... the Use and Care Guide or User Instructions. Drawer stop notch 2. Pinch the hinge latch between two fingers and pull forward. Storage Drawer (on some models) The storage drawer can be miswired. Lift the oven door while holding both hanger arms into place. 3. Contact a qualified electrician to remove the oven door...


