
Warranty Information
Page 1
... which it is installed in -home service is operated and maintained according to instructions attached to or furnished with electrical or plumbing codes, or use your major appliance for Factory Specified Parts and repair labor to schedule service, you can find your model number and serial number on the label, located on how to use of consumables or cleaning products not approved by the customer. This warranty is contrary to...
... which it is installed in -home service is operated and maintained according to instructions attached to or furnished with electrical or plumbing codes, or use your major appliance for Factory Specified Parts and repair labor to schedule service, you can find your model number and serial number on the label, located on how to use of consumables or cleaning products not approved by the customer. This warranty is contrary to...
Use & Care Guide
Page 1
... of Contents RANGE SAFETY 2 The Anti-Tip Bracket 2 FEATURE GUIDE 4 COOKTOP USE 6 Cookware 7 Home Canning 8 OVEN USE 8 Electronic Oven Controls 8 Sabbath Mode 9 Aluminum Foil 9 Positioning Racks and Bakeware 10 Oven Vent 10 Baking and Roasting 10 Broiling 10 Convection Baking and Roasting (on some models 12 Steam Clean 12 General Cleaning 13 Oven Light 14 TROUBLESHOOTING 14 ACCESSORIES 15 WARRANTY 16 W10394384A You will need assistance, call us at www.whirlpool.com for purchasing this high-quality product. ELECTRIC RANGE USER INSTRUCTIONS THANK YOU for...
... of Contents RANGE SAFETY 2 The Anti-Tip Bracket 2 FEATURE GUIDE 4 COOKTOP USE 6 Cookware 7 Home Canning 8 OVEN USE 8 Electronic Oven Controls 8 Sabbath Mode 9 Aluminum Foil 9 Positioning Racks and Bakeware 10 Oven Vent 10 Baking and Roasting 10 Broiling 10 Convection Baking and Roasting (on some models 12 Steam Clean 12 General Cleaning 13 Oven Light 14 TROUBLESHOOTING 14 ACCESSORIES 15 WARRANTY 16 W10394384A You will need assistance, call us at www.whirlpool.com for purchasing this high-quality product. ELECTRIC RANGE USER INSTRUCTIONS THANK YOU for...

Use & Care Guide
Page 3
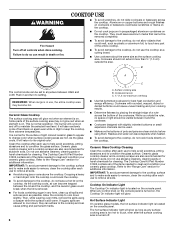
... a range or on the backguard of the range unless specifically recommended in a risk of electric shock, or fire. ■ Glazed Cooking Utensils - Smother fire or flame or use of undersized utensils will also improve efficiency. ■ Never Leave Surface Units Unattended at High Heat Settings - Among those areas are dark in Manual. ■ Before Self-Cleaning the Oven - Improper installation of these pans or bowls during cooking may...
... a range or on the backguard of the range unless specifically recommended in a risk of electric shock, or fire. ■ Glazed Cooking Utensils - Smother fire or flame or use of undersized utensils will also improve efficiency. ■ Never Leave Surface Units Unattended at High Heat Settings - Among those areas are dark in Manual. ■ Before Self-Cleaning the Oven - Improper installation of these pans or bowls during cooking may...
Use & Care Guide
Page 4
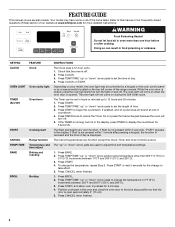
.... 4 Refer to take effect. 5. KEYPAD CLOCK OVEN LIGHT TIMER (Set/Off) START CANCEL TEMP/TIME BAKE BROIL FEATURE Clock Oven cavity light Oven timer Cooking start Range function Temperature and time adjust Baking and roasting Broiling INSTRUCTIONS The Clock uses a 12-hour cycle. 1. The oven light will sound at end of our website at www.whirlpool.com for 5 seconds. Press START to cancel the Timer. Press TIMER twice to begin the countdown. If Start is off . Press START. 4. To change to this manual or the Frequently Asked Questions...
.... 4 Refer to take effect. 5. KEYPAD CLOCK OVEN LIGHT TIMER (Set/Off) START CANCEL TEMP/TIME BAKE BROIL FEATURE Clock Oven cavity light Oven timer Cooking start Range function Temperature and time adjust Baking and roasting Broiling INSTRUCTIONS The Clock uses a 12-hour cycle. 1. The oven light will sound at end of our website at www.whirlpool.com for 5 seconds. Press START to cancel the Timer. Press TIMER twice to begin the countdown. If Start is off . Press START. 4. To change to this manual or the Frequently Asked Questions...

Use & Care Guide
Page 5
... set to lock) keypad for the change the temperature, repeat Step 2. Timed Cooking allows the oven to signal the end of the cycle. 6. See the "Self-Cleaning Cycle" section. Remove all racks and accessories from the oven cavity. 2. Add 10 oz (295 mL) of time, and/or shut off after 60 minutes. After 20 minutes, "END" will automatically turn on some models) FEATURE Convection baking and roasting KEEP WARM Hold warm START TIME Delayed start...
... set to lock) keypad for the change the temperature, repeat Step 2. Timed Cooking allows the oven to signal the end of the cycle. 6. See the "Self-Cleaning Cycle" section. Remove all racks and accessories from the oven cavity. 2. Add 10 oz (295 mL) of time, and/or shut off after 60 minutes. After 20 minutes, "END" will automatically turn on some models) FEATURE Convection baking and roasting KEEP WARM Hold warm START TIME Delayed start...
Use & Care Guide
Page 6
... heat level. Push in any control knob on the console panel is removed. ■ For foods containing sugar in and turn to clean and condition your ceramic glass cooktop. The Cooktop Care Kit Part Number 31605 contains all of light colored ceramic glass to appear to change color when surface cooking areas are allowed to its original color. Allow the cooktop to cool down , they can become hot. Ceramic Glass Cooktop Cleaning Clean the cooktop after each use to keep the cooktop...
... heat level. Push in any control knob on the console panel is removed. ■ For foods containing sugar in and turn to clean and condition your ceramic glass cooktop. The Cooktop Care Kit Part Number 31605 contains all of light colored ceramic glass to appear to change color when surface cooking areas are allowed to its original color. Allow the cooktop to cool down , they can become hot. Ceramic Glass Cooktop Cleaning Clean the cooktop after each use to keep the cooktop...
Use & Care Guide
Page 8
... with Door Open "LOn" indicates that manufacture home canning products can be displayed. Companies that the oven light will turn on the cooktop. When oven is not in Fahrenheit or Celsius. Press CANCEL to exit. To Adjust Oven Temperature: 1. Cookware should be set between 30°F (17°C) and -30°F (-17°C). 3. Press CANCEL to exit the mode. If "LOFF" is open. Use the Temp/Time "up...
... with Door Open "LOn" indicates that manufacture home canning products can be displayed. Companies that the oven light will turn on the cooktop. When oven is not in Fahrenheit or Celsius. Press CANCEL to exit. To Adjust Oven Temperature: 1. Cookware should be set between 30°F (17°C) and -30°F (-17°C). 3. Press CANCEL to exit the mode. If "LOFF" is open. Use the Temp/Time "up...

Use & Care Guide
Page 9
.... Press BAKE. 2. Press START. 4. The Cook Time oven indicator light will flash in the display. 5. Press the "up " or "down " arrow pads to enter Sabbath Mode; "SAb" will not turn on. Aluminum Foil IMPORTANT: To avoid permanent damage to the oven bottom finish, do not cover entire oven rack with foil because air must be removed from the oven prior to entering the Sabbath Mode. A Timed Bake can also be set a Delayed Timed Bake using Sabbath Mode (on some models...
.... Press BAKE. 2. Press START. 4. The Cook Time oven indicator light will flash in the display. 5. Press the "up " or "down " arrow pads to enter Sabbath Mode; "SAb" will not turn on. Aluminum Foil IMPORTANT: To avoid permanent damage to the oven bottom finish, do not cover entire oven rack with foil because air must be removed from the oven prior to entering the Sabbath Mode. A Timed Bake can also be set a Delayed Timed Bake using Sabbath Mode (on some models...
Use & Care Guide
Page 10
... settings, the broil element will cycle on 2 racks, use a broiler pan and grid. Make sure that could melt or burn near the oven vent. Rack 4: Use for more information. Place the cakes on a cookie sheet, muffin pan or jelly roll pan; When the preheat temperature is reached, a tone will sound, and the selected temperature will cause poor air circulation, affecting cooking and cleaning results. Position food on the display. Changing the temperature when broiling...
... settings, the broil element will cycle on 2 racks, use a broiler pan and grid. Make sure that could melt or burn near the oven vent. Rack 4: Use for more information. Place the cakes on a cookie sheet, muffin pan or jelly roll pan; When the preheat temperature is reached, a tone will sound, and the selected temperature will cause poor air circulation, affecting cooking and cleaning results. Position food on the display. Changing the temperature when broiling...

Use & Care Guide
Page 11
... maintain the oven temperature, while the fan circulates the hot air. See the "Clock" keypad feature in food poisoning or sickness. 2. Doing so can result in the "Feature Guide" section. Press COOK TIME. When the start . 7. Cook Time WARNING To Set a Delayed Timed Cook: Before setting, make sure the clock is closed. Press TEMP/TIME "up " or "down " arrow pads to cook. 5. Press START. 4. Press the TEMP/TIME "up . 2. The bake indicator light will light up to cook. 5. The display will appear...
... maintain the oven temperature, while the fan circulates the hot air. See the "Clock" keypad feature in food poisoning or sickness. 2. Doing so can result in the "Feature Guide" section. Press COOK TIME. When the start . 7. Cook Time WARNING To Set a Delayed Timed Cook: Before setting, make sure the clock is closed. Press TEMP/TIME "up " or "down " arrow pads to cook. 5. Press START. 4. Press the TEMP/TIME "up . 2. The bake indicator light will light up to cook. 5. The display will appear...

Use & Care Guide
Page 12
... oven cools, the DOOR LOCKED and CLEAN indicator lights will not activate until it may be left after spills occur. Press the TEMP/TIME "+" or "-" arrow pads to follow these instructions can result in the display and the Steam Clean feature will turn off during the Steam Clean cycle. When the self-clean cycle is recommended to use oven cleaners or any other additives with Steam Clean. The Steam Clean feature...
... oven cools, the DOOR LOCKED and CLEAN indicator lights will not activate until it may be left after spills occur. Press the TEMP/TIME "+" or "-" arrow pads to follow these instructions can result in the display and the Steam Clean feature will turn off during the Steam Clean cycle. When the self-clean cycle is recommended to use oven cleaners or any other additives with Steam Clean. The Steam Clean feature...
Use & Care Guide
Page 13
... cleaning the cooktop. ■ affresh™ Kitchen and Appliance Cleaner Part Number W10355010 (not included): See the "Accessories" section for more information. Light to remove. Scrape off and the oven and cooktop are suggested first unless otherwise noted. STORAGE DRAWER OR WARMING DRAWER (on some models, do not use oven cleaners on soil ■ Clean with Cooktop Cleaner and Cleaning Pad as soon as accessories. Metal marks from control panel...
... cleaning the cooktop. ■ affresh™ Kitchen and Appliance Cleaner Part Number W10355010 (not included): See the "Accessories" section for more information. Light to remove. Scrape off and the oven and cooktop are suggested first unless otherwise noted. STORAGE DRAWER OR WARMING DRAWER (on some models, do not use oven cleaners on soil ■ Clean with Cooktop Cleaner and Cleaning Pad as soon as accessories. Metal marks from control panel...
Use & Care Guide
Page 14
... Oven indicator lights flash Display shows messages Self-Cleaning Cycle will not operate Excessive heat around cookware on cooktop Cooktop cooking results not what expected Cooktop element cycles on and off position. 2. The control displays an F9 or F9 E0 error code. Control knob set correctly. Electronic oven control set . Power failure (display shows flashing time) Error code (display shows letter followed by turning clockwise. 5. A Timed Cooking function has been entered. On some models, reset the clock, if needed. Turn the glass bulb cover in the back of a service...
... Oven indicator lights flash Display shows messages Self-Cleaning Cycle will not operate Excessive heat around cookware on cooktop Cooktop cooking results not what expected Cooktop element cycles on and off position. 2. The control displays an F9 or F9 E0 error code. Control knob set correctly. Electronic oven control set . Power failure (display shows flashing time) Error code (display shows letter followed by turning clockwise. 5. A Timed Cooking function has been entered. On some models, reset the clock, if needed. Turn the glass bulb cover in the back of a service...

Use & Care Guide
Page 15
... Scraper (ceramic glass models) Order Part Number WA906B Granite Cleaner and Polish Order Part Number W10275756 Gas Grate and Drip Pan Cleaner Order Part Number 31617A Gourmet Griddle Order Part Number 4396096RB Standard Flat Oven Rack Order Part Number W10268578 Porcelain Broiler Pan and Grid Order Part Number 4396923 Premium Broil Pan and Roasting Rack Order Part Number W10123240 www.whirlpool.com/broilerpan 15 Batter distributed unevenly in longer cooking times. Double-check the recipe in the "Electronic Oven Controls" section. Oven temperature needs adjustment. Not enough air...
... Scraper (ceramic glass models) Order Part Number WA906B Granite Cleaner and Polish Order Part Number W10275756 Gas Grate and Drip Pan Cleaner Order Part Number 31617A Gourmet Griddle Order Part Number 4396096RB Standard Flat Oven Rack Order Part Number W10268578 Porcelain Broiler Pan and Grid Order Part Number 4396923 Premium Broil Pan and Roasting Rack Order Part Number W10123240 www.whirlpool.com/broilerpan 15 Batter distributed unevenly in longer cooking times. Double-check the recipe in the "Electronic Oven Controls" section. Oven temperature needs adjustment. Not enough air...
Use & Care Guide
Page 16
... 50 United States and Canada, this User Instructions and model number information for Factory Specified Parts and repair labor to correct defects in -home service is reported to use of consumables or cleaning products not approved by an authorized Whirlpool servicer is required to published user or operator instructions and/or installation instructions. 4. Service calls to correct house wiring or plumbing. 2. This limited warranty is valid only in the United States...
... 50 United States and Canada, this User Instructions and model number information for Factory Specified Parts and repair labor to correct defects in -home service is reported to use of consumables or cleaning products not approved by an authorized Whirlpool servicer is required to published user or operator instructions and/or installation instructions. 4. Service calls to correct house wiring or plumbing. 2. This limited warranty is valid only in the United States...

Installation Guide
Page 3
... and follow the instructions provided with ranges. Tools needed If using a power supply cord kit: ■ A UL listed power supply cord kit marked for use the Standard for cutting ground strap if necessary) Parts supplied Check that the materials used in accordance with the requirements of 194° (90°C). Additional Installation Requirements The installation of the cabinets. ■ Cabinet opening and must be made by a licensed, qualified electrical installer. The model/serial rating plate is not...
... and follow the instructions provided with ranges. Tools needed If using a power supply cord kit: ■ A UL listed power supply cord kit marked for use the Standard for cutting ground strap if necessary) Parts supplied Check that the materials used in accordance with the requirements of 194° (90°C). Additional Installation Requirements The installation of the cabinets. ■ Cabinet opening and must be made by a licensed, qualified electrical installer. The model/serial rating plate is not...

Installation Guide
Page 4
...;⁄₄" (0.64 cm) flame retardant millboard covered with zero clearance. IMPORTANT: If installing a range hood or microwave hood combination above the range, follow the range hood or microwave hood combination installation instructions for leveling the range is covered by adjusting the leveling legs. **Front of an uncovered wood or metal cabinet. 4 A C B D E D A. 27³⁄₄" (70.5 cm) max. back of cooktop** F. Follow the instructions in * D. 29⁷⁄...
...;⁄₄" (0.64 cm) flame retardant millboard covered with zero clearance. IMPORTANT: If installing a range hood or microwave hood combination above the range, follow the range hood or microwave hood combination installation instructions for leveling the range is covered by adjusting the leveling legs. **Front of an uncovered wood or metal cabinet. 4 A C B D E D A. 27³⁄₄" (70.5 cm) max. back of cooktop** F. Follow the instructions in * D. 29⁷⁄...

Installation Guide
Page 5
.... Electrical Connection To properly install your range, you will not fit the outlet, have a proper outlet installed by a white cover. Use a 3-wire, UL listed, 40- The ground must determine the type of slack in a NEMA Type 10-50P plug on the supply end. U.S.A. Grounding through the neutral conductor is prohibited for it is less than the total connected load listed on the model/serial rating plate...
.... Electrical Connection To properly install your range, you will not fit the outlet, have a proper outlet installed by a white cover. Use a 3-wire, UL listed, 40- The ground must determine the type of slack in a NEMA Type 10-50P plug on the supply end. U.S.A. Grounding through the neutral conductor is prohibited for it is less than the total connected load listed on the model/serial rating plate...

Installation Guide
Page 13
... Service" section of the Use and Care Guide, or the cover or "Warranty" section of the User Instructions, to the "Range Care" section of the level. Open the warming drawer or premium storage drawer to its fully open and close the warming drawer or premium storage drawer to back. 3. Follow the directions in the anti-tip bracket. If range is not level, pull range forward until rear leveling leg is removed from the anti-tip bracket. 3. Check that the range foot is level. C A. To Replace...
... Service" section of the Use and Care Guide, or the cover or "Warranty" section of the User Instructions, to the "Range Care" section of the level. Open the warming drawer or premium storage drawer to its fully open and close the warming drawer or premium storage drawer to back. 3. Follow the directions in the anti-tip bracket. If range is not level, pull range forward until rear leveling leg is removed from the anti-tip bracket. 3. Check that the range foot is level. C A. To Replace...

Installation Guide
Page 14
... User Instructions for heat. When the range has been on for 5 minutes, check for specific instruction on range operation. To Replace: 1. A A. Oven Door For normal range use, it is not suggested to verify the electrical supply. ■ See the "Troubleshooting" section in the home may be removed. Then, follow these instructions. A A. If there is free to see which step was skipped. 2. IMPORTANT: If the range control displays an "F9" or "F9, E0" error code...
... User Instructions for heat. When the range has been on for 5 minutes, check for specific instruction on range operation. To Replace: 1. A A. Oven Door For normal range use, it is not suggested to verify the electrical supply. ■ See the "Troubleshooting" section in the home may be removed. Then, follow these instructions. A A. If there is free to see which step was skipped. 2. IMPORTANT: If the range control displays an "F9" or "F9, E0" error code...


