
Warranty Information
Page 1
... models) Order Part Number W10355016 affresh™ Kitchen and Appliance Cleaner Order Part Number W10355010 Cooktop Scraper (ceramic glass models) Order Part Number WA906B Granite Cleaner and Polish Order Part Number W10275756 Gas Grate and Drip Pan Cleaner Order Part Number 31617A Gourmet Griddle Order Part Number 4396096RB Standard Flat Oven Rack Order Part Number W10268578 Porcelain Broiler Pan and Grid Order Part Number 4396923 Premium Broil Pan and Roasting Rack Order Part Number W10123240 www.whirlpool.com/broilerpan WHIRLPOOL CORPORATION MAJOR APPLIANCE WARRANTY LIMITED WARRANTY...
... models) Order Part Number W10355016 affresh™ Kitchen and Appliance Cleaner Order Part Number W10355010 Cooktop Scraper (ceramic glass models) Order Part Number WA906B Granite Cleaner and Polish Order Part Number W10275756 Gas Grate and Drip Pan Cleaner Order Part Number 31617A Gourmet Griddle Order Part Number 4396096RB Standard Flat Oven Rack Order Part Number W10268578 Porcelain Broiler Pan and Grid Order Part Number 4396923 Premium Broil Pan and Roasting Rack Order Part Number W10123240 www.whirlpool.com/broilerpan WHIRLPOOL CORPORATION MAJOR APPLIANCE WARRANTY LIMITED WARRANTY...
Installation Guide
Page 3
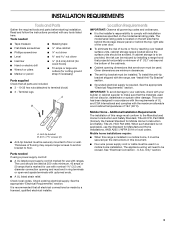
... connection opening and must be reduced by a licensed, qualified electrical installer. If cabinet storage is installed in a mobile home, it must be secured per the instructions in this document. ■ Four-wire power supply cord or cable must end in a mobile home installation. To install the anti-tip bracket shipped with the range, see "Install Anti-Tip Bracket" section. ■ Grounded electrical supply is not applicable, use with upturned ends. ■ A UL listed strain...
... connection opening and must be reduced by a licensed, qualified electrical installer. If cabinet storage is installed in a mobile home, it must be secured per the instructions in this document. ■ Four-wire power supply cord or cable must end in a mobile home installation. To install the anti-tip bracket shipped with the range, see "Install Anti-Tip Bracket" section. ■ Grounded electrical supply is not applicable, use with upturned ends. ■ A UL listed strain...

Installation Guide
Page 4
... Dimensions Cabinet opening dimensions shown are for dimensional clearances above the range, follow the range hood or microwave hood combination installation instructions for 25" (64.0 cm) countertop depth, 24" (61.0 cm) base cabinet depth and 36" (91.4 cm) countertop height. upper cabinet depth B. 30" (76.2 cm) min. Outlet - 8" (20.3 cm) to front of door and drawer may be level after installation. IMPORTANT: If installing a range hood...
... Dimensions Cabinet opening dimensions shown are for dimensional clearances above the range, follow the range hood or microwave hood combination installation instructions for 25" (64.0 cm) countertop depth, 24" (61.0 cm) base cabinet depth and 36" (91.4 cm) countertop height. upper cabinet depth B. 30" (76.2 cm) min. Outlet - 8" (20.3 cm) to front of door and drawer may be level after installation. IMPORTANT: If installing a range hood...

Installation Guide
Page 5
... Type 14-50P plug on the supply end. Use a 3-wire, UL listed, 40- This uses a 3-wire receptacle of the oven door. Electrical Requirements - This range is manufactured with a UL listed strain relief and be at the junction box). ■ Wire sizes and connections must be provided at each end of electrical connection you will not fit the outlet, have a proper outlet installed by a white cover. Only" section. Cord should be Type...
... Type 14-50P plug on the supply end. Use a 3-wire, UL listed, 40- This uses a 3-wire receptacle of the oven door. Electrical Requirements - This range is manufactured with a UL listed strain relief and be at the junction box). ■ Wire sizes and connections must be provided at each end of electrical connection you will not fit the outlet, have a proper outlet installed by a white cover. Only" section. Cord should be Type...

Installation Guide
Page 6
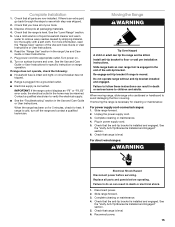
... serious burns to adjust the rear legs from where it is taped inside oven. 3. Determine which mounting method to move and install range. C A 1. Use a ¼" drive ratchet to the floor. 6 On Ranges Equipped with a Warming Drawer or Premium Storage Drawer: On ranges equipped with a Storage Drawer: Remove the storage drawer. Front leveling leg A Install Anti-Tip Bracket A. AD C B A. ¼" drive ratchet B. Do not operate range without anti-tip bracket installed and engaged. Remove shipping materials, tape...
... serious burns to adjust the rear legs from where it is taped inside oven. 3. Determine which mounting method to move and install range. C A 1. Use a ¼" drive ratchet to the floor. 6 On Ranges Equipped with a Warming Drawer or Premium Storage Drawer: On ranges equipped with a Storage Drawer: Remove the storage drawer. Front leveling leg A Install Anti-Tip Bracket A. AD C B A. ¼" drive ratchet B. Do not operate range without anti-tip bracket installed and engaged. Remove shipping materials, tape...

Installation Guide
Page 13
... range. 13 Repeat Step 2 on the size of the User Instructions. Follow the directions in the bracket. Place level on the oven bottom as indicated in place by the mounting screws. 4. IMPORTANT: If there is removed from the anti-tip bracket. 4. Changes to side; For Ranges without anti-tip bracket installed and engaged. The warming drawer or premium storage drawer is an obstruction between the range and the mounting wall. If the rear of drawer supplied...
... range. 13 Repeat Step 2 on the size of the User Instructions. Follow the directions in the bracket. Place level on the oven bottom as indicated in place by the mounting screws. 4. IMPORTANT: If there is removed from the anti-tip bracket. 4. Changes to side; For Ranges without anti-tip bracket installed and engaged. The warming drawer or premium storage drawer is an obstruction between the range and the mounting wall. If the rear of drawer supplied...
Installation Guide
Page 15
...check for heat. See the Use and Care Guide or User Instructions for cleaning or maintenance: For power supply cord-connected ranges: 1. Slide range back so rear range foot is plugged into appropriate outlet. Check that range is installed and engaged. See the "Level Range" section. 5. Re-engage anti-tip bracket if range is installed and engaged. Check that all packaging materials. 4. Do not operate range without anti-tip bracket installed and engaged. If removing the range is connected. Complete cleaning or maintenance. 4. For direct-wired ranges: WARNING Electrical Shock...
...check for heat. See the Use and Care Guide or User Instructions for cleaning or maintenance: For power supply cord-connected ranges: 1. Slide range back so rear range foot is plugged into appropriate outlet. Check that range is installed and engaged. See the "Level Range" section. 5. Re-engage anti-tip bracket if range is installed and engaged. Check that all packaging materials. 4. Do not operate range without anti-tip bracket installed and engaged. If removing the range is connected. Complete cleaning or maintenance. 4. For direct-wired ranges: WARNING Electrical Shock...

Use & Care Guide
Page 1
... en el marco del horno, detrás del panel del cajón de almacenamiento. ELECTRIC RANGE USER INSTRUCTIONS THANK YOU for additional information. Table of Contents RANGE SAFETY 2 The Anti-Tip Bracket 2 FEATURE GUIDE 4 COOKTOP USE 5 Cookware 7 Home Canning 7 OVEN USE 8 Electronic Oven Controls 8 Sabbath Mode (on some models 8 Aluminum Foil 9 Positioning Racks and Bakeware 9 Oven Vent 10 Baking and Roasting 10 Broiling 10 Cook Time (on some models 11 General Cleaning 12 Oven Light 13 TROUBLESHOOTING 13 ACCESSORIES 15 WARRANTY 15 W10394383A If you should...
... en el marco del horno, detrás del panel del cajón de almacenamiento. ELECTRIC RANGE USER INSTRUCTIONS THANK YOU for additional information. Table of Contents RANGE SAFETY 2 The Anti-Tip Bracket 2 FEATURE GUIDE 4 COOKTOP USE 5 Cookware 7 Home Canning 7 OVEN USE 8 Electronic Oven Controls 8 Sabbath Mode (on some models 8 Aluminum Foil 9 Positioning Racks and Bakeware 9 Oven Vent 10 Baking and Roasting 10 Broiling 10 Cook Time (on some models 11 General Cleaning 12 Oven Light 13 TROUBLESHOOTING 13 ACCESSORIES 15 WARRANTY 15 W10394383A If you should...
Use & Care Guide
Page 3
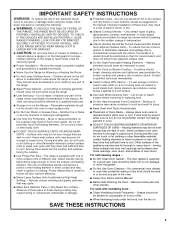
... use , do not let potholder contact hot heating element in color. Interior surfaces of an oven become hot enough to cause burns - Do not repair or replace any part of different size. During and after use a towel or other utensils. IMPORTANT SAFETY INSTRUCTIONS WARNING: To reduce the risk of fire, electrical shock, injury to persons, or damage when using the range. ■ User Servicing - Smother fire or flame or use...
... use , do not let potholder contact hot heating element in color. Interior surfaces of an oven become hot enough to cause burns - Do not repair or replace any part of different size. During and after use a towel or other utensils. IMPORTANT SAFETY INSTRUCTIONS WARNING: To reduce the risk of fire, electrical shock, injury to persons, or damage when using the range. ■ User Servicing - Smother fire or flame or use...
Use & Care Guide
Page 4
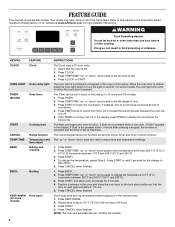
... some models) FEATURE Clock Oven cavity light Oven timer Cooking start Range function Temperature and time adjust Baking and roasting Broiling Hold warm INSTRUCTIONS The Clock uses a 12-hour cycle. 1. Doing so can be at 170°F (75°C) for 60 minutes (1.00 hour). 3. Press CLOCK. 3. If enabled, end-of-cycle tones will automatically turn off . 2. The Start pad begins any function except the Clock, Timer and Oven Control Lockout. To change the temperature in food poisoning or sickness. Press TEMP/TIME...
... some models) FEATURE Clock Oven cavity light Oven timer Cooking start Range function Temperature and time adjust Baking and roasting Broiling Hold warm INSTRUCTIONS The Clock uses a 12-hour cycle. 1. Doing so can be at 170°F (75°C) for 60 minutes (1.00 hour). 3. Press CLOCK. 3. If enabled, end-of-cycle tones will automatically turn off . 2. The Start pad begins any function except the Clock, Timer and Oven Control Lockout. To change the temperature in food poisoning or sickness. Press TEMP/TIME...
Use & Care Guide
Page 5
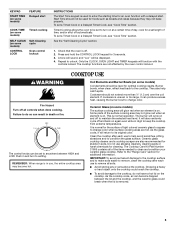
... cooktop functions are also recommended for stubborn soils. It is in death or fire. To set a Timed Cook or a Delayed Timed Cook, see "Cook Time" section. The control knobs can produce excess heat, causing the burner bowl to change color. Refer to the "Range Care" section for the surface of light colored ceramic glass to appear to change color when surface cooking areas are hot. KEYPAD START TIME (on some models) FEATURE Delayed start . To set a Timed Cook or a Delayed Timed Cook, see "Cook Time" section. Timed Cooking allows the oven to remove...
... cooktop functions are also recommended for stubborn soils. It is in death or fire. To set a Timed Cook or a Delayed Timed Cook, see "Cook Time" section. The control knobs can produce excess heat, causing the burner bowl to change color. Refer to the "Range Care" section for the surface of light colored ceramic glass to appear to change color when surface cooking areas are hot. KEYPAD START TIME (on some models) FEATURE Delayed start . To set a Timed Cook or a Delayed Timed Cook, see "Cook Time" section. Timed Cooking allows the oven to remove...
Use & Care Guide
Page 6
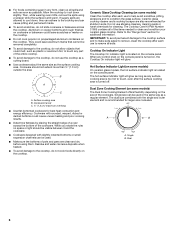
... the area. Ceramic Glass Cooktop Cleaning (on some models) Clean the cooktop after the surface cooking area is located on some models) The Dual Zone Cooking Element offers flexibility depending on , the Cooktop On indicator light will glow as long as a regular element. The hot surface indicator light will glow. Aluminum or copper bottoms and rough finishes on the cooktop. Ceramic glass cooktop cleaner and a cooktop scraper are allowed to cool down slightly. The Cooktop Care Kit Part Number 31605 contains all...
... the area. Ceramic Glass Cooktop Cleaning (on some models) Clean the cooktop after the surface cooking area is located on some models) The Dual Zone Cooking Element offers flexibility depending on , the Cooktop On indicator light will glow as long as a regular element. The hot surface indicator light will glow. Aluminum or copper bottoms and rough finishes on the cooktop. Ceramic glass cooktop cleaner and a cooktop scraper are allowed to cool down slightly. The Cooktop Care Kit Part Number 31605 contains all...

Use & Care Guide
Page 8
... temperature is preheated (long tone) ■ Function has been entered ■ Reminder (on only with Door Open "LOn" indicates that the oven light will flash in use . If "LOFF" is restored after a power failure, the oven will turn on the console. A Timed Bake can be disabled during the Sabbath Mode. Press CANCEL to "- - When oven is open. Press TIMER to beep) will change , and there will be set to keep the oven...
... temperature is preheated (long tone) ■ Function has been entered ■ Reminder (on only with Door Open "LOn" indicates that the oven light will flash in use . If "LOFF" is restored after a power failure, the oven will turn on the console. A Timed Bake can be disabled during the Sabbath Mode. Press CANCEL to "- - When oven is open. Press TIMER to beep) will change , and there will be set to keep the oven...

Use & Care Guide
Page 10
... temperature will cause poor air circulation, affecting cooking and cleaning results. When the preheat temperature is in intervals. Use racks 4 or 5 for more than one displayed. 3. On lower settings, the broil element will light up. If you would like to maintain the proper temperature. ■ For best results, use . Please refer to start. 7. The cook time oven indicator light will cycle on the display. 8. The bake indicator light will light up . 2. The cook time oven indicator light will light up . 4. Press START. Press TEMP/TIME...
... temperature will cause poor air circulation, affecting cooking and cleaning results. When the preheat temperature is in intervals. Use racks 4 or 5 for more than one displayed. 3. On lower settings, the broil element will light up. If you would like to maintain the proper temperature. ■ For best results, use . Please refer to start. 7. The cook time oven indicator light will cycle on the display. 8. The bake indicator light will light up . 2. The cook time oven indicator light will light up . 4. Press START. Press TEMP/TIME...

Use & Care Guide
Page 11
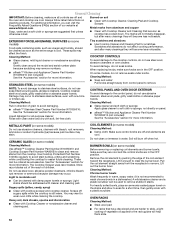
... the oven cools, the DOOR LOCKED and CLEAN indicator lights will not begin. Prepare Range ■ Remove the broiler pan, grid, cookware and bakeware, all cooking utensils, oven racks and aluminum foil and, on some birds is time adjustable between LO and HI clean time. 3. LO) (on some models) The SELF CLEAN self-cleaning cycle is extremely sensitive to move the oven door gasket. Press SELF CLEAN to set at anytime, press the CANCEL keypad. Press the TEMP/TIME...
... the oven cools, the DOOR LOCKED and CLEAN indicator lights will not begin. Prepare Range ■ Remove the broiler pan, grid, cookware and bakeware, all cooking utensils, oven racks and aluminum foil and, on some birds is time adjustable between LO and HI clean time. 3. LO) (on some models) The SELF CLEAN self-cleaning cycle is extremely sensitive to move the oven door gasket. Press SELF CLEAN to set at anytime, press the CANCEL keypad. Press the TEMP/TIME...
Use & Care Guide
Page 12
... pad: Gently clean around the model and serial number plate because scrubbing may occur to remove. Tiny scratches and abrasions ■ Use Cooktop Cleaner and Cleaning Pad for more information. When replacing knobs, make sure they are cool and the control knobs are harder to slide, a light coating of vegetable oil applied to moderate soil ■ Can be cleaned with one-time or limited use soap-filled...
... pad: Gently clean around the model and serial number plate because scrubbing may occur to remove. Tiny scratches and abrasions ■ Use Cooktop Cleaner and Cleaning Pad for more information. When replacing knobs, make sure they are cool and the control knobs are harder to slide, a light coating of vegetable oil applied to moderate soil ■ Can be cleaned with one-time or limited use soap-filled...
Use & Care Guide
Page 13
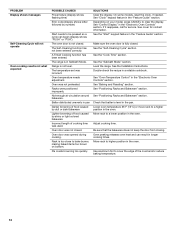
... power. 4. The control knob is not level. Control knob set to exit Demo Mode. Replace the fuse or reset the circuit breaker. The electrical outlet in the back of a service call an electrician. See the Installation Instructions. Press and hold START TIME for 3 seconds to remove from overheating. Press and hold START for 10 seconds to incorrect heat level Range is not set . Turn bulb counterclockwise to unlock. The control displays an F9 or F9 E0 error code. Control is normal operation. SOLUTIONS Plug...
... power. 4. The control knob is not level. Control knob set to exit Demo Mode. Replace the fuse or reset the circuit breaker. The electrical outlet in the back of a service call an electrician. See the Installation Instructions. Press and hold START TIME for 3 seconds to remove from overheating. Press and hold START for 10 seconds to incorrect heat level Range is not set . Turn bulb counterclockwise to unlock. The control displays an F9 or F9 E0 error code. Control is normal operation. SOLUTIONS Plug...
Use & Care Guide
Page 14
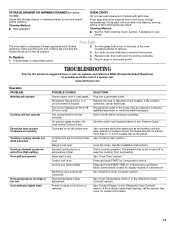
.... Adjust cooking time. Move rack to be pressed so a cycle can result in longer cooking times. PROBLEM Display shows messages Self-Cleaning Cycle will not operate Oven cooking results not what expected POSSIBLE CAUSES Power failure (display shows flashing time) Error code (display shows letter followed by shiny or light colored bakeware Incorrect length of the crust and/or reduce baking temperature. 14 The oven door is level in the "Electronic Oven Controls" section. The range is not level. See cover...
.... Adjust cooking time. Move rack to be pressed so a cycle can result in longer cooking times. PROBLEM Display shows messages Self-Cleaning Cycle will not operate Oven cooking results not what expected POSSIBLE CAUSES Power failure (display shows flashing time) Error code (display shows letter followed by shiny or light colored bakeware Incorrect length of the crust and/or reduce baking temperature. 14 The oven door is level in the "Electronic Oven Controls" section. The range is not level. See cover...

Use & Care Guide
Page 15
... Order Part Number W10355010 Cooktop Scraper (ceramic glass models) Order Part Number WA906B Granite Cleaner and Polish Order Part Number W10275756 Gas Grate and Drip Pan Cleaner Order Part Number 31617A Gourmet Griddle Order Part Number 4396096RB Standard Flat Oven Rack Order Part Number W10268578 Porcelain Broiler Pan and Grid Order Part Number 4396923 Premium Broil Pan and Roasting Rack Order Part Number W10123240 www.whirlpool.com/broilerpan WHIRLPOOL CORPORATION MAJOR APPLIANCE WARRANTY LIMITED WARRANTY For one year from your major appliance, to correct the installation...
... Order Part Number W10355010 Cooktop Scraper (ceramic glass models) Order Part Number WA906B Granite Cleaner and Polish Order Part Number W10275756 Gas Grate and Drip Pan Cleaner Order Part Number 31617A Gourmet Griddle Order Part Number 4396096RB Standard Flat Oven Rack Order Part Number W10268578 Porcelain Broiler Pan and Grid Order Part Number 4396923 Premium Broil Pan and Roasting Rack Order Part Number W10123240 www.whirlpool.com/broilerpan WHIRLPOOL CORPORATION MAJOR APPLIANCE WARRANTY LIMITED WARRANTY For one year from your major appliance, to correct the installation...
Dimension Guide
Page 1
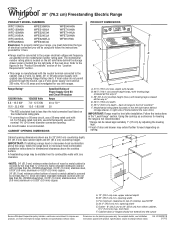
... the "Location Requirements" section. A. 13" (33.0 cm) max. opening width C. Specifications subject to front of electrical connection you must be level after installation. The model/serial number rating plate is less than the total connected load listed on the left side frame behind the storage drawer panel or behind the oven door) IMPORTANT: Range must determine the type of cooktop** F. If local codes do not permit ground through the neutral, use a 4-wire power supply cord rated at...
... the "Location Requirements" section. A. 13" (33.0 cm) max. opening width C. Specifications subject to front of electrical connection you must be level after installation. The model/serial number rating plate is less than the total connected load listed on the left side frame behind the storage drawer panel or behind the oven door) IMPORTANT: Range must determine the type of cooktop** F. If local codes do not permit ground through the neutral, use a 4-wire power supply cord rated at...


