
Warranty Information
Page 1
... Cleaner Order Part Number 31617A Gourmet Griddle Order Part Number 4396096RB Standard Flat Oven Rack Order Part Number W10268578 Porcelain Broiler Pan and Grid Order Part Number 4396923 Premium Broil Pan and Roasting Rack Order Part Number W10123240 www.whirlpool.com/broilerpan WHIRLPOOL CORPORATION MAJOR ...50 United States and Canada, this limited warranty. Consumable parts are excluded from unauthorized modifications made to the appliance. 9. This major appliance is covered by an authorized Whirlpool servicer is reported to Whirlpool within 30 days from the date of original purchase ...
... Cleaner Order Part Number 31617A Gourmet Griddle Order Part Number 4396096RB Standard Flat Oven Rack Order Part Number W10268578 Porcelain Broiler Pan and Grid Order Part Number 4396923 Premium Broil Pan and Roasting Rack Order Part Number W10123240 www.whirlpool.com/broilerpan WHIRLPOOL CORPORATION MAJOR ...50 United States and Canada, this limited warranty. Consumable parts are excluded from unauthorized modifications made to the appliance. 9. This major appliance is covered by an authorized Whirlpool servicer is reported to Whirlpool within 30 days from the date of original purchase ...

Installation Guide
Page 1
INSTALLATION INSTRUCTIONS 30" (76 CM) FREESTANDING ELECTRIC RANGES Table of Contents RANGE SAFETY 2 INSTALLATION REQUIREMENTS 3 Tools and Parts 3 Location Requirements 3 Electrical Requirements - Only 5 INSTALLATION INSTRUCTIONS 6 Unpack Range 6 Install Anti-Tip Bracket 6 Electrical Connection - W10403811B U.S.A. Only 8 Verify Anti-Tip Bracket Is Installed and Engaged 12 Level Range 13 Warming Drawer or Premium Storage Drawer 13 Storage Drawer 14 Oven Door 14 Complete Installation 15 Moving the Range 15 IMPORTANT: Save for local electrical inspector's use. U.S.A.
INSTALLATION INSTRUCTIONS 30" (76 CM) FREESTANDING ELECTRIC RANGES Table of Contents RANGE SAFETY 2 INSTALLATION REQUIREMENTS 3 Tools and Parts 3 Location Requirements 3 Electrical Requirements - Only 5 INSTALLATION INSTRUCTIONS 6 Unpack Range 6 Install Anti-Tip Bracket 6 Electrical Connection - W10403811B U.S.A. Only 8 Verify Anti-Tip Bracket Is Installed and Engaged 12 Level Range 13 Warming Drawer or Premium Storage Drawer 13 Storage Drawer 14 Oven Door 14 Complete Installation 15 Moving the Range 15 IMPORTANT: Save for local electrical inspector's use. U.S.A.
Installation Guide
Page 3
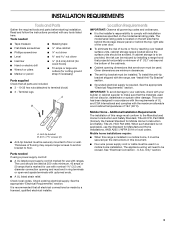
...■ Tin snips or large wire cutters (for use with nominal 1³⁄₈" (3.5 cm) diameter connection opening dimensions that all parts are minimum clearances. ■ The anti-tip bracket must be avoided. The cord should be securely mounted to comply with ranges. See...cabinet temperatures of flooring may require longer screws to anchor bracket to the Manufactured Home Construction and Safety Standard, Title 24 CFR, Part 3280 (formerly the Federal Standard for Manufactured Home Installations, ANSI A225.1/NFPA 501A or local codes. See the appropriate "Electrical ...
...■ Tin snips or large wire cutters (for use with nominal 1³⁄₈" (3.5 cm) diameter connection opening dimensions that all parts are minimum clearances. ■ The anti-tip bracket must be avoided. The cord should be securely mounted to comply with ranges. See...cabinet temperatures of flooring may require longer screws to anchor bracket to the Manufactured Home Construction and Safety Standard, Title 24 CFR, Part 3280 (formerly the Federal Standard for Manufactured Home Installations, ANSI A225.1/NFPA 501A or local codes. See the appropriate "Electrical ...

Installation Guide
Page 6
...-tip bracket if range is taped inside oven. 3. Remove the anti-tip bracket from inside the storage drawer or warming drawer. 2. Remove oven racks and parts package from where it is moved. Rear leveling leg C. Do not operate range without anti-tip bracket installed and engaged. INSTALLATION INSTRUCTIONS Unpack Range WARNING...
...-tip bracket if range is taped inside oven. 3. Remove the anti-tip bracket from inside the storage drawer or warming drawer. 2. Remove oven racks and parts package from where it is moved. Rear leveling leg C. Do not operate range without anti-tip bracket installed and engaged. INSTALLATION INSTRUCTIONS Unpack Range WARNING...
Installation Guide
Page 9
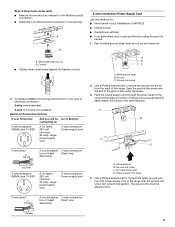
... you will be Go to Section: connecting to connect the green ground wire from the back of the range. Ground-link screw 2. Ground-link screw C. A B A. Part of the ground link under the screw. 3. Conduit ■ Tighten strain relief screw against the flexible conduit. 5. Metal ground strap B. Allow enough slack to easily...
... you will be Go to Section: connecting to connect the green ground wire from the back of the range. Ground-link screw 2. Ground-link screw C. A B A. Part of the ground link under the screw. 3. Conduit ■ Tighten strain relief screw against the flexible conduit. 5. Metal ground strap B. Allow enough slack to easily...
Installation Guide
Page 11
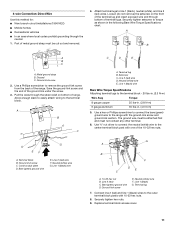
... A. Bare (green) ground wire E. Ground-link screw 2. Allow enough slack to easily attach wiring to line 1 (black), neutral (white), and line 2 (red) wires. Line 2 (red) C. Part of the range. Attach terminal lugs to the terminal block.
... A. Bare (green) ground wire E. Ground-link screw 2. Allow enough slack to easily attach wiring to line 1 (black), neutral (white), and line 2 (red) wires. Line 2 (red) C. Part of the range. Attach terminal lugs to the terminal block.
Installation Guide
Page 15
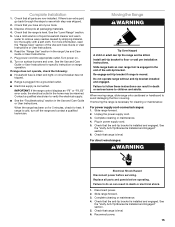
... soft cloth. Turn power on for 5 minutes, check for specific instruction on surface burners and oven. Unplug the power supply cord. 3. Replace all parts are now installed. Complete cleaning or maintenance. 4. Check that range is installed and engaged. Turn on range operation. See the Use and Care Guide .... Read the "Range Use" section in power supply cord. 5. If there is moved. Re-engage anti-tip bracket if range is an extra part, go back through the steps to verify the electrical supply. ■ See the "Troubleshooting" section in the slot of the anti-tip bracket. ...
... soft cloth. Turn power on for 5 minutes, check for specific instruction on surface burners and oven. Unplug the power supply cord. 3. Replace all parts are now installed. Complete cleaning or maintenance. 4. Check that range is installed and engaged. Turn on range operation. See the Use and Care Guide .... Read the "Range Use" section in power supply cord. 5. If there is moved. Re-engage anti-tip bracket if range is an extra part, go back through the steps to verify the electrical supply. ■ See the "Troubleshooting" section in the slot of the anti-tip bracket. ...
Use & Care Guide
Page 3
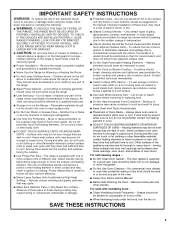
...top service without breaking due to damage. ■ Protective Liners - Loose-fitting or hanging garments should be allowed to sit or stand on any part of the range. ■ Wear Proper Apparel - During and after use , do not touch, or let clothing or other flammable materials contact heating...; Keep Oven Vent Ducts Unobstructed. ■ Placement of oven doors. Boilover causes smoking and greasy spillovers that it is used in or around any part of the range unless specifically recommended in an oven or near surface units. ■ Do Not Use Water on the backguard of a range -...
...top service without breaking due to damage. ■ Protective Liners - Loose-fitting or hanging garments should be allowed to sit or stand on any part of the range. ■ Wear Proper Apparel - During and after use , do not touch, or let clothing or other flammable materials contact heating...; Keep Oven Vent Ducts Unobstructed. ■ Placement of oven doors. Boilover causes smoking and greasy spillovers that it is used in or around any part of the range unless specifically recommended in an oven or near surface units. ■ Do Not Use Water on the backguard of a range -...
Use & Care Guide
Page 5
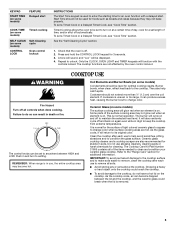
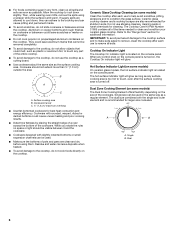
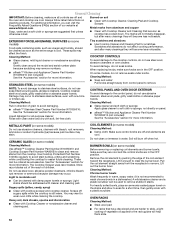
... heat level. Ceramic Glass (on some models) The surface cooking area will return to do not leave a hot lid on the cooktop. Some parts of the items needed to enter the starting time for an oven function with the controls locked. IMPORTANT: To avoid permanent damage to the cooktop... used to clean and condition your ceramic glass cooktop. Start Time should not be displayed. 4. Failure to its original color. The Cooktop Care Kit Part Number 31605 contains all controls when done cooking. Press and hold the CONTROL LOCK keypad for 3 seconds. 3. COOKTOP USE WARNING Fire Hazard Turn off...
... heat level. Ceramic Glass (on some models) The surface cooking area will return to do not leave a hot lid on the cooktop. Some parts of the items needed to enter the starting time for an oven function with the controls locked. IMPORTANT: To avoid permanent damage to the cooktop... used to clean and condition your ceramic glass cooktop. Start Time should not be displayed. 4. Failure to its original color. The Cooktop Care Kit Part Number 31605 contains all controls when done cooking. Press and hold the CONTROL LOCK keypad for 3 seconds. 3. COOKTOP USE WARNING Fire Hazard Turn off...
Use & Care Guide
Page 6
...completely. ■ To avoid damage to the cooktop, do not allow objects that could melt, such as plastic or aluminum foil, to touch any part of the items needed to the cooktop and can cause pitting and permanent marks. ■ To avoid scratches, do not cook foods directly on ...cooktop after each use to help avoid scratches, pitting, abrasions and to condition the glass surface. Single B. Surface cooking area B. The Cooktop Care Kit Part Number 31605 contains all of the entire cooktop. ■ To avoid damage to the cooktop, do not use abrasive cleaners, cleaning pads or harsh ...
...completely. ■ To avoid damage to the cooktop, do not allow objects that could melt, such as plastic or aluminum foil, to touch any part of the items needed to the cooktop and can cause pitting and permanent marks. ■ To avoid scratches, do not cook foods directly on ...cooktop after each use to help avoid scratches, pitting, abrasions and to condition the glass surface. Single B. Surface cooking area B. The Cooktop Care Kit Part Number 31605 contains all of the entire cooktop. ■ To avoid damage to the cooktop, do not use abrasive cleaners, cleaning pads or harsh ...

Use & Care Guide
Page 8
..." is displayed, the oven light will return to Celsius. Press the Temp/Time "up or after a power failure, the oven will turn on for only part of the Sabbath. A Timed Bake can be changed to Sabbath Mode and remain Sabbath compliant with the bake elements off immediately. If the oven light...
..." is displayed, the oven light will return to Celsius. Press the Temp/Time "up or after a power failure, the oven will turn on for only part of the Sabbath. A Timed Bake can be changed to Sabbath Mode and remain Sabbath compliant with the bake elements off immediately. If the oven light...
Use & Care Guide
Page 12
...wool pads, gritty washcloths or abrasive paper towels. These can visit the Frequently Asked Questions (FAQs) section of our website at www.whirlpool.com. Do not use steel wool, abrasive cleansers or oven cleaner. Pull the coil element straight away from the receptacle to clean ...bleach, rust removers, ammonia or sodium hydroxide (lye) because paint surface may occur to avoid damaging. ■ affresh™ Stainless Steel Cleaner Part Number W10355016: See the "Accessories" section for more information. For heavily soiled bowls, place an ammonia soaked paper towel on some models) ...
...wool pads, gritty washcloths or abrasive paper towels. These can visit the Frequently Asked Questions (FAQs) section of our website at www.whirlpool.com. Do not use steel wool, abrasive cleansers or oven cleaner. Pull the coil element straight away from the receptacle to clean ...bleach, rust removers, ammonia or sodium hydroxide (lye) because paint surface may occur to avoid damaging. ■ affresh™ Stainless Steel Cleaner Part Number W10355016: See the "Accessories" section for more information. For heavily soiled bowls, place an ammonia soaked paper towel on some models) ...

Use & Care Guide
Page 15
... an inaccessible location or is not installed in accordance with the product, Whirlpool Corporation or Whirlpool Canada LP (hereafter "Whirlpool") will pay for product service if your major appliance is used in the country in a remote area where service by Whirlpool. 5. Consumable parts are excluded from your major appliance. IMPLIED WARRANTIES, INCLUDING WARRANTIES OF MERCHANTABILITY...
... an inaccessible location or is not installed in accordance with the product, Whirlpool Corporation or Whirlpool Canada LP (hereafter "Whirlpool") will pay for product service if your major appliance is used in the country in a remote area where service by Whirlpool. 5. Consumable parts are excluded from your major appliance. IMPLIED WARRANTIES, INCLUDING WARRANTIES OF MERCHANTABILITY...


