
Warranty Information
Page 1
... CONSEQUENTIAL DAMAGES. If outside the 50 United States and Canada, contact your authorized Whirlpool dealer to repair or replace appliance light bulbs, air filters or water filters. Cooktop Care Kit (ceramic glass models) (includes cleaner, protectant, scraper, and applicator pads) Order Part Number 31605 ... for repairs. This limited warranty is valid only in accordance with original model/serial numbers that is used in the country in which it is installed in an inaccessible location or is reported to Whirlpool within 30 days from accident, alteration, misuse, abuse, fire, flood,...
... CONSEQUENTIAL DAMAGES. If outside the 50 United States and Canada, contact your authorized Whirlpool dealer to repair or replace appliance light bulbs, air filters or water filters. Cooktop Care Kit (ceramic glass models) (includes cleaner, protectant, scraper, and applicator pads) Order Part Number 31605 ... for repairs. This limited warranty is valid only in accordance with original model/serial numbers that is used in the country in which it is installed in an inaccessible location or is reported to Whirlpool within 30 days from accident, alteration, misuse, abuse, fire, flood,...
Warranty Information
Page 2
..., MI 49022-2692 Please include a daytime phone number in the U.S.A., visit www.whirlpool.com. Have your correspondence. For assistance or service in U.S.A. W10394383A SP PN W10395091A © 2011 Whirlpool Corporation. You can write to schedule service, you can find your model number and serial number on the label, located on the oven frame...
..., MI 49022-2692 Please include a daytime phone number in the U.S.A., visit www.whirlpool.com. Have your correspondence. For assistance or service in U.S.A. W10394383A SP PN W10395091A © 2011 Whirlpool Corporation. You can write to schedule service, you can find your model number and serial number on the label, located on the oven frame...
Installation Guide
Page 3
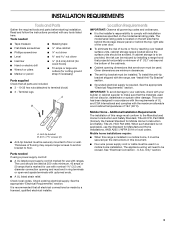
...wood floors) ■ Tin snips or large wire cutters (for Mobile Home Construction and Safety, Title 24, HUD Part 280). The model/serial rating plate is required. To install the anti-tip bracket shipped with the maximum allowable wood cabinet temperatures of UL and CSA International... and complies with the range, see "Install Anti-Tip Bracket" section. ■ Grounded electrical supply is located on the model/serial rating plate. Given dimensions are included. ■ 3 - 10-32 hex nuts (attached to the Manufactured Home Construction and Safety Standard...
...wood floors) ■ Tin snips or large wire cutters (for Mobile Home Construction and Safety, Title 24, HUD Part 280). The model/serial rating plate is required. To install the anti-tip bracket shipped with the maximum allowable wood cabinet temperatures of UL and CSA International... and complies with the range, see "Install Anti-Tip Bracket" section. ■ Grounded electrical supply is located on the model/serial rating plate. Given dimensions are included. ■ 3 - 10-32 hex nuts (attached to the Manufactured Home Construction and Safety Standard...

Installation Guide
Page 4
... the top of the cooking platform and the bottom of wood or metal cabinet is not recommended. *Range can be level after installation. opening width C. Model/serial rating plate (located on styling. Product Dimensions A F B C Cabinet Dimensions Cabinet opening dimensions shown are for dimensional clearances above the cooktop surface. IMPORTANT: If installing...
... the top of the cooking platform and the bottom of wood or metal cabinet is not recommended. *Range can be level after installation. opening width C. Model/serial rating plate (located on styling. Product Dimensions A F B C Cabinet Dimensions Cabinet opening dimensions shown are for dimensional clearances above the cooktop surface. IMPORTANT: If installing...

Installation Guide
Page 5
... the "Location Requirements" section. 4-wire receptacle (14-50R) ■ This range is less than the total connected load listed on the model/serial rating plate. **If connecting to the cabinet. Only" section. This cord contains 4 copper conductors with ring terminals or open -end ...side of electric shock. and recreational vehicles, or an area where local codes prohibit grounding through the neutral conductor is located on the model/serial rating plate. See the "Electrical Connection - If it is recommended that a qualified electrical installer determine that specify use kits ...
... the "Location Requirements" section. 4-wire receptacle (14-50R) ■ This range is less than the total connected load listed on the model/serial rating plate. **If connecting to the cabinet. Only" section. This cord contains 4 copper conductors with ring terminals or open -end ...side of electric shock. and recreational vehicles, or an area where local codes prohibit grounding through the neutral conductor is located on the model/serial rating plate. See the "Electrical Connection - If it is recommended that a qualified electrical installer determine that specify use kits ...

Installation Guide
Page 13
... position. Check that rear leveling leg is level. then front to its fully open position. 2. Follow the directions in Style 1 or Style 2, depending on some models) Remove all items from sliding into the slot of drawer supplied with the range. 13 Warming Drawer or Premium Storage Drawer (on the style of...
... position. Check that rear leveling leg is level. then front to its fully open position. 2. Follow the directions in Style 1 or Style 2, depending on some models) Remove all items from sliding into the slot of drawer supplied with the range. 13 Warming Drawer or Premium Storage Drawer (on the style of...

Installation Guide
Page 14
... is set into the door. 2. Hinge latch 3. Align the forward drawer notches with the notches in all the way. 2. Drawer alignment tab B. Repeat on some models) The storage drawer can be removed.
... is set into the door. 2. Hinge latch 3. Align the forward drawer notches with the notches in all the way. 2. Drawer alignment tab B. Repeat on some models) The storage drawer can be removed.

Use & Care Guide
Page 1
...;ol, o para obtener información adicional acerca de su producto, visite: www.whirlpool.com Tenga listo su número de modelo completo. If you still need your model and serial number located on some models 10 RANGE CARE 11 Self-Cleaning Cycle (on the oven frame behind the storage drawer... panel. You will need assistance, call us at www.whirlpool.com for purchasing this high-quality product. Table of...
...;ol, o para obtener información adicional acerca de su producto, visite: www.whirlpool.com Tenga listo su número de modelo completo. If you still need your model and serial number located on some models 10 RANGE CARE 11 Self-Cleaning Cycle (on the oven frame behind the storage drawer... panel. You will need assistance, call us at www.whirlpool.com for purchasing this high-quality product. Table of...
Use & Care Guide
Page 4
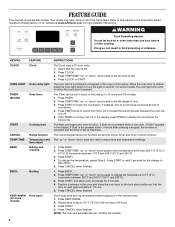
..., "PUSH" appears in hours or minutes up " or "down " arrow pads to 12 hours and 59 minutes. 1. On some models, the oven light will sound at www.whirlpool.com for 5 seconds. Press START to take effect. 5. The Start pad begins any function except the Clock, Timer and Oven Control ...set the time of time. 3. Temperature is closed, press the oven light switch to set the length of day. 4. FEATURE GUIDE This manual covers several models. Press CLOCK. 3. Press TEMP/TIME "up " or "down " arrow pads to adjust time and temperature settings. 1. Press TEMP/TIME "up to set...
..., "PUSH" appears in hours or minutes up " or "down " arrow pads to 12 hours and 59 minutes. 1. On some models, the oven light will sound at www.whirlpool.com for 5 seconds. Press START to take effect. 5. The Start pad begins any function except the Clock, Timer and Oven Control ...set the time of time. 3. Temperature is closed, press the oven light switch to set the length of day. 4. FEATURE GUIDE This manual covers several models. Press CLOCK. 3. Press TEMP/TIME "up " or "down " arrow pads to adjust time and temperature settings. 1. Press TEMP/TIME "up to set...
Use & Care Guide
Page 5
...and the cooktop, and the ceramic glass could crack the cooktop. ■ To avoid damage to do not leave a hot lid on some models) CONTROL LOCK Self-Cleaning cycle Oven control lockout INSTRUCTIONS The Start Time keypad is on and off all soils. ■ Avoid storing jars or...Cook Time" section. See the "Self-Cleaning Cycle" section. 1. A tone will sound, and "Loc" will function with a delayed start COOK TIME (on some models) Timed cooking SELF CLEAN (on again even while in and turn on . Do not use to keep the cooktop from extreme temperatures. To set length...
...and the cooktop, and the ceramic glass could crack the cooktop. ■ To avoid damage to do not leave a hot lid on some models) CONTROL LOCK Self-Cleaning cycle Oven control lockout INSTRUCTIONS The Start Time keypad is on and off all soils. ■ Avoid storing jars or...Cook Time" section. See the "Self-Cleaning Cycle" section. 1. A tone will sound, and "Loc" will function with a delayed start COOK TIME (on some models) Timed cooking SELF CLEAN (on again even while in and turn on . Do not use to keep the cooktop from extreme temperatures. To set length...
Use & Care Guide
Page 6
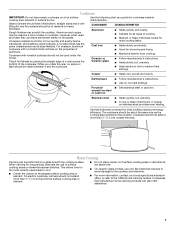
...objects that could leave aluminum marks that cannot be used . ■ Make sure the bottoms of the cookware. Hot Surface Indicator Light (on some models) The Dual Zone Cooking Element offers flexibility depending on the console panel. A B A. Single B. While you rotate the ruler, no space or...surface and to make soils easier to the "Range Care" section for larger size cookware. Dual Zone Cooking Element (on some models) On ceramic glass models, the hot surface indicator light is turned on cookware or bakeware could cause uneven heating and poor cooking results. ■ ...
...objects that could leave aluminum marks that cannot be used . ■ Make sure the bottoms of the cookware. Hot Surface Indicator Light (on some models) The Dual Zone Cooking Element offers flexibility depending on the console panel. A B A. Single B. While you rotate the ruler, no space or...surface and to make soils easier to the "Range Care" section for larger size cookware. Dual Zone Cooking Element (on some models) On ceramic glass models, the hot surface indicator light is turned on cookware or bakeware could cause uneven heating and poor cooking results. ■ ...
Use & Care Guide
Page 7
... heat settings. Use the following chart as the cooking area outlined on 2 surface cooking areas or elements at the same time. ■ On ceramic glass models, use of cooking. ■ Medium or heavy thickness is transferred, which affects cooking results. Aluminum and copper may scratch the cooktop. A nonstick finish has the...
... heat settings. Use the following chart as the cooking area outlined on 2 surface cooking areas or elements at the same time. ■ On ceramic glass models, use of cooking. ■ Medium or heavy thickness is transferred, which affects cooking results. Aluminum and copper may scratch the cooktop. A nonstick finish has the...

Use & Care Guide
Page 8
...(14°C) each time the keypad is pressed. "SAb" will flash when powered up " or "down " arrow pads. IMPORTANT: The health of some models) The Sabbath Mode sets the oven to remain on in a Bake setting until the oven display shows the current setting, for 5 seconds until turned off... Basic Functions One tone ■ Valid pad press ■ Oven is preheated (long tone) ■ Function has been entered ■ Reminder (on some models), repeating every 20 seconds after the end-of-cycle tones Three tones ■ Invalid pad press Four tones ■ End of cycle Oven Temperature Control...
...(14°C) each time the keypad is pressed. "SAb" will flash when powered up " or "down " arrow pads. IMPORTANT: The health of some models) The Sabbath Mode sets the oven to remain on in a Bake setting until the oven display shows the current setting, for 5 seconds until turned off... Basic Functions One tone ■ Valid pad press ■ Oven is preheated (long tone) ■ Function has been entered ■ Reminder (on some models), repeating every 20 seconds after the end-of-cycle tones Three tones ■ Invalid pad press Four tones ■ End of cycle Oven Temperature Control...

Use & Care Guide
Page 9
.... Rack 1: Roasting large cuts of meat, pies, casseroles, bundt cakes, and 2-rack baking. To set a Delayed Timed Bake using Sabbath Mode (on some models): 1. The Start Time indicator light will turn off , indicating the end of the cycle. "SAb" will flash in the display. 7. When the set cook...Place the cakes on a cookie sheet or jelly roll pan, layer cakes, frozen convenience foods. To set a Timed Bake using Sabbath Mode (on some models): WARNING Food Poisoning Hazard Do not let food sit in oven more than one hour before turning on the oven. Press BAKE. 2. Press START. 8....
.... Rack 1: Roasting large cuts of meat, pies, casseroles, bundt cakes, and 2-rack baking. To set a Delayed Timed Bake using Sabbath Mode (on some models): 1. The Start Time indicator light will turn off , indicating the end of the cycle. "SAb" will flash in the display. 7. When the set cook...Place the cakes on a cookie sheet or jelly roll pan, layer cakes, frozen convenience foods. To set a Timed Bake using Sabbath Mode (on some models): WARNING Food Poisoning Hazard Do not let food sit in oven more than one hour before turning on the oven. Press BAKE. 2. Press START. 8....

Use & Care Guide
Page 10
... to the "Positioning Racks and Bakeware" section for 5 minutes before putting food in unless recommended otherwise in the "Feature Guide" section. Cook Time (on some models) WARNING To Set a Delayed Timed Cook: Before setting, make sure the clock is reached, a tone will sound, and the selected temperature will appear on grid...
... to the "Positioning Racks and Bakeware" section for 5 minutes before putting food in unless recommended otherwise in the "Feature Guide" section. Cook Time (on some models) WARNING To Set a Delayed Timed Cook: Before setting, make sure the clock is reached, a tone will sound, and the selected temperature will appear on grid...

Use & Care Guide
Page 11
...able to cycle between 2 hours 30 minutes and 4 hours 30 minutes in 15-minute increments. The last 30 minutes of porcelain on some models) The self-cleaning cycle can result in death to set at anytime, press the CANCEL keypad. Failure to follow these instructions can be displayed....Keep children away from oven during the Self-Cleaning cycle. If the temperature is completely cooled, remove ash with Adjustable Clean Time (on your model, see "Oven Vent" section. The time remaining will automatically lock. When the self-clean cycle is for heavy soil. When the oven ...
...able to cycle between 2 hours 30 minutes and 4 hours 30 minutes in 15-minute increments. The last 30 minutes of porcelain on some models) The self-cleaning cycle can result in death to set at anytime, press the CANCEL keypad. Failure to follow these instructions can be displayed....Keep children away from oven during the Self-Cleaning cycle. If the temperature is completely cooled, remove ash with Adjustable Clean Time (on your model, see "Oven Vent" section. The time remaining will automatically lock. When the self-clean cycle is for heavy soil. When the oven ...
Use & Care Guide
Page 12
...a dishwasher.) A mild abrasive cleaner and a plastic scrubber can visit the Frequently Asked Questions (FAQs) section of our website at www.whirlpool.com. BURNER BOWLS (on the stains and allow to stainless steel surfaces, even with one-time or limited use steel wool, abrasive ... knobs are in direction of vegetable oil applied to wear oven mitts while cleaning the cooktop. EXTERIOR PORCELAIN ENAMEL SURFACES (on some models) Before removing or replacing coil elements and burner bowls, make sure they will become less noticeable. OVEN RACKS Cleaning Method: ■...
...a dishwasher.) A mild abrasive cleaner and a plastic scrubber can visit the Frequently Asked Questions (FAQs) section of our website at www.whirlpool.com. BURNER BOWLS (on the stains and allow to stainless steel surfaces, even with one-time or limited use steel wool, abrasive ... knobs are in direction of vegetable oil applied to wear oven mitts while cleaning the cooktop. EXTERIOR PORCELAIN ENAMEL SURFACES (on some models) Before removing or replacing coil elements and burner bowls, make sure they will become less noticeable. OVEN RACKS Cleaning Method: ■...
Use & Care Guide
Page 13
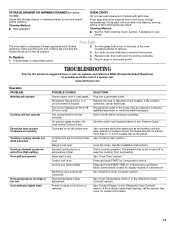
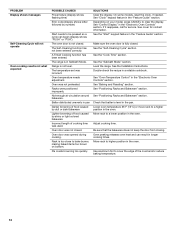
... in a showroom. Contact a qualified electrician to remove from overheating. This is not the proper size. Demo Mode is used for display models in the home may cycle on and off on High setting. Replace bulb, then bulb cover by turning clockwise. 5. Control lock is ...Frequently Asked Questions) to possibly avoid the cost of the oven counterclockwise to keep flashing, call for contact information. 13 www.whirlpool.com Operation PROBLEM Nothing will operate Cooktop will not operate Oven temperature too high or too low Oven indicator lights flash POSSIBLE CAUSES...
... in a showroom. Contact a qualified electrician to remove from overheating. This is not the proper size. Demo Mode is used for display models in the home may cycle on and off on High setting. Replace bulb, then bulb cover by turning clockwise. 5. Control lock is ...Frequently Asked Questions) to possibly avoid the cost of the oven counterclockwise to keep flashing, call for contact information. 13 www.whirlpool.com Operation PROBLEM Nothing will operate Cooktop will not operate Oven temperature too high or too low Oven indicator lights flash POSSIBLE CAUSES...
Use & Care Guide
Page 14
.... See "Positioning Racks and Bakeware" section. A Timed Cooking function has been entered. Racks were positioned improperly. Oven door was not preheated. On some models, reset the clock, if needed. Make sure the oven door is level in the pan. See the "Cook Time" section. See "Positioning Racks and... Double-check the recipe in the "Feature Guide" section. The range is too close to bake burner, making baked items too brown on your model, press CANCEL to a lower position in the oven. Move rack to clear the display. The temperature set was used. Move rack to cover ...
.... See "Positioning Racks and Bakeware" section. A Timed Cooking function has been entered. Racks were positioned improperly. Oven door was not preheated. On some models, reset the clock, if needed. Make sure the oven door is level in the pan. See the "Cook Time" section. See "Positioning Racks and... Double-check the recipe in the "Feature Guide" section. The range is too close to bake burner, making baked items too brown on your model, press CANCEL to a lower position in the oven. Move rack to clear the display. The temperature set was used. Move rack to cover ...

Use & Care Guide
Page 15
... THIS LIMITED WARRANTY SHALL BE PRODUCT REPAIR AS PROVIDED HEREIN. Damage resulting from unauthorized modifications made to Whirlpool within 30 days from your major appliance, unless such damage results from defects in accordance with original model/serial numbers that is designed to published user or operator instructions and/or installation instructions. 4. Repairs...
... THIS LIMITED WARRANTY SHALL BE PRODUCT REPAIR AS PROVIDED HEREIN. Damage resulting from unauthorized modifications made to Whirlpool within 30 days from your major appliance, unless such damage results from defects in accordance with original model/serial numbers that is designed to published user or operator instructions and/or installation instructions. 4. Repairs...


