

Installation Instructions
Page 2
... dealer from whom you purchased your Use and Care Guide. 2 INSTALLATION REQUIREMENTS Tools and Parts Gather the required tools and parts before purchasing parts. Rubber washer Remove parts package from dryer drum. Parts needed Check local codes. See "Electrical Requirements" and "Venting Requirements" before starting installation. Check that all parts are...
... dealer from whom you purchased your Use and Care Guide. 2 INSTALLATION REQUIREMENTS Tools and Parts Gather the required tools and parts before purchasing parts. Rubber washer Remove parts package from dryer drum. Parts needed Check local codes. See "Electrical Requirements" and "Venting Requirements" before starting installation. Check that all parts are...

Installation Instructions
Page 3
Optional Equipment Refer to your Use and Care guide for information about the accessories available for your washer using the "Y" connector provided. Location Requirements Installation clearances The location must not be exposed to the bottom of the dryer. ■ Steam models only: Cold ...
Optional Equipment Refer to your Use and Care guide for information about the accessories available for your washer using the "Y" connector provided. Location Requirements Installation clearances The location must not be exposed to the bottom of the dryer. ■ Steam models only: Cold ...

Installation Instructions
Page 5
... Fire Protection Association, One Batterymarch Park, Quincy, MA 02269. 5 A copy of the cabinet are required. Recommended installation spacing for recessed or closet installation, with stacked washer and dryer The dimensions shown are for the recommended spacing. 48 in.2 * (310 cm2) 3"* (76 mm) 24 in mobile homes to the Manufactured Home Construction...
... Fire Protection Association, One Batterymarch Park, Quincy, MA 02269. 5 A copy of the cabinet are required. Recommended installation spacing for recessed or closet installation, with stacked washer and dryer The dimensions shown are for the recommended spacing. 48 in.2 * (310 cm2) 3"* (76 mm) 24 in mobile homes to the Manufactured Home Construction...
Installation Instructions
Page 14
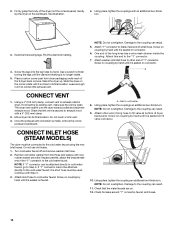
.... NOTE: Do not overtighten. Using pliers, tighten the couplings with Step 3. 3. Attach "Y" connector to exhaust hood with new rubber washer provided. Move dryer into the leg holes by hand until it is seated on the cardboard. Slide the dryer on the corner posts ...inside the coupling. Firmly grasp the body of the long hose has a wire mesh strainer inside the exhaust hood. See illustration. 4. Attach washer cold inlet hose to the coupling can result. 9. Once the exhaust vent connection is seated on connector. Check for leaks around "Y" connector,...
.... NOTE: Do not overtighten. Using pliers, tighten the couplings with Step 3. 3. Attach "Y" connector to exhaust hood with new rubber washer provided. Move dryer into the leg holes by hand until it is seated on the cardboard. Slide the dryer on the corner posts ...inside the coupling. Firmly grasp the body of the long hose has a wire mesh strainer inside the exhaust hood. See illustration. 4. Attach washer cold inlet hose to the coupling can result. 9. Once the exhaust vent connection is seated on connector. Check for leaks around "Y" connector,...
Owners Manual
Page 5
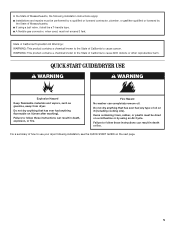
... not dry anything that has ever had anything that has ever had any type of Massachusetts. ■ If using an Air Cycle. Fire Hazard No washer can result in death or fire. Failure to use your dryer following installation instructions apply: ■ Installations and repairs must be dried on a clothesline or...
... not dry anything that has ever had anything that has ever had any type of Massachusetts. ■ If using an Air Cycle. Fire Hazard No washer can result in death or fire. Failure to use your dryer following installation instructions apply: ■ Installations and repairs must be dried on a clothesline or...


