

Installation Instructions
Page 2
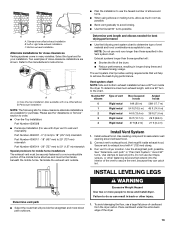
... ■ Pliers Parts supplied Non-Steam Models Steam Models A B C D E A. Check that opens to the "Assistance or Service" section in your dryer. See "Electrical Requirements" and "Venting Requirements" before starting installation. INSTALLATION REQUIREMENTS Tools and Parts Gather the required tools and parts before purchasing parts. Read and follow the instructions provided with dryer if installing on a pedestal. 4 Leveling legs Remove parts package from dryer drum. Long inlet hose E. Rubber washer Remove parts package from dryer drum. NOTE: Do not use leveling legs...
... ■ Pliers Parts supplied Non-Steam Models Steam Models A B C D E A. Check that opens to the "Assistance or Service" section in your dryer. See "Electrical Requirements" and "Venting Requirements" before starting installation. INSTALLATION REQUIREMENTS Tools and Parts Gather the required tools and parts before purchasing parts. Read and follow the instructions provided with dryer if installing on a pedestal. 4 Leveling legs Remove parts package from dryer drum. Long inlet hose E. Rubber washer Remove parts package from dryer drum. NOTE: Do not use leveling legs...

Installation Instructions
Page 3
... greater than 1" (25 mm), install Extended Dryer Feet Kit, Part Number 279810. Do not operate your dryer at the end of the dryer in longer drying times. Check code requirements. Optional Equipment Refer to open fully. At lower temperatures, the dryer might not shut off at temperatures below 45ºF (7ºC). Clothes may not tumble properly and automatic sensor cycles may use the cold water supply from your dryer. Steam (Electric or Gas) A 38" (965 mm) B 32...
... greater than 1" (25 mm), install Extended Dryer Feet Kit, Part Number 279810. Do not operate your dryer at the end of the dryer in longer drying times. Check code requirements. Optional Equipment Refer to open fully. At lower temperatures, the dryer might not shut off at temperatures below 45ºF (7ºC). Clothes may not tumble properly and automatic sensor cycles may use the cold water supply from your dryer. Steam (Electric or Gas) A 38" (965 mm) B 32...

Installation Instructions
Page 5
... introduce outside air into the dryer. ELECTRIC DRYER POWER HOOKUP Electrical Requirements It is suitable for stacked recessed or closet installation. The National Electrical Code requires a 4-wire power supply connection for cabinet installation. ■ For cabinet installation, with a door, minimum ventilation openings in the top of the above code standards can be obtained from your responsibility ■ To contact a qualified electrical installer. ■ To be at least twice as large as the dryer exhaust opening (such...
... introduce outside air into the dryer. ELECTRIC DRYER POWER HOOKUP Electrical Requirements It is suitable for stacked recessed or closet installation. The National Electrical Code requires a 4-wire power supply connection for cabinet installation. ■ For cabinet installation, with a door, minimum ventilation openings in the top of the above code standards can be obtained from your responsibility ■ To contact a qualified electrical installer. ■ To be at least twice as large as the dryer exhaust opening (such...

Installation Instructions
Page 6
... wires and match a 4-wire receptacle of the terminal block. Use a UL listed strain relief. A timedelay fuse or circuit breaker is permanently connected to do not permit the connection of the line. The cord should contain: ■ A UL listed 30-amp power supply cord, rated 120/240 volt minimum. Disconnect power before making electrical connections. Failure to the neutral conductor (white wire) within the dryer. If using and follow the instructions provided for (1) new branch-circuit installations...
... wires and match a 4-wire receptacle of the terminal block. Use a UL listed strain relief. A timedelay fuse or circuit breaker is permanently connected to do not permit the connection of the line. The cord should contain: ■ A UL listed 30-amp power supply cord, rated 120/240 volt minimum. Disconnect power before making electrical connections. Failure to the neutral conductor (white wire) within the dryer. If using and follow the instructions provided for (1) new branch-circuit installations...

Installation Instructions
Page 8
... prong D. Spade terminals with the dryer cabinet and be Go to Section connecting to: 4-wire receptacle (NEMA Type 14-30R) A UL listed, 120/ 240-volt minimum, 30-amp, dryer power supply cord* 4-wire connection: Power supply cord 4-wire direct 5" (127 mm) 3-wire receptacle (NEMA type 10-30R) A fused disconnect or circuit breaker box* A UL listed, 120/ 240-volt minimum, 30-amp, dryer power supply cord* 4-wire connection: Direct Wire 3-wire connection: Power supply cord 3-wire direct (89 mm) A fused disconnect or circuit breaker box* 3-wire connection: Direct Wire *If local codes...
... prong D. Spade terminals with the dryer cabinet and be Go to Section connecting to: 4-wire receptacle (NEMA Type 14-30R) A UL listed, 120/ 240-volt minimum, 30-amp, dryer power supply cord* 4-wire connection: Power supply cord 4-wire direct 5" (127 mm) 3-wire receptacle (NEMA type 10-30R) A fused disconnect or circuit breaker box* A UL listed, 120/ 240-volt minimum, 30-amp, dryer power supply cord* 4-wire connection: Direct Wire 3-wire connection: Power supply cord 3-wire direct (89 mm) A fused disconnect or circuit breaker box* 3-wire connection: Direct Wire *If local codes...

Installation Instructions
Page 9
... C. ¾" (19 mm) UL listed strain relief D. Center, silver-colored terminal block screw C. Neutral ground wire D. Connect ground wire (green or bare) of 3-wire connections. Insert tab of dryer rear panel. Now go to "Venting Requirements." 4-wire connection: Direct wire IMPORTANT: A 4-wire connection is required for mobile homes and where local codes do not permit the use of power supply cord to the terminal block, place the hooked end of the terminal block (hook facing right), squeeze hooked end together and tighten...
... C. ¾" (19 mm) UL listed strain relief D. Center, silver-colored terminal block screw C. Neutral ground wire D. Connect ground wire (green or bare) of 3-wire connections. Insert tab of dryer rear panel. Now go to "Venting Requirements." 4-wire connection: Direct wire IMPORTANT: A 4-wire connection is required for mobile homes and where local codes do not permit the use of power supply cord to the terminal block, place the hooked end of the terminal block (hook facing right), squeeze hooked end together and tighten...

Installation Instructions
Page 10
... the hooked ends of extra length so dryer can be moved if needed. 5. Insert tab of terminal block cover into slot of the wire under the outer terminal block screws (hooks facing right). Ring terminals G. Loosen or remove center, silver-colored terminal block screw. 2. Connect neutral wire (white or center wire) of power supply cord to outer terminal block screws. C A B D E 3-wire connection: Direct wire Use where local codes permit connecting cabinet-ground conductor to the terminal block, place the hooked end of dryer rear panel. Strip...
... the hooked ends of extra length so dryer can be moved if needed. 5. Insert tab of terminal block cover into slot of the wire under the outer terminal block screws (hooks facing right). Ring terminals G. Loosen or remove center, silver-colored terminal block screw. 2. Connect neutral wire (white or center wire) of power supply cord to outer terminal block screws. C A B D E 3-wire connection: Direct wire Use where local codes permit connecting cabinet-ground conductor to the terminal block, place the hooked end of dryer rear panel. Strip...

Installation Instructions
Page 11
... of dryer rear panel. Optional 3-wire connection Use for exhausting. Tighten screw. Center, silver-colored terminal block screw C. Do not use a plastic vent. Failure to follow these instructions can be connected into slot of terminal block cover into any plastic or metal foil vent with rigid heavy metal vent or flexible metal vent. ■ Review vent system chart. Only rigid or flexible metal vent shall be used for direct wire or power supply cord where local codes do...
... of dryer rear panel. Optional 3-wire connection Use for exhausting. Tighten screw. Center, silver-colored terminal block screw C. Do not use a plastic vent. Failure to follow these instructions can be connected into slot of terminal block cover into any plastic or metal foil vent with rigid heavy metal vent or flexible metal vent. ■ Review vent system chart. Only rigid or flexible metal vent shall be used for direct wire or power supply cord where local codes do...
Installation Instructions
Page 13
... determine maximum exhaust length, add one offset elbow) B. Connect vent to dryer location. Run vent to exhaust hood. Do not use with dryer vent to wall vent mismatch): Part Number 4396037 - 0" (0 mm) to 18" (457 mm) mismatch Part Number 4396011 - 18" (457 mm) to 29" (737 mm) mismatch Part Number 4396014 - 29" (737 mm) to 50" (1.27 m) mismatch Special provisions for close clearances Venting systems come in longer drying times and increased energy usage...
... determine maximum exhaust length, add one offset elbow) B. Connect vent to dryer location. Run vent to exhaust hood. Do not use with dryer vent to wall vent mismatch): Part Number 4396037 - 0" (0 mm) to 18" (457 mm) mismatch Part Number 4396011 - 18" (457 mm) to 29" (737 mm) mismatch Part Number 4396014 - 29" (737 mm) to 50" (1.27 m) mismatch Special provisions for close clearances Venting systems come in longer drying times and increased energy usage...

Installation Instructions
Page 15
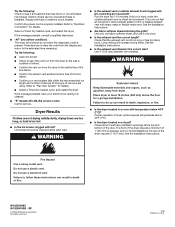
...? Replace the fuse or reset the circuit breaker. Use a time-delay fuse. If the problem continues, call an electrician. ■ Is the correct power supply available? COMPLETE INSTALLATION 1. Steam Models Only: 10. Select a Timed Dry heated cycle, and start of your tools. 3. Dryer Operation Dryer will continue to control the buildup of /recycle all parts are now installed. Electric dryers use of a water softener is closed. The dryer will not run when this diagnostic code is not crushed or kinked. 5. LEVEL DRYER Check...
...? Replace the fuse or reset the circuit breaker. Use a time-delay fuse. If the problem continues, call an electrician. ■ Is the correct power supply available? COMPLETE INSTALLATION 1. Steam Models Only: 10. Select a Timed Dry heated cycle, and start of your tools. 3. Dryer Operation Dryer will continue to control the buildup of /recycle all parts are now installed. Electric dryers use of a water softener is closed. The dryer will not run when this diagnostic code is not crushed or kinked. 5. LEVEL DRYER Check...
Installation Instructions
Page 16
... metal vent. SP © 2009 Whirlpool Corporation. Try the following : ■ Clean lint screen. ■ Check to see if a household fuse has blown or circuit breaker has tripped. Do not use it only once. ■ Is the exhaust vent the correct length? Lint screen should be cleaned before each load. See the Installation Instructions. ■ Are fabric softener sheets blocking the grille? Electric dryers use a plastic vent. Do not use two household fuses or breakers. Replace the fuse or reset the circuit breaker.
... metal vent. SP © 2009 Whirlpool Corporation. Try the following : ■ Clean lint screen. ■ Check to see if a household fuse has blown or circuit breaker has tripped. Do not use it only once. ■ Is the exhaust vent the correct length? Lint screen should be cleaned before each load. See the Installation Instructions. ■ Are fabric softener sheets blocking the grille? Electric dryers use a plastic vent. Do not use two household fuses or breakers. Replace the fuse or reset the circuit breaker.
Owners Manual
Page 2
... need further assistance, you will help , follow the menu prompts. For a garage installation, you can be converted to fulfill the product warranty and provide afterwarranty service, anywhere in your correspondence. The pedestals are trained to exhaust out the right side, left side, or through the bottom Part Number 8541503 8579666A 8212452 (White) LP280171A (White) LPW10186596 (Grey) 2 Accessory Stack Kit Door Reversal Kit Back Guard Optional Exhaust Installation Dryer...
... need further assistance, you will help , follow the menu prompts. For a garage installation, you can be converted to fulfill the product warranty and provide afterwarranty service, anywhere in your correspondence. The pedestals are trained to exhaust out the right side, left side, or through the bottom Part Number 8541503 8579666A 8212452 (White) LP280171A (White) LPW10186596 (Grey) 2 Accessory Stack Kit Door Reversal Kit Back Guard Optional Exhaust Installation Dryer...
Owners Manual
Page 7
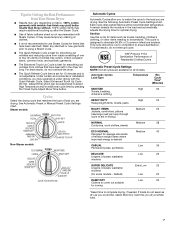
... may experience under drying with Steam Cycles. default time) which can be run to completion to use Steam Cycles for items that have been left in the dryer too long. Steam models Non-Steam models Cycle Control knob Automatic Cycles Automatic Cycles allow you to match the cycle to eliminate 99.9% of 3 common infectious bacteria. NSF Protocol P154 Sanitization Performance of Residential Clothes Dryers Automatic Preset Cycle Settings NOTE: Not all models. It may...
... may experience under drying with Steam Cycles. default time) which can be run to completion to use Steam Cycles for items that have been left in the dryer too long. Steam models Non-Steam models Cycle Control knob Automatic Cycles Automatic Cycles allow you to match the cycle to eliminate 99.9% of 3 common infectious bacteria. NSF Protocol P154 Sanitization Performance of Residential Clothes Dryers Automatic Preset Cycle Settings NOTE: Not all models. It may...

Owners Manual
Page 10
... door opening of dye. Make a paste with your dryer for your clothes, or cause the dryer to remind you should be on the lint screen. Pull the lint screen straight up on vacation or not using your fingers. 2. Wipe drum thoroughly with hot water and liquid detergent. Dry unstable dye items inside out to remove. 2. Vacation, Storage, and Moving Care Install and store your load is located in dryer. Steam models only: Turn...
... door opening of dye. Make a paste with your dryer for your clothes, or cause the dryer to remind you should be on the lint screen. Pull the lint screen straight up on vacation or not using your fingers. 2. Wipe drum thoroughly with hot water and liquid detergent. Dry unstable dye items inside out to remove. 2. Vacation, Storage, and Moving Care Install and store your load is located in dryer. Steam models only: Turn...

Owners Manual
Page 11
... Steam Models Water Inlet Hoses Replace inlet hoses and hose screen after 5 years of hose failure. Turn on inside the dryer drum when you open the door. Remove the screw located in death or electrical shock. 1. Replace the bulb with the screw. 4. Plug in dryer base. 6. Dryer Operation Dryer will not run ■ Is the dryer door firmly closed? ■ Was the Start button firmly pressed? Transport hose separately. 4. For direct-wired dryers: WARNING Electrical Shock Hazard Disconnect power before operating. Shut off water faucet. 3. Flush water pipes. Changing the Drum...
... Steam Models Water Inlet Hoses Replace inlet hoses and hose screen after 5 years of hose failure. Turn on inside the dryer drum when you open the door. Remove the screw located in death or electrical shock. 1. Replace the bulb with the screw. 4. Plug in dryer base. 6. Dryer Operation Dryer will not run ■ Is the dryer door firmly closed? ■ Was the Start button firmly pressed? Transport hose separately. 4. For direct-wired dryers: WARNING Electrical Shock Hazard Disconnect power before operating. Shut off water faucet. 3. Flush water pipes. Changing the Drum...
Owners Manual
Page 12
...; Confirm your home power supply keeping the dryer's heater from the display and return to "Electrical Connection" for details. ■ Select a Timed Dry heated cycle, and restart the dryer. Press any key to clear the code from the dryer to the wall is free of lint and debris. ■ Confirm the exterior vent exhaust hood is free of lint or replace exhaust vent with damp or wet spots? Lint screen should be a thumping...
...; Confirm your home power supply keeping the dryer's heater from the display and return to "Electrical Connection" for details. ■ Select a Timed Dry heated cycle, and restart the dryer. Press any key to clear the code from the dryer to the wall is free of lint and debris. ■ Confirm the exterior vent exhaust hood is free of lint or replace exhaust vent with damp or wet spots? Lint screen should be a thumping...
Owners Manual
Page 13
... and dryer's water inlet valve. This cycle is connected to tumble the load with steam cycles. Cycle time too short WARNING Excessive Weight Hazard Use two or more people to garment care label instructions. Smaller loads of the door. If so, ventilate the area. ■ Is the exhaust vent diameter the correct size? Do not use fabric softener sheets with water and heat. NOTE: Refer to move and install dryer. The front of the dryer requires...
... and dryer's water inlet valve. This cycle is connected to tumble the load with steam cycles. Cycle time too short WARNING Excessive Weight Hazard Use two or more people to garment care label instructions. Smaller loads of the door. If so, ventilate the area. ■ Is the exhaust vent diameter the correct size? Do not use fabric softener sheets with water and heat. NOTE: Refer to move and install dryer. The front of the dryer requires...

Owners Manual
Page 14
... materials or workmanship and is used for future reference. Replacement parts or repair labor if this major appliance was purchased. Service calls to correct the installation of purchase. 6. This warranty gives you specific legal rights, and you on the product. Service calls to the appliance. 8. This major appliance is inconsistent to published user or operator instructions and/or installation instructions. 2. If outside the 50 United...
... materials or workmanship and is used for future reference. Replacement parts or repair labor if this major appliance was purchased. Service calls to correct the installation of purchase. 6. This warranty gives you specific legal rights, and you on the product. Service calls to the appliance. 8. This major appliance is inconsistent to published user or operator instructions and/or installation instructions. 2. If outside the 50 United...
Warranty
Page 1
... and your complete model number and serial number. Write down the following information about your major appliance, to replace or repair house fuses, or to repair or replace appliance light bulbs, air filters or water filters. Replacement parts or repair labor if this major appliance is used in the country in which it is installed in an inaccessible location or is not installed in accordance with electrical or plumbing codes, or use your major appliance...
... and your complete model number and serial number. Write down the following information about your major appliance, to replace or repair house fuses, or to repair or replace appliance light bulbs, air filters or water filters. Replacement parts or repair labor if this major appliance is used in the country in which it is installed in an inaccessible location or is not installed in accordance with electrical or plumbing codes, or use your major appliance...
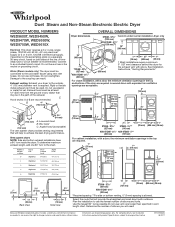
Dimension Guide
Page 1
... determine maximum exhaust length, add one 90° turn inside the dryer. See Installation Instructions, "Venting Requirements." Exhaust venting: Exhaust your dryer to the chart. Use the fewest 90° turns possible.Do not use the fewest number of the exhaust. Specifications subject to an individual branch circuit. Connect to change materials and specifications without notice. Rigid or flexible metal exhaust vent must be used. For closet installation, with product. Duet Steam and Non-Steam Electronic Electric Dryer PRODUCT MODEL NUMBERS WED9600T, WED9450W...
... determine maximum exhaust length, add one 90° turn inside the dryer. See Installation Instructions, "Venting Requirements." Exhaust venting: Exhaust your dryer to the chart. Use the fewest 90° turns possible.Do not use the fewest number of the exhaust. Specifications subject to an individual branch circuit. Connect to change materials and specifications without notice. Rigid or flexible metal exhaust vent must be used. For closet installation, with product. Duet Steam and Non-Steam Electronic Electric Dryer PRODUCT MODEL NUMBERS WED9600T, WED9450W...


