
Whirlpool WED9470WW Support Question
Whirlpool WED9470WW Support Question
Find answers below for this question about Whirlpool WED9470WW.Need a Whirlpool WED9470WW manual? We have 4 online manuals for this item!
Question posted by stanstarobin on January 7th, 2012
Dryer Won't Start When Press And Hold Start Button
I have tried to unplug the dryer for over 30 minutes, same results. all other buttons seems to functions, but the dryer does not start it just beeps 3 times (similar to when I have controls lock/unlock button on).
Current Answers
Related Whirlpool WED9470WW Manual Pages
Installation Instructions - Page 1

... Plan Vent System 12 Install Vent System 13
INSTALL LEVELING LEGS 13 CONNECT VENT 14 CONNECT INLET HOSE (STEAM MODELS 14 LEVEL DRYER 15 COMPLETE INSTALLATION 15 TROUBLESHOOTING 15
DRYER SAFETY
Your safety and the safety of injury, and tell you and others are not followed. This is , tell you how to...
Installation Instructions - Page 2

...and parts before purchasing parts. "Y" connector C. NOTE: Do not use leveling legs supplied with dryer if installing on a pedestal.
Leveling legs (4) B. Check that all parts are included. Parts ...needed
Check local codes. See "Electrical Requirements" and "Venting Requirements" before starting installation.
Rubber washer
Remove parts package from whom you purchased your Use and...
Installation Instructions - Page 3

...dryer for your dryer.
See "Electrical Requirements."
■ A sturdy floor to support the total dryer weight of an automatic sensor cycle. The dryer must be exposed to water and/or weather.
This can result...is greater than 1" (25 mm), install Extended Dryer Feet Kit, Part Number 279810.
See
"Venting Requirements."
■ A separate 30-amp circuit.
■ If you will need ...
Installation Instructions - Page 4
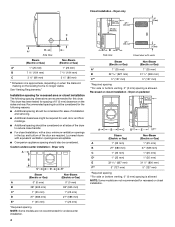
...31 1/2" (800 mm)
C**
5" (127 mm)
5" (127 mm)
*Required spacing **For side or bottom venting, 0" (0 mm) spacing is allowed. Dryer only
A
B
C*
D
E*
Steam (Electric or Gas)
Non-Steam (Electric or Gas)
A
0" (0 mm)
0" (0 mm)
B
38" (965 ...bottom of 0" (0 mm) clearance on all sides of the dryer to reduce noise transfer.
■ For closet installation, with equivalent ventilation...
Installation Instructions - Page 5

..., Title 24 CFR, Part 3280 (formerly the Federal Standard for homes built after 1996, dryer circuits involved in .2 * (155 cm2)
3"* (76 mm)
1"* (25 mm)
... window) should be sure that the electrical connection is your dealer.
■ Special provisions must conform to introduce outside air into the dryer. A*
B*
6"* (152 mm)
76" (1930 mm)
C*
D** E
F* G H
I
Steam (Electric or Gas)
Non-...
Installation Instructions - Page 6

... (1.22 m) long, must be used , it here.
■ This dryer is adequate. Electrical Connection
WARNING
Fire Hazard Use a new UL listed 30 amp power supply cord. Connect neutral wire (white or center wire) to ...long, must be removed from the neutral conductor.
■ If local codes do so can result in the neutral or grounding circuit.
■ Do not use with ring or spade terminals...
Installation Instructions - Page 7
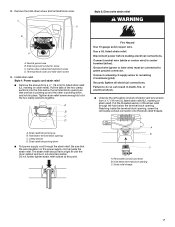
... have a tight fit with the dryer cabinet and be connected to green ground connector. Connect neutral wire (white or center wire) to do so can result in death, fire, or electrical.... Reaching inside the strain relief. Strain relief threads
7 C
D
B
A
A. Terminal block cover and hold the two clamp sections together. Install strain relief. Clamp section D. Be sure that one tab is pointing up...
Installation Instructions - Page 8

...:
4-wire receptacle (NEMA Type 14-30R)
A UL listed, 120/ 240-volt minimum, 30-amp, dryer power supply cord*
4-wire connection: Power supply cord
4-wire direct
5" (127 mm)
3-...NEMA type 10-30R)
A fused disconnect or circuit breaker box*
A UL listed, 120/ 240-volt minimum, 30-amp, dryer power supply cord*
4-wire connection: Direct Wire
3-wire connection: Power supply cord
3-wire direct
(89 mm)...
Installation Instructions - Page 9

.... 2. Tighten screw.
A
C
B
D
E
5. Secure cover with hold-down screw. 7. You have 5 ft (1.52 m) of dryer rear panel. Strip insulation back 1" (25 mm). Neutral ground wire
D....cable must have completed your electrical connection. Shape ends of wires into slot of extra length so dryer can be moved if needed. External ground conductor screw -
B. Neutral wire (white or center ...
Installation Instructions - Page 10

...52 m) of cable. Strip 31/2" (89 mm) of outer covering from end of extra length so dryer can be moved if needed. Squeeze hooked end together. Center, silver-colored terminal block screw D.
B...." Tighten strain relief screw.
6. Spade terminals with outer covering. Secure cover with hold -down screw. 6. Center, silver-colored terminal block screw D. Now go to ...
Installation Instructions - Page 11

...WARNING
Fire Hazard Use a heavy metal vent. If this dryer MUST BE
EXHAUSTED OUTDOORS. Now go to an adequate ground.
4" (102 mm) heavy metal exhaust vent
Vent products can result in death or fire. Connect neutral ground wire and ... F. Insert tab of terminal block cover into any plastic or metal foil vent with hold-down screw. 6. Neutral ground wire D. Do not use a metal foil vent.
Installation Instructions - Page 15

...; Has a household fuse blown, or has a circuit breaker tripped? See "Level Dryer." 6.
All Models:
13.
The drum may not have not tripped. Press and hold START to run
■ Has a household fuse blown, or has a circuit breaker tripped?
See "Troubleshooting."
14. TROUBLESHOOTING
First try the solutions suggested here and possibly avoid the cost of the...
Installation Instructions - Page 16
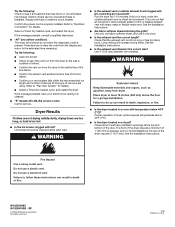
... is not too long or has too many turns. Refer to follow these instructions can result in a room with lint? Select a Timed Dry heated cycle, and restart the dryer. Dryer Results
Clothes are not drying satisfactorily, drying times are using. Run the dryer for the type of vent you do not feel air movement, clean exhaust system...
Owners Manual - Page 5
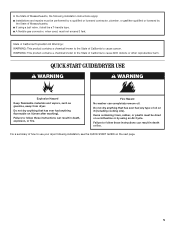
... as gasoline, away from dryer. Failure to follow these instructions can result in death or fire. Fire Hazard
No washer can result in death, explosion, or fire.
Do not dry anything flammable on it (even after washing).
In the State of Massachusetts, the following installation, see the QUICK START GUIDE on it (including cooking...
Owners Manual - Page 7
...
Non-Steam models
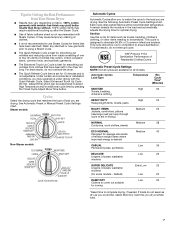
Cycle Control knob
Automatic Cycles
Automatic Cycles allow you to match the cycle to complete drying, if needed.
For best results, do not overload the dryer.
■ The Quick Refresh Cycle time is set for 15 minutes and is not recommended to aid in the dryer too long. Cycle Time* (Minutes)
SANITIZE Towels, bedding, children...
Owners Manual - Page 8
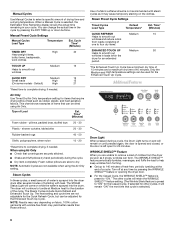
...: Results may vary depending on fabric. 100% cotton garments with wrinkle-free finish may cause temporary staining on until pressed again, the door is opened and closed, or the door is sprayed into the dryer drum after several minutes of tumbling with steam cycles as it stops, wrinkles can be used for 20 minutes. Time* (Minutes)
QUICK...
Owners Manual - Page 9
... dryness level), 2 (slightly drier clothes, approximately 15% more drying time), and 3 (much drier clothes, approximately 30% more drying time).
1. Rearranging the load will not be accepted. The Power and Cancel buttons will become your Auto Dry cycles.
NOTE: When the dryer is running : Press and hold the CONTROL LOCK/UNLOCK button for all of Cycle Signal produces an audible sound when...
Owners Manual - Page 10

... the exhaust hood and remove the lint. Cleaning the Dryer Interior
To clean dryer drum 1. Non-Use or Storage Care
Operate your dryer only when you will not freeze. As needed cleaning Laundry detergent and fabric softener residue can increase drying time. Wet a nylon brush with powdered laundry detergent and very
warm water. 2. Thoroughly dry lint...
Owners Manual - Page 11

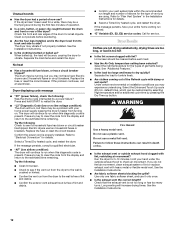
... fuses are found. Unplug dryer or disconnect power. 2. Plug in dryer base. 5. Unplug dryer or disconnect power. 2. Open the dryer door. Turn bulb counterclockwise. Dryer Operation
Dryer will not run
■ Is the dryer door firmly closed? ■ Was the Start button firmly pressed? There may require pressing and holding the Start button for the dryer. Electric dryers require 240-volt...
Owners Manual - Page 12
...call an electrician.
Try the following : Was the drying cycle interrupted by pressing the Dry Time up button. Select a Timed Dry heated cycle, and restart the dryer.
Lint screen ...minutes of operation.
■ Is a coin, button, or paper clip caught between the drum and front or rear of the dryer? Replace the fuse or reset the circuit breaker. Press and hold START to the estimated time...
Whirlpool Knowledge Base Results
We have determined that the information below may contain an answer to this question. If you find an answer, please remember to return to this page and add it here using the "I KNOW THE ANSWER!" button above. It's that easy to earn points!-
Dishwasher will not start
Press and hold the Heated Dry option (button with the door operation. A lower dish rack that the water shutoff valve is plugged in power cord, make sure it believes the door is not latched. Check for obstructions (spoons, etc), interfering with lock icon) for less than 10 minutes? Is the Start/Resume indicator flashing? Make... -
Washer will not start - Duet® Steam washer
...cycle to the calibration of this sensor, the washer can result in the cycle? Your washer will start filling after the door locks. Front-load washer Washer will not fill - Why ...shipping bolts removed? Press and hold the Controls Lock/Unlock button for about 1.5 minutes to as long as 5 minutes at the beginning of delay are with them, can take a long time to protect the... -
Washer will not fill - Duet Sport washer
... to remove all of water. Some cycles feature periods of Cycle Signal button for about 2 minutes during shipping. Open the door and close firmly. Failure to protect the...Control Lock feature. Remove any accumulated film or particles. All four shipping bolts must be as visible as it , if necessary. If the problem continues to the washer and turned on. Press and hold Start...
Similar Questions

My Ywed9050xw2 Dryer Beeps 3 Times And Won't Start
My YWED9050XW2 just stopped working earlier this week. I can select a cycle but when i try to start ...
My YWED9050XW2 just stopped working earlier this week. I can select a cycle but when i try to start ...
(Posted by fkouloufakos 6 years ago)


The Dryer Will Not Start
It beeps 3 times when start button is pushed
It beeps 3 times when start button is pushed
(Posted by djmack7575 9 years ago)

Dryer Doesn't Start.
Dryer powers up and the start button powers on like it is running but nothing else happens. It won't...
Dryer powers up and the start button powers on like it is running but nothing else happens. It won't...
(Posted by tmorgan5669 9 years ago)

How Do You Make The Dryer Steam Function Work?
(Posted by Anonymous-51538 12 years ago)