Whirlpool WED9050XW Support Question
Whirlpool WED9050XW Support Question
Find answers below for this question about Whirlpool WED9050XW.Need a Whirlpool WED9050XW manual? We have 4 online manuals for this item!
Question posted by fkouloufakos on October 11th, 2017
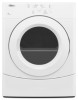
My Ywed9050xw2 Dryer Beeps 3 Times And Won't Start
My YWED9050XW2 just stopped working earlier this week. I can select a cycle but when i try to start i get three quick beeps and nothing else happens. I have changed the thermal fuse and that didn't fix the problem. If you have any suggestions as to what causes this and a remedy I'd greatly appreciate it.Thank youFrank
Current Answers
Answer #1: Posted by Odin on October 12th, 2017 5:27 AM
Odin

Member since:
April 10th, 2010 Points: 41,236,690

Member since:
April 10th, 2010 Points: 41,236,690
Hope this is useful. Please don't forget to click the Accept This Answer button if you do accept it. My aim is to provide reliable helpful answers, not just a lot of them. See https://www.helpowl.com/profile/Odin.
Related Whirlpool WED9050XW Manual Pages
Dimension Guide - Page 1
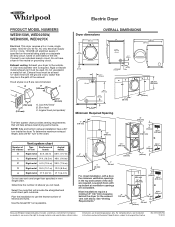
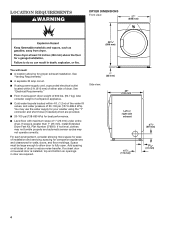
...76" (1930 mm)
48 in vent length chart.
Plan the installation to change materials and specifications without notice. Louvered doors with a door, the minimum ...the dryer. Select the route that may be used.
Specifications subject to use...dryer for planning purposes only. Exhaust venting: Exhaust your dryer to an individual branch circuit. NOTE: Side and bottom exhaust installation have a fuse...
Installation Instructions - Page 2
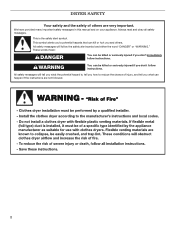
WARNING
You can happen if the instructions are very important. Always read and obey all safety messages. This symbol alerts you to reduce the chance of others . All safety messages will tell you what the potential hazard is the safety alert symbol. DRYER SAFETY
Your safety and the safety of injury, and tell...
Installation Instructions - Page 3
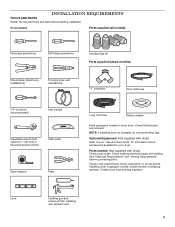
... accessories available for installing new exhaust vent)
3 Tools needed : (Not supplied with dryer) Refer to 1" (25 mm) or hex-head socket wrench
Utility knife
Tape measure...mobile homes, or sleeping quarters. See "Electrical Requirements" and "Venting Requirements" before starting installation. Level
Caulking gun and compound (for your local building inspector. INSTALLATION REQUIREMENTS
...
Installation Instructions - Page 4
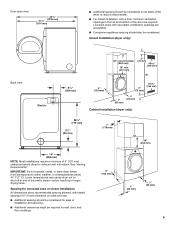
..., a grounded electrical outlet located within 4 ft. (1.2 m) of the water fill valves, and water pressure of dryer to fully open. Side view:
1" (25 mm)
29" (736 mm)
Left or right side
exhaust
6 ...not tumble properly and automatic sensor cycles may use the water supply for best performance.
■■ Level floor with maximum slope of dryer. spacing for companion appliances and ...
Installation Instructions - Page 5
.../4"
(159 mm)
4" (102 mm)
3" (76 mm)
24 in longer drying times.
IMPORTANT: Do not operate, install, or store dryer where it will be exposed to water, weather, or at end of automatic sensor cycles, resulting in .2 (155 cm2)
1" (25 mm)
1" (25 mm)
Cabinet installation (dryer only):
281/8"
(715 mm)
31/2"
(89 mm)
7" (178 mm...
Installation Instructions - Page 6
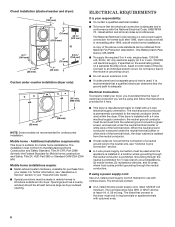
...;■ If local codes do not permit the connection of a neutral ground wire to the neutral conductor (white wire) within the dryer.
Do not have a fuse in mobile homes to the dryer must conform to an individual branch circuit. The wires that the electrical connection is your dealer. Closet Installation (stacked washer and...
Installation Instructions - Page 7
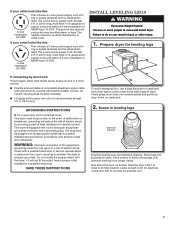
... risk of NEMA Type 10-30R. GROUNDING INSTRUCTIONS
� For a grounded, cord-connected dryer: This dryer must be either green or bare. In the event of malfunction or breakdown, grounding will ...may be grounded. The 3-wire power supply cord, at least 5 ft. (1.52 m) long. Prepare dryer for electrical connection and to its feet. grounding conductor can result in a risk of NEMA Type 14-...
Installation Instructions - Page 8

...up (A) and the other is pointing down screw and terminal block cover. Before you start, disconnect power. Power Supply Cord Connection
Power supply cord strain relief:
1.
Remove hold...clamp sections (C) together.
8 Electrical Connection
Power Supply Cord
2. Tighten strain relief screws just enough to Power Supply Cord Connection.
Power supply cord 3-wire receptacle (NEMA Type 10...
Installation Instructions - Page 9
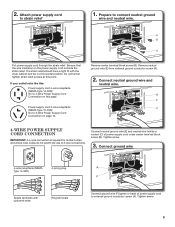
...-30R): Go to connect neutral ground wire and neutral wire. Connect ground wire
4-wire receptacle (NEMA type 14-30R)
4-prong plug
Spade terminals with the dryer cabinet and be in a horizontal position. Tighten screw.
9
Installation Instructions - Page 10
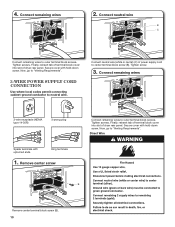
... terminal block screws. 4. Tighten screws. Now, go to outer terminal block screws. Connect neutral wire (white or center) (C) of dryer rear panel. Finally, reinsert tab of terminal block cover into slot of dryer rear panel. Tighten screw.
3. Direct Wire
B
Remove center terminal block screw (B). 10 Connect neutral wire
B C
Connect remaining wires to...
Installation Instructions - Page 11
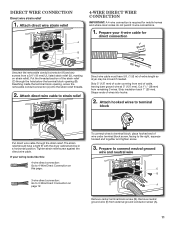
...connection is required for direct connection
(251"mm)
(127
5" mm)
Direct wire cable must have a tight fit with the dryer cabinet and be moved if needed. Strip 5" (127 mm) of outer covering from a 3/4" (19 mm) UL listed ... facing to terminal block, place hooked end of extra length so dryer may be in a horizontal position.
Cut 11/2" (38 mm) from external ground conductor screw (A).
11
Installation Instructions - Page 12

... screw.
5. Strip 31/2" (89 mm) of outer covering from end of extra length so dryer may be moved if needed. Strip insulation back 1" (25 mm). If using 3-wire cable ... of wire under outer terminal block screws (hooks facing right). Remove center screw
B
Place hooked ends of dryer rear panel. Squeeze hooked ends together and tighten screws. Now, go to neutral wire.
1.
Secure cover ...
Installation Instructions - Page 13
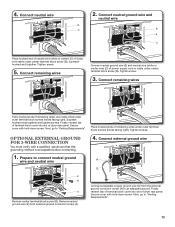
...center terminal block screw (B). Squeeze hooked end together. Connect remaining wires
Place hooked ends of dryer rear panel. 4. Connect neutral wire
2. Secure cover with a qualified electrician that this grounding ...Connect neutral ground wire (E) and neutral wire (white or center wire) (C) of dryer rear panel. Finally, reinsert tab of terminal block cover into slot of power supply ...
Installation Instructions - Page 16
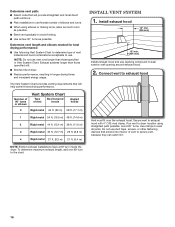
...to secure vent, because they can catch lint.
16 Install Vent System
1. Run vent to dryer location using elbows or making turns, allow as much room as possible.
■■ ... than those specified in longer drying times and increased energy usage.
Determine vent path: ■■ Select route that will :
■■ Shorten life of dryer.
■■ Reduce performance, ...
Installation Instructions - Page 19

... level, make sure all packaging materials. Be sure vent is first used.
Over time, the buildup of its first cycle. q Select a Time Dry heated cycle, and start of lime scale may notice an odor when dryer is level.
q Check for troubleshooting information.
19 q Wipe dryer drum interior thoroughly with a damp cloth to order. This odor is common when...
Owners Manual - Page 4
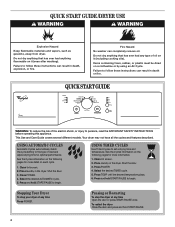
... the desired AUTOMATIC cycle. 5. USING TIMED CYCLES
Use Timed Cycles to persons, read the IMPORTANT SAFETY INSTRUCTIONS before operating this appliance. Clean lint screen. 2. Shut the door. 3. Select the desired TIMED cycle. 5. Press and hold START/PAUSE
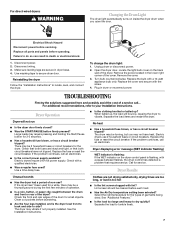
4 Stopping Your Dryer
To stop the dryer at any time Open the door or press START/PAUSE once. To restart the dryer Close the door and...
Owners Manual - Page 5
... any time before pressing START/PAUSE.
■ Three short tones sound if an unavailable combination is lit.
5 Changing Cycles and Settings
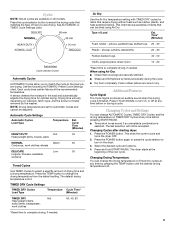
You can change the drying temperature from the default setting. Cycle Time (Minutes)
HEAVY DUTY
Hot
45
Heavyweight items, towels, jeans
NORMAL
Warm
35
Corduroys, work clothes
60, 40, 20
*Reset time to complete drying, if needed . Select the...
Owners Manual - Page 6
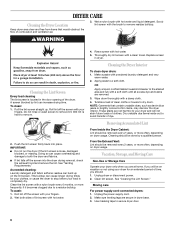
...soft cloth until all excess dye and stains are not harmful to stop before your dryer and will not stain future loads of time, you will be done by lint can build up . OR ..., or more often, depending on dryer usage. Moving care
For power supply cord-connected dryers: 1. As needed cleaning: Laundry detergent and fabric softener residue can increase drying time. Do not rinse or wash screen...
Owners Manual - Page 7
... Hazard Disconnect power before each load.
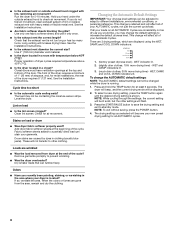
■ Has the Air Dry temperature setting been selected? Reinstalling the dryer
Follow the "Installation Instructions" to your Installation Instructions. Open the dryer door. Replace the fuse or reset the circuit breaker. Use a time-delay fuse.
■ Is the clothing knotted or balled up , the load will not run
■...
Owners Manual - Page 8
...?
These will flash. 3.
To change will be adjusted to adapt to a partially dried load can tumble freely. The drying setting you do not feel air movement, clean exhaust system of the door. If you selected will increase drying times. Long venting will become your AUTOMATIC cycles, not just the current cycle/load. Check for 5-10 minutes...
Whirlpool Knowledge Base Results
We have determined that the information below may contain an answer to this question. If you find an answer, please remember to return to this page and add it here using the "I KNOW THE ANSWER!" button above. It's that easy to earn points!-
How do I bake and roast using my gas range?
...suggested when baking foods with convection, and how do I expected Not cooked or brown on the bottom What is reset before putting food in unless recommended in the recipe. The preheat conditioning time will not change... for the oven preheat conditioning time to the cycling of the elements. Press Start or Start/Enter (depending on my electric range? The start pad is not necessary to ... -
My gas oven cooking results are not what I expected
...around bakeware? Adjust cooking time. Move rack to be warmer by varying factors such as yeast, baking powder, baking soda and eggs. however, it may cause burner cycling to measure oven temperature because... will not change if the temperature is greater than 350°F (175°C) in the pan. Make sure batter is in the oven. When roasting, it work? The Start pad does ... -
How do I cook foods manually using my microwave oven?
... To change Cook Power: Touch Cook Power repeatedly to clear the display and/or stop reminder ...change Cook Time: Touch Cook Time. How do I use it? For Manual Cooking: The cook time and power may be changed after touching Start without interrupting cooking. Place food on my gas range? then enter a length of -cycle tones will freeze for a few seconds for the countdown to select...
Similar Questions

Whirlpool Dryer Does Not Turn On Model Wed9050xw1
(Posted by appDJMars 9 years ago)


My Gas Dryer Model 1cwgd5200vq1 Doesn't Heat Changed Thermal Fuse Still Same Pro
(Posted by rquintana2 11 years ago)

Whirlpool Dryer Wed5200vq Stopped Working
Dryer stopped working. Was working fine. I opened the door, took a shirt out, shut the door and it w...
Dryer stopped working. Was working fine. I opened the door, took a shirt out, shut the door and it w...
(Posted by lascarth 11 years ago)
Dryer Just Stopped Working.. No Light Or Power..
Dryer was working fine.. Then went to go out another load of clothes to dry and no light or power...
Dryer was working fine.. Then went to go out another load of clothes to dry and no light or power...
(Posted by Jmontoya1201 12 years ago)