Whirlpool WED9050XW Support Question
Whirlpool WED9050XW Support Question
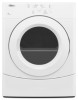
Find answers below for this question about Whirlpool WED9050XW.Need a Whirlpool WED9050XW manual? We have 4 online manuals for this item!
Question posted by Jmontoya1201 on April 26th, 2012
Dryer Just Stopped Working.. No Light Or Power..
Dryer was working fine.. Then went to go out another load of clothes to dry and no light or power...
Current Answers
Related Whirlpool WED9050XW Manual Pages
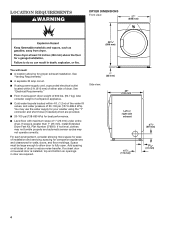
Dimension Guide - Page 1
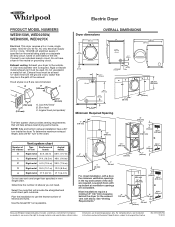
...; turn to change without notice.
To determine maximum exhaust length, add one 90° turn inside the dryer.
OVERALL DIMENSIONS
Dryer dimensions
27" (686 mm)
29" (736 mm)
481/8" (1238 mm) 471/8" (1197 mm)... 12" (305 mm) from the ground or any object that will help achieve best drying performance.
Rigid or flexible metal exhaust vent must be in .2 (310 cm2)
Number of...
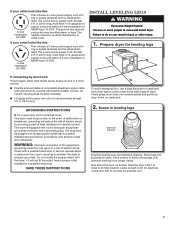
Installation Instructions - Page 2
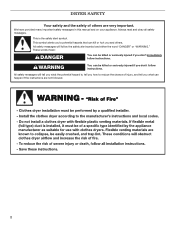
DRYER SAFETY
Your safety and the safety of injury, and tell you what the potential hazard is the safety alert symbol.
All safety messages will tell ...
Installation Instructions - Page 3
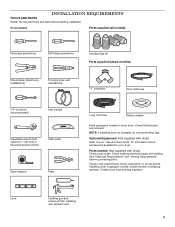
... vent installations)
"Y" connector
Short inlet hose
1/4" nut driver (recommended)
Vent clamps
Adjustable wrench that opens to your local building inspector.
Tools needed : (Not supplied with dryer) Refer to 1" (25 mm) or hex-head socket wrench
Utility knife
Tape measure
Pliers
Long inlet hose
Rubber washer
Parts package is located in garages...
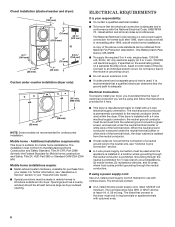
Installation Instructions - Page 4
...Level floor with maximum slope of 200 lbs. (90.7 kg). Add spacing on all sides of dryer. See "Venting Requirements."
■■ A separate 30 amp circuit.
■■ If using... doors, and floor moldings. If not level, clothes may not tumble properly and automatic sensor cycles may use the water supply for your washer using power supply cord, a grounded electrical outlet located within 4...
Installation Instructions - Page 5
...closet installation All dimensions show recommended spacing allowed, with a door, minimum ventilation openings in longer drying times. Closet installation (dryer only):
34" recommended (864 mm)
18" min. (457 mm)
3" (76 mm... (102 mm)
3" (76 mm)
24 in.2 (155 cm2)
1" (25 mm)
1" (25 mm)
Cabinet installation (dryer only):
281/8"
(715 mm)
31/2"
(89 mm)
7" (178 mm)
18" (460 mm)
14" (358 mm)
...
Installation Instructions - Page 6
...with a 3-wire electrical supply connection.
Openings (such as dryer exhaust opening. latest edition and all mobile home installations. The National Electrical Code requires a 4-wire power supply connection for homes built after 1996, and all ....
6 The installation must end in remodeling after 1996, dryer circuits involved in ring terminals or spade terminals with clothes dryers.
Installation Instructions - Page 7
... armored cable or nonmetallic sheathed copper cable (with ground wire), covered with the dryer: if it is close to move and install dryer. Slide the dryer until diamond marking is properly installed and grounded in back or other injury.
1. The 4-wire power supply cord, at least 5 ft. (1.52 m) long. All current-carrying wires must...
Installation Instructions - Page 8

Tighten strain relief screws just enough to "Optional 3-wire connection." Power supply cord 3-wire receptacle (NEMA Type 10-30R): Go to Power Supply Cord Connection.
4-wire direct connection: Go to Direct Wire Connection.
3-wire direct connection: Go to Power Supply Cord Connection. Remove terminal block cover
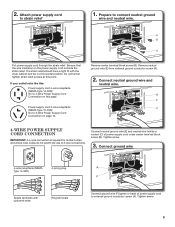
Electrical Connection Options
1. NOTE: If local codes do not...
Installation Instructions - Page 9
... strain relief screws at this page. Tighten screw.
3. If your outlet looks like this:
Power supply cord 4-wire receptacle (NEMA Type 14-30R): Go to external ground conductor screw (A).
... terminals with the dryer cabinet and be in a horizontal position.
Connect neutral ground wire (E) and neutral wire (white or center) (C) of power supply cord to 4-Wire Power Supply Cord Connection ...
Installation Instructions - Page 10
...neutral wire (white or center) (C) of dryer rear panel. Now, go to "Venting Requirements".
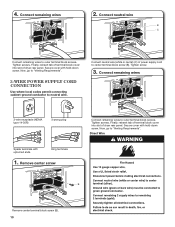
3-wire Power Supply Cord Connection
Use where local codes permit ...with hold -down screw. Tighten screw.
3. Finally, reinsert tab of terminal block cover into slot of dryer rear panel. Connect remaining wires
2. Connect neutral wire
B C
Connect remaining wires to outer terminal block ...
Installation Instructions - Page 11
...
(251"mm)
(127
5" mm)
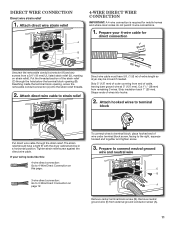
Direct wire cable must have a tight fit with the dryer cabinet and be moved if needed. To connect wires to terminal block, place hooked end of wires...cable. Remove neutral ground wire (E) from remaining 3 wires. Strip 5" (127 mm) of extra length so dryer may be in a horizontal position. The strain relief should have 5 ft. (1.52 m) of outer covering from...
Installation Instructions - Page 13
... and neutral wire
4. Finally, reinsert tab of terminal block cover into slot of power supply cord or cable under outer terminal block screws (hooks facing right). Connect remaining...
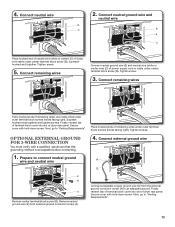
Connect neutral ground wire (E) and neutral wire (white or center wire) (C) of dryer rear panel. Place hooked ends of dryer rear panel. Connect external ground wire
A
G
E B
A
Remove center terminal block...
Installation Instructions - Page 16
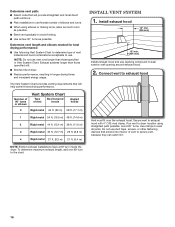
... caulking compound to exhaust hood
Vent must fit over the exhaust hood. Install Vent System
1. Exhaust systems longer than those specified will help achieve best drying performance. Run vent to dryer location using elbows or making turns, allow as much room as possible.
■■ Bend vent gradually to determine type of...
Installation Instructions - Page 19

... interior thoroughly with a damp cloth to
remove any tape remaining on your "Use and Care Guide". Excessive scale buildup may notice an odor when dryer is available to see what was skipped. Do not select Air Only Temperature setting. q Select a Time Dry heated cycle, and start of your "Use and Care Guide". This...
Owners Manual - Page 3

...with local codes, or in the absence of local codes, with the National Fuel Gas Code, ANSI Z223.1/NFPA 54. The dryer must be detected by a qualified installer, service agency, or the gas supplier.
WARNING: Gas leaks cannot always be performed by... UL or CSA.
WHAT TO DO IF YOU SMELL GAS:
• Do not try to light any appliance. • Do not touch any phone in your gas supplier.
Owners Manual - Page 4
... screen. 2. Place laundry in the dryer. Place laundry in the dryer.
Press and hold START/PAUSE
4
Do not dry anything that has ever had anything that has ever had any type of fire electric shock, or injury to set a drying time and temperature.
Pausing or Restarting
To stop your dryer at any time
Press POWER.
Your dryer may not have...
Owners Manual - Page 5
...
35
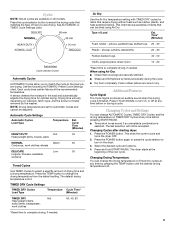
Corduroys, work clothes
60, 40, 20
*Reset time to complete drying, if needed .
Air Dry
Use the Air Dry temperature setting with TIMED DRY cycles for optimal drying. Type of load you are drying. When using Air Dry. The last selection will vary depending on Timed Dry cycles at any time by the washer. Changing Cycles after starting dryer: 1. Cycles
NOTE...
Owners Manual - Page 6
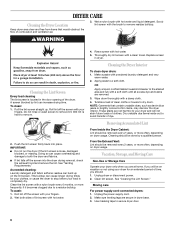
... lint screen. Moving care
For power supply cord-connected dryers: 1. Make sure leveling legs are at home. Scrub lint screen with powdered laundry detergent and very
warm water. 2. IMPORTANT: ■ Do not run the dryer if the lint screen is hard to stop before your
fingers. Cleaning the Dryer Interior
To clean dryer drum: 1. Make a paste with...
Owners Manual - Page 7
... breaker tripped? Reinstalling the dryer
Follow the "Installation Instructions" to tumble freely.
7
Locate the light bulb cover on the back...dryer? Disconnect power. 2. Clothes are not drying satisfactorily, drying times are intact and tight, or that requires service. Select the right temperature for service. Replace all parts and panels before each load.
■ Has the Air Dry...
Owners Manual - Page 8
...dryer. Check for 5-10 minutes. Loads are wrinkled
■ Was the load removed from the area, rewash and dry the clothing. If all your loads on all AUTOMATIC cycles.
8 NOTE: To exit without saving, press the POWER...you may not be changed while the dryer is retained and will become your AUTOMATIC cycles, not just the current cycle/load. Closet doors must have ventilation openings ...
Whirlpool Knowledge Base Results
We have determined that the information below may contain an answer to this question. If you find an answer, please remember to return to this page and add it here using the "I KNOW THE ANSWER!" button above. It's that easy to earn points!-
Rusty racks/dishes in my dishwasher
... Guides and Use and Care Manuals are needed, a dishwasher rack repair kit just might work. Treating rusted dishes: For stainless steel items, use a mildly abrasive cleanser&...nbsp;that contains a rust remover for dishes. Ordering replacement parts or accessories Stains on tub or dishes in your load... -
Lint is on the load - Front-load washer
...;A tightly packed load of a dryer removes lint from lint takers (corduroys, synthetics, permanent press). video Consider reducing your laundered items when line drying. The air movement and tumbling of laundry is more lint in the first few washes. Did you line dry the load of lint o n my clothes. Top-load HE washer... -
My dryer makes sounds or vibrations
...few minutes of operation. When the dryer is not level. Check if any of load moisture in the seam. A level dryer is twisted or balled up. Laundry items with large amounts of fabric,...;and the sound should stop. Play the sound of a dryer. Were you hearing a knocking or rattling sound? Another form of thumping can roll into the dryer. Remove any bunching that...
Similar Questions

My Ywed9050xw2 Dryer Beeps 3 Times And Won't Start
My YWED9050XW2 just stopped working earlier this week. I can select a cycle but when i try to start ...
My YWED9050XW2 just stopped working earlier this week. I can select a cycle but when i try to start ...
(Posted by fkouloufakos 6 years ago)

Whirlpool Dryer Does Not Turn On Model Wed9050xw1
(Posted by appDJMars 9 years ago)


Whirlpool Dryer Wed5200vq Stopped Working
Dryer stopped working. Was working fine. I opened the door, took a shirt out, shut the door and it w...
Dryer stopped working. Was working fine. I opened the door, took a shirt out, shut the door and it w...
(Posted by lascarth 11 years ago)

Dryer Stopped Working
Our dryer was making a grinding sound and then it just stopped
Our dryer was making a grinding sound and then it just stopped
(Posted by Anonymous-29155 12 years ago)