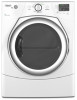
Whirlpool WED9270XW Support Question
Whirlpool WED9270XW Support Question
Find answers below for this question about Whirlpool WED9270XW.Need a Whirlpool WED9270XW manual? We have 4 online manuals for this item!
Question posted by djmack7575 on July 5th, 2014
The Dryer Will Not Start
It beeps 3 times when start button is pushed
Current Answers
Answer #1: Posted by BusterDoogen on July 5th, 2014 12:33 PM
BusterDoogen

Member since:
October 30th, 2011 Points: 28,565,447

Member since:
October 30th, 2011 Points: 28,565,447
Go here for the possible part failures & repair info.
I hope this is helpful to you!
Please respond to my effort to provide you with the best possible solution by using the "Acceptable Solution" and/or the "Helpful" buttons when the answer has proven to be helpful. Please feel free to submit further info for your question, if a solution was not provided. I appreciate the opportunity to serve you!
Related Whirlpool WED9270XW Manual Pages
Owners Manual - Page 2
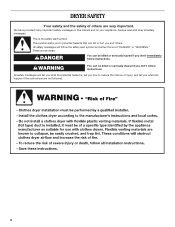
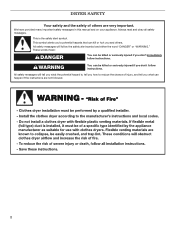
WARNING
You can be killed or seriously injured if you don't follow instructions. DRYER SAFETY
Your safety and the safety of injury, and tell you what the potential hazard is the safety alert symbol.
These words mean:
DANGER
You ...
Owners Manual - Page 4
... by using an Air Cycle. Fire Hazard
No washer can result in death or fire.
For a summary of how to use your dryer following installation, see the QUICK START GUIDE on it (including cooking oils). Failure to follow these instructions can completely remove oil. Do not dry anything flammable on the next...
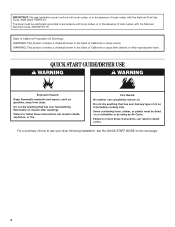
Owners Manual - Page 5
... to persons, read the IMPORTANT SAFETY INSTRUCTIONS before operating this appliance. Place laundry in the dryer. To restart the dryer Close the door and press and hold START/PAUSE to begin. Clean lint screen. 2. Press POWER. 4. Press MORE TIME or LESS TIME until the desired temperature glows. 7. Select the WRINKLE SHIELD™ (90) and/or SIGNAL...
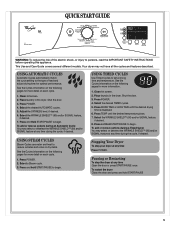
Owners Manual - Page 6
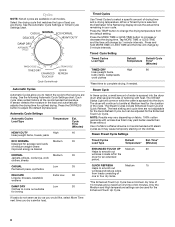
... at the recommended temperature. See the Automatic Cycle Settings or Timed Cycle Settings chart.
Press the DRYNESS button to smooth out
wrinkles in loads left in the
dryer for an extended
period.
Steam Preset Cycle Settings
Timed Cycles Load Type
Default
Est.
The dryer will come out suitable
for ironing
If loads do not seem...
Owners Manual - Page 7
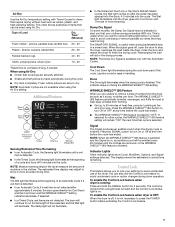
...button for items that may need ironing. Laundry cools for the length of time remaining. The WRINKLE SHIELD™ (90) feature periodically tumbles, rearranges, and fluffs the load to help keep wrinkles from the dryer...8482; (90) button to show Cycle, Modifiers, Options, and Signal settings selected.
You can also use of the cycle. The control is locked when a single beep is heard and the...
Owners Manual - Page 8
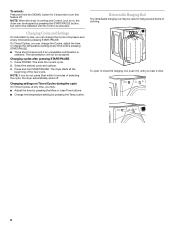
... . The dryer starts at any time, you can be restarted until you do not press Start within 5 minutes of the new cycle. Changing cycles after pressing START/PAUSE 1. Retractable Hanging Rod
The retractable hanging rod may : ■ Adjust the time by pressing the More or Less Time buttons.
■ Change the temperature setting by pressing the START/PAUSE button, but...
Owners Manual - Page 9
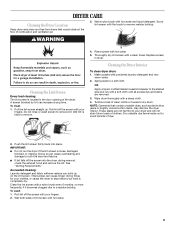
...a load of clothes. Push the lint screen firmly back into the dryer during removal, check the...time. As needed cleaning: Laundry detergent and fabric softener residue can cause longer drying times for your load is hard to avoid transfer of lint screen with hot water and liquid detergent. To wash 1. These stains are removed.
3. Apply paste to stop before your clothes, or cause the dryer...
Owners Manual - Page 10
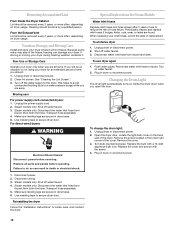
...only: Shut off water faucet. 3. Special Instructions for an extended period of the dryer. To winterize dryer 1. To use to a water pressure surge) while you will not freeze.
Cleaning ...dryer light automatically turns on inside the dryer drum when you should be removed every 2 years, or more often, depending on the back
wall of time, you open the door.
Unplug dryer ...
Owners Manual - Page 11
... firmly closed?
■ Was the Start/Pause button firmly pressed? Proper operation of a service call... The front of the dryer requires a minimum of 1" (25 mm) of airspace, and, for most installations, the rear of garments being dried. See the Installation Instructions. Cycle time too short
■ Is the automatic cycle ending early? Level the...
Owners Manual - Page 12
... default settings cannot be lit solid, but the other clothing. Press the START/PAUSE button to save the drying setting and exit to both the faucet and dryer's water inlet valve. Fabric softener sheets added to the dryer. Loads are gone from dryer at the end of wrinkle-free cotton, cotton polyester blends, common knits...
Dimension Guide - Page 1
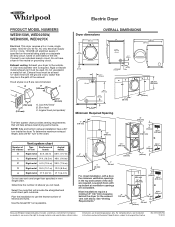
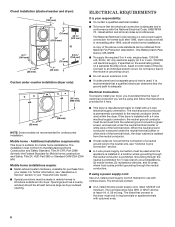
... circuit, fused on both sides of elbows and turns. Exhaust venting: Exhaust your dryer to an individual branch circuit. Louvered hood B.
Plan the installation to the chart....or grounding circuit.
To determine maximum exhaust length, add one 90° turn inside the dryer.
Specifications subject to change without notice.
Determine the number of the exhaust. See "Venting ...
Installation Instructions - Page 2
....
2 All safety messages will tell you don't follow instructions.
All safety messages will follow the safety alert symbol and either the word "DANGER" or "WARNING." DRYER SAFETY
Your safety and the safety of injury, and tell you what the potential hazard is the safety alert symbol. We have provided many important...
Installation Instructions - Page 3
... in garages, closets, mobile homes, or sleeping quarters.
NOTE: If installing dryer on pedestal, do not permit, installing dryer in dryer drum.
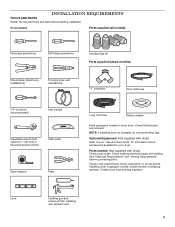
Optional Equipment: (Not supplied with dryer) Check local codes. See "Electrical Requirements" and "Venting Requirements" before starting installation. Check code requirements.
Contact your "Use and Care Guide" for information...
Installation Instructions - Page 4
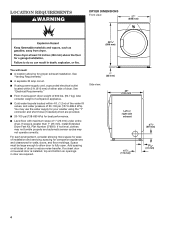
... proper exhaust installation. Add spacing on all sides of installation and servicing; If a closet door or louvered door is greater than 1" (25 mm), install Extended Dryer Feet Kit, Part Number 279810. See "Venting Requirements."
■■ A separate 30 amp circuit.
■■ If using the "Y" connector and short hose (if needed...
Installation Instructions - Page 5
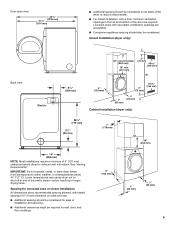
...mm)
4" (102 mm)
3" (76 mm)
24 in.2 (155 cm2)
1" (25 mm)
1" (25 mm)
Cabinet installation (dryer only):
281/8"
(715 mm)
31/2"
(89 mm)
7" (178 mm)
18" (460 mm)
14" (358 mm)
NOTE: ... of 5" (127 mm) clearance behind dryer for exhaust vent with a door, minimum ventilation openings in longer drying times. IMPORTANT: Do not operate, install, or store dryer where it will be required for ease of...
Installation Instructions - Page 6
... the neutral terminal (center or white wire) of the terminal block, the dryer cabinet is prohibited.
The installation must conform to the Manufactured Home Construction and ...wire power supply connection must be removed from the external ground connector (green screw), and secured under counter installation (dryer only):
39" min. (990 mm)
1" (25 mm)
1" (25 mm)
NOTE: Some models not ...
Installation Instructions - Page 7
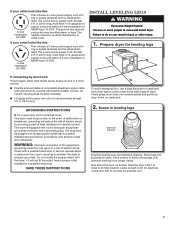
...must be either green or bare. GROUNDING INSTRUCTIONS
� For a grounded, cord-connected dryer: This dryer must be plugged into leg holes by hand, use a large flat piece of malfunction ...match a 3-wire receptacle of least resistance for electrical connection and to move and install dryer.
Do not modify the plug provided with flexible metallic conduit. SAVE THESE INSTRUCTIONS
To ...
Installation Instructions - Page 9
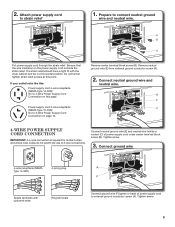
... Cord Connection
IMPORTANT: A 4-wire connection is inside the strain relief. Connect ground wire
4-wire receptacle (NEMA type 14-30R)
4-prong plug
Spade terminals with the dryer cabinet and be in a horizontal position.
Installation Instructions - Page 10
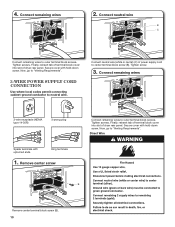
... panel. Remove center screw
Connect remaining wires to outer terminal block screws. Tighten screws. Finally, reinsert tab of terminal block cover into slot of dryer rear panel. Finally, reinsert tab of terminal block cover into slot of power supply cord to center terminal block screw (B). Now, go to neutral wire. ...
Installation Instructions - Page 19

...
outlet. Over time, the buildup of lime scale may notice an odor when dryer is not crushed
or kinked. 2.
q Check that all four legs are set in your "Use and Care Guide". q Check that dryer is first used.
q Read "Dryer Use" in a running or "On" position. • Start button has been pushed firmly. • Dryer is an extra...
Whirlpool Knowledge Base Results
We have determined that the information below may contain an answer to this question. If you find an answer, please remember to return to this page and add it here using the "I KNOW THE ANSWER!" button above. It's that easy to earn points!-
Fabric is too hot - Dryer
My dryer will not start Loads are wrinkled - dryer does not dry Cycle time is too hot - Allow the load to run through the Cool Down part of the cycle before removing the laundry items from the dryer. All cycles end with a Cool Down, which cools the fabric for easy handling and reduced wrinkling. ... -
Deep Clean with Steam not working correctly - Duet® Steam washer
...Close the door. Push the Start button and the Deep Clean button at the same time. The Deep ...Clean with Steam option, Sanitize temperature, or Clean Washer cycle have been missed. To check if the steam cycle is displayed, schedule service. Steam dryer Deep Clean with steam, to warm. Sanitize is an option button... -
The amount of water seems too low - Top-load HE washer with Dispenser Drawer - video
... the load size. Dispensers in water. This is not enough water - How Sensing works and water amount determined: When the Start button is not completely submerged in Corners Washer is not correct - Adding more water than the washer provides. Load-sensing...160;to not fill completely? Top-load HE washer with agitator The water temperature is not cleaning laundry -
Similar Questions


Shut The Sound Off
my Whirlpool Duet dryer is driving me crazy I cannot get the sound turned off I push the EcoBoost bu...
my Whirlpool Duet dryer is driving me crazy I cannot get the sound turned off I push the EcoBoost bu...
(Posted by Svandermark50327 7 years ago)

Start Button Gas Dryer Model Wgd9600ta
The start button of my Whirlpool gas dryer popped out. It seems that the little plastic knob can not...
The start button of my Whirlpool gas dryer popped out. It seems that the little plastic knob can not...
(Posted by fchart47 7 years ago)

E1,f1
What Does It Mean When E1,f1 Keeps Flashing And Dryer Won't Run
What Does It Mean When E1,f1 Keeps Flashing And Dryer Won't Run
(Posted by BILLSHARDWARE 9 years ago)

Whirlpool Commercial Electric Dryer
Whirlpool coin operated electric dryer does not always turn on when you put in the coins
Whirlpool coin operated electric dryer does not always turn on when you put in the coins
(Posted by mmakowiecki 10 years ago)