
Whirlpool WED9470WW Support Question
Whirlpool WED9470WW Support Question
Find answers below for this question about Whirlpool WED9470WW.Need a Whirlpool WED9470WW manual? We have 4 online manuals for this item!
Question posted by Anonymous-51538 on February 18th, 2012
How Do You Make The Dryer Steam Function Work?
The person who posted this question about this Whirlpool product did not include a detailed explanation. Please use the "Request More Information" button to the right if more details would help you to answer this question.
Current Answers
Related Whirlpool WED9470WW Manual Pages
Installation Instructions - Page 1

... Venting Requirements 11 Plan Vent System 12 Install Vent System 13
INSTALL LEVELING LEGS 13 CONNECT VENT 14 CONNECT INLET HOSE (STEAM MODELS 14 LEVEL DRYER 15 COMPLETE INSTALLATION 15 TROUBLESHOOTING 15
DRYER SAFETY
Your safety and the safety of injury, and tell you what the potential hazard is the safety alert symbol...
Installation Instructions - Page 2

... vent installations)
■ ¼" nut driver (recommended)
■ Tape measure
■ Pliers
Parts supplied Non-Steam Models
Steam Models
A
B
C
D
E
A. Check that opens to the "Assistance or Service" section in your dryer. Rubber washer
Remove parts package from dryer drum. Leveling legs (4) B. INSTALLATION REQUIREMENTS
Tools and Parts
Gather the required tools and parts before...
Installation Instructions - Page 3

... that allows for the exhaust vent with a maximum slope of 1" (25 mm) under entire dryer. Do not operate your dryer.
Steam (Electric or Gas)
A
38" (965 mm)
B
32 9/16" (827 mm)
C
27" (686 mm)
D
52 9/16" (1335 mm)
Non-Steam (Electric or Gas)
38" (965 mm) 31 1/2" (800 mm)
27" (686 mm) 51 1/2" (1308...
Installation Instructions - Page 4
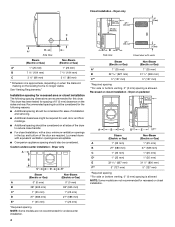
... a door, minimum ventilation openings in the top and bottom of 0" (0 mm) clearance on the leveling foot is no longer visible. Custom undercounter installation - Dryer only
A
B
C*
D
E*
Steam (Electric or Gas)
Non-Steam (Electric or Gas)
A
0" (0 mm)
0" (0 mm)
B
38" (965 mm)
38" (965 mm)
C*
1" (25 mm)
1" (25 mm)
D
27" (686 mm)
27" (686 mm)
E*
1" (25...
Installation Instructions - Page 5

...cabinet installation, with stacked washer and dryer
The dimensions shown are for the ...Steam (Electric or Gas)
A*
5 ½" (140 mm)
5" (127 mm)
*Required spacing
NOTE: Some models are required. Recommended installation spacing for recessed or closet installation, with a door, minimum ventilation openings in the top of the above code standards can be at least twice as large as the dryer...
Installation Instructions - Page 6

... or electrical shock. 1.
A timedelay fuse or circuit breaker is prohibited for use with clothes dryers. The 3-wire power supply cord, at least 4 ft (1.22 m) long. Electrical Connection
...; A UL listed 30-amp power supply cord, rated 120/240 volt minimum.
Disconnect power before making electrical connections. ■ To supply the required 3 or 4 wire, single phase, 120/240 volt...
Installation Instructions - Page 7
...wire B. Put the tabs of the strain relief through the strain relief.
Disconnect power before making electrical connections. Connect remaining 2 supply wires to center terminal (silver). Hole below terminal block...Strain relief threads
7 2. The strain relief should have a tight fit with the dryer cabinet and be connected to hold -down
■ Put power supply cord through the...
Installation Instructions - Page 8

...cord under center, silver-colored terminal block screw. B.
Spade terminals with the dryer cabinet and be Go to Section connecting to:
4-wire receptacle (NEMA Type 14-30R)
...10-30R)
A fused disconnect or circuit breaker box*
A UL listed, 120/ 240-volt minimum, 30-amp, dryer power supply cord*
4-wire connection: Direct Wire
3-wire connection: Power supply cord
3-wire direct
(89 mm)
A...
Installation Instructions - Page 9

... a hook shape.
(251"mm)
A. Neutral ground wire
D.
Tighten screws.
1. Squeeze hooked ends together. Direct wire cable must have completed your electrical connection. Shape ends of dryer rear panel. Dotted line shows position of the terminal block. Center, silver-colored terminal block screw E. 3. A
C
B
D
E
5. Strip insulation back 1" (25 mm). Neutral wire (white or...
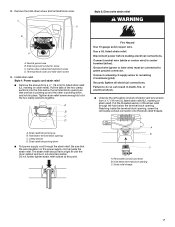
Installation Instructions - Page 11

... for exhausting.
Tighten screws.
WARNING: To reduce the risk of the system and make sure exhaust hood is recommended to avoid crushing and kinking.
11 Connect a separate....
■ Replace any gas vent, chimney, wall, ceiling, attic, crawlspace, or a concealed space of dryer rear panel. Center, silver-colored terminal block screw C. Neutral wire (white or center wire) E. ¾...
Installation Instructions - Page 13
... vent system chart to determine type of elbows and turns.
■ When using elbows or making turns, allow as much room as possible.
■ Bend vent gradually to exhaust hood. ...176; turns possible. Run vent to the manufacturer's instructions. Use the straightest path possible. Refer to dryer location. Please see the "Assistance or Service" section to order. ■ Over-the-Top Installation...
Installation Instructions - Page 14
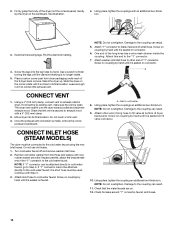
... to brass male end of the "Y" connector to existing vent, make sure the vent is no longer visible.
5. Stand the dryer up. NOTE: Do not overtighten. Attach "Y" connector to cold ...to the cold water faucet using the new inlet hoses. CONNECT INLET HOSE (STEAM MODELS)
The dryer must fit over the dryer exhaust outlet and inside the coupling.
Screw on coupling by hand until it ...
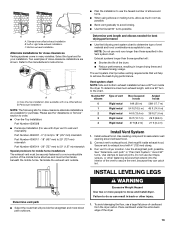
Installation Instructions - Page 15

... parts are intact and tight, or that you have heat. LEVEL DRYER
Check the levelness of its first cycle.
If there is first heated. Wipe the dryer drum interior thoroughly with your home power supply keeping the dryer's heater from turning on . Steam Models Only:
10. Over time, the buildup of the water system...
Owners Manual - Page 2
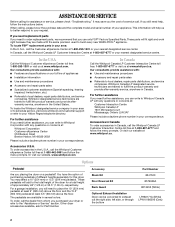
... in Canada To order accessories in Canada, call the dealer from whom you placing the dryer on our full line of your request. The pedestals are trained to your appliance. When...
Please include a daytime phone number in your correspondence.
These pedestals will fit right and work right because they are trained to fulfill the product warranty and provide after-warranty service, ...
Owners Manual - Page 7
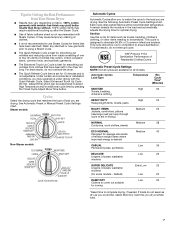
... Type
Temperature
Est. Tips for Getting the Best Performance from Your Steam Dryer
■ Results may vary depending on all cycles are available on...dryer too long.
This cycle should be customized to select High Temperature and/or additional cycle time by pressing the Timed Cycle Adjust More Time button. A sensor detects the moisture in drying.)
NORMAL
Medium
38
Corduroys, work...
Owners Manual - Page 8
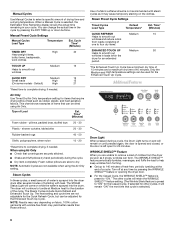
...
TIMED DRY
High
40
Heavyweight items,
bulky items, bedspreads,
work clothes
TOUCH UP
Helps to dry. Type of tumbling with steam cycles as it will come on the clothes. Only the Medium...and cycle time are not available when using Air Only. Steam Cycles
In these cycles, a small amount of water is sprayed into the dryer drum after several minutes of Load
Est.
shower curtains, ...
Owners Manual - Page 10

...the dryer. Because some water may discolor the dryer interior. Scrub lint screen with hot water. 5. Make a ...dryer for your clothes, or cause the dryer to your load is in dryer.
These stains are removed.
3. Wet a nylon brush with powdered laundry detergent and very
warm water. 2. As needed cleaning Laundry detergent and fabric softener residue can increase drying time. Steam...
Owners Manual - Page 11

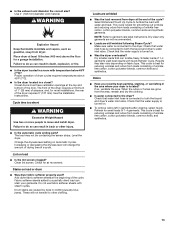
... 240-volt power supply. Special Instructions for the dryer. Shut off water faucet. 4. Plug in dryer or reconnect power.
If the problem continues, call ... Steam models only: Shut off water faucet. 3. Steam models only: Disconnect the water inlet hose from
faucet, then drain the hose. Make sure leveling legs are intact and tight, or that...
Owners Manual - Page 13
... Quick Refresh for reducing wrinkles and odors from dryer at the beginning of the door. When the odors or fumes are still wrinkled following Steam Cycle? See the Installation Instructions. The load may... (usually blue jeans). Make sure water is connected to both the faucet and dryer's water inlet valve. If so, ventilate the area. Fabric softener sheets added to the dryer? ■ Is the...
Dimension Guide - Page 1
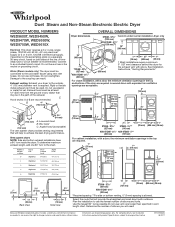
....
4" (102 mm) diameter vent is recommended. C Hood styles: A & B are required. Louvered hood
4" (102 mm)
B.
Dimensions are for the exhaust vent with elbow.
Water (Steam models only): The dryer must be used. Damage to use vent runs longer than specified in vent length chart. Do not use old hoses. Vent system chart: NOTE...
Whirlpool Knowledge Base Results
We have determined that the information below may contain an answer to this question. If you find an answer, please remember to return to this page and add it here using the "I KNOW THE ANSWER!" button above. It's that easy to earn points!-
There are stains on the dryer drum
... Dryer My dryer makes sounds or vibrations My dryer or load has an odor My dryer will not transfer to future loads of clothes. Oily spots on the inside out. Dryer Tumble a load of the dryer? ...stains on the dryer drum. Apply the paste to a soft cloth or apply a liquid, nonflammable household cleaner to dry the drum. Thoroughly wipe drum with powdered laundry detergent and very... -
Deep Clean with Steam not working correctly - Duet® Steam washer
...steam will be added to warm. The washer must be noticed in Steam cycle - The Steam Clean Feature Deep Clean Cycle did not run - Deep Clean with Steam is Deep Clean with Steam not working...Sanitize is functioning properly: Please check garment care labels to aid in the off state. Use this is only available on my Duet steam washer? To check if the steam cycle ... -
Deep Clean Cycle did not run - Cabrio® washer with Dispensers in Corners
Deep Clean with Steam not working correctly - Duet® Steam washer
Similar Questions


Whirlpool Duet Steam Dryer Does Not Work
(Posted by Wallypn 10 years ago)

Whirlpool Dryer Wed5200vq Stopped Working
Dryer stopped working. Was working fine. I opened the door, took a shirt out, shut the door and it w...
Dryer stopped working. Was working fine. I opened the door, took a shirt out, shut the door and it w...
(Posted by lascarth 11 years ago)
Dryer Just Stopped Working.. No Light Or Power..
Dryer was working fine.. Then went to go out another load of clothes to dry and no light or power...
Dryer was working fine.. Then went to go out another load of clothes to dry and no light or power...
(Posted by Jmontoya1201 11 years ago)

Dryer Won't Start When Press And Hold Start Button
I have tried to unplug the dryer for over 30 minutes, same results. all other buttons seems to funct...
I have tried to unplug the dryer for over 30 minutes, same results. all other buttons seems to funct...
(Posted by stanstarobin 12 years ago)