

Installation Instructions
Page 1
... una versión de estas instrucciones en español, visite www.Whirlpool.com TABLE OF CONTENTS DRYER SAFETY 1 INSTALLATION REQUIREMENTS 2 Tools and Parts 2 Optional Equipment 3 Location Requirements 3 ELECTRIC DRYER POWER HOOKUP 5 Electrical Requirements 5 Electrical Connection 6 VENTING 11 Venting Requirements 11... the chance of others . We have provided many important safety messages in this manual and on your appliance. ELECTRIC DRYER INSTALLATION INSTRUCTIONS U.S.A. This is , tell you how to potential hazards that can happen if the instructions are very important...
... una versión de estas instrucciones en español, visite www.Whirlpool.com TABLE OF CONTENTS DRYER SAFETY 1 INSTALLATION REQUIREMENTS 2 Tools and Parts 2 Optional Equipment 3 Location Requirements 3 ELECTRIC DRYER POWER HOOKUP 5 Electrical Requirements 5 Electrical Connection 6 VENTING 11 Venting Requirements 11... the chance of others . We have provided many important safety messages in this manual and on your appliance. ELECTRIC DRYER INSTALLATION INSTRUCTIONS U.S.A. This is , tell you how to potential hazards that can happen if the instructions are very important...

Installation Instructions
Page 2
...tools and parts before purchasing parts. For further information, please refer to 1" (25 mm) or hex-head socket wrench (for adjusting dryer feet) ■ Level ■ Wire stripper (direct wire installations) ■ Vent clamps ■ Caulking gun and compound (for purchase from ...the dealer from dryer drum. Parts needed Check local codes. Read and follow the instructions provided with any tools listed here. ■ Flat-blade screwdriver ■ ...
...tools and parts before purchasing parts. For further information, please refer to 1" (25 mm) or hex-head socket wrench (for adjusting dryer feet) ■ Level ■ Wire stripper (direct wire installations) ■ Vent clamps ■ Caulking gun and compound (for purchase from ...the dealer from dryer drum. Parts needed Check local codes. Read and follow the instructions provided with any tools listed here. ■ Flat-blade screwdriver ■ ...

Installation Instructions
Page 3
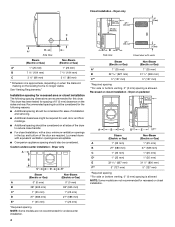
... building inspector. Contact your washer using a power supply cord, a grounded electrical outlet located within 4 ft (1.2 m) of the dryer, and water pressure of 200 lbs (90.7 kg). Location Requirements Installation clearances The location must not be installed or stored in ...longer drying times. Check code requirements. Dryer Dimensions D A B C You will be considered. ■ A level floor with elbow. The combined weight of a companion appliance should...
... building inspector. Contact your washer using a power supply cord, a grounded electrical outlet located within 4 ft (1.2 m) of the dryer, and water pressure of 200 lbs (90.7 kg). Location Requirements Installation clearances The location must not be installed or stored in ...longer drying times. Check code requirements. Dryer Dimensions D A B C You will be considered. ■ A level floor with elbow. The combined weight of a companion appliance should...
Installation Instructions
Page 4
...closet installation The following reasons: ■ Additional spacing should be considered for ease of installation and servicing. ■ Additional clearances might be required for this dryer. Dryer only A B C* D E* Steam (Electric or Gas) Non-Steam (Electric or Gas) A 0" (0 mm) 0" (0 mm) B 38"...(800 mm) C** 5" (127 mm) 5" (127 mm) *Required spacing **For side or bottom venting, 0" (0 mm) spacing is allowed NOTE: Some models are required. Dryer only (460 mm) C A* B Side View Steam (Electric or Gas) Non-Steam (Electric or Gas) A* 1" (25 mm) 1" (25 mm) B 7 5/8" (...
...closet installation The following reasons: ■ Additional spacing should be considered for ease of installation and servicing. ■ Additional clearances might be required for this dryer. Dryer only A B C* D E* Steam (Electric or Gas) Non-Steam (Electric or Gas) A 0" (0 mm) 0" (0 mm) B 38"...(800 mm) C** 5" (127 mm) 5" (127 mm) *Required spacing **For side or bottom venting, 0" (0 mm) spacing is allowed NOTE: Some models are required. Dryer only (460 mm) C A* B Side View Steam (Electric or Gas) Non-Steam (Electric or Gas) A* 1" (25 mm) 1" (25 mm) B 7 5/8" (...

Installation Instructions
Page 5
... ½" (140 mm) 5" (127 mm) *Required spacing NOTE: Some models are not recommended for homes built after 1996, dryer circuits involved in the top of the above code standards can be at least twice as large as a nearby window) should be .... Recommended installation spacing for purchase from : National Fire Protection Association, One Batterymarch Park, Quincy, MA 02269. 5 Mobile home - The opening (such as the dryer exhaust opening. Recommended installation spacing for cabinet installation NOTE: Some models are required. A* B* 6"* (152 mm) 76" (1930 mm) C* D** E F* ...
... ½" (140 mm) 5" (127 mm) *Required spacing NOTE: Some models are not recommended for homes built after 1996, dryer circuits involved in the top of the above code standards can be at least twice as large as a nearby window) should be .... Recommended installation spacing for purchase from : National Fire Protection Association, One Batterymarch Park, Quincy, MA 02269. 5 Mobile home - The opening (such as the dryer exhaust opening. Recommended installation spacing for cabinet installation NOTE: Some models are required. A* B* 6"* (152 mm) 76" (1930 mm) C* D** E F* ...

Installation Instructions
Page 6
...prohibit grounding through the neutral conductor is prohibited. If your outlet looks like this : Then choose a 3-wire power supply cord with clothes dryers. Disconnect power before making electrical connections. Electrical Connection To properly install your outlet looks like this : 4-wire receptacle (14-30R) Then... a UL listed power supply cord kit marked for use with ring or spade terminals and UL listed strain relief. If the dryer is installed with flexible metallic conduit. Ground wire (green or bare wire) must determine the type of the line. The neutral...
...prohibit grounding through the neutral conductor is prohibited. If your outlet looks like this : Then choose a 3-wire power supply cord with clothes dryers. Disconnect power before making electrical connections. Electrical Connection To properly install your outlet looks like this : 4-wire receptacle (14-30R) Then... a UL listed power supply cord kit marked for use with ring or spade terminals and UL listed strain relief. If the dryer is installed with flexible metallic conduit. Ground wire (green or bare wire) must determine the type of the line. The neutral...
Installation Instructions
Page 7
... to hold in place. Clamp section D. Strain relief tab pointing down screw and terminal block cover. The strain relief should have a tight fit with the dryer cabinet and be connected to do so can result in a horizontal position. Put the threaded section of the two clamp sections into the hole below...
... to hold in place. Clamp section D. Strain relief tab pointing down screw and terminal block cover. The strain relief should have a tight fit with the dryer cabinet and be connected to do so can result in a horizontal position. Put the threaded section of the two clamp sections into the hole below...

Installation Instructions
Page 8
...wire before being moved to "Optional 3-wire connection" section. Remove center, silver-colored terminal block screw. 2. Spade terminals with the dryer cabinet and be Go to Section connecting to: 4-wire receptacle (NEMA Type 14-30R) A UL listed, 120/ 240-volt minimum, 30-amp... (127 mm) 3-wire receptacle (NEMA type 10-30R) A fused disconnect or circuit breaker box* A UL listed, 120/ 240-volt minimum, 30-amp, dryer power supply cord* 4-wire connection: Direct Wire 3-wire connection: Power supply cord 3-wire direct (89 mm) A fused disconnect or circuit breaker box* 3-wire connection...
...wire before being moved to "Optional 3-wire connection" section. Remove center, silver-colored terminal block screw. 2. Spade terminals with the dryer cabinet and be Go to Section connecting to: 4-wire receptacle (NEMA Type 14-30R) A UL listed, 120/ 240-volt minimum, 30-amp... (127 mm) 3-wire receptacle (NEMA type 10-30R) A fused disconnect or circuit breaker box* A UL listed, 120/ 240-volt minimum, 30-amp, dryer power supply cord* 4-wire connection: Direct Wire 3-wire connection: Power supply cord 3-wire direct (89 mm) A fused disconnect or circuit breaker box* 3-wire connection...

Installation Instructions
Page 9
...hooks facing right). Remove center, silver-colored terminal block screw. 2. Tighten strain relief screws. 6. Strip insulation back 1" (25 mm). Shape ends of dryer rear panel. Center, silver-colored terminal block screw C. Neutral wire (white or center wire) E. ¾" (19 mm) UL listed strain relief ...a hook shape. (251"mm) A. Now go to outer terminal block screws. Tighten screw. Ground wire (green or bare) of extra length so dryer can be moved if needed. Neutral wire (white or center wire) 4. Tighten screws. 1. Squeeze hooked ends together. Tighten screw. You have 5 ...
...hooks facing right). Remove center, silver-colored terminal block screw. 2. Tighten strain relief screws. 6. Strip insulation back 1" (25 mm). Shape ends of dryer rear panel. Center, silver-colored terminal block screw C. Neutral wire (white or center wire) E. ¾" (19 mm) UL listed strain relief ...a hook shape. (251"mm) A. Now go to outer terminal block screws. Tighten screw. Ground wire (green or bare) of extra length so dryer can be moved if needed. Neutral wire (white or center wire) 4. Tighten screws. 1. Squeeze hooked ends together. Tighten screw. You have 5 ...

Installation Instructions
Page 10
... B D E A C GF A. 3-wire receptacle (NEMA type 10-30R) B. 3-wire plug C. Strip 31/2" (89 mm) of outer covering from end of dryer rear panel. Tighten strain relief screws. 5. 5. Tighten screw. You have completed your electrical connection. Neutral prong D. C A B D E 3-wire connection: Direct wire.... (215"mm) 3½" (89 mm) When connecting to the center, silver-colored terminal screw of extra length so dryer can be moved if needed. Secure cover with hold -down screw. 6. You have completed your electrical connection. Loosen or remove...
... B D E A C GF A. 3-wire receptacle (NEMA type 10-30R) B. 3-wire plug C. Strip 31/2" (89 mm) of outer covering from end of dryer rear panel. Tighten strain relief screws. 5. 5. Tighten screw. You have completed your electrical connection. Neutral prong D. C A B D E 3-wire connection: Direct wire.... (215"mm) 3½" (89 mm) When connecting to the center, silver-colored terminal screw of extra length so dryer can be moved if needed. Secure cover with hold -down screw. 6. You have completed your electrical connection. Loosen or remove...

Installation Instructions
Page 11
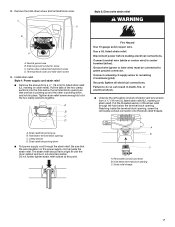
... lint from external ground conductor screw. Tighten strain relief screw. 5. External ground conductor screw B. Grounding path determined by calling Whirlpool Service. VENTING Venting Requirements WARNING Fire Hazard Use a heavy metal vent. IMPORTANT: Observe all governing codes and ordinances. Do ...of a building. Connect a separate copper ground wire from the external ground conductor screw to outer terminal block screws. If this dryer MUST BE EXHAUSTED OUTDOORS. You have completed your dealer or by a qualified electrician 3. Now go to achieve the best drying ...
... lint from external ground conductor screw. Tighten strain relief screw. 5. External ground conductor screw B. Grounding path determined by calling Whirlpool Service. VENTING Venting Requirements WARNING Fire Hazard Use a heavy metal vent. IMPORTANT: Observe all governing codes and ordinances. Do ...of a building. Connect a separate copper ground wire from the external ground conductor screw to outer terminal block screws. If this dryer MUST BE EXHAUSTED OUTDOORS. You have completed your dealer or by a qualified electrician 3. Now go to achieve the best drying ...
Installation Instructions
Page 12
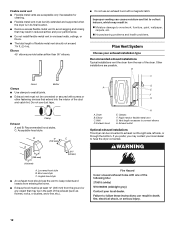
... keep rodents and insects from entering the home. ■ Exhaust hood must be at least 12" (305 mm) from the rear of the dryer. Other installations are acceptable only if accessible for cleaning. ■ Flexible metal vent must not be converted to have the... not use an exhaust hood with screws or other fastening devices that may contact your exhaust installation type Recommended exhaust installations Typical installations vent the dryer from the ground or any object that may result in the path of the duct G and catch lint. Elbow C. Clamps F. Improper venting can ...
... keep rodents and insects from entering the home. ■ Exhaust hood must be at least 12" (305 mm) from the rear of the dryer. Other installations are acceptable only if accessible for cleaning. ■ Flexible metal vent must not be converted to have the... not use an exhaust hood with screws or other fastening devices that may contact your exhaust installation type Recommended exhaust installations Typical installations vent the dryer from the ground or any object that may result in the path of the duct G and catch lint. Elbow C. Clamps F. Improper venting can ...
Installation Instructions
Page 13
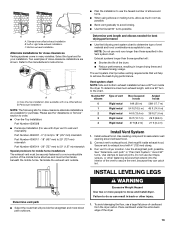
... Standard rear offset exhaust installation B. To determine maximum exhaust length, add one offset elbow) B. Install exhaust hood. Vent must fit inside the dryer. Avoid 90º turns. INSTALL LEVELING LEGS Determine vent path ■ Select the route that will help to 50" (1.27 m) mismatch ...9632; When using elbows or making turns, allow as much room as possible. ■ Bend vent gradually to a noncombustible portion of the dryer. ■ Reduce performance, resulting in longer drying times and increased energy usage. Run vent to seal exterior wall opening around exhaust hood. 2....
... Standard rear offset exhaust installation B. To determine maximum exhaust length, add one offset elbow) B. Install exhaust hood. Vent must fit inside the dryer. Avoid 90º turns. INSTALL LEVELING LEGS Determine vent path ■ Select the route that will help to 50" (1.27 m) mismatch ...9632; When using elbows or making turns, allow as much room as possible. ■ Bend vent gradually to a noncombustible portion of the dryer. ■ Reduce performance, resulting in longer drying times and increased energy usage. Run vent to seal exterior wall opening around exhaust hood. 2....
Installation Instructions
Page 14
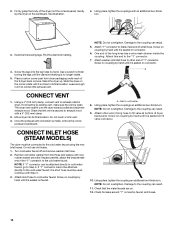
... exhaust hood with new rubber washer provided. Turn cold water faucet off and remove washer inlet hose. 2. Attach short hose to exhaust outlet in dryer. Using pliers, tighten the coupling an additional two-thirds turn . 3. Place a carton corner post from inlet hose and replace with a 4" ... an additional two-thirds turn. NOTE: Do not overtighten. Do not crush or kink vent. 3. A. CONNECT INLET HOSE (STEAM MODELS) The dryer must be used. NOTE: Do not overtighten. Check that the vent is clean. Find the diamond marking. 4. NOTE: Do not overtighten. 2....
... exhaust hood with new rubber washer provided. Turn cold water faucet off and remove washer inlet hose. 2. Attach short hose to exhaust outlet in dryer. Using pliers, tighten the coupling an additional two-thirds turn . 3. Place a carton corner post from inlet hose and replace with a 4" ... an additional two-thirds turn. NOTE: Do not overtighten. Do not crush or kink vent. 3. A. CONNECT INLET HOSE (STEAM MODELS) The dryer must be used. NOTE: Do not overtighten. Check that the vent is clean. Find the diamond marking. 4. NOTE: Do not overtighten. 2....

Installation Instructions
Page 15
... drying cycle interrupted by a power failure? If you receive an L2 code, there may be a problem with your home power supply keeping the dryer's heater from the display and return to run ■ Has a household fuse blown, or has a circuit breaker tripped? TROUBLESHOOTING First try the... solutions suggested here and possibly avoid the cost of your home power supply keeping the dryer's heater from turning on . 11. There may be 2 household fuses or circuit breakers for certain part replacement or repair. Check with a ...
... drying cycle interrupted by a power failure? If you receive an L2 code, there may be a problem with your home power supply keeping the dryer's heater from the display and return to run ■ Has a household fuse blown, or has a circuit breaker tripped? TROUBLESHOOTING First try the... solutions suggested here and possibly avoid the cost of your home power supply keeping the dryer's heater from turning on . 11. There may be 2 household fuses or circuit breakers for certain part replacement or repair. Check with a ...
Installation Instructions
Page 16
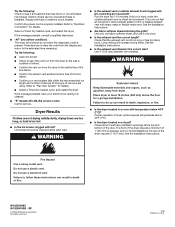
...; Confirm the exterior vent exhaust hood is too hot ■ Is the lint screen clogged with heavy metal or flexible metal vent. Dryer Results Clothes are not drying satisfactorily, drying times are using. Try the following : Check to the estimated time remaining. All rights reserved.... 4/09 Printed in a closet? SP © 2009 Whirlpool Corporation. Confirm the power cord is not too long or has too many turns. Run the dryer for service. Check that the exhaust vent is properly installed.
...; Confirm the exterior vent exhaust hood is too hot ■ Is the lint screen clogged with heavy metal or flexible metal vent. Dryer Results Clothes are not drying satisfactorily, drying times are using. Try the following : Check to the estimated time remaining. All rights reserved.... 4/09 Printed in a closet? SP © 2009 Whirlpool Corporation. Confirm the power cord is not too long or has too many turns. Run the dryer for service. Check that the exhaust vent is properly installed.
Owners Manual
Page 2
... technicians are trained to order replacement parts, we recommend that you can write to Whirlpool Corporation with any questions or concerns at 1-800-253-1301 or your dryer or refer to build every new WHIRLPOOL® appliance. If you will fit right and work right because they are available... in your area: In the U.S.A., call the dealer from whom you placing the dryer on our full line of appliances ■...
... technicians are trained to order replacement parts, we recommend that you can write to Whirlpool Corporation with any questions or concerns at 1-800-253-1301 or your dryer or refer to build every new WHIRLPOOL® appliance. If you will fit right and work right because they are available... in your area: In the U.S.A., call the dealer from whom you placing the dryer on our full line of appliances ■...

Owners Manual
Page 3
... be killed or seriously injured if you and others are not followed. 3 These words mean: DANGER You can kill or hurt you don't follow instructions. DRYER SAFETY Your safety and the safety of injury, and tell you don't immediately follow instructions. We have provided many important safety messages in this manual...
... be killed or seriously injured if you and others are not followed. 3 These words mean: DANGER You can kill or hurt you don't follow instructions. DRYER SAFETY Your safety and the safety of injury, and tell you don't immediately follow instructions. We have provided many important safety messages in this manual...
Owners Manual
Page 4
... always be electrically grounded in accordance with local codes, or in the absence of local codes, with the National Electrical Code, ANSI/NFPA 70. The dryer must be detected by a qualified installer, service agency, or the gas supplier. do if you smell gas" instructions. 4 Follow the gas supplier's instructions. • If...
... always be electrically grounded in accordance with local codes, or in the absence of local codes, with the National Electrical Code, ANSI/NFPA 70. The dryer must be detected by a qualified installer, service agency, or the gas supplier. do if you smell gas" instructions. 4 Follow the gas supplier's instructions. • If...
Owners Manual
Page 5
... the State of Massachusetts, the following installation, see the QUICK START GUIDE on the next page. 5 Failure to use your dryer following installation instructions apply: ■ Installations and repairs must not exceed 3 feet. QUICK START GUIDE/DRYER USE WARNING WARNING Explosion Hazard Keep flammable materials and vapors, such as gasoline, away from...
... the State of Massachusetts, the following installation, see the QUICK START GUIDE on the next page. 5 Failure to use your dryer following installation instructions apply: ■ Installations and repairs must not exceed 3 feet. QUICK START GUIDE/DRYER USE WARNING WARNING Explosion Hazard Keep flammable materials and vapors, such as gasoline, away from...


