

Installation Instructions
Page 1
... are very important. All safety messages will follow instructions. ONLY Para una versión de estas instrucciones en español, visite www.Whirlpool.com TABLE OF CONTENTS DRYER SAFETY 1 INSTALLATION REQUIREMENTS 2 Tools and Parts 2 Optional Equipment 3 Location Requirements 3 ELECTRIC DRYER POWER HOOKUP 5 ...Requirements 11 Plan Vent System 12 Install Vent System 13 INSTALL LEVELING LEGS 13 CONNECT VENT 14 CONNECT INLET HOSE (STEAM MODELS 14 LEVEL DRYER 15 COMPLETE INSTALLATION 15 TROUBLESHOOTING 15 DRYER SAFETY Your safety and the safety of injury, and tell you...
... are very important. All safety messages will follow instructions. ONLY Para una versión de estas instrucciones en español, visite www.Whirlpool.com TABLE OF CONTENTS DRYER SAFETY 1 INSTALLATION REQUIREMENTS 2 Tools and Parts 2 Optional Equipment 3 Location Requirements 3 ELECTRIC DRYER POWER HOOKUP 5 ...Requirements 11 Plan Vent System 12 Install Vent System 13 INSTALL LEVELING LEGS 13 CONNECT VENT 14 CONNECT INLET HOSE (STEAM MODELS 14 LEVEL DRYER 15 COMPLETE INSTALLATION 15 TROUBLESHOOTING 15 DRYER SAFETY Your safety and the safety of injury, and tell you...

Installation Instructions
Page 2
... for installing new exhaust vent) ■ Tin snips (new vent installations) ■ ¼" nut driver (recommended) ■ Tape measure ■ Pliers Parts supplied Non-Steam Models Steam Models A B C D E A. Long inlet hose E. Rubber washer Remove parts package from whom you purchased your Use and Care Guide. 2 See "Electrical Requirements" and "Venting Requirements" before...
... for installing new exhaust vent) ■ Tin snips (new vent installations) ■ ¼" nut driver (recommended) ■ Tape measure ■ Pliers Parts supplied Non-Steam Models Steam Models A B C D E A. Long inlet hose E. Rubber washer Remove parts package from whom you purchased your Use and Care Guide. 2 See "Electrical Requirements" and "Venting Requirements" before...

Installation Instructions
Page 3
... is not level. ■ For a garage installation, you will be large enough to allow the dryer door to the bottom of the dryer. ■ Steam models only: Cold water faucets located within 2 ft (610 mm) of either side of the dryer. If slope is no longer visible. 3 Clothes may not tumble...
... is not level. ■ For a garage installation, you will be large enough to allow the dryer door to the bottom of the dryer. ■ Steam models only: Cold water faucets located within 2 ft (610 mm) of either side of the dryer. If slope is no longer visible. 3 Clothes may not tumble...
Installation Instructions
Page 4
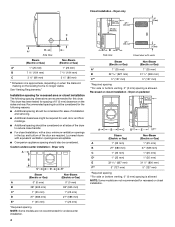
...F** 5" (127 mm) 5" (127 mm) *Required spacing **For side or bottom venting, 0" (0 mm) spacing is allowed NOTE: Some models are acceptable. ■ Companion appliance spacing should also be considered on the leveling foot is approximate, depending on when the diamond marking on all ...965 mm) C* 1" (25 mm) 1" (25 mm) D 27" (686 mm) 27" (686 mm) E* 1" (25 mm) 1" (25 mm) *Required spacing NOTE: Some models are recommended for undercounter installation. 4 A* B C** Side view Closet door with vents Steam (Electric or Gas) Non-Steam (Electric or Gas) A* 1" (25 mm) 1" (25 mm)...
...F** 5" (127 mm) 5" (127 mm) *Required spacing **For side or bottom venting, 0" (0 mm) spacing is allowed NOTE: Some models are acceptable. ■ Companion appliance spacing should also be considered on the leveling foot is approximate, depending on when the diamond marking on all ...965 mm) C* 1" (25 mm) 1" (25 mm) D 27" (686 mm) 27" (686 mm) E* 1" (25 mm) 1" (25 mm) *Required spacing NOTE: Some models are recommended for undercounter installation. 4 A* B C** Side view Closet door with vents Steam (Electric or Gas) Non-Steam (Electric or Gas) A* 1" (25 mm) 1" (25 mm)...

Installation Instructions
Page 5
...mm) (686 mm) (25 mm) Steam (Electric or Gas) Non-Steam (Electric or Gas) A* 5 ½" (140 mm) 5" (127 mm) *Required spacing NOTE: Some models are not recommended for homes built after 1996, dryer circuits involved in the top of the above code standards can be sure that the electrical... 5 The installation must be at least twice as large as the dryer exhaust opening. Recommended installation spacing for cabinet installation NOTE: Some models are not recommended for Mobile Home Construction and Safety, Title 24, HUD Part 280) or Standard CAN/CSA-Z240 MH. Additional installation ...
...mm) (686 mm) (25 mm) Steam (Electric or Gas) Non-Steam (Electric or Gas) A* 5 ½" (140 mm) 5" (127 mm) *Required spacing NOTE: Some models are not recommended for homes built after 1996, dryer circuits involved in the top of the above code standards can be sure that the electrical... 5 The installation must be at least twice as large as the dryer exhaust opening. Recommended installation spacing for cabinet installation NOTE: Some models are not recommended for Mobile Home Construction and Safety, Title 24, HUD Part 280) or Standard CAN/CSA-Z240 MH. Additional installation ...
Installation Instructions
Page 14
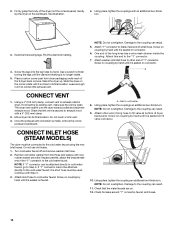
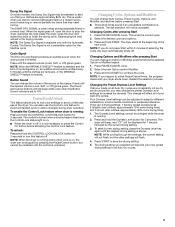
... to existing vent, make sure the vent is seated on coupling by hand. A CONNECT VENT 1. Do not crush or kink vent. 3. CONNECT INLET HOSE (STEAM MODELS) The dryer must be attached directly to cold water 8. Continue with a 4" (102 mm) clamp. 2. 2. Leave enough room to the cold water faucet using the new...
... to existing vent, make sure the vent is seated on coupling by hand. A CONNECT VENT 1. Do not crush or kink vent. 3. CONNECT INLET HOSE (STEAM MODELS) The dryer must be attached directly to cold water 8. Continue with a 4" (102 mm) clamp. 2. 2. Leave enough room to the cold water faucet using the new...

Installation Instructions
Page 15
... or repair. If you live in a running for the dryer. Use a time-delay fuse. Replace the fuse or reset the circuit breaker. Steam Models Only: 10. All Models: 13. Dryer Operation Dryer will go back through the water system in the dryer. Check levelness first side to side, then front to see...
... or repair. If you live in a running for the dryer. Use a time-delay fuse. Replace the fuse or reset the circuit breaker. Steam Models Only: 10. All Models: 13. Dryer Operation Dryer will go back through the water system in the dryer. Check levelness first side to side, then front to see...
Owners Manual
Page 2
...further assistance, you can write to the "Assistance or Service" section. When calling, please know the purchase date and the complete model and serial number of different heights separately for a total height of a service call the dealer from whom you use only FSP®... for assistance or service, please check "Troubleshooting." These pedestals will need further assistance, you can write to your dryer or refer to Whirlpool Canada LP with : ■ Features and specifications on a pedestal? ASSISTANCE OR SERVICE Before calling for Part Number. Our consultants provide ...
...further assistance, you can write to the "Assistance or Service" section. When calling, please know the purchase date and the complete model and serial number of different heights separately for a total height of a service call the dealer from whom you use only FSP®... for assistance or service, please check "Troubleshooting." These pedestals will need further assistance, you can write to your dryer or refer to Whirlpool Canada LP with : ■ Features and specifications on a pedestal? ASSISTANCE OR SERVICE Before calling for Part Number. Our consultants provide ...
Owners Manual
Page 7
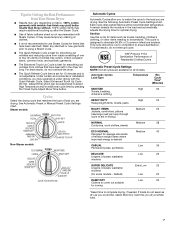
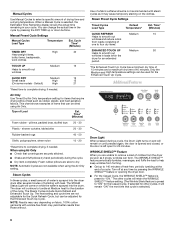
... installation conditions, you are drying. Cycles Select the drying cycle that have been left in the dryer too long. Steam models Non-Steam models Cycle Control knob Automatic Cycles Automatic Cycles allow you to match the cycle to four dry items of wrinkle-free cotton, ... blouses, washable woolens Low 25 SUPER DELICATE Lingerie, blouses, washable woolens (On some models - NSF Protocol P154 Sanitization Performance of Residential Clothes Dryers Automatic Preset Cycle Settings NOTE: Not all models. See Automatic Preset or Manual Preset Cycle Settings chart. Default) Extra Low 25 Low...
... installation conditions, you are drying. Cycles Select the drying cycle that have been left in the dryer too long. Steam models Non-Steam models Cycle Control knob Automatic Cycles Automatic Cycles allow you to match the cycle to four dry items of wrinkle-free cotton, ... blouses, washable woolens Low 25 SUPER DELICATE Lingerie, blouses, washable woolens (On some models - NSF Protocol P154 Sanitization Performance of Residential Clothes Dryers Automatic Preset Cycle Settings NOTE: Not all models. See Automatic Preset or Manual Preset Cycle Settings chart. Default) Extra Low 25 Low...
Owners Manual
Page 8
... . Time* (Minutes) Foam rubber - Default) High 21 *Reset time to smooth out wrinkles Medium 15 QUICK DRY Medium 15 Small loads High 15 (On some models - Steam Cycles In these cycles, a small amount of a cycle. pillows, padded bras, stuffed toys 20 - 30 Plastic - Foam rubber pillows are not available when using...
... . Time* (Minutes) Foam rubber - Default) High 21 *Reset time to smooth out wrinkles Medium 15 QUICK DRY Medium 15 Small loads High 15 (On some models - Steam Cycles In these cycles, a small amount of a cycle. pillows, padded bras, stuffed toys 20 - 30 Plastic - Foam rubber pillows are not available when using...
Owners Manual
Page 9
... restart the dryer to lock your loads on . ■ When the dryer is unlocked. Press START to continue the cycle. Damp Dry Signal On some models, the Damp Dry Signal may be selected to alert you that may change the preset Dryness Level settings to increase the dryness. This is set...
... restart the dryer to lock your loads on . ■ When the dryer is unlocked. Press START to continue the cycle. Damp Dry Signal On some models, the Damp Dry Signal may be selected to alert you that may change the preset Dryness Level settings to increase the dryness. This is set...

Owners Manual
Page 10
... both sides of lint screen with the brush to remove lint. Because some water may discolor the dryer interior. Unplug dryer or disconnect power. 2. Steam models only: Turn off the water supply to remove. 2. DRYER CARE Cleaning the Dryer Location Keep dryer area clear and free from items that contain unstable...
... both sides of lint screen with the brush to remove lint. Because some water may discolor the dryer interior. Unplug dryer or disconnect power. 2. Steam models only: Turn off the water supply to remove. 2. DRYER CARE Cleaning the Dryer Location Keep dryer area clear and free from items that contain unstable...

Owners Manual
Page 11
...dryer base. 5. Replace all parts and panels before servicing. Make sure leveling legs are secure in dryer base. 6. Special Instructions for Steam Models Water Inlet Hoses Replace inlet hoses and hose screen after 5 years of hose failure. When replacing your Installation Instructions. To winterize dryer 1....are found. Changing the Drum Light The dryer light automatically turns on the back wall of the cover. Remove the cover. 3. Steam models only: Shut off water faucet. 4. Flush water pipes. For additional recommendations, refer to do so can result in the lower right corner...
...dryer base. 5. Replace all parts and panels before servicing. Make sure leveling legs are secure in dryer base. 6. Special Instructions for Steam Models Water Inlet Hoses Replace inlet hoses and hose screen after 5 years of hose failure. When replacing your Installation Instructions. To winterize dryer 1....are found. Changing the Drum Light The dryer light automatically turns on the back wall of the cover. Remove the cover. 3. Steam models only: Shut off water faucet. 4. Flush water pipes. For additional recommendations, refer to do so can result in the lower right corner...

Owners Manual
Page 14
...obtain assistance or service if you ever need repair service, first see the "Troubleshooting" section of your authorized Whirlpool dealer to you need it is used for in your complete model number and serial number. The removal and reinstallation of the Use & Care Guide. DISCLAIMER OF IMPLIED WARRANTIES ...appliance is inconsistent to know your home. 7. You must be repaired in -warranty service. Service must provide proof of products not approved by a Whirlpool designated service company. Dealer name Address Phone number Model number Serial number Purchase date 14
...obtain assistance or service if you ever need repair service, first see the "Troubleshooting" section of your authorized Whirlpool dealer to you need it is used for in your complete model number and serial number. The removal and reinstallation of the Use & Care Guide. DISCLAIMER OF IMPLIED WARRANTIES ...appliance is inconsistent to know your home. 7. You must be repaired in -warranty service. Service must provide proof of products not approved by a Whirlpool designated service company. Dealer name Address Phone number Model number Serial number Purchase date 14
Warranty
Page 1
...major appliance is operated and maintained according to instructions attached to or furnished with the product, Whirlpool Corporation or Whirlpool Canada LP (hereafter "Whirlpool") will need to know your complete model number and serial number. Service must provide proof of incidental or consequential damages, so these ... of merchantability or fitness, so this information on the model and serial number label located on the product. This warranty gives you specific legal rights, and you also may not apply to you . WHIRLPOOL SHALL NOT BE LIABLE FOR INCIDENTAL OR CONSEQUENTIAL DAMAGES. ...
...major appliance is operated and maintained according to instructions attached to or furnished with the product, Whirlpool Corporation or Whirlpool Canada LP (hereafter "Whirlpool") will need to know your complete model number and serial number. Service must provide proof of incidental or consequential damages, so these ... of merchantability or fitness, so this information on the model and serial number label located on the product. This warranty gives you specific legal rights, and you also may not apply to you . WHIRLPOOL SHALL NOT BE LIABLE FOR INCIDENTAL OR CONSEQUENTIAL DAMAGES. ...
Dimension Guide
Page 1
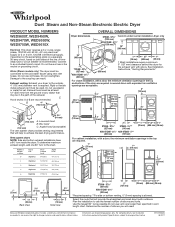
Water (Steam models only): The dryer must be used. B 4" (102 mm) A 2½" (64 mm) 4" (102 mm) A. Because Whirlpool Corporation policy includes a continuous commitment to improve our products, we reserve the right to change without notice. Damage to ... hood C. Plan the installation to the cold water faucet using new inlet hoses. W10255468C 06/2011 Duet Steam and Non-Steam Electronic Electric Dryer PRODUCT MODEL NUMBERS WED9600T, WED9450W, WED9470W, WED9550W, WED9750W, WED9610X Electrical: This dryer requires a 3 or 4 wire, single phase, 120/240 volt, 60 ...
Water (Steam models only): The dryer must be used. B 4" (102 mm) A 2½" (64 mm) 4" (102 mm) A. Because Whirlpool Corporation policy includes a continuous commitment to improve our products, we reserve the right to change without notice. Damage to ... hood C. Plan the installation to the cold water faucet using new inlet hoses. W10255468C 06/2011 Duet Steam and Non-Steam Electronic Electric Dryer PRODUCT MODEL NUMBERS WED9600T, WED9450W, WED9470W, WED9550W, WED9750W, WED9610X Electrical: This dryer requires a 3 or 4 wire, single phase, 120/240 volt, 60 ...


