

Installation Instructions
Page 2
Leveling legs (4) B. Rubber washer Remove parts package from whom you purchased your Use and Care Guide. 2 NOTE: Do not use leveling legs supplied with dryer if installing on a pedestal. 4 ...
Leveling legs (4) B. Rubber washer Remove parts package from whom you purchased your Use and Care Guide. 2 NOTE: Do not use leveling legs supplied with dryer if installing on a pedestal. 4 ...

Installation Instructions
Page 3
...) 38" (965 mm) 31 1/2" (800 mm) 27" (686 mm) 51 1/2" (1308 mm) NOTE: Most installations require a minimum 5" (127 mm) clearance behind the dryer for your washer using a power supply cord, a grounded electrical outlet located within 4 ft (1.2 m) of the dryer, and water pressure of an automatic sensor cycle. Venting Dimensions C A* B Back View...
...) 38" (965 mm) 31 1/2" (800 mm) 27" (686 mm) 51 1/2" (1308 mm) NOTE: Most installations require a minimum 5" (127 mm) clearance behind the dryer for your washer using a power supply cord, a grounded electrical outlet located within 4 ft (1.2 m) of the dryer, and water pressure of an automatic sensor cycle. Venting Dimensions C A* B Back View...

Installation Instructions
Page 5
..., Title 24 CFR, Part 3280 (formerly the Federal Standard for stacked recessed or closet installation. Recommended installation spacing for recessed or closet installation, with stacked washer and dryer The dimensions shown are for the recommended spacing. 48 in.2 * (310 cm2) 3"* (76 mm) 24 in remodeling after 1996, and all local codes...
..., Title 24 CFR, Part 3280 (formerly the Federal Standard for stacked recessed or closet installation. Recommended installation spacing for recessed or closet installation, with stacked washer and dryer The dimensions shown are for the recommended spacing. 48 in.2 * (310 cm2) 3"* (76 mm) 24 in remodeling after 1996, and all local codes...
Installation Instructions
Page 14
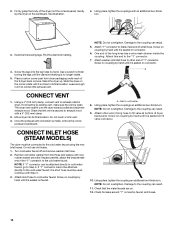
...final location. Leave enough room to cold water faucet. A CONNECT VENT 1. Damage to the cold water faucet. NOTE: Do not overtighten. Attach washer cold inlet hose to other end of long hose to fill valve at bottom of the "Y" connector to the coupling can result. 11. Once.... Move dryer into the leg holes by hand until it is made, remove the corner posts and cardboard. Turn cold water faucet off and remove washer inlet hose. 2. Firmly grasp the body of "Y" connector. See illustration. 4. Attach short hose to connect the exhaust vent. Inlet to the coupling ...
...final location. Leave enough room to cold water faucet. A CONNECT VENT 1. Damage to the cold water faucet. NOTE: Do not overtighten. Attach washer cold inlet hose to other end of long hose to fill valve at bottom of the "Y" connector to the coupling can result. 11. Once.... Move dryer into the leg holes by hand until it is made, remove the corner posts and cardboard. Turn cold water faucet off and remove washer inlet hose. 2. Firmly grasp the body of "Y" connector. See illustration. 4. Attach short hose to connect the exhaust vent. Inlet to the coupling ...
Owners Manual
Page 5
... the State of how to follow these instructions can completely remove oil. Do not dry anything flammable on it (even after washing). Fire Hazard No washer can result in death or fire. Do not dry anything that has ever had anything that has ever had any type of oil on it...
... the State of how to follow these instructions can completely remove oil. Do not dry anything flammable on it (even after washing). Fire Hazard No washer can result in death or fire. Do not dry anything that has ever had anything that has ever had any type of oil on it...


