
Use & Care Guide
Page 10
... lint screen. Make sure leveling legs are secure in dryer base. 6. Turn off valve to secure dryer door. Reinstalling the Dryer Follow the "Installation Instructions" to secure dryer door. Open the dryer door. Replace all parts and panels before servicing. Disconnect wiring. 3. Unplug or disconnect power to dryer pipe. 4. Disconnect gas supply line pipe and remove fittings...
... lint screen. Make sure leveling legs are secure in dryer base. 6. Turn off valve to secure dryer door. Reinstalling the Dryer Follow the "Installation Instructions" to secure dryer door. Open the dryer door. Replace all parts and panels before servicing. Disconnect wiring. 3. Unplug or disconnect power to dryer pipe. 4. Disconnect gas supply line pipe and remove fittings...
Installation Guide
Page 4
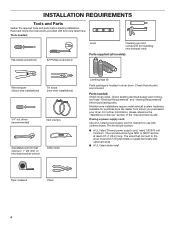
...Read and follow the instructions provided with upturned ends. ■■ A UL listed strain relief. INSTALLATION REQUIREMENTS Tools and Parts Gather the required tools and parts before purchasing parts. For further information, please reference the "Assistance or Service" section of the "Use and Care Guide...knife Leveling legs (4) Parts package is located in ring terminals or spade terminals with any tools listed here. If using a power supply cord: Use a UL listed power supply cord kit marked for purchase from the dealer from whom you purchased your dryer. Tape measure Pliers...
...Read and follow the instructions provided with upturned ends. ■■ A UL listed strain relief. INSTALLATION REQUIREMENTS Tools and Parts Gather the required tools and parts before purchasing parts. For further information, please reference the "Assistance or Service" section of the "Use and Care Guide...knife Leveling legs (4) Parts package is located in ring terminals or spade terminals with any tools listed here. If using a power supply cord: Use a UL listed power supply cord kit marked for purchase from the dealer from whom you purchased your dryer. Tape measure Pliers...
Installation Guide
Page 5
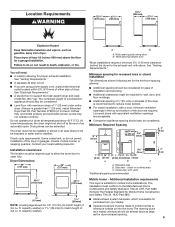
...38 mm) NOTE: Leveling legs should be extended. Wide opening hamper door *Most installations require a minimum 5½" (140 mm) clearance behind the dryer for ease of an automatic cycle. Louvered doors with equivalent ventilation openings are required. Recessed area B. Closet door with elbow. The opening . 5 ..., and floor moldings. ■■ Additional spacing of 1" (25 mm) on all sides of the dryer is greater than 1" [25 mm], install Extended Dryer Feet Kit, Part Number 279810.) If not level, clothes may not tumble properly and automatic sensor cycles may not operate correctly....
...38 mm) NOTE: Leveling legs should be extended. Wide opening hamper door *Most installations require a minimum 5½" (140 mm) clearance behind the dryer for ease of an automatic cycle. Louvered doors with equivalent ventilation openings are required. Recessed area B. Closet door with elbow. The opening . 5 ..., and floor moldings. ■■ Additional spacing of 1" (25 mm) on all sides of the dryer is greater than 1" [25 mm], install Extended Dryer Feet Kit, Part Number 279810.) If not level, clothes may not tumble properly and automatic sensor cycles may not operate correctly....
Installation Guide
Page 14
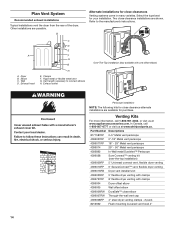
...installations are possible. Venting Kits For more information, call 1-800-807-6777 or visit us at www.whirlpoolparts.ca. Part Number Descriptions 8171587RP 0-5" Metal vent periscope 4396037RP 0"-18" Metal vent periscope 4396011RP 18" - 29" Metal vent periscope...the-top installation) 4396009RP 5' Universal connect vent, flexible dryer venting 4396010RP 6' SecureConnect™ vent, flexible dryer venting 4396013RB Dryer vent installer's kit 4396033RP 5' flexible dryer venting with clamps 4396727RP 8' flexible dryer venting with one offset elbow) Periscope installation NOTE: The...
...installations are possible. Venting Kits For more information, call 1-800-807-6777 or visit us at www.whirlpoolparts.ca. Part Number Descriptions 8171587RP 0-5" Metal vent periscope 4396037RP 0"-18" Metal vent periscope 4396011RP 18" - 29" Metal vent periscope...the-top installation) 4396009RP 5' Universal connect vent, flexible dryer venting 4396010RP 6' SecureConnect™ vent, flexible dryer venting 4396013RB Dryer vent installer's kit 4396033RP 5' flexible dryer venting with clamps 4396727RP 8' flexible dryer venting with one offset elbow) Periscope installation NOTE: The...
Installation Guide
Page 16
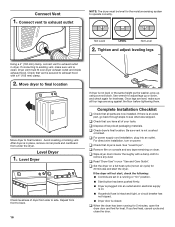
...and check again for heat. Repeat from front to existing vent, make sure all parts are level, make sure vent is clean. Once legs are now installed. q Dispose of/recycle all of dryer from under the dryer. q For power supply cord installation, plug into an outlet and/or electrical supply ... minutes and start , check the following: ■■ Controls are snug against the floor before tightening them. q Check dryer's final location. If there is not crushed or kinked. Be sure vent is an extra part, go back through steps to final location. Avoid crushing or kinking vent. Move...
...and check again for heat. Repeat from front to existing vent, make sure all parts are level, make sure vent is clean. Once legs are now installed. q Dispose of/recycle all of dryer from under the dryer. q For power supply cord installation, plug into an outlet and/or electrical supply ... minutes and start , check the following: ■■ Controls are snug against the floor before tightening them. q Check dryer's final location. If there is not crushed or kinked. Be sure vent is an extra part, go back through steps to final location. Avoid crushing or kinking vent. Move...
Installation Guide
Page 17
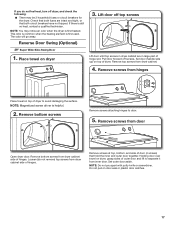
... Place towel on top of hinges. Set outer door aside. Do not pull on dryer 3. The odor will go away. Lift door off top screws Lift door until top screws in large part of hinges. Remove screws from dryer cabinet. 4. This odor is common when the heating element is first heated. Pull door... forward off dryer, and check the following: ■■ There may notice an odor when the...
... Place towel on top of hinges. Set outer door aside. Do not pull on dryer 3. The odor will go away. Lift door off top screws Lift door until top screws in large part of hinges. Remove screws from dryer cabinet. 4. This odor is common when the heating element is first heated. Pull door... forward off dryer, and check the following: ■■ There may notice an odor when the...


