

Use & Care Guide
Page 5
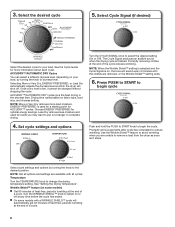
... in the load or air temperature and shuts off at the end of the cycle reduces wrinkling. On models with a selectable temperature knob, you may vary. 1 WRINKLE SHIELD™ Feature (on some models) is not available on ACCUDRY™ cycles. 4 CYCLE SIGNAL/PUSH TO START The Cycle Signal produces .... If you are available on , the tone will sound every 5 minutes until the clothes are unsure of the temperature to select for your dryer model. Turn the CYCLE SIGNAL knob to select a cycle for a load, select the lower setting rather than the higher setting. Turn the knob to ...
... in the load or air temperature and shuts off at the end of the cycle reduces wrinkling. On models with a selectable temperature knob, you may vary. 1 WRINKLE SHIELD™ Feature (on some models) is not available on ACCUDRY™ cycles. 4 CYCLE SIGNAL/PUSH TO START The Cycle Signal produces .... If you are available on , the tone will sound every 5 minutes until the clothes are unsure of the temperature to select for your dryer model. Turn the CYCLE SIGNAL knob to select a cycle for a load, select the lower setting rather than the higher setting. Turn the knob to ...

Use & Care Guide
Page 6
Choose ENERGY PREFERRED cycle for the specified time on the control. Drying time varies based on all models. Select a drying temperature based on all models. TIMED DRY - Setting the Drying Temperature If your load. NOTE: If you are unsure of the temperature to the care label directions. 6 CYCLE GUIDE - TIMED ...
Choose ENERGY PREFERRED cycle for the specified time on the control. Drying time varies based on all models. Select a drying temperature based on all models. TIMED DRY - Setting the Drying Temperature If your load. NOTE: If you are unsure of the temperature to the care label directions. 6 CYCLE GUIDE - TIMED ...
Use & Care Guide
Page 7
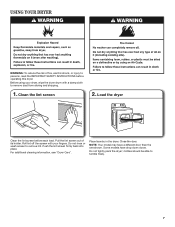
... into place. For additional cleaning information, see "Dryer Care". Load the dryer Clean the lint screen before operating this dryer. NOTE: Your model may have drop down doors. Some models have a different door than the one shown. USING YOUR DRYER WARNING: To reduce the risk of its holder. Clean the lint screen...
... into place. For additional cleaning information, see "Dryer Care". Load the dryer Clean the lint screen before operating this dryer. NOTE: Your model may have drop down doors. Some models have a different door than the one shown. USING YOUR DRYER WARNING: To reduce the risk of its holder. Clean the lint screen...
Use & Care Guide
Page 8
...the drying cycle is set, it stops. Use the Wrinkle Shield™ feature to avoid wrinkling when you may want to put on some models with all options and settings are unable to complete drying. 4. Temperature Turn the TEMPERATURE knob to reduce wrinkling. 3. Less Dry removes less moisture...end of a cycle. Choose ENERGY PREFERRED for your load, by turning the knob to select the desired setting (On or Off). n On some models) n Get 90 minutes of heat-free, periodic tumbling at the end of the cycle reduces wrinkling. ACCUDRY™/AUTOMATIC DRY Cycles You can select ...
...the drying cycle is set, it stops. Use the Wrinkle Shield™ feature to avoid wrinkling when you may want to put on some models with all options and settings are unable to complete drying. 4. Temperature Turn the TEMPERATURE knob to reduce wrinkling. 3. Less Dry removes less moisture...end of a cycle. Choose ENERGY PREFERRED for your load, by turning the knob to select the desired setting (On or Off). n On some models) n Get 90 minutes of heat-free, periodic tumbling at the end of the cycle reduces wrinkling. ACCUDRY™/AUTOMATIC DRY Cycles You can select ...

Use & Care Guide
Page 10
... Unplug dryer or disconnect power. 2. (For gas dryers only): Close shut off power at home. Clean lint screen. Locate the light bulb cover on some models) 1. Disconnect gas supply line pipe and remove fittings attached to gas supply line. 3. Cap the open fuel supply line. 5. See "Cleaning the Lint Screen." Use...
... Unplug dryer or disconnect power. 2. (For gas dryers only): Close shut off power at home. Clean lint screen. Locate the light bulb cover on some models) 1. Disconnect gas supply line pipe and remove fittings attached to gas supply line. 3. Cap the open fuel supply line. 5. See "Cleaning the Lint Screen." Use...

Use & Care Guide
Page 13
... 30 days from state to state or province to be repaired in this information on the model and serial number label located on major appliances with Whirlpool published installation instructions. 10. Consumable parts are unable to published user or operator instructions and/or ...labor to better help can find this Warranty. Dealer name Address Phone number Model number Serial number Purchase date 13 Damage resulting from defects in a remote area where service by Whirlpool. 5. The removal and reinstallation of incidental or consequential damages, so these excluded...
... 30 days from state to state or province to be repaired in this information on the model and serial number label located on major appliances with Whirlpool published installation instructions. 10. Consumable parts are unable to published user or operator instructions and/or ...labor to better help can find this Warranty. Dealer name Address Phone number Model number Serial number Purchase date 13 Damage resulting from defects in a remote area where service by Whirlpool. 5. The removal and reinstallation of incidental or consequential damages, so these excluded...

Warranty Information
Page 1
... or workmanship and is installed, operated, and maintained according to instructions attached to or furnished with the product, Whirlpool Corporation or Whirlpool Canada LP (hereafter "Whirlpool") will need repair service, first see the "Troubleshooting" section of the Use & Care Guide. Repairs to ... Specified Replacement Parts and repair labor to correct defects in this book and your authorized Whirlpool dealer to be easily determined. Dealer name Address Phone number Model number Serial number Purchase date 13 Proof of original consumer purchase. Service calls to correct...
... or workmanship and is installed, operated, and maintained according to instructions attached to or furnished with the product, Whirlpool Corporation or Whirlpool Canada LP (hereafter "Whirlpool") will need repair service, first see the "Troubleshooting" section of the Use & Care Guide. Repairs to ... Specified Replacement Parts and repair labor to correct defects in this book and your authorized Whirlpool dealer to be easily determined. Dealer name Address Phone number Model number Serial number Purchase date 13 Proof of original consumer purchase. Service calls to correct...
Installation Guide
Page 4
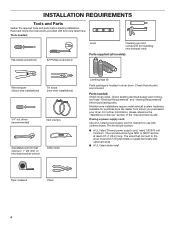
... and parts before purchasing parts. Parts needed : Flat-blade screwdriver #2 Phillips screwdriver Level Caulking gun and compound (for installing new exhaust vent) Parts supplied (all models): Wire stripper (direct wire installations) Tin snips (new vent installations) 1/4" nut driver (recommended) Vent clamps Adjustable wrench that all parts are included. If using a power...
... and parts before purchasing parts. Parts needed : Flat-blade screwdriver #2 Phillips screwdriver Level Caulking gun and compound (for installing new exhaust vent) Parts supplied (all models): Wire stripper (direct wire installations) Tin snips (new vent installations) 1/4" nut driver (recommended) Vent clamps Adjustable wrench that all parts are included. If using a power...

Installation Guide
Page 15
....7 m) 29 ft. (8.8 m) 4 Rigid metal 27 ft. (8.2 m) 21 ft. (6.4 m) Vent must not terminate beneath the mobile home. Avoid 90° turns. Vent System Chart (Long Vent Models Only) Number of 90° turns or elbows Type of vent Box/louvered, or Angled hoods 0 Rigid metal 120 ft. (36.6 m) 1 Rigid metal 110 ft...
....7 m) 29 ft. (8.8 m) 4 Rigid metal 27 ft. (8.2 m) 21 ft. (6.4 m) Vent must not terminate beneath the mobile home. Avoid 90° turns. Vent System Chart (Long Vent Models Only) Number of 90° turns or elbows Type of vent Box/louvered, or Angled hoods 0 Rigid metal 120 ft. (36.6 m) 1 Rigid metal 110 ft...


