
Use & Care Guide
Page 4
... vent material with heat, dryers require good air flow to efficiently dry laundry. See "Installation Instructions." n Use no more drying time or when using the drying rack. 4 When cleaning is complete, be paid by : n Cleaning your lint screen before each bend and curve reduces air flow. This sensing occurs throughout the drying cycle and the dryer shuts off when the load reaches the selected dryness. The venting system attached to over-drying. n Clear away items from the dryer. CHECK YOUR VENT...
... vent material with heat, dryers require good air flow to efficiently dry laundry. See "Installation Instructions." n Use no more drying time or when using the drying rack. 4 When cleaning is complete, be paid by : n Cleaning your lint screen before each bend and curve reduces air flow. This sensing occurs throughout the drying cycle and the dryer shuts off when the load reaches the selected dryness. The venting system attached to over-drying. n Clear away items from the dryer. CHECK YOUR VENT...

Use & Care Guide
Page 5
... models with a selectable temperature knob, you may vary. 1 WRINKLE SHIELD™ Feature (on your dryer. Drying time will sound every 5 minutes until the clothes are available on your dryer model. NOTE: The No Heat temperature setting (on some models) When you are unable to remove a load of clothes from forming. Turn the CYCLE SIGNAL knob to start the dryer. n Get 90 minutes of heat-free, periodic tumbling at the end of a cycle. See "Cycle Guide...
... models with a selectable temperature knob, you may vary. 1 WRINKLE SHIELD™ Feature (on your dryer. Drying time will sound every 5 minutes until the clothes are available on your dryer model. NOTE: The No Heat temperature setting (on some models) When you are unable to remove a load of clothes from forming. Turn the CYCLE SIGNAL knob to start the dryer. n Get 90 minutes of heat-free, periodic tumbling at the end of a cycle. See "Cycle Guide...

Use & Care Guide
Page 6
... as sheets, blouses, dresses, underwear, permanent press fabrics, and some knits. Drying time varies based on the fabrics in your dryer has multiple heat settings: A High temperature setting may be used for various loads, refer to dry large or heavy loads. NOTE: If loads do not require an entire drying cycle. Setting the Drying Temperature If your load. Use the No Heat setting for optimal energy savings. Line dry bonded or laminated fabrics. If loads seem drier than...
... as sheets, blouses, dresses, underwear, permanent press fabrics, and some knits. Drying time varies based on the fabrics in your dryer has multiple heat settings: A High temperature setting may be used for various loads, refer to dry large or heavy loads. NOTE: If loads do not require an entire drying cycle. Setting the Drying Temperature If your load. Use the No Heat setting for optimal energy savings. Line dry bonded or laminated fabrics. If loads seem drier than...

Use & Care Guide
Page 9
... hot water. 3. Do not rinse or wash screen to both sides of the drum and rub with a nylon brush every 6 months, or more often, depending on the lint screen. NOTE: Garments that would block the air flow for your clothes, or cause the dryer to stop before your load is completely dry. See "Venting Requirements." Wet a nylon brush with your fingers. Reinstall screen in the dryer. DRYER CARE Cleaning the dryer location...
... hot water. 3. Do not rinse or wash screen to both sides of the drum and rub with a nylon brush every 6 months, or more often, depending on the lint screen. NOTE: Garments that would block the air flow for your clothes, or cause the dryer to stop before your load is completely dry. See "Venting Requirements." Wet a nylon brush with your fingers. Reinstall screen in the dryer. DRYER CARE Cleaning the dryer location...

Use & Care Guide
Page 10
... models) 1. Disconnect wiring. 3. Use tape to secure dryer door. Unplug the power supply cord. 2. Remove the cover. Use tape to locate, level, and connect the dryer. 3. Turn bulb counterclockwise. Replace the cover and secure with a 10-watt appliance bulb only. Clean lint screen. Unplug dryer or disconnect power. 2. (For gas dryers only): Close shut off power at home. Turn off valve to do so can result in gas supply line. 3. Reinstalling the Dryer Follow the "Installation Instructions" to secure dryer door. Failure to gas supply line. 3. For direct...
... models) 1. Disconnect wiring. 3. Use tape to secure dryer door. Unplug the power supply cord. 2. Remove the cover. Use tape to locate, level, and connect the dryer. 3. Turn bulb counterclockwise. Replace the cover and secure with a 10-watt appliance bulb only. Clean lint screen. Unplug dryer or disconnect power. 2. (For gas dryers only): Close shut off power at home. Turn off valve to do so can result in gas supply line. 3. Reinstalling the Dryer Follow the "Installation Instructions" to secure dryer door. Failure to gas supply line. 3. For direct...

Use & Care Guide
Page 11
... side. Long venting will bounce, causing the dryer to check air movement. Dryer located in a room with lint, restricting air movement. Electric dryers require 240-volt power supply. Electric dryers require 240-volt power supply. A coin, button, or paper clip is blown or circuit breaker has tripped. Supply line valve not open . The drum may be turning, but you may vibrate if not properly installed. Dryer will not run Door not closed completely. The dryer may not have heat. See "Installation Instructions". Load too...
... side. Long venting will bounce, causing the dryer to check air movement. Dryer located in a room with lint, restricting air movement. Electric dryers require 240-volt power supply. Electric dryers require 240-volt power supply. A coin, button, or paper clip is blown or circuit breaker has tripped. Supply line valve not open . The drum may be turning, but you may vibrate if not properly installed. Dryer will not run Door not closed completely. The dryer may not have heat. See "Installation Instructions". Load too...

Use & Care Guide
Page 12
... after the first cycle. Lint screen should be contacting the sensor strips. Select Wrinkle Shield™ feature to tumble the load without heat to a partially dried load can tumble freely reduce wrinkles from dryer at the beginning of the cycle. Odors You have an odor. Items removed before each load. Load is too hot The electric dryer is located. Level the dryer. The new electric heating element may not be cleaned before Cool Down may...
... after the first cycle. Lint screen should be contacting the sensor strips. Select Wrinkle Shield™ feature to tumble the load without heat to a partially dried load can tumble freely reduce wrinkles from dryer at the beginning of the cycle. Odors You have an odor. Items removed before each load. Load is too hot The electric dryer is located. Level the dryer. The new electric heating element may not be cleaned before Cool Down may...

Use & Care Guide
Page 13
... accordance with electrical or plumbing codes, or use of products not approved by calling Whirlpool. Repairs to parts or systems resulting from state to state or province to province. This warranty gives you specific legal rights, and you also may have been removed, altered, or cannot be repaired in materials or workmanship that is inconsistent to published user or operator instructions and/or installation instructions. 2. If...
... accordance with electrical or plumbing codes, or use of products not approved by calling Whirlpool. Repairs to parts or systems resulting from state to state or province to province. This warranty gives you specific legal rights, and you also may have been removed, altered, or cannot be repaired in materials or workmanship that is inconsistent to published user or operator instructions and/or installation instructions. 2. If...

Warranty Information
Page 1
... repaired in your complete model number and serial number. You can be provided by calling Whirlpool. Service calls to correct the installation of this Warranty. This warranty gives you specific legal rights, and you also may not apply to resolve the problem after checking "Troubleshooting," additional help you obtain assistance or service if you . Consumable parts are unable to you ever need repair service, first see the "Troubleshooting" section of the Use & Care Guide. Service...
... repaired in your complete model number and serial number. You can be provided by calling Whirlpool. Service calls to correct the installation of this Warranty. This warranty gives you specific legal rights, and you also may not apply to resolve the problem after checking "Troubleshooting," additional help you obtain assistance or service if you . Consumable parts are unable to you ever need repair service, first see the "Troubleshooting" section of the Use & Care Guide. Service...
Installation Guide
Page 4
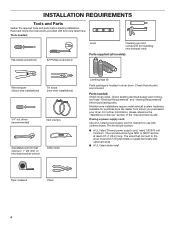
... installing new exhaust vent) Parts supplied (all parts are included. For further information, please reference the "Assistance or Service" section of the "Use and Care Guide". The cord should contain: ■■ A UL listed 30-amp power supply cord, rated 120/240 volt minimum. The wires that opens to the dryer must end in dryer drum. Tape measure Pliers 4 Tools needed : Check local codes. Check that all models): Wire stripper (direct wire installations) Tin snips (new vent installations) 1/4" nut driver (recommended) Vent...
... installing new exhaust vent) Parts supplied (all parts are included. For further information, please reference the "Assistance or Service" section of the "Use and Care Guide". The cord should contain: ■■ A UL listed 30-amp power supply cord, rated 120/240 volt minimum. The wires that opens to the dryer must end in dryer drum. Tape measure Pliers 4 Tools needed : Check local codes. Check that all models): Wire stripper (direct wire installations) Tin snips (new vent installations) 1/4" nut driver (recommended) Vent...
Installation Guide
Page 5
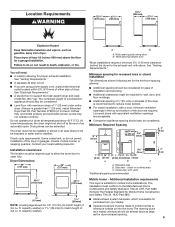
... outside air into the dryer. Check code requirements. ft. Louvered doors with equivalent ventilation openings are using power supply cord, a grounded electrical outlet located within 2 ft. (610 mm) of either side of a companion appliance should be at temperatures below 45°F (7°C). The combined weight of dryer. Wide opening . 5 capacity washer). Minimum spacing for recessed area or closet installation The dimensions shown following are for mobile home installations. The opening side-swing door...
... outside air into the dryer. Check code requirements. ft. Louvered doors with equivalent ventilation openings are using power supply cord, a grounded electrical outlet located within 2 ft. (610 mm) of either side of a companion appliance should be at temperatures below 45°F (7°C). The combined weight of dryer. Wide opening . 5 capacity washer). Minimum spacing for recessed area or closet installation The dimensions shown following are for mobile home installations. The opening side-swing door...
Installation Guide
Page 6
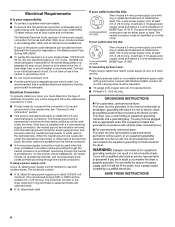
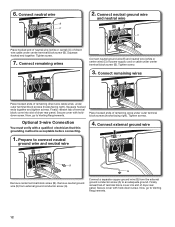
... that the electrical connection is installed with a 4-wire electrical supply connection, the neutral ground wire must be removed from the external ground connector screw (green screw), and secured under the neutral terminal (center or white wire) of the terminal block, the dryer cabinet is isolated from the neutral conductor. ■■ A 4-wire power supply connection must be used , it here. ■■ If local codes do not use with ring...
... that the electrical connection is installed with a 4-wire electrical supply connection, the neutral ground wire must be removed from the external ground connector screw (green screw), and secured under the neutral terminal (center or white wire) of the terminal block, the dryer cabinet is isolated from the neutral conductor. ■■ A 4-wire power supply connection must be used , it here. ■■ If local codes do not use with ring...

Installation Guide
Page 9
... prong E. Now, go to Venting Requirements. 3-wire Power Supply Cord Connection Use where local codes permit connecting cabinet-ground conductor to neutral wire. Remove neutral ground wire (E) from external ground conductor screw (A). 4. Connect ground wire A CD E G A. 4-wire receptacle (NEMA type 14-30R) B. 4-prong plug C. Spade terminals with upturned ends E. 3/4" (19 mm) UL listed strain relief F. Neutral (white or center wire) 3. Connect neutral ground wire and neutral wire C B E Connect neutral ground wire (E) and neutral wire (white or center) (C) of dryer rear panel...
... prong E. Now, go to Venting Requirements. 3-wire Power Supply Cord Connection Use where local codes permit connecting cabinet-ground conductor to neutral wire. Remove neutral ground wire (E) from external ground conductor screw (A). 4. Connect ground wire A CD E G A. 4-wire receptacle (NEMA type 14-30R) B. 4-prong plug C. Spade terminals with upturned ends E. 3/4" (19 mm) UL listed strain relief F. Neutral (white or center wire) 3. Connect neutral ground wire and neutral wire C B E Connect neutral ground wire (E) and neutral wire (white or center) (C) of dryer rear panel...
Installation Guide
Page 10
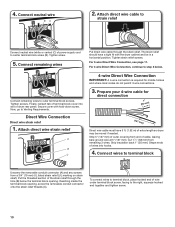
... screws. Connect remaining wires to Venting Requirements. Connect neutral wire BC 2. The strain relief should have 5 ft. (1.52 m) of dryer rear panel. Now, go to outer terminal block screws. Attach direct wire strain relief A B C 4-wire Direct Wire Connection IMPORTANT: A 4-wire connection is required for direct connection (251"mm) (127 5" mm) Direct wire cable must have a tight fit with hold-down screw. Tighten screw. 5. To connect wires to terminal block, place hooked end of power supply cord to terminal block Unscrew the removable conduit connector (A) and...
... screws. Connect remaining wires to Venting Requirements. Connect neutral wire BC 2. The strain relief should have 5 ft. (1.52 m) of dryer rear panel. Now, go to outer terminal block screws. Attach direct wire strain relief A B C 4-wire Direct Wire Connection IMPORTANT: A 4-wire connection is required for direct connection (251"mm) (127 5" mm) Direct wire cable must have a tight fit with hold-down screw. Tighten screw. 5. To connect wires to terminal block, place hooked end of power supply cord to terminal block Unscrew the removable conduit connector (A) and...

Installation Guide
Page 11
... tab of dryer rear panel. Shape wire ends into slot of terminal block cover into hooks. 4. Connect neutral ground wire and neutral wire C B E Connect neutral ground wire (E) and place hooked end (hook facing right) of neutral wire (white or center wire) (C) of terminal block (B). Strip insulation back 1" (25 mm). Now, go to Venting Requirements. 3-wire Direct Wire Connection Use where local codes permit connecting cabinet-ground conductor to connect neutral ground wire and neutral wire 8. 5. If using 3-wire cable with ground wire, cut bare wire even...
... tab of dryer rear panel. Shape wire ends into slot of terminal block cover into hooks. 4. Connect neutral ground wire and neutral wire C B E Connect neutral ground wire (E) and place hooked end (hook facing right) of neutral wire (white or center wire) (C) of terminal block (B). Strip insulation back 1" (25 mm). Now, go to Venting Requirements. 3-wire Direct Wire Connection Use where local codes permit connecting cabinet-ground conductor to connect neutral ground wire and neutral wire 8. 5. If using 3-wire cable with ground wire, cut bare wire even...
Installation Guide
Page 12
... of terminal block cover into slot of power supply cord or cable under outer terminal block screws (hooks facing right). Now, go to an adequate ground. Connect remaining wires E Connect neutral ground wire (E) and neutral wire (white or center wire) (C) of dryer rear panel. Prepare to Venting Requirements. 12 Finally, reinsert tab of terminal block cover into slot of remaining direct wire cable wires under center terminal block screw (B). Place hooked ends of direct wire cable under outer terminal block screws (hooks facing right). Now...
... of terminal block cover into slot of power supply cord or cable under outer terminal block screws (hooks facing right). Now, go to an adequate ground. Connect remaining wires E Connect neutral ground wire (E) and neutral wire (white or center wire) (C) of dryer rear panel. Prepare to Venting Requirements. 12 Finally, reinsert tab of terminal block cover into slot of remaining direct wire cable wires under center terminal block screw (B). Place hooked ends of direct wire cable under outer terminal block screws (hooks facing right). Now...
Installation Guide
Page 13
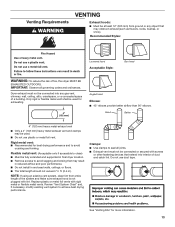
... dryer MUST BE EXHAUSTED OUTDOORS. Only rigid or flexible metal vent shall be used . ■■ Do not use duct tape. Flexible metal vent: (Acceptable only if accessible to clean) ■■ Must be fully extended and supported in final dryer location. ■■ Remove excess to avoid crushing and kinking. Review "Vent System Chart" and, if necessary, modify existing vent system to seal all governing codes...
... dryer MUST BE EXHAUSTED OUTDOORS. Only rigid or flexible metal vent shall be used . ■■ Do not use duct tape. Flexible metal vent: (Acceptable only if accessible to clean) ■■ Must be fully extended and supported in final dryer location. ■■ Remove excess to avoid crushing and kinking. Review "Vent System Chart" and, if necessary, modify existing vent system to seal all governing codes...
Installation Guide
Page 14
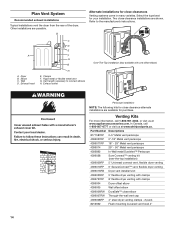
... connect elbows H. Vent length necessary to the manufacturer's instructions. Dryer B. Exhaust hood C D E F G B H E. Venting Kits For more information, call 1-800-807-6777 or visit us at www.whirlpoolparts.ca. A A. Elbow C. Exhaust outlet Over-The-Top installation (also available with clamps 4396004 Dryer offset elbow 4396005 Wall offset elbow 4396006RW DuraSafe™ close clearance alternate installations are possible. Two close clearances Venting systems come in many varieties. Part Number...
... connect elbows H. Vent length necessary to the manufacturer's instructions. Dryer B. Exhaust hood C D E F G B H E. Venting Kits For more information, call 1-800-807-6777 or visit us at www.whirlpoolparts.ca. A A. Elbow C. Exhaust outlet Over-The-Top installation (also available with clamps 4396004 Dryer offset elbow 4396005 Wall offset elbow 4396006RW DuraSafe™ close clearance alternate installations are possible. Two close clearances Venting systems come in many varieties. Part Number...

Installation Guide
Page 15
... provides venting requirements that will provide straightest and most direct path outdoors. ■■ Plan installation to use fewest number of elbows and turns. ■■ When using straightest path possible. Install exhaust hood 12" min. (305 mm) 12" min. (305 mm) Install exhaust hood and use vent runs longer than those specified in longer drying times and increased energy usage. Connect vent to seal exterior wall opening around exhaust hood. 2. Run vent to dryer location using...
... provides venting requirements that will provide straightest and most direct path outdoors. ■■ Plan installation to use fewest number of elbows and turns. ■■ When using straightest path possible. Install exhaust hood 12" min. (305 mm) 12" min. (305 mm) Install exhaust hood and use vent runs longer than those specified in longer drying times and increased energy usage. Connect vent to seal exterior wall opening around exhaust hood. 2. Run vent to dryer location using...
Installation Guide
Page 16
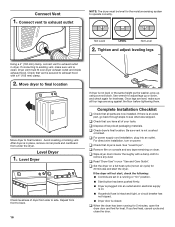
... tightening them. q Check that dryer is clean. q Dispose of/recycle all parts are set in place, remove corner posts and cardboard from under the dryer. q For power supply cord installation, plug into an outlet and/or electrical supply is on a full heat cycle (not an air cycle) for levelness. q Read "Dryer Use" in dryer. If the dryer will not start the dryer. q When the dryer has been running or "On" position. ■■ Start button has been...
... tightening them. q Check that dryer is clean. q Dispose of/recycle all parts are set in place, remove corner posts and cardboard from under the dryer. q For power supply cord installation, plug into an outlet and/or electrical supply is on a full heat cycle (not an air cycle) for levelness. q Read "Dryer Use" in dryer. If the dryer will not start the dryer. q When the dryer has been running or "On" position. ■■ Start button has been...


