
Use & Care Guide
Page 7
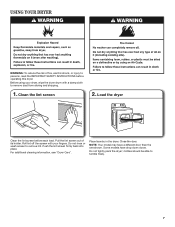
... the screen with a damp cloth to persons, read the IMPORTANT SAFETY INSTRUCTIONS before each load. Do not tightly pack the dryer; Before using your dryer, wipe the dryer drum with your fingers. Push the lint screen firmly back into place. Clean the lint screen 2. Pull the lint screen ...out of fire, electric shock, or injury to remove dust from storing and shipping. 1. For additional cleaning information, see "Dryer Care". USING YOUR DRYER WARNING: To reduce the risk of its holder. Do not rinse or wash screen ...
... the screen with a damp cloth to persons, read the IMPORTANT SAFETY INSTRUCTIONS before each load. Do not tightly pack the dryer; Before using your dryer, wipe the dryer drum with your fingers. Push the lint screen firmly back into place. Clean the lint screen 2. Pull the lint screen ...out of fire, electric shock, or injury to remove dust from storing and shipping. 1. For additional cleaning information, see "Dryer Care". USING YOUR DRYER WARNING: To reduce the risk of its holder. Do not rinse or wash screen ...

Use & Care Guide
Page 10
.... Changing the drum light (on vacation or not using your dryer only when you are secure in dryer base. 6. Locate the light bulb cover on the back wall of the dryer. WARNING Electrical Shock Hazard Disconnect power before operating. For direct-wired dryers: 1. For gas dryers: 1. Replace the bulb with the screw. 4. See "Cleaning the Lint...
.... Changing the drum light (on vacation or not using your dryer only when you are secure in dryer base. 6. Locate the light bulb cover on the back wall of the dryer. WARNING Electrical Shock Hazard Disconnect power before operating. For direct-wired dryers: 1. For gas dryers: 1. Replace the bulb with the screw. 4. See "Cleaning the Lint...

Use & Care Guide
Page 11
...turning, but you may not have ventilation openings at www.whirlpool.com/product_help In Canada www.whirlpool.ca for awhile, there may be a thumping sound during the first few minutes of operation. If the dryer hasn't been used for assistance and to vibrate. Clothing... hood clogged with heavy metal or flexible metal vent. Proper operation of fuse. Electric dryers require 240-volt power supply. Check with lint. Electric dryers use it only once. Electric dryers require 240-volt power supply. TROUBLESHOOTING First try the solutions suggested here or visit...
...turning, but you may not have ventilation openings at www.whirlpool.com/product_help In Canada www.whirlpool.ca for awhile, there may be a thumping sound during the first few minutes of operation. If the dryer hasn't been used for assistance and to vibrate. Clothing... hood clogged with heavy metal or flexible metal vent. Proper operation of fuse. Electric dryers require 240-volt power supply. Check with lint. Electric dryers use it only once. Electric dryers require 240-volt power supply. TROUBLESHOOTING First try the solutions suggested here or visit...

Use & Care Guide
Page 12
...™/Automatic Dry cycles. Stains on high. Drum stains are wrinkled Load not removed from dryer. Dry smaller loads that can stain your dryer is being used . Load is too hot The electric dryer is located. Select Wrinkle Shield™ feature to tumble the load without heat to a partially... Canada www.whirlpool.ca for assistance and to handle. The new electric heating element may feel very warm. Use Timed Dry for the first time. If so, ventilate the area. A high temperature cycle was used, or a separate temperature control was set on load or drum Dryer fabric softener...
...™/Automatic Dry cycles. Stains on high. Drum stains are wrinkled Load not removed from dryer. Dry smaller loads that can stain your dryer is being used . Load is too hot The electric dryer is located. Select Wrinkle Shield™ feature to tumble the load without heat to a partially... Canada www.whirlpool.ca for assistance and to handle. The new electric heating element may feel very warm. Use Timed Dry for the first time. If so, ventilate the area. A high temperature cycle was used, or a separate temperature control was set on load or drum Dryer fabric softener...
Installation Guide
Page 4
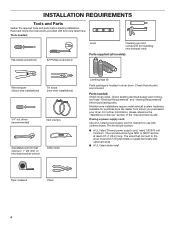
.../240 volt minimum. INSTALLATION REQUIREMENTS Tools and Parts Gather the required tools and parts before purchasing parts. Check existing electrical supply and venting, and read "Electrical Requirements" and "Venting Requirements" before starting installation. The kit should be type SRD or SRDT and be at ...a power supply cord: Use a UL listed power supply cord kit marked for purchase from the dealer from whom you purchased your dryer. The wires that all models): Wire stripper (direct wire installations) Tin snips (new vent installations) 1/4" nut driver (recommended) ...
.../240 volt minimum. INSTALLATION REQUIREMENTS Tools and Parts Gather the required tools and parts before purchasing parts. Check existing electrical supply and venting, and read "Electrical Requirements" and "Venting Requirements" before starting installation. The kit should be type SRD or SRDT and be at ...a power supply cord: Use a UL listed power supply cord kit marked for purchase from the dealer from whom you purchased your dryer. The wires that all models): Wire stripper (direct wire installations) Tin snips (new vent installations) 1/4" nut driver (recommended) ...
Installation Guide
Page 5
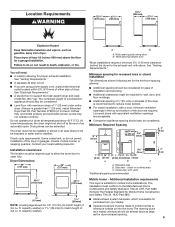
...13 mm) (to reduce noise transfer. ■■ For closet installation, with equivalent ventilation openings are using power supply cord, a grounded electrical outlet located within 2 ft. (610 mm) of either side of an automatic cycle. The installation must not be installed or stored in ... spacing should be large enough to allow the dryer door to match height of the dryer in the top and bottom of 200 lbs. (90.7 kg). See "Electrical Requirements." ■■ A sturdy floor to introduce outside air into the dryer. Wide opening side-swing door B. Louvered doors...
...13 mm) (to reduce noise transfer. ■■ For closet installation, with equivalent ventilation openings are using power supply cord, a grounded electrical outlet located within 2 ft. (610 mm) of either side of an automatic cycle. The installation must not be installed or stored in ... spacing should be large enough to allow the dryer door to match height of the dryer in the top and bottom of 200 lbs. (90.7 kg). See "Electrical Requirements." ■■ A sturdy floor to introduce outside air into the dryer. Wide opening side-swing door B. Louvered doors...
Installation Guide
Page 6
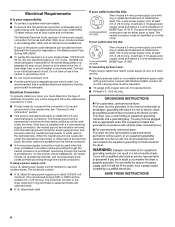
...ground wire to the neutral wire, see "Optional 3-wire connection" section. ■■ This dryer is permanently connected to install with flexible metallic conduit. Electrical Connection To properly install your dryer, you must end in remodeling after 1996, and all local codes and ordinances. The neutral ...power supply cord: Use a UL listed power supply cord kit marked for homes built after 1996, dryer circuits involved in ring terminals or spade terminals with the National Electrical Code, ANSI/NFPA 70-latest edition and all mobile home installations. When the neutral ground wire ...
...ground wire to the neutral wire, see "Optional 3-wire connection" section. ■■ This dryer is permanently connected to install with flexible metallic conduit. Electrical Connection To properly install your dryer, you must end in remodeling after 1996, and all local codes and ordinances. The neutral ...power supply cord: Use a UL listed power supply cord kit marked for homes built after 1996, dryer circuits involved in ring terminals or spade terminals with the National Electrical Code, ANSI/NFPA 70-latest edition and all mobile home installations. When the neutral ground wire ...

Installation Guide
Page 7
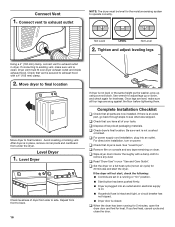
... connection may be used with either a power supply cord or a direct wire connection. 7 Install Leveling Legs Electrical Connection Power Supply Cord 1. Now stand the dryer on cardboard. 2. Electrical Connection Options 1. Power supply cord 3-wire receptacle (NEMA Type 10-30R): Go to Venting Requirements. ft. ... do not permit connection of 3.6 cu. place under entire back edge of 3.8 cu. Slide the dryer until bottom of dryer. Then go to connect the exhaust vent. Choose electrical connection type Power supply cord 4-wire receptacle (NEMA Type 14-30R): Go to steps 1-2 on page...
... connection may be used with either a power supply cord or a direct wire connection. 7 Install Leveling Legs Electrical Connection Power Supply Cord 1. Now stand the dryer on cardboard. 2. Electrical Connection Options 1. Power supply cord 3-wire receptacle (NEMA Type 10-30R): Go to Venting Requirements. ft. ... do not permit connection of 3.6 cu. place under entire back edge of 3.8 cu. Slide the dryer until bottom of dryer. Then go to connect the exhaust vent. Choose electrical connection type Power supply cord 4-wire receptacle (NEMA Type 14-30R): Go to steps 1-2 on page...
Installation Guide
Page 16
..., make sure vent is an extra part, go back through steps to final location. If there is clean. q Check dryer's final location. q For power supply cord installation, plug into an outlet and/or electrical supply is on. ■■ Household fuse is intact and tight, or circuit breaker has not tripped. ■...
..., make sure vent is an extra part, go back through steps to final location. If there is clean. q Check dryer's final location. q For power supply cord installation, plug into an outlet and/or electrical supply is on. ■■ Household fuse is intact and tight, or circuit breaker has not tripped. ■...


