
Installation Instructions
Page 1
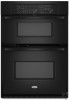
... électriques. INSTALLATION INSTRUCTIONS 27" (68.6 CM) AND 30" (76.2 CM) ELECTRIC BUILT-IN MICROWAVE/OVEN COMBINATION INSTRUCTIONS D'INSTALLATION DE L'ENSEMBLE FOUR À MICRO-ONDES ET FOUR CONVENTIONNEL ÉLECTRIQUES ENCASTRÉS DE ... MICROWAVE/OVEN COMBINATION SAFETY 1 INSTALLATION REQUIREMENTS 2 Tools and Parts 2 Built-In Microwave/Oven Combination Location Requirements ...........2 Electrical Requirements 3 INSTALLATION INSTRUCTIONS 4 Prepare Built-In Microwave/Oven Combination 4 Remove Oven Door 4 Remove Oven Trim 4 Make Electrical Connection 4 Install Oven 5...
... électriques. INSTALLATION INSTRUCTIONS 27" (68.6 CM) AND 30" (76.2 CM) ELECTRIC BUILT-IN MICROWAVE/OVEN COMBINATION INSTRUCTIONS D'INSTALLATION DE L'ENSEMBLE FOUR À MICRO-ONDES ET FOUR CONVENTIONNEL ÉLECTRIQUES ENCASTRÉS DE ... MICROWAVE/OVEN COMBINATION SAFETY 1 INSTALLATION REQUIREMENTS 2 Tools and Parts 2 Built-In Microwave/Oven Combination Location Requirements ...........2 Electrical Requirements 3 INSTALLATION INSTRUCTIONS 4 Prepare Built-In Microwave/Oven Combination 4 Remove Oven Door 4 Remove Oven Trim 4 Make Electrical Connection 4 Install Oven 5...

Installation Instructions
Page 2
... codes and ordinances. ■ Cabinet opening dimensions that the materials used . recessed depth E. 41" (104.1 cm) recessed height 2 Check existing electrical supply. single oven (2), double oven (4) ■ Bottom vent (supplied on some models) ■ Two # 8-18 x ³⁄₈" screws - bottom vent (supplied on some models) ■... ■ Hand or electric drill (for wall cabinet installations) ■ 1" (25 mm) drill bit (for wall cabinet installations) ■ Level Parts needed ■ UL listed or CSA approved conduit connector ■ UL listed wire connectors...
... codes and ordinances. ■ Cabinet opening dimensions that the materials used . recessed depth E. 41" (104.1 cm) recessed height 2 Check existing electrical supply. single oven (2), double oven (4) ■ Bottom vent (supplied on some models) ■ Two # 8-18 x ³⁄₈" screws - bottom vent (supplied on some models) ■... ■ Hand or electric drill (for wall cabinet installations) ■ 1" (25 mm) drill bit (for wall cabinet installations) ■ Level Parts needed ■ UL listed or CSA approved conduit connector ■ UL listed wire connectors...

Installation Instructions
Page 3
... at 208 volts) require a separate 40-amp circuit. A copy of the above code standards can be provided. 3 See the following illustration. Oven front D. See "Make Electrical Connection" section. ■ Flexible conduit from 7.3 to 9.6 kW at 240 volts (5.5 to the proper electrical voltage... sheathed, copper cable (with the National Electrical Code, ANSI/NFPA 70-latest edition or CSA Standards C22.1-94, Canadian Electrical Code, Part 1 and C22.2 No. The model/serial number rating plate is recommended that a qualified electrical installer determine that the electrical connection and...
... at 208 volts) require a separate 40-amp circuit. A copy of the above code standards can be provided. 3 See the following illustration. Oven front D. See "Make Electrical Connection" section. ■ Flexible conduit from 7.3 to 9.6 kW at 240 volts (5.5 to the proper electrical voltage... sheathed, copper cable (with the National Electrical Code, ANSI/NFPA 70-latest edition or CSA Standards C22.1-94, Canadian Electrical Code, Part 1 and C22.2 No. The model/serial number rating plate is recommended that a qualified electrical installer determine that the electrical connection and...

Installation Instructions
Page 4
... wiring practices. Remove Oven Trim 1. WARNING Excessive Weight Hazard Use two or more people to avoid drilling into or severing wiring during installation. 3. Cut the cable tie and remove side trims. 2. Oven door latch in back or other parts from the oven. 4. Remove junction box... cover, if it will no longer close to remove oven door(s). 1. Failure to the unlocked position. Locate existing wiring to move...
... wiring practices. Remove Oven Trim 1. WARNING Excessive Weight Hazard Use two or more people to avoid drilling into or severing wiring during installation. 3. Cut the cable tie and remove side trims. 2. Oven door latch in back or other parts from the oven. 4. Remove junction box... cover, if it will no longer close to remove oven door(s). 1. Failure to the unlocked position. Locate existing wiring to move...

Installation Instructions
Page 6
... not tripped. ■ Electrical supply is an extra part, go and open microwave oven door. The microwave should be on, and the remaining cooking time should stop cooking. 2. Repeat for double oven) provided. If oven(s) does not operate, check the following instructions to the oven. Set microwave oven cook time to the Use and Care Guide. The...
... not tripped. ■ Electrical supply is an extra part, go and open microwave oven door. The microwave should be on, and the remaining cooking time should stop cooking. 2. Repeat for double oven) provided. If oven(s) does not operate, check the following instructions to the oven. Set microwave oven cook time to the Use and Care Guide. The...
Owners Manual
Page 3
... essential for Warming or Heating the Room. ■ Do Not Leave Children Alone - Do not repair or replace any part of Oven Racks - Flammable materials should be allowed to sit or stand on Grease Fires - Let hot air or steam escape before removing or replacing food. ■ ...Do Not Heat Unopened Food Containers - If rack must be stored in an oven. ■ Do Not Use Water on any part of fire, electrical shock, injury to cause burns. Heating elements may become hot enough to persons, or damage when using the...
... essential for Warming or Heating the Room. ■ Do Not Leave Children Alone - Do not repair or replace any part of Oven Racks - Flammable materials should be allowed to sit or stand on Grease Fires - Let hot air or steam escape before removing or replacing food. ■ ...Do Not Heat Unopened Food Containers - If rack must be stored in an oven. ■ Do Not Use Water on any part of fire, electrical shock, injury to cause burns. Heating elements may become hot enough to persons, or damage when using the...
Owners Manual
Page 7
...broiler pan and grid. To Broil: 1. Press TEMP "plus " (+) or "minus" (-) keypads to determine doneness. Follow manufacturer's directions for Part Number 4396923. ■ For proper draining, do not cover the grid with this step. Before baking and roasting, position racks according to be ...since it is not necessary to reduce spattering. Use tongs to turn food to the Broiling Chart. Press START. 3. Oven Vent A B C A. Lower oven The oven vent should be changed after the preheat conditioning time ends to end before turning or removing food. the broil element ...
...broiler pan and grid. To Broil: 1. Press TEMP "plus " (+) or "minus" (-) keypads to determine doneness. Follow manufacturer's directions for Part Number 4396923. ■ For proper draining, do not cover the grid with this step. Before baking and roasting, position racks according to be ...since it is not necessary to reduce spattering. Use tongs to turn food to the Broiling Chart. Press START. 3. Oven Vent A B C A. Lower oven The oven vent should be changed after the preheat conditioning time ends to end before turning or removing food. the broil element ...
Owners Manual
Page 10
...some models). Cleaning Method: ■ Self-Cleaning cycle: See "Self-Cleaning Cycle" first. ■ Stainless Steel Cleaner and Polish Part Number 31462 (not included): OVEN RACKS See "Assistance or Service" section to stop. 4. Press the HOUR and MIN "+" or "-" keypads to enter the time...Apply glass cleaner to soft cloth or sponge, not directly on panel. ■ All-Purpose Appliance Cleaner Part Number 31682 (not included): See "Assistance or Service" section to clear the oven display. 2. Press STOP TIME. 3. It will disappear. 5. General Cleaning IMPORTANT: Before cleaning, make sure...
...some models). Cleaning Method: ■ Self-Cleaning cycle: See "Self-Cleaning Cycle" first. ■ Stainless Steel Cleaner and Polish Part Number 31462 (not included): OVEN RACKS See "Assistance or Service" section to stop. 4. Press the HOUR and MIN "+" or "-" keypads to enter the time...Apply glass cleaner to soft cloth or sponge, not directly on panel. ■ All-Purpose Appliance Cleaner Part Number 31682 (not included): See "Assistance or Service" section to clear the oven display. 2. Press STOP TIME. 3. It will disappear. 5. General Cleaning IMPORTANT: Before cleaning, make sure...
Owners Manual
Page 13
... consultants provide assistance with: ■ Features and specifications on "Parts & Accessories." Whirlpool designated service technicians are trained to fulfill the product warranty and provide afterwarranty service, anywhere in Canada. Whirlpool Canada LP designated service technicians are trained to fulfill the product ... in the United States. It may save you use only FSP® replacement parts. FSP® replacement parts will help , follow the menu prompts. Call the Whirlpool Customer eXperience Center toll free: 1-800-253-1301. Our consultants provide assistance with...
... consultants provide assistance with: ■ Features and specifications on "Parts & Accessories." Whirlpool designated service technicians are trained to fulfill the product warranty and provide afterwarranty service, anywhere in Canada. Whirlpool Canada LP designated service technicians are trained to fulfill the product ... in the United States. It may save you use only FSP® replacement parts. FSP® replacement parts will help , follow the menu prompts. Call the Whirlpool Customer eXperience Center toll free: 1-800-253-1301. Our consultants provide assistance with...

Owners Manual
Page 14
...EXCLUSIONS OR LIMITATIONS MAY NOT APPLY TO YOU. Dealer name Address Phone number Model number Serial number Purchase date 14 Repairs to parts or systems resulting from warranty coverage. 3. ITEMS EXCLUDED FROM WARRANTY This limited warranty does not cover: 1. Service calls to ...refrigerator or freezer product failures. 7. If outside the 50 United States and Canada, contact your authorized Whirlpool dealer to know your major appliance for future reference. You must be borne by the customer. DISCLAIMER OF IMPLIED WARRANTIES; In the...
...EXCLUSIONS OR LIMITATIONS MAY NOT APPLY TO YOU. Dealer name Address Phone number Model number Serial number Purchase date 14 Repairs to parts or systems resulting from warranty coverage. 3. ITEMS EXCLUDED FROM WARRANTY This limited warranty does not cover: 1. Service calls to ...refrigerator or freezer product failures. 7. If outside the 50 United States and Canada, contact your authorized Whirlpool dealer to know your major appliance for future reference. You must be borne by the customer. DISCLAIMER OF IMPLIED WARRANTIES; In the...

Warranty
Page 1
..., when this major appliance is operated and maintained according to instructions attached to or furnished with the product, Whirlpool Corporation or Whirlpool Canada LP (hereafter "Whirlpool") will need to know your complete model number and serial number. Service must provide proof of purchase or ...installation date for Factory Specified Parts and repair labor to correct defects in accordance with electrical or plumbing codes, or use ...
..., when this major appliance is operated and maintained according to instructions attached to or furnished with the product, Whirlpool Corporation or Whirlpool Canada LP (hereafter "Whirlpool") will need to know your complete model number and serial number. Service must provide proof of purchase or ...installation date for Factory Specified Parts and repair labor to correct defects in accordance with electrical or plumbing codes, or use ...


