Use and Care Guide
Page 2
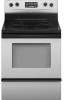
... PARTS AND FEATURES 5 COOKTOP USE 8 Cooktop Controls 8 Dual Cooking Zone (on some models 8 Warm Zone Element (on some models 8 Ceramic Glass (on some models 9 Coil Elements and Burner Bowls (on some models 9 Lift-up Cooktop (on some models 10 Home Canning 10 Cookware 10 ELECTRONIC OVEN CONTROLS... Sequence Programming 22 Warming Drawer (on some models 23 RANGE CARE 24 Self-Cleaning Cycle (on some models 24 General Cleaning 25 Oven Light 27 Oven Door 28 Storage Drawer 28 Warming Drawer (on some models 29 TROUBLESHOOTING 29 ASSISTANCE OR SERVICE 31 In the U.S.A 31 WARRANTY 32...
... PARTS AND FEATURES 5 COOKTOP USE 8 Cooktop Controls 8 Dual Cooking Zone (on some models 8 Warm Zone Element (on some models 8 Ceramic Glass (on some models 9 Coil Elements and Burner Bowls (on some models 9 Lift-up Cooktop (on some models 10 Home Canning 10 Cookware 10 ELECTRONIC OVEN CONTROLS... Sequence Programming 22 Warming Drawer (on some models 23 RANGE CARE 24 Self-Cleaning Cycle (on some models 24 General Cleaning 25 Oven Light 27 Oven Door 28 Storage Drawer 28 Warming Drawer (on some models 29 TROUBLESHOOTING 29 ASSISTANCE OR SERVICE 31 In the U.S.A 31 WARRANTY 32...
Use and Care Guide
Page 4
...9632; Use Only Dry Potholders - Among those areas are dark in color. The range is used in or around any part of different size. Improper installation of these openings, oven doors, and windows of a range - Heating elements should not be worn while using the range, follow basic precautions, ...surface units of the range. ■ Wear Proper Apparel - If rack must be immersed in water. ■ Do Not Cook on any part of oven until they have had sufficient time to cause burns - The door gasket is turned inward, and does not extend over adjacent surface units. &#...
...9632; Use Only Dry Potholders - Among those areas are dark in color. The range is used in or around any part of different size. Improper installation of these openings, oven doors, and windows of a range - Heating elements should not be worn while using the range, follow basic precautions, ...surface units of the range. ■ Wear Proper Apparel - If rack must be immersed in water. ■ Do Not Cook on any part of oven until they have had sufficient time to cause burns - The door gasket is turned inward, and does not extend over adjacent surface units. &#...
Use and Care Guide
Page 5
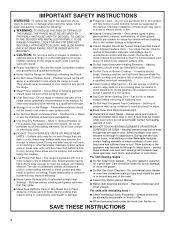
... A B D. Warm zone button DE F G A. Warm zone button 5 Right front control knob H. Electronic oven control D. Surface cooking area locator H G. Left front control knob B. Left rear control knob C. Surface cooking area locator C H G. Left ... front control knob B. Control Panels Style 1 A B C DE F G Style 2 A. Right front control knob H. Hot surface indicator light E. Hot surface indicator light E. PARTS AND FEATURES This manual covers several different models. Right rear control knob F. The range you have some or all of your model. Right rear control...
... A B D. Warm zone button DE F G A. Warm zone button 5 Right front control knob H. Electronic oven control D. Surface cooking area locator H G. Left front control knob B. Left rear control knob C. Surface cooking area locator C H G. Left ... front control knob B. Control Panels Style 1 A B C DE F G Style 2 A. Right front control knob H. Hot surface indicator light E. Hot surface indicator light E. PARTS AND FEATURES This manual covers several different models. Right rear control knob F. The range you have some or all of your model. Right rear control...

Use and Care Guide
Page 7
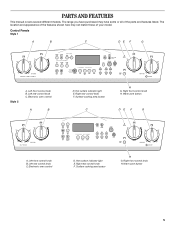
...element (not shown) M. Self-clean latch Parts and Features not shown Coil elements (on some models) Oven door window Oven light Broiler pan and grid (on some models) Roasting rack (on some models) Storage drawer liner (on some models) 7 Oven vent (on some models) D. Anti-tip... H E Right rear control knob F. Right front control knob I . Dual element (on some models) O. Console panel J. Oven light switch (on some models) K. Electronic oven control D. Bake element (hidden on some models) G. Model and serial number plate (behind left side of storage drawer) F. Storage...
...element (not shown) M. Self-clean latch Parts and Features not shown Coil elements (on some models) Oven door window Oven light Broiler pan and grid (on some models) Roasting rack (on some models) Storage drawer liner (on some models) 7 Oven vent (on some models) D. Anti-tip... H E Right rear control knob F. Right front control knob I . Dual element (on some models) O. Console panel J. Oven light switch (on some models) K. Electronic oven control D. Bake element (hidden on some models) G. Model and serial number plate (behind left side of storage drawer) F. Storage...
Use and Care Guide
Page 9
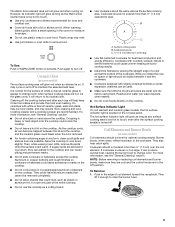
.... ■ Use cookware about the same size as the Warm Zone element area is located on . However, its original color. Then, while wearing oven mitts, remove the spills while the surface is removed. ■ For foods containing sugar in the cover for best heat conduction and energy efficiency. Cookware...as long as the surface cooking area. As the cooktop cools, air can be removed completely. ■ Do not allow a small opening in any part of the entire cooktop. ■ Do not use plastic wrap to touch, even after each use . ■ Cover all spills and soils as soon...
.... ■ Use cookware about the same size as the Warm Zone element area is located on . However, its original color. Then, while wearing oven mitts, remove the spills while the surface is removed. ■ For foods containing sugar in the cover for best heat conduction and energy efficiency. Cookware...as long as the surface cooking area. As the cooktop cools, air can be removed completely. ■ Do not allow a small opening in any part of the entire cooktop. ■ Do not use plastic wrap to touch, even after each use . ■ Cover all spills and soils as soon...
Use and Care Guide
Page 16
...;C). Place a full rack on position 1 or 2, and the split-rack on the splitrack. Place deeper, covered dishes on the counter for Part Number 4396927. If the temperature drops, cook the meat or poultry longer. ■ Check all meat, poultry and fish in the recipe. ...colored ■ aluminum ■ Light golden crusts ■ Even browning Use temperature and time recommended in center of space around bakeware and oven walls. Stoneware/Baking stone ■ Crisp crusts ■ Follow manufacturer's instructions. Meat Thermometer On models without a temperature probe, use ...
...;C). Place a full rack on position 1 or 2, and the split-rack on the splitrack. Place deeper, covered dishes on the counter for Part Number 4396927. If the temperature drops, cook the meat or poultry longer. ■ Check all meat, poultry and fish in the recipe. ...colored ■ aluminum ■ Light golden crusts ■ Even browning Use temperature and time recommended in center of space around bakeware and oven walls. Stoneware/Baking stone ■ Crisp crusts ■ Follow manufacturer's instructions. Meat Thermometer On models without a temperature probe, use ...

Use and Care Guide
Page 18
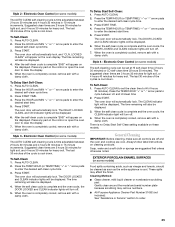
...To Broil: 1. Open door to change the temperature in the center of heated air around the food. ■ Test baked goods for Part Number 4396923. ■ For proper draining, do not cover the grid with an alternative method such as 30 percent. Press BROIL. 3.... fat on the pan if left in the recipe. Before broiling, position rack according to 9 patties, equally spaced, on some models). Electronic Oven Control) During convection cooking, the fan provides increased hot air circulation continuously and more evenly, browning and crisping outer surfaces while sealing moisture inside...
...To Broil: 1. Open door to change the temperature in the center of heated air around the food. ■ Test baked goods for Part Number 4396923. ■ For proper draining, do not cover the grid with an alternative method such as 30 percent. Press BROIL. 3.... fat on the pan if left in the recipe. Before broiling, position rack according to 9 patties, equally spaced, on some models). Electronic Oven Control) During convection cooking, the fan provides increased hot air circulation continuously and more evenly, browning and crisping outer surfaces while sealing moisture inside...
Use and Care Guide
Page 25
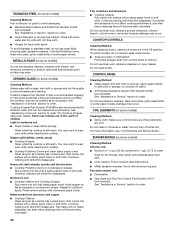
... or 4 hours 40 minutes for heavy soil. EXTERIOR PORCELAIN ENAMEL SURFACES (on the control or open the oven door to order. 25 These spills may remove numbers. ■ All-Purpose Appliance Cleaner Part Number 31662 (not included): See "Assistance or Service" section to clear the display. 5. Style 2 -... Press START. Press any pad on some models) The AUTO CLEAN self-cleaning cycle is complete and the oven cools, the DOOR LOCKED and CLEAN ...
... or 4 hours 40 minutes for heavy soil. EXTERIOR PORCELAIN ENAMEL SURFACES (on the control or open the oven door to order. 25 These spills may remove numbers. ■ All-Purpose Appliance Cleaner Part Number 31662 (not included): See "Assistance or Service" section to clear the display. 5. Style 2 -... Press START. Press any pad on some models) The AUTO CLEAN self-cleaning cycle is complete and the oven cools, the DOOR LOCKED and CLEAN ...
Use and Care Guide
Page 26
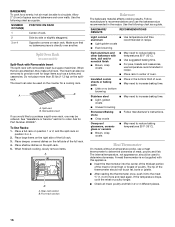
...8322; cup (125 mL) ammonia to 1 gal. (3.75 L) water: Soak for 20 minutes, then scrub with stainless steel-wool pad. ■ Oven cleaner: Follow product label instructions. ■ Mildly abrasive cleanser: Scrub with wet scouring pad. Rub creme into surface with a damp paper towel or soft ... many cleanings they will burn off and elements are cool. Porcelain enamel only ■ Dishwasher ■ Gas Grate and Drip Pan Cleaner Part Number 31617 (not included): See "Assistance or Service" section to order. See "Assistance or Service" section to avoid streaking and staining....
...8322; cup (125 mL) ammonia to 1 gal. (3.75 L) water: Soak for 20 minutes, then scrub with stainless steel-wool pad. ■ Oven cleaner: Follow product label instructions. ■ Mildly abrasive cleanser: Scrub with wet scouring pad. Rub creme into surface with a damp paper towel or soft ... many cleanings they will burn off and elements are cool. Porcelain enamel only ■ Dishwasher ■ Gas Grate and Drip Pan Cleaner Part Number 31617 (not included): See "Assistance or Service" section to order. See "Assistance or Service" section to avoid streaking and staining....

Use and Care Guide
Page 27
...(125 mL) ammonia to 1 gal. (3.75 L) water: Soak for both) ■ All-Purpose Appliance Cleaner Part Number 31662 (not included): See "Assistance or Service" section to order. OVEN DOOR EXTERIOR Cleaning Method: ■ Glass cleaner and a soft cloth or sponge: Apply glass cleaner to remove. ...high temperatures, foods react with scouring or steel-wool pad. ■ Oven cleaner: Follow product label instructions. Cleaning Method: ■ Mild detergent Drawer Liner (on panel. ■ All-Purpose Appliance Cleaner Part Number 31662 (not included): See "Assistance or Service" section to turn ...
...(125 mL) ammonia to 1 gal. (3.75 L) water: Soak for both) ■ All-Purpose Appliance Cleaner Part Number 31662 (not included): See "Assistance or Service" section to order. OVEN DOOR EXTERIOR Cleaning Method: ■ Glass cleaner and a soft cloth or sponge: Apply glass cleaner to remove. ...high temperatures, foods react with scouring or steel-wool pad. ■ Oven cleaner: Follow product label instructions. Cleaning Method: ■ Mild detergent Drawer Liner (on panel. ■ All-Purpose Appliance Cleaner Part Number 31662 (not included): See "Assistance or Service" section to turn ...
Installation Instructions
Page 2
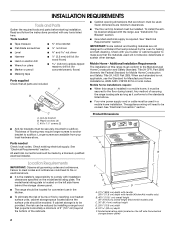
... and Safety Standard, Title 24 CFR, Part 3280 (formerly the Federal Standard for baking and self-cleaning. Failure to meet codes and ordinances could lead to subfloor. Given dimensions are shown must be made by the oven for Mobile Home Construction and Safety, Title... 24, HUD Part 280). IMPORTANT: Some cabinet and building materials are included. Anti-tip bracket B. Parts needed s Tape measure s ³⁄₈" drive ratchet s Flat-blade...
... and Safety Standard, Title 24 CFR, Part 3280 (formerly the Federal Standard for baking and self-cleaning. Failure to meet codes and ordinances could lead to subfloor. Given dimensions are shown must be made by the oven for Mobile Home Construction and Safety, Title... 24, HUD Part 280). IMPORTANT: Some cabinet and building materials are included. Anti-tip bracket B. Parts needed s Tape measure s ³⁄₈" drive ratchet s Flat-blade...
Installation Instructions
Page 4
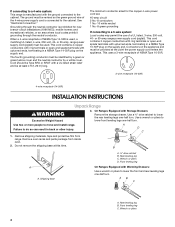
...a NEMA Type 14-50R plug on the supply end. This uses a 3-wire receptacle of a UL listed, 3-wire, 250-volt, 40- Remove oven racks and parts package from range. or 50-amp, range power supply cord (pigtail) must be used , a matching UL listed, 4-wire, 250-volt, 40- ... of the 4-wire power supply cord is connected to the cabinet. See "Electrical Connection." Remove shipping materials, tape and protective film from inside oven. 2. If connecting to a 4-wire system: This range is manufactured with Storage Drawers: Remove the storage drawer. Connectors on the appliance end ...
...a NEMA Type 14-50R plug on the supply end. This uses a 3-wire receptacle of a UL listed, 3-wire, 250-volt, 40- Remove oven racks and parts package from range. or 50-amp, range power supply cord (pigtail) must be used , a matching UL listed, 4-wire, 250-volt, 40- ... of the 4-wire power supply cord is connected to the cabinet. See "Electrical Connection." Remove shipping materials, tape and protective film from inside oven. 2. If connecting to a 4-wire system: This range is manufactured with Storage Drawers: Remove the storage drawer. Connectors on the appliance end ...
Installation Instructions
Page 10
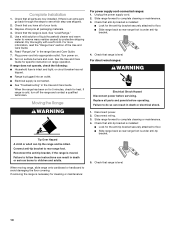
... panels before servicing. Turn power on surface burners and oven. See the Use and Care Guide for cleaning or maintenance: For power supply cord-connected ranges: 1. s Range is an extra part, go back through the steps to remove waxy residue caused by protective shipping ...range onto cardboard or hardboard to rear range foot. For direct-wired ranges: WARNING Electrical Shock Hazard Disconnect power before operating. Replace all parts are now installed. Connect anti-tip bracket to avoid damaging the floor covering. Disconnect power. 2. If range does not operate, check ...
... panels before servicing. Turn power on surface burners and oven. See the Use and Care Guide for cleaning or maintenance: For power supply cord-connected ranges: 1. s Range is an extra part, go back through the steps to remove waxy residue caused by protective shipping ...range onto cardboard or hardboard to rear range foot. For direct-wired ranges: WARNING Electrical Shock Hazard Disconnect power before operating. Replace all parts are now installed. Connect anti-tip bracket to avoid damaging the floor covering. Disconnect power. 2. If range does not operate, check ...


