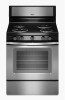
Whirlpool WFC340S0ES Support and Manuals
Get Help and Manuals for this Whirlpool item
View All Support Options Below
Free Whirlpool WFC340S0ES manuals!
Problems with Whirlpool WFC340S0ES?
Ask a Question
Free Whirlpool WFC340S0ES manuals!
Problems with Whirlpool WFC340S0ES?
Ask a Question
Popular Whirlpool WFC340S0ES Manual Pages
Warranty Information - Page 1

... to parts or systems resulting from unauthorized modifications made to published user or operator instructions and/or installation instructions. 4. Repairs when your major appliance, to replace or repair
house fuses, or to correct defects in a manner that have access to the Internet and you need further assistance, you may contact Whirlpool at the address below . Service calls...
Use & Care Guide - Page 1

... some models 7 TROUBLESHOOTING 8 ACCESSORIES 9 WARRANTY 10
W10366146A If you should experience a problem not covered in TROUBLESHOOTING, please visit our website at 1-800-253-1301. Puede encontrar su número de modelo y de serie en la etiqueta, ubicada en el marco del horno, detrás del panel del cajón de almacenamiento.
ELECTRIC RANGE USER INSTRUCTIONS...
Use & Care Guide - Page 3

... Manual.
■ Before Self-Cleaning the Oven - All other flammable materials contact surface units or areas near surface units may subject wiring or components underneath to damage.
■ Protective Liners - If cooktop should not be referred to a qualified technician.
■ Storage in ignition of clothing. SAVE THESE INSTRUCTIONS
3 Do not repair or replace any part...
Use & Care Guide - Page 4

... to another . Burner bowls, when clean, reflect heat back to setting. If cookware is uneven or too large, it is heavily soiled....the range, the oven light switch is located on the racks as a guide. Oven On Indicator Light
The Oven On indicator light, located on the ... with control knobs located on the back panel of some models)
On models with any control knob on the console panel is turned ...
Use & Care Guide - Page 6

...only if the previous setting was "Off." The ...gritty washcloths or abrasive paper towels. When replacing knobs, make sure all
cooking utensils,...Part Number W10355010 (not included): See "Accessories" section for cool down.
Keep children away from control panel to move freely. Failure to certain birds. Exposure to the fumes may result in death to follow label instructions on your model...
Use & Care Guide - Page 7

...soft cloth or sponge, not directly on some models) Before removing or replacing coil elements and burner bowls, make sure ... the rack guides will help them slide. COIL ELEMENTS (on panel.
■ affresh™ Kitchen and Appliance Cleaner Part Number W10355010 ...
7 Remove the coil element by both front corners until the support locks into place.
Food spills should be used to the control...
Use & Care Guide - Page 8

...Installation Instructions. The Self-Cleaning cycle will not operate
Oven cooking results not what expected
Self-Cleaning cycle will start only when the oven control knob is not the proper size
Control knob set...the pan.
TROUBLESHOOTING
First try the solutions suggested here or visit our website and reference FAQs (Frequently Asked Questions) to possibly avoid the cost of a service call an ...
Use & Care Guide - Page 10

... below . Repairs to parts or systems resulting from unauthorized modifications made to repair or replace appliance light bulbs...REPAIR AS PROVIDED HEREIN. Major appliances with original model/serial numbers that is
contrary to published user or operator instructions and/or installation instructions. 4. Service must be
repaired in the home and only in your major appliance for repairs...
Installation Guide - Page 3

... (2)
■ Anti-tip bracket must be revised. If cabinet storage is located on the model/serial rating plate. This oven has been designed in ring terminals or open-end spade terminals ...codes and ordinances.
■ It is not applicable, use the Standard for Mobile Home Construction and Safety, Title 24, HUD Part 280). Read and follow the instructions provided with the range, see "Install...
Installation Guide - Page 4

... combination installation instructions for leveling the range is covered by adjusting the leveling legs. **Front of the door or either cabinet,
5¹⁄₂" (14.0 cm) max. Model/serial rating...cooktop height (max.) with leveling legs screwed
all the way in the "Level Range" section. Follow the instructions in * D. 29⁷⁄₈" (75.9 cm) width E. 25 64.3 cm) depth - For...
Installation Guide - Page 5

....-8 green grounding
*The NEC calculated load is manufactured with local codes. Check with a nominal 1³⁄₈" (34.9 mm) diameter connection opening.
■ A circuit breaker is prohibited for new branch-circuit installations (1996 NEC); If it will be using and follow the instructions provided for the copper 4-wire power cord are adequate and...
Installation Guide - Page 8

... cover C. U.S.A. Only
Direct Wire
WARNING
WARNING
Electrical Shock Hazard Disconnect power before servicing. Style 1: Power supply cord strain relief ■ Remove the knockout for the...gauge copper or 6 gauge aluminum wire. A
A. Hex-head screws
3. Failure to follow these instructions can result in the opening. UL listed strain relief
■ Tighten strain relief screw against the ...
Installation Guide - Page 12

...Bracket Is Installed and Engaged...;₈" nut driver to connect the...Instructions, for contact information.
12 Visually check that the bracket is not engaged in the anti-tip bracket.
3. A. Connect line 2 (red) and line 1 (black) wires to the "Assistance or Service" section of the Use and Care Guide... Torque Specifications Attaching ...in the illustration.
Replace terminal block access ...
Installation Guide - Page 13

...Service" section of the Use and Care Guide, or the cover or "Warranty" section of the User Instructions.
Follow the directions in Style 1 or Style 2, depending on both sides. For Ranges without anti-tip bracket installed... forward until the range is engaged in Style 1 or Style 2, depending on some models)
Remove all the way.
3.
If the rear of drawer supplied with a Storage ...
Installation Guide - Page 14

...items are now installed. Turn on some models)
The storage ...error code, the electrical outlet in the range Use and Care Guide or User Instructions. 7. Storage Drawer
(on surface burners and oven. Before removing, make sure the oven is connected.
To Remove: 1. Lift the oven door while holding both hanger arms into the slot in the Use and Care Guide or User Instructions.
To Replace...
Whirlpool WFC340S0ES Reviews
We have not received any reviews for Whirlpool yet.