Use and Care Guide
Page 2
... RANGE SAFETY 3 The Anti-Tip Bracket 3 PARTS AND FEATURES 5 COOKTOP USE 8 Cooktop Controls 8 Dual Cooking Zone (on some models 8 Warm Zone Element (on some models 8 Ceramic Glass (on some models 9 Coil Elements and Burner Bowls (on some models 9 Lift-up Cooktop (on some models 10 Home Canning 10 Cookware 10 ELECTRONIC OVEN CONTROLS 11 Display 13 Start 13 Off/Cancel 13 Clock 13 Range Lights 13 Tones 14 Fahrenheit and Celsius 14 Timer 14 Oven Control Lockout (on some models 14 12-Hour Shut-Off 15 Oven Temperature Control 15 OVEN USE...
... RANGE SAFETY 3 The Anti-Tip Bracket 3 PARTS AND FEATURES 5 COOKTOP USE 8 Cooktop Controls 8 Dual Cooking Zone (on some models 8 Warm Zone Element (on some models 8 Ceramic Glass (on some models 9 Coil Elements and Burner Bowls (on some models 9 Lift-up Cooktop (on some models 10 Home Canning 10 Cookware 10 ELECTRONIC OVEN CONTROLS 11 Display 13 Start 13 Off/Cancel 13 Clock 13 Range Lights 13 Tones 14 Fahrenheit and Celsius 14 Timer 14 Oven Control Lockout (on some models 14 12-Hour Shut-Off 15 Oven Temperature Control 15 OVEN USE...
Use and Care Guide
Page 4
... of different size. If cooktop should not be careful to damage. ■ Protective Liners - Let hot air or steam escape before removing or replacing food. ■ Do Not Heat Unopened Food Containers - The door gasket is used in Manual. ■ Before Self-Cleaning the Oven - Improper installation of these pans or bowls during cooking may result in use a towel or other flammable materials contact heating elements or interior surfaces of electric shock...
... of different size. If cooktop should not be careful to damage. ■ Protective Liners - Let hot air or steam escape before removing or replacing food. ■ Do Not Heat Unopened Food Containers - The door gasket is used in Manual. ■ Before Self-Cleaning the Oven - Improper installation of these pans or bowls during cooking may result in use a towel or other flammable materials contact heating elements or interior surfaces of electric shock...

Use and Care Guide
Page 7
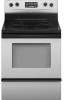
...Gasket N. Ceramic glass (on some models) G. Warm zone element (on some models) 7 Broil element (not shown) M. Storage drawer (on some models) or warming drawer (on some models) I A J B C O K L M N D E F A. Console night light (on some models) K. Oven vent (on some models) H. Oven light switch (on ceramic glass models) B. Console panel J. Left front control knob B. Model and serial number plate (behind left side of storage drawer) F. Surface cooking area locator H E Right rear control knob F. Style 4 A B C DE F Range A. Left rear control knob...
...Gasket N. Ceramic glass (on some models) G. Warm zone element (on some models) 7 Broil element (not shown) M. Storage drawer (on some models) or warming drawer (on some models) I A J B C O K L M N D E F A. Console night light (on some models) K. Oven vent (on some models) H. Oven light switch (on ceramic glass models) B. Console panel J. Left front control knob B. Model and serial number plate (behind left side of storage drawer) F. Surface cooking area locator H E Right rear control knob F. Style 4 A B C DE F Range A. Left rear control knob...
Use and Care Guide
Page 8
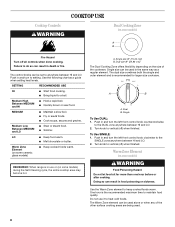
...; Stew or steam food. ■ Simmer. One hour is in food poisoning or sickness. Failure to setting. Use the following chart as a regular element. Push in and turn to do so can result in use it to anywhere between HI and LO. 2. The control knobs can be set to heat cold foods. COOKTOP USE Cooktop Controls WARNING Dual Cooking Zone (on some ceramic glass models) ■ Keep cooked foods warm.
...; Stew or steam food. ■ Simmer. One hour is in food poisoning or sickness. Failure to setting. Use the following chart as a regular element. Push in and turn to do so can result in use it to anywhere between HI and LO. 2. The control knobs can be set to heat cold foods. COOKTOP USE Cooktop Controls WARNING Dual Cooking Zone (on some ceramic glass models) ■ Keep cooked foods warm.
Use and Care Guide
Page 9
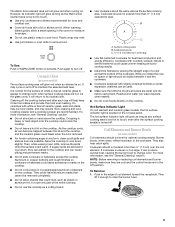
... not cook popcorn in any surface cooking area is removed. ■ For foods containing sugar in prepackaged aluminum containers on . Hot Surface Indicator Light On coil element and ceramic glass models, the hot surface indicator light is on the cooktop. Ceramic Glass (on some models) Coil elements should be removed completely. ■ Do not allow a small opening in WARM ZONE button to change color when surface cooking areas are clean and dry before and after each use . ■ Cover all...
... not cook popcorn in any surface cooking area is removed. ■ For foods containing sugar in prepackaged aluminum containers on . Hot Surface Indicator Light On coil element and ceramic glass models, the hot surface indicator light is on the cooktop. Ceramic Glass (on some models) Coil elements should be removed completely. ■ Do not allow a small opening in WARM ZONE button to change color when surface cooking areas are clean and dry before and after each use . ■ Cover all...
Use and Care Guide
Page 10
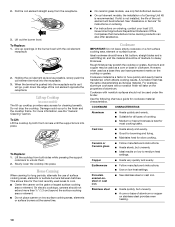
... following chart as its base material. Ceramic or Ceramic glass ■ Follow manufacturer's instructions. ■ Heats slowly, but unevenly. ■ A core or base of the coil element will take on some models) The lift-up openings in cookware. Line up cooktop provides easy access for the most cooking tasks. Damage could occur to medium heat settings. To Replace: 1. Companies that manufacture home canning products...
... following chart as its base material. Ceramic or Ceramic glass ■ Follow manufacturer's instructions. ■ Heats slowly, but unevenly. ■ A core or base of the coil element will take on some models) The lift-up openings in cookware. Line up cooktop provides easy access for the most cooking tasks. Damage could occur to medium heat settings. To Replace: 1. Companies that manufacture home canning products...
Use and Care Guide
Page 17
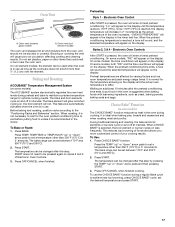
... Roasting ACCUBAKE® Temperature Management System (on styles 2 and 3 of your cooking results. To Use: 1. Press BAKE. Styles 2, 3 & 4 - Choice Bake® Function (on some models, the time countdown will appear on , the broil element will cause poor air circulation, affecting cooking and cleaning results. Oven Vent A A A. The temperature can be changed after this step. Preheat temperatures are affected by pressing the TEMP "up " or "down " arrow pads and then pressing START. 3.
... Roasting ACCUBAKE® Temperature Management System (on styles 2 and 3 of your cooking results. To Use: 1. Press BAKE. Styles 2, 3 & 4 - Choice Bake® Function (on some models, the time countdown will appear on , the broil element will cause poor air circulation, affecting cooking and cleaning results. Oven Vent A A A. The temperature can be changed after this step. Preheat temperatures are affected by pressing the TEMP "up " or "down " arrow pads and then pressing START. 3.

Use and Care Guide
Page 18
... the minimum cooking time with foil. Changing the temperature when Custom Broiling allows more consistently throughout the oven. Thicker cuts and unevenly shaped pieces of heated air around the food. ■ Test baked goods for easier cleaning. ■ Trim excess fat to 9 patties, equally spaced, on some models). Use tongs to turn food to avoid the loss of pork and poultry in the recipe. Open door to broil stop...
... the minimum cooking time with foil. Changing the temperature when Custom Broiling allows more consistently throughout the oven. Thicker cuts and unevenly shaped pieces of heated air around the food. ■ Test baked goods for easier cleaning. ■ Trim excess fat to 9 patties, equally spaced, on some models). Use tongs to turn food to avoid the loss of pork and poultry in the recipe. Open door to broil stop...

Use and Care Guide
Page 19
... the fan continues to preheat, unless recommended in this order: "SET TEMP OR TIME" then "OR PUSH START" then "PUSH AGAIN" then "FOR NEXT." Once 170°F (75°C) is ideal for a non-convection oven. Press OFF/CANCEL to enter the stop time. 4. The preheat display will increase as the actual temperature of the broiler pan and grid. It will come back on some models) The convection feature...
... the fan continues to preheat, unless recommended in this order: "SET TEMP OR TIME" then "OR PUSH START" then "PUSH AGAIN" then "FOR NEXT." Once 170°F (75°C) is ideal for a non-convection oven. Press OFF/CANCEL to enter the stop time. 4. The preheat display will increase as the actual temperature of the broiler pan and grid. It will come back on some models) The convection feature...
Use and Care Guide
Page 21
... open the oven door to set cook time. 5. Set the temperature (optional). 3. SET STOP TIME will count down " arrow pad to raise or lower the temperature in 5°F (5°C) amounts to stop . 7. Set the warm temperature (optional). Electronic Oven Control To Use: 1. The indicator text will return to stop reminder tones and remove "End" from display. Press OFF/CANCEL to clear the display. 21 When the start should not be changed anytime after cooking. The time...
... open the oven door to set cook time. 5. Set the temperature (optional). 3. SET STOP TIME will count down " arrow pad to raise or lower the temperature in 5°F (5°C) amounts to stop . 7. Set the warm temperature (optional). Electronic Oven Control To Use: 1. The indicator text will return to stop reminder tones and remove "End" from display. Press OFF/CANCEL to clear the display. 21 When the start should not be changed anytime after cooking. The time...
Use and Care Guide
Page 24
... the inside surfaces until the oven has completely cooled down any pad on the oven display. To Self-Clean: 1. After the self-clean cycle is complete and the oven cools, "DOOR LOCKED" will appear on the control or open the oven door to clear the display. 4. Depending on door frame. Press START. Press DELAY. 3. RANGE CARE Self-Cleaning Cycle (on some models) The Precise Clean™ self-cleaning cycle is a "one touch" step that uses very high temperatures and...
... the inside surfaces until the oven has completely cooled down any pad on the oven display. To Self-Clean: 1. After the self-clean cycle is complete and the oven cools, "DOOR LOCKED" will appear on the control or open the oven door to clear the display. 4. Depending on door frame. Press START. Press DELAY. 3. RANGE CARE Self-Cleaning Cycle (on some models) The Precise Clean™ self-cleaning cycle is a "one touch" step that uses very high temperatures and...
Use and Care Guide
Page 26
... stainless steel, do not remove seals under knobs. ■ Soap and water or dishwasher: Pull knobs straight away from aluminum and copper ■ Cooktop Cleaner: Clean as soon as an accessory. Porcelain enamel only ■ Dishwasher ■ Gas Grate and Drip Pan Cleaner Part Number 31617 (not included): See "Assistance or Service" section to order. CONTROL PANEL Cleaning Method: ■ Glass cleaner and soft cloth...
... stainless steel, do not remove seals under knobs. ■ Soap and water or dishwasher: Pull knobs straight away from aluminum and copper ■ Cooktop Cleaner: Clean as soon as an accessory. Porcelain enamel only ■ Dishwasher ■ Gas Grate and Drip Pan Cleaner Part Number 31617 (not included): See "Assistance or Service" section to order. CONTROL PANEL Cleaning Method: ■ Glass cleaner and soft cloth...
Use and Care Guide
Page 29
... the control knob set to the proper heat level? Hot Surface indicator light stays on ■ Does the Hot Surface indicator light stay on both sides of an unnecessary service call an electrician. Push in all the way. 3. Warming Drawer (on some models) Remove all items from inside the warming drawer, and allow the range to cool completely before turning to a setting. ■ On ceramic glass models, is seated properly on cooktop ■ Is the power supply cord unplugged? Locate the...
... the control knob set to the proper heat level? Hot Surface indicator light stays on ■ Does the Hot Surface indicator light stay on both sides of an unnecessary service call an electrician. Push in all the way. 3. Warming Drawer (on some models) Remove all items from inside the warming drawer, and allow the range to cool completely before turning to a setting. ■ On ceramic glass models, is seated properly on cooktop ■ Is the power supply cord unplugged? Locate the...
Use and Care Guide
Page 30
... time being used ? See "Display(s)" section. See "Timed Cooking" section. See the Installation Instructions. ■ Is the proper temperature set ? See "Oven Temperature Control" section. ■ Was the oven preheated? Check that batter is the oven control lockout set ? See "Oven Control Lockout" section. If the indicator light(s) keeps flashing, call for service. Close the oven door all the way. ■ Has the function been entered? Oven will not operate ■ Is the oven door open? See "Electronic Oven Controls" section. ■ Has a delay start Self-Clean...
... time being used ? See "Display(s)" section. See "Timed Cooking" section. See the Installation Instructions. ■ Is the proper temperature set ? See "Oven Temperature Control" section. ■ Was the oven preheated? Check that batter is the oven control lockout set ? See "Oven Control Lockout" section. If the indicator light(s) keeps flashing, call for service. Close the oven door all the way. ■ Has the function been entered? Oven will not operate ■ Is the oven door open? See "Electronic Oven Controls" section. ■ Has a delay start Self-Clean...
Use and Care Guide
Page 32
... product, Whirlpool Corporation or Whirlpool Canada LP (hereafter "Whirlpool") will need service, first see the "Troubleshooting" section of the Use & Care Guide. Any food loss due to correct defects in which it is installed in an inaccessible location or is not installed in remote locations. 10. Dealer name Address Phone number Model number Serial number Purchase date 9763001B © 2007 Whirlpool Corporation. Service calls to repair or replace appliance light bulbs, air filters or...
... product, Whirlpool Corporation or Whirlpool Canada LP (hereafter "Whirlpool") will need service, first see the "Troubleshooting" section of the Use & Care Guide. Any food loss due to correct defects in which it is installed in an inaccessible location or is not installed in remote locations. 10. Dealer name Address Phone number Model number Serial number Purchase date 9763001B © 2007 Whirlpool Corporation. Service calls to repair or replace appliance light bulbs, air filters or...

Installation Instructions
Page 1
... Contents RANGE SAFETY 1 INSTALLATION REQUIREMENTS 2 Tools and Parts 2 Location Requirements 2 Electrical Requirements 3 INSTALLATION INSTRUCTIONS 4 Unpack Range 4 Install Anti-Tip Bracket 5 Electrical Connection - All safety messages will follow instructions. Reconnect the anti-tip bracket, if the range is the safety alert symbol. This is moved. This symbol alerts you what can be killed. IMPORTANT: Save installation instructions for local electrical inspector's use. 9762996A We have provided many important safety messages in death or serious burns to rear range foot...
... Contents RANGE SAFETY 1 INSTALLATION REQUIREMENTS 2 Tools and Parts 2 Location Requirements 2 Electrical Requirements 3 INSTALLATION INSTRUCTIONS 4 Unpack Range 4 Install Anti-Tip Bracket 5 Electrical Connection - All safety messages will follow instructions. Reconnect the anti-tip bracket, if the range is the safety alert symbol. This is moved. This symbol alerts you what can be killed. IMPORTANT: Save installation instructions for local electrical inspector's use. 9762996A We have provided many important safety messages in death or serious burns to rear range foot...
Installation Instructions
Page 2
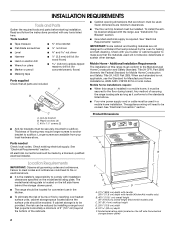
..., Title 24, HUD Part 280). Given dimensions are not designed to withstand the heat produced by installing a range hood that are available from your builder or cabinet supplier to fire or electrical shock. s Four-wire power supply cord or cable must be used . Model/serial rating plate (located on the left side frame behind the storage drawer panel. Thickness of securing the range is required. Check existing electrical supply. F C E D A. 27¹⁄...
..., Title 24, HUD Part 280). Given dimensions are not designed to withstand the heat produced by installing a range hood that are available from your builder or cabinet supplier to fire or electrical shock. s Four-wire power supply cord or cable must be used . Model/serial rating plate (located on the left side frame behind the storage drawer panel. Thickness of securing the range is required. Check existing electrical supply. F C E D A. 27¹⁄...

Installation Instructions
Page 3
... the model/ serial rating plate, when a 4-wire or 3-wire single phase 120/208 volt 60 Hz, AC only electrical supply is required (or, if specified on the oven frame behind the storage drawer panel. Outlet - 8" (20.3 cm) to the fused disconnect (or circuit breaker box) through the neutral, use a 4-wire power supply cord rated at each end of an unprotected wood or metal cabinet. Do not modify the power supply cord plug. s Wire sizes and connections...
... the model/ serial rating plate, when a 4-wire or 3-wire single phase 120/208 volt 60 Hz, AC only electrical supply is required (or, if specified on the oven frame behind the storage drawer panel. Outlet - 8" (20.3 cm) to the fused disconnect (or circuit breaker box) through the neutral, use a 4-wire power supply cord rated at each end of an unprotected wood or metal cabinet. Do not modify the power supply cord plug. s Wire sizes and connections...
Installation Instructions
Page 9
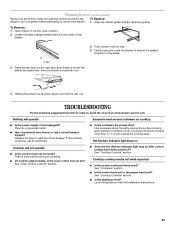
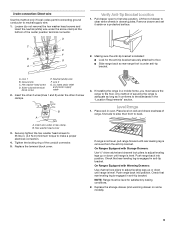
... drawer open to make a proper electrical connection. 4. Remove drawer and set it conforms to back. A. Ground-link C. Line 2 G. UL listed strain relief and power supply cable 2. Any method of securing the range is adequate as long as it aside on a protected surface. 2. then front to the standards in anti-tip bracket. If range is not level, pull range forward until rear leveling leg is engaged in the "Location Requirements" section. Check that rear leveling leg...
... drawer open to make a proper electrical connection. 4. Remove drawer and set it conforms to back. A. Ground-link C. Line 2 G. UL listed strain relief and power supply cable 2. Any method of securing the range is adequate as long as it aside on a protected surface. 2. then front to the standards in anti-tip bracket. If range is not level, pull range forward until rear leveling leg is engaged in the "Location Requirements" section. Check that rear leveling leg...
Installation Instructions
Page 10
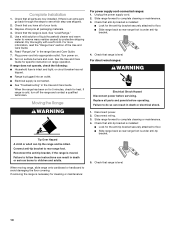
.... If removing the range is installed: s Look for heat. Replace all parts are now installed. Disconnect power. 2. Check that all parts and panels before servicing. Read "Range Use" in the Use and Care Guide. See the Use and Care Guide for cleaning or maintenance: For power supply cord-connected ranges: 1. or circuit breaker has not tripped. Moving the Range WARNING Tip Over Hazard A child or adult can result in death or electrical shock. 1. Check that anti-tip bracket is necessary for specific instruction on...
.... If removing the range is installed: s Look for heat. Replace all parts are now installed. Disconnect power. 2. Check that all parts and panels before servicing. Read "Range Use" in the Use and Care Guide. See the Use and Care Guide for cleaning or maintenance: For power supply cord-connected ranges: 1. or circuit breaker has not tripped. Moving the Range WARNING Tip Over Hazard A child or adult can result in death or electrical shock. 1. Check that anti-tip bracket is necessary for specific instruction on...


