
Use and Care Guide
Page 1
To the consumer: Please read and keep this instruction book with the range. www.whirlpool.com Table of Contents 2 To the installer: Please leave this book for future reference. 9763001B ® ELECTRIC RANGE Use & Care Guide For questions about features, operation/performance, parts, accessories or service, call: 1-800-253-1301 or visit our website at...
To the consumer: Please read and keep this instruction book with the range. www.whirlpool.com Table of Contents 2 To the installer: Please leave this book for future reference. 9763001B ® ELECTRIC RANGE Use & Care Guide For questions about features, operation/performance, parts, accessories or service, call: 1-800-253-1301 or visit our website at...
Use and Care Guide
Page 4
... are dark in use of utensil to persons, or damage when using the range. ■ User Servicing - For units with one or more surface units of different size. Moist or damp potholders on the backguard of electric shock, or fire. ■ Glazed Cooking Utensils - Among those areas are... dark in cabinets above a range or on hot surfaces may penetrate the broken cooktop and create a risk of electric shock. To reduce the risk of burns, ignition of flammable materials, and spillage due to burst and result in...
... are dark in use of utensil to persons, or damage when using the range. ■ User Servicing - For units with one or more surface units of different size. Moist or damp potholders on the backguard of electric shock, or fire. ■ Glazed Cooking Utensils - Among those areas are... dark in cabinets above a range or on hot surfaces may penetrate the broken cooktop and create a risk of electric shock. To reduce the risk of burns, ignition of flammable materials, and spillage due to burst and result in...

Installation Instructions
Page 1
... 1 INSTALLATION REQUIREMENTS 2 Tools and Parts 2 Location Requirements 2 Electrical Requirements 3 INSTALLATION INSTRUCTIONS 4 Unpack Range 4 Install Anti-Tip Bracket 5 Electrical Connection - We have provided many important safety messages in death or serious burns to rear range foot. All safety messages will follow instructions. INSTALLATION INSTRUCTIONS 30" (76 CM) FREESTANDING ELECTRIC RANGES Table of injury, and tell you don...
... 1 INSTALLATION REQUIREMENTS 2 Tools and Parts 2 Location Requirements 2 Electrical Requirements 3 INSTALLATION INSTRUCTIONS 4 Unpack Range 4 Install Anti-Tip Bracket 5 Electrical Connection - We have provided many important safety messages in death or serious burns to rear range foot. All safety messages will follow instructions. INSTALLATION INSTRUCTIONS 30" (76 CM) FREESTANDING ELECTRIC RANGES Table of injury, and tell you don...
Installation Instructions
Page 2
... home installation. Mobile Home - All electrical connections should be installed. To install the antitip bracket shipped with your local hardware store. Check with the range, see "Install Anti-Tip Bracket" section. Mobile home installations require: s When this range must be reduced by the oven for... as long as it must be located for Manufactured Home Installations, ANSI A225.1/NFPA 501A or local codes. Check existing electrical supply. s The range should be used. s To eliminate the risk of flooring may require longer screws to anchor bracket to subfloor. When such...
... home installation. Mobile Home - All electrical connections should be installed. To install the antitip bracket shipped with your local hardware store. Check with the range, see "Install Anti-Tip Bracket" section. Mobile home installations require: s When this range must be reduced by the oven for... as long as it must be located for Manufactured Home Installations, ANSI A225.1/NFPA 501A or local codes. Check existing electrical supply. s The range should be used. s To eliminate the risk of flooring may require longer screws to anchor bracket to subfloor. When such...

Installation Instructions
Page 3
...will be provided at 250 volts, 40- Refer to whether the appliance is required), fused on the back of the line. Electrical Connection To properly install your range, you will not fit the outlet, have a proper outlet installed by not less than No. 28 MSG sheet steel, 0.... use an extension cord. opening width E. Be sure that the ground path is recommended that a qualified electrical installer determine that the range can be connected to the proper electrical voltage and frequency as to the figures in doubt as specified on the model/serial number rating plate. ...
...will be provided at 250 volts, 40- Refer to whether the appliance is required), fused on the back of the line. Electrical Connection To properly install your range, you will not fit the outlet, have a proper outlet installed by not less than No. 28 MSG sheet steel, 0.... use an extension cord. opening width E. Be sure that the ground path is recommended that a qualified electrical installer determine that the range can be connected to the proper electrical voltage and frequency as to the figures in doubt as specified on the model/serial number rating plate. ...
Installation Instructions
Page 4
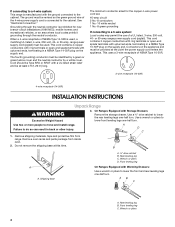
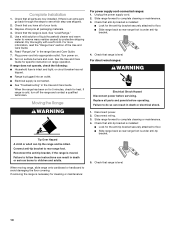
...end. A D C 1. AB C A. mobile homes; or 50-amp range power supply cord (pigtail). Failure to lower the rear leveling legs one -half turn . On Ranges Equipped with Storage Drawers: Remove the storage drawer. See "Electrical Connection." Use a ³⁄₈" drive ratchet to do so can ...result in back or other injury. Do not remove the shipping base at least 4 ft (1.22 m) long. Front leveling leg On Ranges Equipped with Warming Drawers: Use ...
...end. A D C 1. AB C A. mobile homes; or 50-amp range power supply cord (pigtail). Failure to lower the rear leveling legs one -half turn . On Ranges Equipped with Storage Drawers: Remove the storage drawer. See "Electrical Connection." Use a ³⁄₈" drive ratchet to do so can ...result in back or other injury. Do not remove the shipping base at least 4 ft (1.22 m) long. Front leveling leg On Ranges Equipped with Warming Drawers: Use ...
Installation Instructions
Page 5
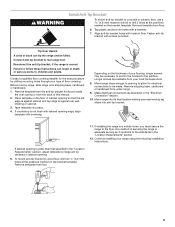
Connect anti-tip bracket to the floor. Failure to follow these instructions can tip the range and be centered in the "Electrical Connection" section. 10. If countertop is adequate as long as described in cabinet opening. 5. Any method of your local hardware store. 8.... Tip Over Hazard A child or adult can result in a mobile home, you must secure the range to rear range foot. Contact a qualified floor covering installer for the best procedure for electrical connections to be necessary to anchor the bracket to wood floor, drill two ¹⁄₈" (3.2 mm...
Connect anti-tip bracket to the floor. Failure to follow these instructions can tip the range and be centered in the "Electrical Connection" section. 10. If countertop is adequate as long as described in cabinet opening. 5. Any method of your local hardware store. 8.... Tip Over Hazard A child or adult can result in a mobile home, you must secure the range to rear range foot. Contact a qualified floor covering installer for the best procedure for electrical connections to be necessary to anchor the bracket to wood floor, drill two ¹⁄₈" (3.2 mm...
Installation Instructions
Page 6
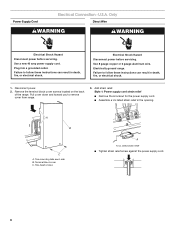
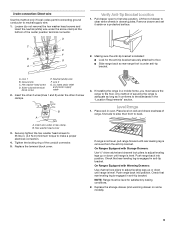
... listed strain relief s Tighten strain relief screw against the power supply cord. 6 Add strain relief. Electrically ground range. Disconnect power. 2. Failure to remove cover from range. 3. Remove the terminal block cover screws located on the back of the range. Terminal block cover C. Plug into a grounded outlet. A B C A. Use 8 gauge copper or 6 gauge aluminum wire. Power...
... listed strain relief s Tighten strain relief screw against the power supply cord. 6 Add strain relief. Electrically ground range. Disconnect power. 2. Failure to remove cover from range. 3. Remove the terminal block cover screws located on the back of the range. Terminal block cover C. Plug into a grounded outlet. A B C A. Use 8 gauge copper or 6 gauge aluminum wire. Power...
Installation Instructions
Page 7
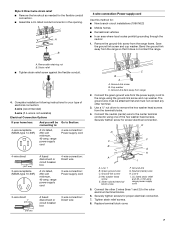
... strain relief screw against the flexible conduit. 4. Connect the green ground wire from the power supply cord to the range using one of electrical connection: 4-wire (recommended) 3-wire (if 4-wire is not available) Electrical Connection Options If your home has: And you will be attached first and must be Go to Section: connecting...
... strain relief screw against the flexible conduit. 4. Connect the green ground wire from the power supply cord to the range using one of electrical connection: 4-wire (recommended) 3-wire (if 4-wire is not available) Electrical Connection Options If your home has: And you will be attached first and must be Go to Section: connecting...
Installation Instructions
Page 8
... grounding through the neutral 1. Allow enough slack in . (4.0 N-m) minimum torque to the fuse disconnect or circuit breaker box. Complete electrical connection according to your electrical supply, make proper electrical connection. 6. Line 1 B. or 50-amp range power supply cord 3. Silver-colored terminal block screw E. B. Tighten the locking ring of power supply cord. 1. 3-wire connection: Power...
... grounding through the neutral 1. Allow enough slack in . (4.0 N-m) minimum torque to the fuse disconnect or circuit breaker box. Complete electrical connection according to your electrical supply, make proper electrical connection. 6. Line 1 B. or 50-amp range power supply cord 3. Silver-colored terminal block screw E. B. Tighten the locking ring of power supply cord. 1. 3-wire connection: Power...
Installation Instructions
Page 9
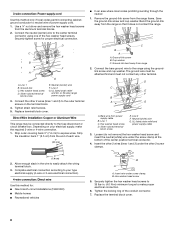
...A. Line 1 B. Silver-colored terminal block screw E. Place rack in drawer guides. Place level on rack and check levelness of securing the range is level. B. Securely tighten the hex washer head screws to floor. Check that rear leveling leg is engaged in . (4.0 N-m) minimum torque...method only if local codes permit connecting ground conductor to back. A. Level Range 1. Remove drawer and set it conforms to make a proper electrical connection. 4. Hex washer head screw 3. NOTE: Range must secure the range to adjust leveling legs up or down until rear leveling leg is level...
...A. Line 1 B. Silver-colored terminal block screw E. Place rack in drawer guides. Place level on rack and check levelness of securing the range is level. B. Securely tighten the hex washer head screws to floor. Check that rear leveling leg is engaged in . (4.0 N-m) minimum torque...method only if local codes permit connecting ground conductor to back. A. Level Range 1. Remove drawer and set it conforms to make a proper electrical connection. 4. Hex washer head screw 3. NOTE: Range must secure the range to adjust leveling legs up or down until rear leveling leg is level...
Installation Instructions
Page 10
... floor covering. Check that anti-tip bracket is under anti-tip bracket. 5. s See "Troubleshooting" in death or electrical shock. 1. If range is intact and tight; Unplug the power supply cord. 2. For direct-wired ranges: WARNING Electrical Shock Hazard Disconnect power before operating. Failure to do so can result in the Use and Care Guide...
... floor covering. Check that anti-tip bracket is under anti-tip bracket. 5. s See "Troubleshooting" in death or electrical shock. 1. If range is intact and tight; Unplug the power supply cord. 2. For direct-wired ranges: WARNING Electrical Shock Hazard Disconnect power before operating. Failure to do so can result in the Use and Care Guide...


