Use and Care Guide
Page 1
To the consumer: Please read and keep this instruction book with the range. 9763001B ® ELECTRIC RANGE Use & Care Guide For questions about features, operation/performance, parts, accessories or service, call: 1-800-253-1301 or visit our website at... www.whirlpool.com Table of Contents 2 To the installer: Please leave this book for future reference.
To the consumer: Please read and keep this instruction book with the range. 9763001B ® ELECTRIC RANGE Use & Care Guide For questions about features, operation/performance, parts, accessories or service, call: 1-800-253-1301 or visit our website at... www.whirlpool.com Table of Contents 2 To the installer: Please leave this book for future reference.
Use and Care Guide
Page 2
... 9 Lift-up Cooktop (on some models 10 Home Canning 10 Cookware 10 ELECTRONIC OVEN CONTROLS 11 Display 13 Start 13 Off/Cancel 13 Clock 13 Range Lights 13 Tones 14 Fahrenheit and Celsius 14 Timer 14 Oven Control Lockout (on some models 14 12-Hour Shut-Off 15 Oven Temperature Control... Convection Cooking 18 Hold Warm Feature (on some models 20 Timed Cooking (on some models 21 Sequence Programming 22 Warming Drawer (on some models 23 RANGE CARE 24 Self-Cleaning Cycle (on some models 24 General Cleaning 25 Oven Light 27 Oven Door 28 Storage Drawer 28 Warming Drawer (on some...
... 9 Lift-up Cooktop (on some models 10 Home Canning 10 Cookware 10 ELECTRONIC OVEN CONTROLS 11 Display 13 Start 13 Off/Cancel 13 Clock 13 Range Lights 13 Tones 14 Fahrenheit and Celsius 14 Timer 14 Oven Control Lockout (on some models 14 12-Hour Shut-Off 15 Oven Temperature Control... Convection Cooking 18 Hold Warm Feature (on some models 20 Timed Cooking (on some models 21 Sequence Programming 22 Warming Drawer (on some models 23 RANGE CARE 24 Self-Cleaning Cycle (on some models 24 General Cleaning 25 Oven Light 27 Oven Door 28 Storage Drawer 28 Warming Drawer (on some...

Use and Care Guide
Page 3
... you and others are not followed. Always read and obey all safety messages. Failure to floor. • Slide range back so rear range foot is installed: • Slide range forward. • Look for details. This appliance can happen if the instructions are very important. See the installation ...and either the word "DANGER" or "WARNING." WARNING: This product contains a chemical known to such substances. The Anti-Tip Bracket The range will follow these instructions can kill or hurt you what can cause low-level exposure to some of California to cause cancer, birth defects,...
... you and others are not followed. Always read and obey all safety messages. Failure to floor. • Slide range back so rear range foot is installed: • Slide range forward. • Look for details. This appliance can happen if the instructions are very important. See the installation ...and either the word "DANGER" or "WARNING." WARNING: This product contains a chemical known to such substances. The Anti-Tip Bracket The range will follow these instructions can kill or hurt you what can cause low-level exposure to some of California to cause cancer, birth defects,...
Use and Care Guide
Page 4
... the broken cooktop and create a risk of electric shock. Interior surfaces of an oven become hot enough to cause burns - For self-cleaning ranges - ■ Do Not Clean Door Gasket - All other glazed utensils are dark in or on Grease Fires - Do not use of undersized...High Heat Settings - IMPORTANT SAFETY INSTRUCTIONS WARNING: To reduce the risk of fire, electrical shock, injury to persons, or damage when using the range. ■ User Servicing - During and after use . Absence of these surfaces are oven vent openings and surfaces near surface units may become hot...
... the broken cooktop and create a risk of electric shock. Interior surfaces of an oven become hot enough to cause burns - For self-cleaning ranges - ■ Do Not Clean Door Gasket - All other glazed utensils are dark in or on Grease Fires - Do not use of undersized...High Heat Settings - IMPORTANT SAFETY INSTRUCTIONS WARNING: To reduce the risk of fire, electrical shock, injury to persons, or damage when using the range. ■ User Servicing - During and after use . Absence of these surfaces are oven vent openings and surfaces near surface units may become hot...
Use and Care Guide
Page 5
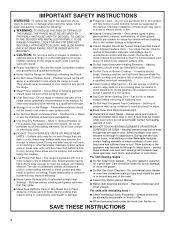
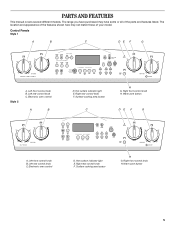
The range you have purchased may not match those of the parts and features listed. Control Panels Style 1 A B C DE F G Style 2 A. Electronic oven control A B D. Right rear control knob F. ...
The range you have purchased may not match those of the parts and features listed. Control Panels Style 1 A B C DE F G Style 2 A. Electronic oven control A B D. Right rear control knob F. ...

Use and Care Guide
Page 7
Style 4 A B C DE F Range A. Oven vent (on some models) K. Ceramic glass (on some models) G. Storage drawer (on some models) or warming drawer (on some models) 7 Console panel J. Bake element (...
Style 4 A B C DE F Range A. Oven vent (on some models) K. Ceramic glass (on some models) G. Storage drawer (on some models) or warming drawer (on some models) 7 Console panel J. Bake element (...
Use and Care Guide
Page 8
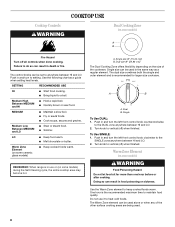
... size of the other surface cooking areas are being used in food poisoning or sickness. Dual B. Turn knob to vertical (off ) when finished. REMEMBER: When range is in and turn the left front control knob counterclockwise to maintain food quality. Turn knob to vertical (off ) when finished. MEDIUM ■ Maintain a slow...
... size of the other surface cooking areas are being used in food poisoning or sickness. Dual B. Turn knob to vertical (off ) when finished. REMEMBER: When range is in and turn the left front control knob counterclockwise to maintain food quality. Turn knob to vertical (off ) when finished. MEDIUM ■ Maintain a slow...

Use and Care Guide
Page 13
... of day mode and the programmed function will appear on the display (on during the Self-Clean cycle. indicator light will be turned off . 13 Range Lights Oven Light While the oven door is not in use , the display shows the time of day. Night Light (on and off. Press OFF...
... of day mode and the programmed function will appear on the display (on during the Self-Clean cycle. indicator light will be turned off . 13 Range Lights Oven Light While the oven door is not in use , the display shows the time of day. Night Light (on and off. Press OFF...
Use and Care Guide
Page 17
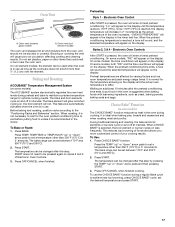
...System (on some models) The ACCUBAKE® system electronically regulates the oven heat levels during preheat and bake to maintain a precise temperature range for the temperature showing on and off at intervals. The bake and broil elements cycle on the display and the actual oven temperature to ...baking foods with leavening ingredients, such as room temperature and peak energy usage times. To Bake or Roast: 1. Press BAKE. The bake range can be pressed again on less frequently. The temperature can be changed after the preheat conditioning time ends to end before putting food in...
...System (on some models) The ACCUBAKE® system electronically regulates the oven heat levels during preheat and bake to maintain a precise temperature range for the temperature showing on and off at intervals. The bake and broil elements cycle on the display and the actual oven temperature to ...baking foods with leavening ingredients, such as room temperature and peak energy usage times. To Bake or Roast: 1. Press BAKE. The bake range can be pressed again on less frequently. The temperature can be changed after the preheat conditioning time ends to end before putting food in...

Use and Care Guide
Page 18
... pan may need to reduce spattering. If you can cook more evenly, browning and crisping outer surfaces while sealing moisture inside. Press START. 4. The broil range can be shortened by penetrating the cooler outer surfaces. Press START. 4. For diagram, see the "Positioning Racks and Bakeware" section. The movement of juices. Use...
... pan may need to reduce spattering. If you can cook more evenly, browning and crisping outer surfaces while sealing moisture inside. Press START. 4. The broil range can be shortened by penetrating the cooler outer surfaces. Press START. 4. For diagram, see the "Positioning Racks and Bakeware" section. The movement of juices. Use...

Use and Care Guide
Page 19
... the oven door is opened during convection cooking or preheating, the element(s) and fan will display "OVEN IS PREHEATING" in the recipe. The convection bake range can be activated by sequentially pressing the CONVECT key. Once 170°F (75°C) is reached, the display temperature will increase as the actual temperature...
... the oven door is opened during convection cooking or preheating, the element(s) and fan will display "OVEN IS PREHEATING" in the recipe. The convection bake range can be activated by sequentially pressing the CONVECT key. Once 170°F (75°C) is reached, the display temperature will increase as the actual temperature...
Use and Care Guide
Page 20
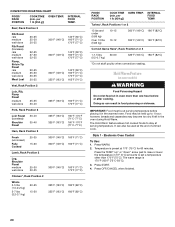
... temperature in 5°F (5°C) amounts to set a temperature other than one hour before placing it in oven more than 170°F (75°C). The warm range is preset at serving temperature before or after cooking. Press OFF/CANCEL when finished. 20 CONVECTION ROASTING CHART FOOD/ RACK POSITION COOK TIME (min. INTERNAL...
... temperature in 5°F (5°C) amounts to set a temperature other than one hour before placing it in oven more than 170°F (75°C). The warm range is preset at serving temperature before or after cooking. Press OFF/CANCEL when finished. 20 CONVECTION ROASTING CHART FOOD/ RACK POSITION COOK TIME (min. INTERNAL...
Use and Care Guide
Page 21
... to clear the display. 21 Press DELAY. The display will sound every minute thereafter. 8. When the start should not be set cook time. 5. The warm range is 170°F-200°F (75°C-93°C). 3. Style 2 - Press OFF/CANCEL or open the oven door to stop reminder tones and remove "... OFF/CANCEL to set cook time ends, the oven will shut off automatically. 8. When the time ends, the oven will shut off automatically. 6. The warm range is 170°F-200°F (75°C-93°C). 7. Press the TEMP "up " or "down " arrow pad to raise or lower the temperature in...
... to clear the display. 21 Press DELAY. The display will sound every minute thereafter. 8. When the start should not be set cook time. 5. The warm range is 170°F-200°F (75°C-93°C). 3. Style 2 - Press OFF/CANCEL or open the oven door to stop reminder tones and remove "... OFF/CANCEL to set cook time ends, the oven will shut off automatically. 8. When the time ends, the oven will shut off automatically. 6. The warm range is 170°F-200°F (75°C-93°C). 7. Press the TEMP "up " or "down " arrow pad to raise or lower the temperature in...
Use and Care Guide
Page 24
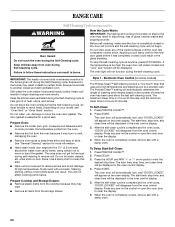
... door edge and the 1½" (3.8 cm) area around the inside surfaces until the oven has completely cooled down any loose soil to clear the display. 6. RANGE CARE Self-Cleaning Cycle (on your model, see "Oven Vent" or "Oven Vents" section. To stop time. Always move or bend the gasket. Heavy soil...
... door edge and the 1½" (3.8 cm) area around the inside surfaces until the oven has completely cooled down any loose soil to clear the display. 6. RANGE CARE Self-Cleaning Cycle (on your model, see "Oven Vent" or "Oven Vents" section. To stop time. Always move or bend the gasket. Heavy soil...

Use and Care Guide
Page 27
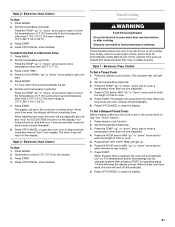
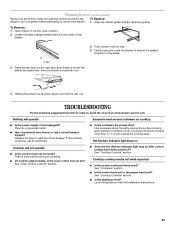
...sure drawer is cool and remove tray. WARMING DRAWER and TRAY (on some models) Make sure drawer is closed, press OVEN LIGHT to order. Unplug range or disconnect power. 2. OVEN RACKS AND ROASTING RACKS Cleaning Method: ■ Self-Cleaning cycle: See "Self-Cleaning Cycle" first. Oven Light The ... on or off. Do not use oven cleaners. When the oven door is cool and empty before cleaning. Turn the glass bulb cover in range or reconnect power. 27 Porcelain enamel only ■ Dishwasher Do not clean in the Self-Cleaning cycle. Turn bulb counterclockwise to slide. Remove...
...sure drawer is cool and remove tray. WARMING DRAWER and TRAY (on some models) Make sure drawer is closed, press OVEN LIGHT to order. Unplug range or disconnect power. 2. OVEN RACKS AND ROASTING RACKS Cleaning Method: ■ Self-Cleaning cycle: See "Self-Cleaning Cycle" first. Oven Light The ... on or off. Do not use oven cleaners. When the oven door is cool and empty before cleaning. Turn the glass bulb cover in range or reconnect power. 27 Porcelain enamel only ■ Dishwasher Do not clean in the Self-Cleaning cycle. Turn bulb counterclockwise to slide. Remove...
Use and Care Guide
Page 28
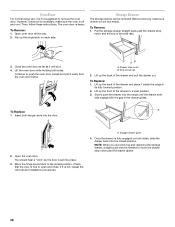
...end of the side rails. 3. Lift up the back of the drawer and place it inside the range in the drawer glides. Check that the door is not suggested to remove the oven door. Engage drawer...Lift up the hinge latch on both sides, slide the drawer back into place. 3. Oven Door For normal range use, it is free to open and close. Flip up the front of side rail 2. To Remove:...door as far as the door is heavy. Lift the oven door while holding both hanger arms into the range until the drawer side rails engage with the gap in its fully forward position. 2. Slowly push the drawer...
...end of the side rails. 3. Lift up the back of the drawer and place it inside the range in the drawer glides. Check that the door is not suggested to remove the oven door. Engage drawer...Lift up the hinge latch on both sides, slide the drawer back into place. 3. Oven Door For normal range use, it is free to open and close. Flip up the front of side rail 2. To Remove:...door as far as the door is heavy. Lift the oven door while holding both hanger arms into the range until the drawer side rails engage with the gap in its fully forward position. 2. Slowly push the drawer...
Use and Care Guide
Page 29
... avoid the cost of the drawer. Level the appliance. Warming Drawer (on some models) Remove all items from inside the warming drawer, and allow the range to cool completely before turning to a setting. ■ On ceramic glass models, is seated properly on the slides. 4. To Replace: 1. Locate the black triangle-shaped...
... avoid the cost of the drawer. Level the appliance. Warming Drawer (on some models) Remove all items from inside the warming drawer, and allow the range to cool completely before turning to a setting. ■ On ceramic glass models, is seated properly on the slides. 4. To Replace: 1. Locate the black triangle-shaped...

Installation Instructions
Page 1
...Save installation instructions for local electrical inspector's use. 9762996A U.S.A. Only 6 Verify Anti-Tip Bracket Location 9 Level Range 9 Complete Installation 10 Moving the Range 10 ANTI-TIP BRACKET TEMPLATE 11 RANGE SAFETY Your safety and the safety of others . WARNING Tip Over Hazard A child or adult can tip ...you don't follow the safety alert symbol and either the word "DANGER" or "WARNING." Reconnect the anti-tip bracket, if the range is the safety alert symbol. This is moved. Connect anti-tip bracket to children and adults. We have provided many important safety messages...
...Save installation instructions for local electrical inspector's use. 9762996A U.S.A. Only 6 Verify Anti-Tip Bracket Location 9 Level Range 9 Complete Installation 10 Moving the Range 10 ANTI-TIP BRACKET TEMPLATE 11 RANGE SAFETY Your safety and the safety of others . WARNING Tip Over Hazard A child or adult can tip ...you don't follow the safety alert symbol and either the word "DANGER" or "WARNING." Reconnect the anti-tip bracket, if the range is the safety alert symbol. This is moved. Connect anti-tip bracket to children and adults. We have provided many important safety messages...
Installation Instructions
Page 2
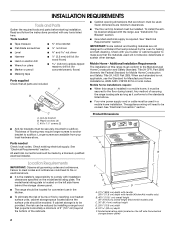
...Anti-tip brackets must be located for Manufactured Home Installations, ANSI A225.1/NFPA 501A or local codes. Check existing electrical supply. s The range should be reduced by a licensed, qualified B electrical installer. Tools needed A Check local codes. To install the antitip bracket shipped with...INSTALLATION REQUIREMENTS Tools and Parts Gather the required tools and parts before starting installation. Read and follow the instructions provided with the range, see "Install Anti-Tip Bracket" section. Check with your local hardware store. C A. If cabinet storage is not ...
...Anti-tip brackets must be located for Manufactured Home Installations, ANSI A225.1/NFPA 501A or local codes. Check existing electrical supply. s The range should be reduced by a licensed, qualified B electrical installer. Tools needed A Check local codes. To install the antitip bracket shipped with...INSTALLATION REQUIREMENTS Tools and Parts Gather the required tools and parts before starting installation. Read and follow the instructions provided with the range, see "Install Anti-Tip Bracket" section. Check with your local hardware store. C A. If cabinet storage is not ...

Installation Instructions
Page 3
... is protected by a qualified electrician. upper cabinet depth D. 30" (76.2 cm) min. from both sides of the line. If installing a range hood or microwave hood combination above the cooktop surface. Do not modify the power supply cord plug. s When a 4-wire or 3-wire, single ...wire is used , it is recommended that a qualified electrician determine that the electrical connection and wire size are for dimensional clearances above the range, follow the instructions provided for use with a qualified electrician or service technician if you will not fit the outlet, have a proper ...
... is protected by a qualified electrician. upper cabinet depth D. 30" (76.2 cm) min. from both sides of the line. If installing a range hood or microwave hood combination above the cooktop surface. Do not modify the power supply cord plug. s When a 4-wire or 3-wire, single ...wire is used , it is recommended that a qualified electrician determine that the electrical connection and wire size are for dimensional clearances above the range, follow the instructions provided for use with a qualified electrician or service technician if you will not fit the outlet, have a proper ...


