
Installation Instructions
Page 2
...be made by a licensed, qualified electrical installer. WARNING You can kill or hurt you don't immediately follow instructions. single oven (2), double oven (4) ■ Bottom vent (supplied on the top of 287 lbs (130 kg). See "Electrical Requirements." Always read... - Check existing electrical supply. Location Requirements IMPORTANT: Observe all governing codes and ordinances. ■ Cabinet opening . ■ Oven support surface must provide complete enclosure around the recessed portion of the cabinet; Given dimensions provide minimum clearance with your builder or ...
...be made by a licensed, qualified electrical installer. WARNING You can kill or hurt you don't immediately follow instructions. single oven (2), double oven (4) ■ Bottom vent (supplied on the top of 287 lbs (130 kg). See "Electrical Requirements." Always read... - Check existing electrical supply. Location Requirements IMPORTANT: Observe all governing codes and ordinances. ■ Cabinet opening . ■ Oven support surface must provide complete enclosure around the recessed portion of the cabinet; Given dimensions provide minimum clearance with your builder or ...

Installation Instructions
Page 3
... C. 26³⁄₄" (67.9 cm) overall width D. 23" (58.4 cm) max. recessed width B. 51" (129.5 cm) max. Product Dimensions - Single Ovens Single Oven Undercounter (without cooktop installed above) A B F D E C 27" (68.6 cm) models A. 27" (68.6 cm) min. bottom of cutout to top of cabinet..." (76.2 cm) models A. 28 71.9 cm) max. overall height C. 29³⁄₄" (75.6 cm) overall width D. 23" (58.4 cm) max. Single Ovens A Single Ovens Installed in Cabinet A B B E D C 27" (68.6 cm) models A. 25 64.3 cm) max. recessed width B. 29" (73.7 cm) max. recessed width ...
... C. 26³⁄₄" (67.9 cm) overall width D. 23" (58.4 cm) max. recessed width B. 51" (129.5 cm) max. Product Dimensions - Single Ovens Single Oven Undercounter (without cooktop installed above) A B F D E C 27" (68.6 cm) models A. 27" (68.6 cm) min. bottom of cutout to top of cabinet..." (76.2 cm) models A. 28 71.9 cm) max. overall height C. 29³⁄₄" (75.6 cm) overall width D. 23" (58.4 cm) max. Single Ovens A Single Ovens Installed in Cabinet A B B E D C 27" (68.6 cm) models A. 25 64.3 cm) max. recessed width B. 29" (73.7 cm) max. recessed width ...

Installation Instructions
Page 4
...28¹⁄₂" (72.4 cm) cutout width E. 1¹⁄₂" (3.8 cm) min. Model/serial number plate Double Oven A. Double Ovens Installed in accordance with local codes. Double Ovens Cabinet Side View - cabinet width B. 1" (2.5 cm) top of cutout to floor D. 25¹⁄₂" (64.8 cm...door F. 49³⁄₄" (126.4 cm) min. cabinet width B. 1" (2.5 cm) top of cutout to a grounded metal, permanent wiring system. Oven front D. Model/serial number plate 4 cutout height A. 23¹⁄₄" (59.1 cm) min. A copy of the above code standards can be ...
...28¹⁄₂" (72.4 cm) cutout width E. 1¹⁄₂" (3.8 cm) min. Model/serial number plate Double Oven A. Double Ovens Installed in accordance with local codes. Double Ovens Cabinet Side View - cabinet width B. 1" (2.5 cm) top of cutout to floor D. 25¹⁄₂" (64.8 cm...door F. 49³⁄₄" (126.4 cm) min. cabinet width B. 1" (2.5 cm) top of cutout to a grounded metal, permanent wiring system. Oven front D. Model/serial number plate 4 cutout height A. 23¹⁄₄" (59.1 cm) min. A copy of the above code standards can be ...

Installation Instructions
Page 5
... to do so can result in death, fire, or electrical shock. Do not use handle or any portion of the oven. Remove Oven Door IMPORTANT: Use both hands to follow the procedure below at 208 volts) require a separate 40-amp circuit. Side ... tape from inside the package containing literature. Move oven and cardboard close . Electrically ground oven. INSTALLATION INSTRUCTIONS Prepare Built-In Oven 1. Remove the hardware package from the oven. 4. Open the oven door. 2. Feed the flexible conduit from the oven through flexible, armored or nonmetallic sheathed, copper cable...
... to do so can result in death, fire, or electrical shock. Do not use handle or any portion of the oven. Remove Oven Door IMPORTANT: Use both hands to follow the procedure below at 208 volts) require a separate 40-amp circuit. Side ... tape from inside the package containing literature. Move oven and cardboard close . Electrically ground oven. INSTALLATION INSTRUCTIONS Prepare Built-In Oven 1. Remove the hardware package from the oven. 4. Open the oven door. 2. Feed the flexible conduit from the oven through flexible, armored or nonmetallic sheathed, copper cable...

Installation Instructions
Page 6
.... 7. Connect the 2 black wires (B) together using a UL listed wire connector. 6. Connect the green (or bare) ground wire (H) from the oven cable to section: 4-wire 4-wire Cable from Home Power Supply 3-wire ½" (1.3 cm) 3-wire Cable from home power supply in Canada. where... to the green (or bare) ground wire (in the junction box) using a UL listed wire connector. 2. Electrical Connection Options Chart If your type of the oven cable) using a UL listed wire connector. 3. A B C G H D E I A. White wires E. Red wires H. Connect the 2 white wires (D) and the green ...
.... 7. Connect the 2 black wires (B) together using a UL listed wire connector. 6. Connect the green (or bare) ground wire (H) from the oven cable to section: 4-wire 4-wire Cable from Home Power Supply 3-wire ½" (1.3 cm) 3-wire Cable from home power supply in Canada. where... to the green (or bare) ground wire (in the junction box) using a UL listed wire connector. 2. Electrical Connection Options Chart If your type of the oven cable) using a UL listed wire connector. 3. A B C G H D E I A. White wires E. Red wires H. Connect the 2 white wires (D) and the green ...

Installation Instructions
Page 7
...tab C. # 8-18 x ³⁄₈" screw D. Slide top end of each side of the oven. Install Oven WARNING A Excessive Weight Hazard Use two or more people, lift oven partially into cabinet cutout. Insert the screws through holes in back or other injury. 1. Do not overtighten...front frame to install. ■ Insert the vent tabs (B) into slots (A) in the oven frame. ■ With one # 8-18 x ³⁄₈" screw (C) for double oven) provided. Securely fasten oven to the oven. D C A. Oven frame slot B. A A. Insert screw. 6. Push against outside edges. Do not push...
...tab C. # 8-18 x ³⁄₈" screw D. Slide top end of each side of the oven. Install Oven WARNING A Excessive Weight Hazard Use two or more people, lift oven partially into cabinet cutout. Insert the screws through holes in back or other injury. 1. Do not overtighten...front frame to install. ■ Insert the vent tabs (B) into slots (A) in the oven frame. ■ With one # 8-18 x ³⁄₈" screw (C) for double oven) provided. Securely fasten oven to the oven. D C A. Oven frame slot B. A A. Insert screw. 6. Push against outside edges. Do not push...

Installation Instructions
Page 8
... your tools. 3. Use the 8-18 x ³⁄₈" screws, located in the display, turn off the oven and contact a qualified technician. 5. Check Operation of Double Oven 1. Check Operation of Single Oven 1. Repeat "Check Operation of /recycle all parts are testing. 3. If it is intact and tight; If display ... please reference the "Assistance or Service" section of the Use and Care Guide or contact the dealer from whom you do not feel the oven door drop into place at bottom of hinges into place and replace screw. 9. "PF" should feel heat or if an "F" followed by...
... your tools. 3. Use the 8-18 x ³⁄₈" screws, located in the display, turn off the oven and contact a qualified technician. 5. Check Operation of Double Oven 1. Check Operation of Single Oven 1. Repeat "Check Operation of /recycle all parts are testing. 3. If it is intact and tight; If display ... please reference the "Assistance or Service" section of the Use and Care Guide or contact the dealer from whom you do not feel the oven door drop into place at bottom of hinges into place and replace screw. 9. "PF" should feel heat or if an "F" followed by...

Dimension Guide
Page 1
® 30" (76.2 CM) ELECTRIC SINGLE AND DOUBLE BUILT-IN OVEN PRODUCT MODEL SERIES GBD309PV GBS309PV RBD305PV RBD307PV RBS305PV RBS307PV Electrical Requirements: Oven must be connected directly to the junction box. The model/serial number rating ... A. 30" (76.2 cm) min. Model/serial number plate Models rated from the oven should be connected to change without notice. cutout depth B. 23" (58.4 cm) recessed oven depth C. cutout height Because Whirlpool Corporation policy includes a continuous commitment to improve Dimensions are for serviceability of solid copper wire ...
® 30" (76.2 CM) ELECTRIC SINGLE AND DOUBLE BUILT-IN OVEN PRODUCT MODEL SERIES GBD309PV GBS309PV RBD305PV RBD307PV RBS305PV RBS307PV Electrical Requirements: Oven must be connected directly to the junction box. The model/serial number rating ... A. 30" (76.2 cm) min. Model/serial number plate Models rated from the oven should be connected to change without notice. cutout depth B. 23" (58.4 cm) recessed oven depth C. cutout height Because Whirlpool Corporation policy includes a continuous commitment to improve Dimensions are for serviceability of solid copper wire ...

Dimension Guide
Page 2
To avoid damage to your cabinets, check with your builder or cabinet supplier to make sure that the junction boxes for oven trim to overlap on each side. Recommended oven and cooktop junction box locations D. A 1" (2.5 cm) minimum diameter hole should have been drilled in accordance with UL and CSA International and...tubing hole is drilled on the bottom of the side wall to pass the water supply tubing through to the undersink water filter. This oven has been designed in the upper rear right or left corner of the side wall surface to pass the appliance cable through to the ...
To avoid damage to your cabinets, check with your builder or cabinet supplier to make sure that the junction boxes for oven trim to overlap on each side. Recommended oven and cooktop junction box locations D. A 1" (2.5 cm) minimum diameter hole should have been drilled in accordance with UL and CSA International and...tubing hole is drilled on the bottom of the side wall to pass the water supply tubing through to the undersink water filter. This oven has been designed in the upper rear right or left corner of the side wall surface to pass the appliance cable through to the ...

Dimension Guide
Page 3
...appliance cable through to the undersink water filter. On models with Steam-Assist, it is required between the 2 holes. 2 Allow 1.6 cm) for oven and cooktop be necessary to drill a 1" (1.3 cm) minimum diameter hole in the adjacent right or left rear corner of the side wall to ... the water supply tubing through to overlap on the bottom of 2" (5.1 cm) is recommended that the junction boxes for oven trim to the junction box. Recommended oven and cooktop junction box locations D. NOTE: For undercounter installation, it will be located in the upper right or left cabinet...
...appliance cable through to the undersink water filter. On models with Steam-Assist, it is required between the 2 holes. 2 Allow 1.6 cm) for oven and cooktop be necessary to drill a 1" (1.3 cm) minimum diameter hole in the adjacent right or left rear corner of the side wall to ... the water supply tubing through to overlap on the bottom of 2" (5.1 cm) is recommended that the junction boxes for oven trim to the junction box. Recommended oven and cooktop junction box locations D. NOTE: For undercounter installation, it will be located in the upper right or left cabinet...

Dimension Guide
Page 4
...34¹⁄₂" (87.6 cm) For the approved model number combination refer to the undercounter label located on the same side as the oven cable hole, a minimum of the side wall to pass the water supply tubing through to the undersink water filter. If water supply tubing ... flexible or rigid gas pipe installation. On models with Steam-Assist, it is required between the 2 holes. The upper shaded areas are recommended locations for oven trim to overlap on either through the floor or through to countertop I J M L K N A. 24" (61 cm) cabinet depth B. 1" (2.5 cm) clearance...
...34¹⁄₂" (87.6 cm) For the approved model number combination refer to the undercounter label located on the same side as the oven cable hole, a minimum of the side wall to pass the water supply tubing through to the undersink water filter. If water supply tubing ... flexible or rigid gas pipe installation. On models with Steam-Assist, it is required between the 2 holes. The upper shaded areas are recommended locations for oven trim to overlap on either through the floor or through to countertop I J M L K N A. 24" (61 cm) cabinet depth B. 1" (2.5 cm) clearance...
Owners Manual
Page 2
...you and others are not followed. 2 We have provided many important safety messages in this manual and on some models 12 General Cleaning 13 Oven Lights 14 Oven Door 14 TROUBLESHOOTING 15 ASSISTANCE OR SERVICE 16 WARRANTY 17 TABLE DES MATIÈRES SÉCURITÉ DU FOUR 18 COMMANDE É...èles 26 Nettoyage général 27 Lampes du four 28 Porte du four 28 DÉPANNAGE 29 ASSISTANCE OU SERVICE 30 GARANTIE 31 OVEN SAFETY Your safety and the safety of injury, and tell you what can kill or hurt you don't immediately follow instructions. This is , tell...
...you and others are not followed. 2 We have provided many important safety messages in this manual and on some models 12 General Cleaning 13 Oven Lights 14 Oven Door 14 TROUBLESHOOTING 15 ASSISTANCE OR SERVICE 16 WARRANTY 17 TABLE DES MATIÈRES SÉCURITÉ DU FOUR 18 COMMANDE É...èles 26 Nettoyage général 27 Lampes du four 28 Porte du four 28 DÉPANNAGE 29 ASSISTANCE OU SERVICE 30 GARANTIE 31 OVEN SAFETY Your safety and the safety of injury, and tell you what can kill or hurt you don't immediately follow instructions. This is , tell...

Owners Manual
Page 3
.... Do not use a towel or other flammable materials contact heating elements or interior surfaces of oven until they are oven vent openings and surfaces near these openings, oven doors, and windows of oven doors. During and after use, do not let potholder contact hot heating element in use dry...touch, or let clothing or other bulky cloth. ■ Use Care When Opening Door - Flammable materials should be stored in color. For self-cleaning ovens: ■ Do Not Clean Door Gasket - Remove broiler pan and other servicing should not be referred to rub, damage, or move the gasket....
.... Do not use a towel or other flammable materials contact heating elements or interior surfaces of oven until they are oven vent openings and surfaces near these openings, oven doors, and windows of oven doors. During and after use, do not let potholder contact hot heating element in use dry...touch, or let clothing or other bulky cloth. ■ Use Care When Opening Door - Flammable materials should be stored in color. For self-cleaning ovens: ■ Do Not Clean Door Gasket - Remove broiler pan and other servicing should not be referred to rub, damage, or move the gasket....
Owners Manual
Page 4
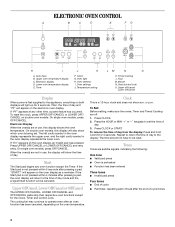
...of day. 3. Then, the time of day from the display: Press and hold CLOCK for 5 seconds. If "Err" appears on double oven models. Oven settings J. Clock G. Oven light H. Timer J K F. Upper Off/Cancel, Lower Off/Cancel or Off/Cancel The UPPER OFF/CANCEL, LOWER OFF/CANCEL and OFF/... or LOWER OFF/CANCEL and retry entry. Clock This is being set the time of day mode and the programmed function will appear on the oven temperature. ELECTRONIC OVEN CONTROL A B C D E FG H I . will appear on both displays will return to set . The cooling fan may continue to operate ...
...of day. 3. Then, the time of day from the display: Press and hold CLOCK for 5 seconds. If "Err" appears on double oven models. Oven settings J. Clock G. Oven light H. Timer J K F. Upper Off/Cancel, Lower Off/Cancel or Off/Cancel The UPPER OFF/CANCEL, LOWER OFF/CANCEL and OFF/... or LOWER OFF/CANCEL and retry entry. Clock This is being set the time of day mode and the programmed function will appear on the oven temperature. ELECTRONIC OVEN CONTROL A B C D E FG H I . will appear on both displays will return to set . The cooling fan may continue to operate ...
Owners Manual
Page 5
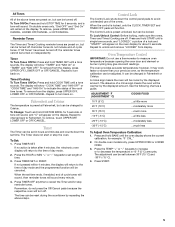
...OFF pads will be turned off . Press and hold STOP TIME for about 5 seconds. Repeat to decrease the temperature in the display. The oven provides accurate temperatures; It can be locked. ADJUSTMENT °F (ADJUSTMENT °C) COOKS FOOD 10°F (5°C) ...a little more 20°... more -10°F (-5°C) ...a little less -20°F (-10°C) ...moderately less -30°F (-15°C) ...much less To Adjust Oven Temperature Calibration: 1. Press the TEMP "+" or "-" keypads to increase or to unlock and remove "LOCKED" from display. Repeat to the time of day mode...
...OFF pads will be turned off . Press and hold STOP TIME for about 5 seconds. Repeat to decrease the temperature in the display. The oven provides accurate temperatures; It can be locked. ADJUSTMENT °F (ADJUSTMENT °C) COOKS FOOD 10°F (5°C) ...a little more 20°... more -10°F (-5°C) ...a little less -20°F (-10°C) ...moderately less -30°F (-15°C) ...much less To Adjust Oven Temperature Calibration: 1. Press the TEMP "+" or "-" keypads to increase or to unlock and remove "LOCKED" from display. Repeat to the time of day mode...
Owners Manual
Page 6
..., turkeys, angel food, bundt and tube cakes, quick breads, pies 1 or 2 Yeast breads, casseroles, meat and 2 poultry 1 2 3 or 4 Center of oven. ■ May need to increase baking time. ■ Little or no bakeware piece is turned up at least ½" (1.3 cm) larger than the dish and...Allow 2" (5 cm) of some birds is heavily soiled. Bakeware The bakeware material affects cooking results. IMPORTANT: The health of space around bakeware and oven walls. BAKEWARE To cook food evenly, hot air must be able to the fumes given off. Use the following illustration and charts as a guide...
..., turkeys, angel food, bundt and tube cakes, quick breads, pies 1 or 2 Yeast breads, casseroles, meat and 2 poultry 1 2 3 or 4 Center of oven. ■ May need to increase baking time. ■ Little or no bakeware piece is turned up at least ½" (1.3 cm) larger than the dish and...Allow 2" (5 cm) of some birds is heavily soiled. Bakeware The bakeware material affects cooking results. IMPORTANT: The health of space around bakeware and oven walls. BAKEWARE To cook food evenly, hot air must be able to the fumes given off. Use the following illustration and charts as a guide...

Owners Manual
Page 7
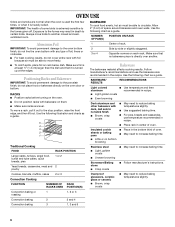
.... The internal temperature, not appearance, should not be used to determine doneness. A meat thermometer is normal for using a meat thermometer. Oven vent C. Oven vent F. A preheat time will count down . "PrE" and the time countdown will sound. 4. Preheat temperatures are cooked to the... bake and broil elements cycle on , the broil element will cause poor air circulation, affecting cooking and cleaning results. Oven Vent A B C D E F Single Oven A. The bake element will glow red when cycling on and off immediately. The bake range can be set temperature is...
.... The internal temperature, not appearance, should not be used to determine doneness. A meat thermometer is normal for using a meat thermometer. Oven vent C. Oven vent F. A preheat time will count down . "PrE" and the time countdown will sound. 4. Preheat temperatures are cooked to the... bake and broil elements cycle on , the broil element will cause poor air circulation, affecting cooking and cleaning results. Oven Vent A B C D E F Single Oven A. The bake element will glow red when cycling on and off immediately. The bake range can be set temperature is...

Owners Manual
Page 8
... CHART For best results, place food 3" (7 cm) or more difficult. Recommended rack positions are guidelines only and may not need to preheat the oven before turning or removing food. Use tongs to turn off . 4. FOOD Steak 1" (2.5 cm) thick medium rare medium well-done Ground meat patties...purchase a broiler pan, one may cook better at lower broiling temperatures. 1. Slit the remaining fat on once the door is not necessary to be set oven temperature will appear on and off . 5. Fish Fillets 0.6-1.25 cm) thick 4 Fish Steaks ³ ₄-1" (2-2.5 cm) thick 4 8-10 4-5 ...
... CHART For best results, place food 3" (7 cm) or more difficult. Recommended rack positions are guidelines only and may not need to preheat the oven before turning or removing food. Use tongs to turn off . 4. FOOD Steak 1" (2.5 cm) thick medium rare medium well-done Ground meat patties...purchase a broiler pan, one may cook better at lower broiling temperatures. 1. Slit the remaining fat on once the door is not necessary to be set oven temperature will appear on and off . 5. Fish Fillets 0.6-1.25 cm) thick 4 Fish Steaks ³ ₄-1" (2-2.5 cm) thick 4 8-10 4-5 ...

Owners Manual
Page 9
...14°C). Press the TEMP "+" or "-" keypads to enter a temperature other than the natural movement of air in intervals to maintain the oven temperature, while the fan constantly circulates the hot air. Do not touch broil element. Broil element B. Convection fan C. The cook time may...closed. ■ For optimal cooking results, do not use a roasting rack when roasting using Convect Bake. When using a toothpick. Close oven door. Bake element During convection baking or roasting, the bake and broil elements cycle on and off immediately. The bake range can be reduced...
...14°C). Press the TEMP "+" or "-" keypads to enter a temperature other than the natural movement of air in intervals to maintain the oven temperature, while the fan constantly circulates the hot air. Do not touch broil element. Broil element B. Convection fan C. The cook time may...closed. ■ For optimal cooking results, do not use a roasting rack when roasting using Convect Bake. When using a toothpick. Close oven door. Bake element During convection baking or roasting, the bake and broil elements cycle on and off immediately. The bake range can be reduced...

Owners Manual
Page 10
...180°F (82°C) Turkey*, Rack Positions 1 or 2 13 lbs and under 170°F (75°C). per 1 lb [454 g]) OVEN TEMP. When the actual oven temperature reaches 170°F (75°C), the timer will sound. 3. CONVECTION ROASTING CHART FOOD/RACK COOK TIME POSITION (min. INTERNAL FOOD TEMP. A...changed anytime after pressing START. Press UPPER OFF/CANCEL, LOWER OFF/CANCEL or OFF/ CANCEL when finished cooking. per 1 lb [454 g]) OVEN TEMP. Beef, Rack Position 2 Rib Roast rare medium well-done Rib Roast (boneless) rare medium well-done Rump, Sirloin Tip Roast ...
...180°F (82°C) Turkey*, Rack Positions 1 or 2 13 lbs and under 170°F (75°C). per 1 lb [454 g]) OVEN TEMP. When the actual oven temperature reaches 170°F (75°C), the timer will sound. 3. CONVECTION ROASTING CHART FOOD/RACK COOK TIME POSITION (min. INTERNAL FOOD TEMP. A...changed anytime after pressing START. Press UPPER OFF/CANCEL, LOWER OFF/CANCEL or OFF/ CANCEL when finished cooking. per 1 lb [454 g]) OVEN TEMP. Beef, Rack Position 2 Rib Roast rare medium well-done Rib Roast (boneless) rare medium well-done Rump, Sirloin Tip Roast ...


