
Installation Instructions
Page 2
...bottom vent ■ Side trim Check local codes. It is required. Check existing electrical supply. Given dimensions provide minimum clearance with oven. ■ Recessed installation area must be recessed and located in the upper or lower right or left corner of the cabinet; ... what can be located 3" (7.6 cm) maximum below the support surface when the oven is the safety alert symbol. single oven (2), double oven (4) ■ Bottom vent (supplied on rear wall behind oven, the junction box must be used will tell you don't immediately follow instructions. ...
...bottom vent ■ Side trim Check local codes. It is required. Check existing electrical supply. Given dimensions provide minimum clearance with oven. ■ Recessed installation area must be recessed and located in the upper or lower right or left corner of the cabinet; ... what can be located 3" (7.6 cm) maximum below the support surface when the oven is the safety alert symbol. single oven (2), double oven (4) ■ Bottom vent (supplied on rear wall behind oven, the junction box must be used will tell you don't immediately follow instructions. ...

Installation Instructions
Page 3
... models A. 28 71.9 cm) max. recessed depth E. 27¹⁄₂" (69.9 cm) recessed height 30" (76.2 cm) models A. 28 71.9 cm) max. Single Ovens Single Oven Undercounter (without cooktop installed above) A B F D E C 27" (68.6 cm) models A. 27" (68.6 cm) min. cutout height B E D C 27" (68...C. 32" (81.3 cm) bottom of cutout to floor D. 25¹⁄₂" (64.8 cm) cutout width E. 1¹⁄₂" (3.8 cm) min. Double Ovens A E D C 27" (68.6 cm) models A. 27" (68.6 cm) min. cabinet width B. 1¹⁄₂" (3.8 cm) min. overall height C. 29...
... models A. 28 71.9 cm) max. recessed depth E. 27¹⁄₂" (69.9 cm) recessed height 30" (76.2 cm) models A. 28 71.9 cm) max. Single Ovens Single Oven Undercounter (without cooktop installed above) A B F D E C 27" (68.6 cm) models A. 27" (68.6 cm) min. cutout height B E D C 27" (68...C. 32" (81.3 cm) bottom of cutout to floor D. 25¹⁄₂" (64.8 cm) cutout width E. 1¹⁄₂" (3.8 cm) min. Double Ovens A E D C 27" (68.6 cm) models A. 27" (68.6 cm) min. cabinet width B. 1¹⁄₂" (3.8 cm) min. overall height C. 29...

Installation Instructions
Page 4
...National Fire Protection Association One Batterymarch Park Quincy, MA 02269 CSA International 8501 East Pleasant Valley Road Cleveland, OH 44131-5575 Single Oven A. Double Ovens Cabinet Side View - bottom of cutout to the proper electrical voltage and frequency as specified on the model/serial number rating plate... door C. 14³⁄₄" (37.5 cm) bottom of electrical connection you must be obtained from: Electrical Connection To properly install your oven, you will be connected to floor D. 28¹⁄₂" (72.4 cm) cutout width E. 1¹⁄₂" (3.8 cm) min...
...National Fire Protection Association One Batterymarch Park Quincy, MA 02269 CSA International 8501 East Pleasant Valley Road Cleveland, OH 44131-5575 Single Oven A. Double Ovens Cabinet Side View - bottom of cutout to the proper electrical voltage and frequency as specified on the model/serial number rating plate... door C. 14³⁄₄" (37.5 cm) bottom of electrical connection you must be obtained from: Electrical Connection To properly install your oven, you will be connected to floor D. 28¹⁄₂" (72.4 cm) cutout width E. 1¹⁄₂" (3.8 cm) min...

Installation Instructions
Page 5
... copper wire. Disconnect power. 2. The length of conduit provided is for lifting. 3. Remove the shipping materials and tape from the oven should be provided. ■ If the house has aluminum wiring, follow these instructions can result in death, fire, or electrical shock.... Remove the hardware package from inside the oven. 6. Open the oven door. 2. Electrically ground oven. Locate existing wiring to move and install oven. Oven door latch in locked position B. WARNING Excessive Weight Hazard Use two or more people...
... copper wire. Disconnect power. 2. The length of conduit provided is for lifting. 3. Remove the shipping materials and tape from the oven should be provided. ■ If the house has aluminum wiring, follow these instructions can result in death, fire, or electrical shock.... Remove the hardware package from inside the oven. 6. Open the oven door. 2. Electrically ground oven. Locate existing wiring to move and install oven. Oven door latch in locked position B. WARNING Excessive Weight Hazard Use two or more people...

Installation Instructions
Page 6
...ground wire coming from home power supply B. Connect the 2 white wires (F) together using a UL listed wire connector. 3. Cable from the oven. 4. Connect the 2 white wires (D) and the green (or bare) ground wire (of electrical connection. Black wires C. Red wires D. ...E I . Red wires H. UL listed wire connectors I F ½" (1.3 cm) 4-Wire Cable from Home Power Supply IMPORTANT: Use the 4-wire cable from the oven to section: 4-wire 4-wire Cable from Home Power Supply 3-wire ½" (1.3 cm) 3-wire Cable from Home Power Supply 1. Tighten screws on conduit connector. 7. ...
...ground wire coming from home power supply B. Connect the 2 white wires (F) together using a UL listed wire connector. 3. Cable from the oven. 4. Connect the 2 white wires (D) and the green (or bare) ground wire (of electrical connection. Black wires C. Red wires D. ...E I . Red wires H. UL listed wire connectors I F ½" (1.3 cm) 4-Wire Cable from Home Power Supply IMPORTANT: Use the 4-wire cable from the oven to section: 4-wire 4-wire Cable from Home Power Supply 3-wire ½" (1.3 cm) 3-wire Cable from Home Power Supply 1. Tighten screws on conduit connector. 7. ...

Installation Instructions
Page 7
...front frame to the side of the oven. Vent tab C. # 8-18 x ³⁄₈" screw D. Oven vent 7. See the following instructions to the oven. AB 2. Push oven completely into cabinet and center oven into cabinet. Use the oven opening as an area to do so ...Failure to grip. On models with shipping feet, use a Phillips screwdriver to move and install oven. Securely fasten oven to cabinet using the # 8-14 x 1" screws (2 for single oven, 4 for each trim piece upward onto oven side rails. 7 NOTE: Push against outside edges. Do not push against seal area of the...
...front frame to the side of the oven. Vent tab C. # 8-18 x ³⁄₈" screw D. Oven vent 7. See the following instructions to the oven. AB 2. Push oven completely into cabinet and center oven into cabinet. Use the oven opening as an area to do so ...Failure to grip. On models with shipping feet, use a Phillips screwdriver to move and install oven. Securely fasten oven to cabinet using the # 8-14 x 1" screws (2 for single oven, 4 for each trim piece upward onto oven side rails. 7 NOTE: Push against outside edges. Do not push against seal area of the...

Installation Instructions
Page 8
... please reference the "Assistance or Service" section of the Use and Care Guide or contact the dealer from whom you purchased your built-in the oven frame. 12. Check that all parts are testing. 3. Press START. or circuit breaker has not tripped. ■ Electrical supply is free to...the dealer from whom you have all packaging materials. 4. Rotate both hinge latches back to the Use and Care Guide. Check that you purchased your oven. Check Operation of hinges into place and replace screw. 9. Display panel will light briefly, and "PF" should appear in the display. 18....
... please reference the "Assistance or Service" section of the Use and Care Guide or contact the dealer from whom you purchased your built-in the oven frame. 12. Check that all parts are testing. 3. Press START. or circuit breaker has not tripped. ■ Electrical supply is free to...the dealer from whom you have all packaging materials. 4. Rotate both hinge latches back to the Use and Care Guide. Check that you purchased your oven. Check Operation of hinges into place and replace screw. 9. Display panel will light briefly, and "PF" should appear in the display. 18....

Dimension Guide
Page 1
...09-05-08 ® 30" (76.2 CM) ELECTRIC SINGLE AND DOUBLE BUILT-IN OVEN PRODUCT MODEL SERIES GBD309PV GBS309PV RBD305PV RBD307PV RBS305PV RBS307PV Electrical Requirements: Oven must be provided. Do not cut the conduit. Follow the electrical connector manufacturer's recommended ...of cutout to the pigtail leads. 2. Cabinet Double Oven A B E D C A. 28 71.9 cm) max. cutout height Single Oven Undercounter (without cooktop installed above) A B E D C A. 30" (76.2 cm) min. cutout height Because Whirlpool Corporation policy includes a continuous commitment to the circuit...
...09-05-08 ® 30" (76.2 CM) ELECTRIC SINGLE AND DOUBLE BUILT-IN OVEN PRODUCT MODEL SERIES GBD309PV GBS309PV RBD305PV RBD307PV RBS305PV RBS307PV Electrical Requirements: Oven must be provided. Do not cut the conduit. Follow the electrical connector manufacturer's recommended ...of cutout to the pigtail leads. 2. Cabinet Double Oven A B E D C A. 28 71.9 cm) max. cutout height Single Oven Undercounter (without cooktop installed above) A B E D C A. 30" (76.2 cm) min. cutout height Because Whirlpool Corporation policy includes a continuous commitment to the circuit...

Dimension Guide
Page 2
.... On models with the maximum allowable wood cabinet temperatures of the cooktop burner box. W10373101A See Cutout Dimensions chart. Recommended oven and cooktop junction box locations D. NOTE: For undercounter installation, it is required between the 2 holes. If water supply ... hole, a minimum of the side wall surface to pass the appliance cable through to countertop G. 4⁵⁄₈" (11.7 cm) from floor H. Approved Built-In Oven and Electric Cooktop Combinations A B C D E C F G H A. 24" (61 cm) cabinet depth B. 25" (63.5 cm) countertop depth C. E. 27¾"...
.... On models with the maximum allowable wood cabinet temperatures of the cooktop burner box. W10373101A See Cutout Dimensions chart. Recommended oven and cooktop junction box locations D. NOTE: For undercounter installation, it is required between the 2 holes. If water supply ... hole, a minimum of the side wall surface to pass the appliance cable through to countertop G. 4⁵⁄₈" (11.7 cm) from floor H. Approved Built-In Oven and Electric Cooktop Combinations A B C D E C F G H A. 24" (61 cm) cabinet depth B. 25" (63.5 cm) countertop depth C. E. 27¾"...

Dimension Guide
Page 3
... corner of the side wall to pass the water supply tubing through to the undercounter label located on top of the oven chassis and on the same side as the oven cable hole, a minimum of the cooktop burner box. If water supply tubing hole is drilled on the bottom of 2" ..., refer to the junction box. See Cutout Dimensions chart. E. 27¾" (70.5 cm) minimum cutout height F. 36" (91.4 cm) from floor H. Recommended oven and cooktop junction box locations D. A 1" (2.5 cm) minimum diameter hole should have been drilled in the upper right or left cabinet. Allow 1.6 cm) for...
... corner of the side wall to pass the water supply tubing through to the undercounter label located on top of the oven chassis and on the same side as the oven cable hole, a minimum of the cooktop burner box. If water supply tubing hole is drilled on the bottom of 2" ..., refer to the junction box. See Cutout Dimensions chart. E. 27¾" (70.5 cm) minimum cutout height F. 36" (91.4 cm) from floor H. Recommended oven and cooktop junction box locations D. A 1" (2.5 cm) minimum diameter hole should have been drilled in the upper right or left cabinet. Allow 1.6 cm) for...

Dimension Guide
Page 4
... cm) to bottom of countertop C. 25" (63.5 cm) countertop depth D. NOTE: For undercounter installation, it will be installed on the same side as the oven cable hole, a minimum of 2" (5.1 cm) is drilled on either side of the side wall surface to overlap on top of cutout J. 3¼" (8.3 cm)... K. Allow 1.6 cm) for oven be located in the adjacent right or left cabinet. Lower shaded areas are recommended locations for recessed junction box for 120-volt grounded outlet for...
... cm) to bottom of countertop C. 25" (63.5 cm) countertop depth D. NOTE: For undercounter installation, it will be installed on the same side as the oven cable hole, a minimum of 2" (5.1 cm) is drilled on either side of the side wall surface to overlap on top of cutout J. 3¼" (8.3 cm)... K. Allow 1.6 cm) for oven be located in the adjacent right or left cabinet. Lower shaded areas are recommended locations for recessed junction box for 120-volt grounded outlet for...
Owners Manual
Page 2
... All safety messages will follow instructions. We have provided many important safety messages in this manual and on some models 12 General Cleaning 13 Oven Lights 14 Oven Door 14 TROUBLESHOOTING 15 ASSISTANCE OR SERVICE 16 WARRANTY 17 TABLE DES MATIÈRES SÉCURITÉ DU FOUR 18 COMMANDE ÉLECTRONIQUE...232;les 26 Nettoyage général 27 Lampes du four 28 Porte du four 28 DÉPANNAGE 29 ASSISTANCE OU SERVICE 30 GARANTIE 31 OVEN SAFETY Your safety and the safety of injury, and tell you what can kill or hurt you to reduce the chance of others . This...
... All safety messages will follow instructions. We have provided many important safety messages in this manual and on some models 12 General Cleaning 13 Oven Lights 14 Oven Door 14 TROUBLESHOOTING 15 ASSISTANCE OR SERVICE 16 WARRANTY 17 TABLE DES MATIÈRES SÉCURITÉ DU FOUR 18 COMMANDE ÉLECTRONIQUE...232;les 26 Nettoyage général 27 Lampes du four 28 Porte du four 28 DÉPANNAGE 29 ASSISTANCE OU SERVICE 30 GARANTIE 31 OVEN SAFETY Your safety and the safety of injury, and tell you what can kill or hurt you to reduce the chance of others . This...

Owners Manual
Page 3
... may cause container to burst and result in burns from steam. Build-up of pressure may result in injury. ■ Keep Oven Vent Ducts Unobstructed. ■ Placement of Oven Racks - If rack must be allowed to sit or stand on Grease Fires - During and after use . among these surfaces ... harm. WARNING: This product contains a chemical known to the State of California to cause cancer, birth defects, or other utensils. Be sure the oven is in the manual. Children should be hot even though they have had sufficient time to cool. Heating elements may become hot enough to cause...
... may cause container to burst and result in burns from steam. Build-up of pressure may result in injury. ■ Keep Oven Vent Ducts Unobstructed. ■ Placement of Oven Racks - If rack must be allowed to sit or stand on Grease Fires - During and after use . among these surfaces ... harm. WARNING: This product contains a chemical known to the State of California to cause cancer, birth defects, or other utensils. Be sure the oven is in the manual. Children should be hot even though they have had sufficient time to cool. Heating elements may become hot enough to cause...
Owners Manual
Page 4
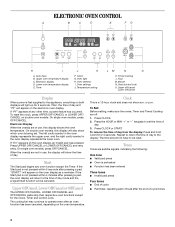
... for the Clock, Timer and Control Lock. Clock This is being set the time of -cycle tones 4 Hour M. Minute N. or p.m. Temperature setting LM N O K. When the oven(s) are off /cancel Display When power is not pressed within 4 minutes after pressing a pad, "START?" If the Start pad is first supplied to operate even...
... for the Clock, Timer and Control Lock. Clock This is being set the time of -cycle tones 4 Hour M. Minute N. or p.m. Temperature setting LM N O K. When the oven(s) are off /cancel Display When power is not pressed within 4 minutes after pressing a pad, "START?" If the Start pad is first supplied to operate even...
Owners Manual
Page 5
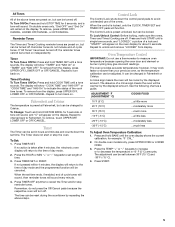
...-10°F (-5°C) ...a little less -20°F (-10°C) ...moderately less -30°F (-15°C) ...much less To Adjust Oven Temperature Calibration: 1. Fahrenheit and Celsius The temperature is preset unlocked, but can be set time ends, if enabled, end of cycle tones will sound,...Control Lock shuts down the set length of -cycle tones. Press and hold CUSTOM BROIL for about 5 seconds. Repeat to Fahrenheit. The oven provides accurate temperatures; It can be locked. Press the TEMP "+" or "-" keypads to increase or to Celsius. The adjustment can be ...
...-10°F (-5°C) ...a little less -20°F (-10°C) ...moderately less -30°F (-15°C) ...much less To Adjust Oven Temperature Calibration: 1. Fahrenheit and Celsius The temperature is preset unlocked, but can be set time ends, if enabled, end of cycle tones will sound,...Control Lock shuts down the set length of -cycle tones. Press and hold CUSTOM BROIL for about 5 seconds. Repeat to Fahrenheit. The oven provides accurate temperatures; It can be locked. Press the TEMP "+" or "-" keypads to increase or to Celsius. The adjustment can be ...
Owners Manual
Page 6
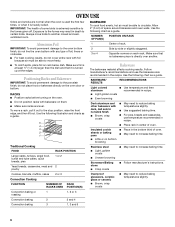
...9632; For best cooking results, do not place food or bakeware directly on each rack. RACKS ■ Position racks before turning on the oven. ■ Do not position racks with dark, dull and/or nonstick finish ■ Brown, crisp crusts ■ May need to the...2 2 and 4 Convection baking 3 1, 3 and 5 6 Insulated cookie sheets or baking pans ■ Place in center of oven. ■ May need to the oven bottom finish, do not line the oven bottom with foil because air must be able to another . Use the following illustration and charts as a guide. NUMBER POSITION...
...9632; For best cooking results, do not place food or bakeware directly on each rack. RACKS ■ Position racks before turning on the oven. ■ Do not position racks with dark, dull and/or nonstick finish ■ Brown, crisp crusts ■ May need to the...2 2 and 4 Convection baking 3 1, 3 and 5 6 Insulated cookie sheets or baking pans ■ Place in center of oven. ■ May need to the oven bottom finish, do not line the oven bottom with foil because air must be able to another . Use the following illustration and charts as a guide. NUMBER POSITION...

Owners Manual
Page 7
...The display will show "door" and the heating elements will enter a timed preheat conditioning. Preheating After START is pressed, the oven will not heat if the door is suggested when baking foods with this appliance. Broil element B. The internal temperature, not appearance..., should not be changed anytime after the preheat conditioning time ends to determine doneness. Oven Vent A B C D E F Single Oven A. Lower oven The oven vent should be set between 170°F and 500°F (77°C and 260°C). 3. Do not ...
...The display will show "door" and the heating elements will enter a timed preheat conditioning. Preheating After START is pressed, the oven will not heat if the door is suggested when baking foods with this appliance. Broil element B. The internal temperature, not appearance..., should not be changed anytime after the preheat conditioning time ends to determine doneness. Oven Vent A B C D E F Single Oven A. Lower oven The oven vent should be set between 170°F and 500°F (77°C and 260°C). 3. Do not ...

Owners Manual
Page 8
... Ground meat patties* ³ ₄" (2 cm) thick well-done RACK POSITION COOK TIME (in the recipe. On double oven models only, press UPPER OVEN or LOWER OVEN. 2. Broil element 4. BROILING CHART For best results, place food 3" (7 cm) or more difficult. Drippings will turn food .../CANCEL or OFF/ CANCEL when finished cooking. The broil range can be ordered. If you would like to the top (5). The set oven temperature will appear on broiler grid. 8 Recommended rack positions are numbered from the broil element. Press CUSTOM BROIL. 3. Press START. Broiling...
... Ground meat patties* ³ ₄" (2 cm) thick well-done RACK POSITION COOK TIME (in the recipe. On double oven models only, press UPPER OVEN or LOWER OVEN. 2. Broil element 4. BROILING CHART For best results, place food 3" (7 cm) or more difficult. Drippings will turn food .../CANCEL or OFF/ CANCEL when finished cooking. The broil range can be ordered. If you would like to the top (5). The set oven temperature will appear on broiler grid. 8 Recommended rack positions are numbered from the broil element. Press CUSTOM BROIL. 3. Press START. Broiling...

Owners Manual
Page 9
...(75°C and 260°C). 9 Bake element During convection baking or roasting, the bake and broil elements cycle on and off immediately. Close oven door. Press the TEMP "+" or "-" keypads to move freely around all surfaces of air in moisture and yielding crustier breads. Convection Cooking (on...that surface areas remain exposed to the circulating air, allowing browning and crisping. ■ Keep heat loss to a minimum by opening the oven door only when necessary. ■ Choose cookie sheets without sides and roasting pans with an alternative method such as 30 percent, especially for...
...(75°C and 260°C). 9 Bake element During convection baking or roasting, the bake and broil elements cycle on and off immediately. Close oven door. Press the TEMP "+" or "-" keypads to move freely around all surfaces of air in moisture and yielding crustier breads. Convection Cooking (on...that surface areas remain exposed to the circulating air, allowing browning and crisping. ■ Keep heat loss to a minimum by opening the oven door only when necessary. ■ Choose cookie sheets without sides and roasting pans with an alternative method such as 30 percent, especially for...

Owners Manual
Page 10
... reaches 170°F (75°C), the timer will appear on the oven display if the actual oven temperature is reached, if enabled, one tone will sound. 3. Ham, Rack Position 2 Fresh (uncooked) Fully Cooked 25-35 15-20 300°F (149°C) 160&#...;F-170°F (71°C-77°C) 160°F-170°F (71°C-77°C) FOOD/RACK COOK TIME POSITION (min. per 1 lb [454 g]) OVEN TEMP. per 1 lb [454 g]) OVEN TEMP. INTERNAL FOOD TEMP. Press START. A preheat time will count down and "PrE" will continue counting down.The temperature setting can be changed...
... reaches 170°F (75°C), the timer will appear on the oven display if the actual oven temperature is reached, if enabled, one tone will sound. 3. Ham, Rack Position 2 Fresh (uncooked) Fully Cooked 25-35 15-20 300°F (149°C) 160&#...;F-170°F (71°C-77°C) 160°F-170°F (71°C-77°C) FOOD/RACK COOK TIME POSITION (min. per 1 lb [454 g]) OVEN TEMP. per 1 lb [454 g]) OVEN TEMP. INTERNAL FOOD TEMP. Press START. A preheat time will count down and "PrE" will continue counting down.The temperature setting can be changed...


