User Manual
Page 1
or visit our website at... www.whirlpool.com or www.whirlpool.com/canada Table of Contents 2 4450568B MODELS RBS245 RBS275 RBS305 RBD245 RBD275 RBD305 RBD306 YRBS275 YRBS305 In Canada, for product-related questions call: 1-800-461-5681, for questions about features, operation, performance, parts, accessories or service, call : 1-800-807-6777. ® BUILT-IN ELECTRIC OVEN Use & Care Guide In the U.S.A, for parts, accessories, installation and service call : 1-800-253-1301.
or visit our website at... www.whirlpool.com or www.whirlpool.com/canada Table of Contents 2 4450568B MODELS RBS245 RBS275 RBS305 RBD245 RBD275 RBD305 RBD306 YRBS275 YRBS305 In Canada, for product-related questions call: 1-800-461-5681, for questions about features, operation, performance, parts, accessories or service, call : 1-800-807-6777. ® BUILT-IN ELECTRIC OVEN Use & Care Guide In the U.S.A, for parts, accessories, installation and service call : 1-800-253-1301.
User Manual
Page 2
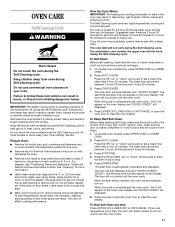
TABLE OF CONTENTS OVEN SAFETY 3 PARTS AND FEATURES 5 ELECTRONIC OVEN CONTROL 6 Display 6 Start/Enter 6 Upper Off, Lower Off or Off/Cancel 6 Clock 6 Tones 6 Fahrenheit and Celsius 7 Timer 7 Control Lock 7 Oven Temperature Control 7 OVEN USE 8 Aluminum Foil 8 Positioning Racks and Bakeware 8 Bakeware 8 Meat Thermometer 8 Oven Vent 9 Baking and Roasting 9 Broiling and Custom Broiling 9 Timed Cooking 10 OVEN CARE 11 Self-Cleaning Cycle 11 Cleaning 12 Oven Lights 13 Oven Door 13 TROUBLESHOOTING 14 ASSISTANCE OR SERVICE 15 In the U.S.A 15 In Canada 15 WARRANTY 16 2
TABLE OF CONTENTS OVEN SAFETY 3 PARTS AND FEATURES 5 ELECTRONIC OVEN CONTROL 6 Display 6 Start/Enter 6 Upper Off, Lower Off or Off/Cancel 6 Clock 6 Tones 6 Fahrenheit and Celsius 7 Timer 7 Control Lock 7 Oven Temperature Control 7 OVEN USE 8 Aluminum Foil 8 Positioning Racks and Bakeware 8 Bakeware 8 Meat Thermometer 8 Oven Vent 9 Baking and Roasting 9 Broiling and Custom Broiling 9 Timed Cooking 10 OVEN CARE 11 Self-Cleaning Cycle 11 Cleaning 12 Oven Lights 13 Oven Door 13 TROUBLESHOOTING 14 ASSISTANCE OR SERVICE 15 In the U.S.A 15 In Canada 15 WARRANTY 16 2
User Manual
Page 3
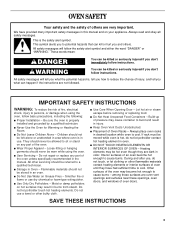
...surfaces are dark in burns from steam. All safety messages will follow instructions. Do not let potholder touch hot heating elements. s Placement of oven doors. If rack must be allowed to reduce the chance of injury, and tell you don't follow basic precautions, including the following: s...This symbol alerts you to a qualified technician. All safety messages will tell you and others are not followed. s Never Use the Oven for Warming or Heating the Room. They should never be referred to potential hazards that can happen if the instructions are very important...
...surfaces are dark in burns from steam. All safety messages will follow instructions. Do not let potholder touch hot heating elements. s Placement of oven doors. If rack must be allowed to reduce the chance of injury, and tell you don't follow basic precautions, including the following: s...This symbol alerts you to a qualified technician. All safety messages will tell you and others are not followed. s Never Use the Oven for Warming or Heating the Room. They should never be referred to potential hazards that can happen if the instructions are very important...
User Manual
Page 4
... of substances known to the State of California to cause cancer, birth defects, or other reproductive harm, and requires businesses to the State of the oven. WARNING: This product contains a chemical known to warn of the substances listed, including benzene, formaldehyde, carbon monoxide, and toluene. 4 Remove broiler pan... and other reproductive harm. Care should be taken not to cause cancer, birth defects, or other utensils. No commercial oven cleaner or oven liner protective coating of any part of California to rub, damage, or move the gasket.
... of substances known to the State of California to cause cancer, birth defects, or other reproductive harm, and requires businesses to the State of the oven. WARNING: This product contains a chemical known to warn of the substances listed, including benzene, formaldehyde, carbon monoxide, and toluene. 4 Remove broiler pan... and other reproductive harm. Care should be taken not to cause cancer, birth defects, or other utensils. No commercial oven cleaner or oven liner protective coating of any part of California to rub, damage, or move the gasket.
User Manual
Page 5
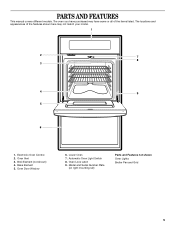
PARTS AND FEATURES This manual covers different models. Bake Element 5. Oven Door Window 6. Model and Serial Number Plate (on right mounting rail) Parts and Features not shown Oven Lights Broiler Pan and Grid 5 Electronic Oven Control 2. Lower Oven 7. Automatic Oven Light Switch 8. Oven Vent 3. The locations and appearances of the items listed. Broil Element (not shown) 4. The oven you have purchased may have some or all of the features shown here may not match your model. 1 2 7 8 3 4 9 5 6 1. Oven Lock Latch 9.
PARTS AND FEATURES This manual covers different models. Bake Element 5. Oven Door Window 6. Model and Serial Number Plate (on right mounting rail) Parts and Features not shown Oven Lights Broiler Pan and Grid 5 Electronic Oven Control 2. Lower Oven 7. Automatic Oven Light Switch 8. Oven Vent 3. The locations and appearances of the items listed. Broil Element (not shown) 4. The oven you have purchased may have some or all of the features shown here may not match your model. 1 2 7 8 3 4 9 5 6 1. Oven Lock Latch 9.
User Manual
Page 6
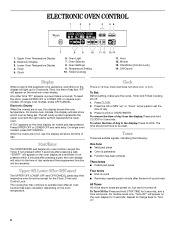
... or LOWER OFF and retry entry. Upper Off, Lower Off or Off/Cancel The UPPER OFF, LOWER OFF and OFF/CANCEL pads stop their respective oven functions except for 5 seconds, and a tone will appear on , but can be reset. Press CLOCK or START/ENTER. To return the time of day. Temperature.... Repeat to change back to the time of the above tones are off . To reset the clock, press UPPER OFF or LOWER OFF on the oven display, an invalid pad was pressed. If not pressed within 5 seconds after the end-of-cycle tones All Tones All of day mode and the...
... or LOWER OFF and retry entry. Upper Off, Lower Off or Off/Cancel The UPPER OFF, LOWER OFF and OFF/CANCEL pads stop their respective oven functions except for 5 seconds, and a tone will appear on , but can be reset. Press CLOCK or START/ENTER. To return the time of day. Temperature.... Repeat to change back to the time of the above tones are off . To reset the clock, press UPPER OFF or LOWER OFF on the oven display, an invalid pad was pressed. If not pressed within 5 seconds after the end-of-cycle tones All Tones All of day mode and the...

User Manual
Page 7
... by the displayed amount. Repeat to turn back on . It can be set in 5°F (3°C) amounts. On double oven models only, press UPPER OVEN or LOWER OVEN. 3. Press START/ENTER. 7 Fahrenheit and Celsius The temperature is preset at high, but can be turned off . The Timer...TIME until 3 tones sound and "LOC", a picture of -cycle tones will sound, then reminder tones will appear on the lower oven display for 5 seconds. The oven provides accurate temperatures; however, it may give incorrect readings. Timer To Turn Tones Off/On: Press and hold CUSTOM BROIL for 3...
... by the displayed amount. Repeat to turn back on . It can be set in 5°F (3°C) amounts. On double oven models only, press UPPER OVEN or LOWER OVEN. 3. Press START/ENTER. 7 Fahrenheit and Celsius The temperature is preset at high, but can be turned off . The Timer...TIME until 3 tones sound and "LOC", a picture of -cycle tones will sound, then reminder tones will appear on the lower oven display for 5 seconds. The oven provides accurate temperatures; however, it may give incorrect readings. Timer To Turn Tones Off/On: Press and hold CUSTOM BROIL for 3...
User Manual
Page 8
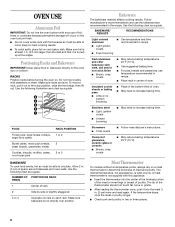
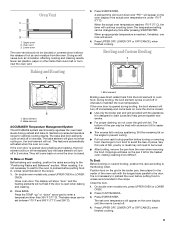
...cm) larger than the dish and that it into the center of the thickest portion of the meat or inner thigh or breast of oven. Bakeware The bakeware material affects cooking results. Dark aluminum and other bakeware with this appliance. s May need to increase baking time. Stoneware...results. Allow 2 in recipe. Use the following chart as a guide. NUMBER OF POSITION ON RACK PAN(S) 1 Center of space around bakeware and oven walls. Follow manufacturer's recommendations and use temperature recommended in . (5 cm) of rack. 2 Side by side or slightly staggered. 3 or 4 Opposite...
...cm) larger than the dish and that it into the center of the thickest portion of the meat or inner thigh or breast of oven. Bakeware The bakeware material affects cooking results. Dark aluminum and other bakeware with this appliance. s May need to increase baking time. Stoneware...results. Allow 2 in recipe. Use the following chart as a guide. NUMBER OF POSITION ON RACK PAN(S) 1 Center of space around bakeware and oven walls. Follow manufacturer's recommendations and use temperature recommended in . (5 cm) of rack. 2 Side by side or slightly staggered. 3 or 4 Opposite...
User Manual
Page 9
... changed any time after pressing START/ENTER. s For proper draining, do not cover the grid with the appliance. On double oven models only, press UPPER OVEN or LOWER OVEN. 2. Doing so will not. The bake and broil elements cycle on once the door is closed . During broiling, the ... it allows the release of the pan may not need to maintain a precise temperature range for easier cleaning. Very thin cuts of the oven rack with aluminum foil for optimal cooking results. Position food on , the broil element will cause poor air circulation, affecting cooking and cleaning...
... changed any time after pressing START/ENTER. s For proper draining, do not cover the grid with the appliance. On double oven models only, press UPPER OVEN or LOWER OVEN. 2. Doing so will not. The bake and broil elements cycle on once the door is closed . During broiling, the ... it allows the release of the pan may not need to maintain a precise temperature range for easier cleaning. Very thin cuts of the oven rack with aluminum foil for optimal cooking results. Position food on , the broil element will cause poor air circulation, affecting cooking and cleaning...

User Manual
Page 10
...Before setting, make sure the clock is set between 170°F and 500°F (77°C and 260°C). 4. On double oven models only, press UPPER OVEN or LOWER OVEN. 2. The start should not be set to enter a temperature other than one displayed. 3. Press START/ENTER. If enabled, end-of... poisoning or sickness. To Custom Broil: Changing the temperature when custom broiling allows more from the bottom (1) to start time is reached, the oven will appear on at lower broiling temperatures. 1. Press the number pads to the correct time of day, cook for food such as breads and...
...Before setting, make sure the clock is set between 170°F and 500°F (77°C and 260°C). 4. On double oven models only, press UPPER OVEN or LOWER OVEN. 2. The start should not be set to enter a temperature other than one displayed. 3. Press START/ENTER. If enabled, end-of... poisoning or sickness. To Custom Broil: Changing the temperature when custom broiling allows more from the bottom (1) to start time is reached, the oven will appear on at lower broiling temperatures. 1. Press the number pads to the correct time of day, cook for food such as breads and...
User Manual
Page 11
... minutes for a 3 hour 30 minute clean cycle, but the time can result in discoloring, loss of heat, odors, and smoke. Once the oven has completely cooled, remove ash with porcelain. The door will disappear. 6. The clean time can result. It will automatically lock. Failure to follow...door frame. If leaving in longer cleaning and more information. For diagram, see "Positioning Racks and Bakeware". s Wipe out any foil from oven during self-cleaning to remove soil. Press AUTO CLEAN. Press AUTO CLEAN. Press START/ENTER. Heavy soil results in , place them shiny...
... minutes for a 3 hour 30 minute clean cycle, but the time can result in discoloring, loss of heat, odors, and smoke. Once the oven has completely cooled, remove ash with porcelain. The door will disappear. 6. The clean time can result. It will automatically lock. Failure to follow...door frame. If leaving in longer cleaning and more information. For diagram, see "Positioning Racks and Bakeware". s Wipe out any foil from oven during self-cleaning to remove soil. Press AUTO CLEAN. Press AUTO CLEAN. Press START/ENTER. Heavy soil results in , place them shiny...
User Manual
Page 12
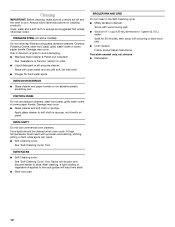
...white spots can result. s Vinegar for 20 minutes, then scrub with wet scouring pad. s Self-Cleaning cycle: See "Self-Cleaning Cycle" first. OVEN RACKS s Self-Cleaning cycle: See "Self-Cleaning Cycle" first. s Steel wool pad BROILER PAN AND GRID Do not clean in direction of vegetable oil... applied to the rack guides will discolor and become harder to order. s Oven cleaner: Follow product label instructions. Rub in the Self-Cleaning cycle. After cleaning, a light coating of grain to 1 gallon (3.75 L) water:...
...white spots can result. s Vinegar for 20 minutes, then scrub with wet scouring pad. s Self-Cleaning cycle: See "Self-Cleaning Cycle" first. OVEN RACKS s Self-Cleaning cycle: See "Self-Cleaning Cycle" first. s Steel wool pad BROILER PAN AND GRID Do not clean in direction of vegetable oil... applied to the rack guides will discolor and become harder to order. s Oven cleaner: Follow product label instructions. Rub in the Self-Cleaning cycle. After cleaning, a light coating of grain to 1 gallon (3.75 L) water:...
User Manual
Page 13
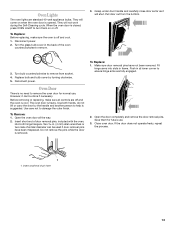
... removal pins. Turn the glass bulb cover in the back of door removal pins, included with the oven, into slots in frame. Replace bulb and bulb cover by the handle and another person to damage the... outer finish. Before removing or replacing, make sure the oven is off and cool. 1. Two in at lower corner to ensure hinge arms are fully engaged. ...under door handle and carefully close door as far as it can be done if necessary. The oven door is removed. They will not work during the Self-Cleaning cycle. To Replace: 1. Insert...
... removal pins. Turn the glass bulb cover in the back of door removal pins, included with the oven, into slots in frame. Replace bulb and bulb cover by the handle and another person to damage the... outer finish. Before removing or replacing, make sure the oven is off and cool. 1. Two in at lower corner to ensure hinge arms are fully engaged. ...under door handle and carefully close door as far as it can be done if necessary. The oven door is removed. They will not work during the Self-Cleaning cycle. To Replace: 1. Insert...
User Manual
Page 14
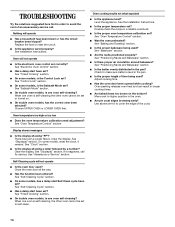
...section. s On some models, is the Control Lock set ? s On double oven models, has the correct oven been selected? Choose UPPER OVEN or LOWER OVEN first. Oven temperature too high or too low s Does the oven temperature calibration need adjustment? If it reappears, call . See "Assistance or Service" ...Cycle" section. Level the appliance. See "Bakeware" section. s Are the racks positioned properly? s Is the batter evenly distributed in the oven. Oven will operate s Has a household fuse been blown or has the circuit breaker been tripped? s Is the proper length of the crust. ...
...section. s On some models, is the Control Lock set ? s On double oven models, has the correct oven been selected? Choose UPPER OVEN or LOWER OVEN first. Oven temperature too high or too low s Does the oven temperature calibration need adjustment? If it reappears, call . See "Assistance or Service" ...Cycle" section. Level the appliance. See "Bakeware" section. s Are the racks positioned properly? s Is the batter evenly distributed in the oven. Oven will operate s Has a household fuse been blown or has the circuit breaker been tripped? s Is the proper length of the crust. ...
User Manual
Page 16
... service company. Dealer name Address Phone number Model number Serial number Purchase date 4450568B © 2000 Whirlpool Corporation. You can be provided by Whirlpool Corporation or Inglis Limited. 5. WHIRLPOOL® COOKTOP, BUILT-IN OVEN AND RANGE WARRANTY FULL ONE-YEAR WARRANTY For one year from anywhere in the U.S.A. Repairs when your appliance is operated...
... service company. Dealer name Address Phone number Model number Serial number Purchase date 4450568B © 2000 Whirlpool Corporation. You can be provided by Whirlpool Corporation or Inglis Limited. 5. WHIRLPOOL® COOKTOP, BUILT-IN OVEN AND RANGE WARRANTY FULL ONE-YEAR WARRANTY For one year from anywhere in the U.S.A. Repairs when your appliance is operated...


