User Manual
Page 1
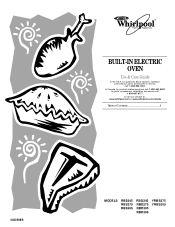
® BUILT-IN ELECTRIC OVEN Use & Care Guide In the U.S.A, for parts, accessories, installation and service call : 1-800-253-1301. or visit our website at... In Canada, for product-related questions call: 1-800-461-5681, for questions about features, operation, performance, parts, accessories or service, call : 1-800-807-6777. www.whirlpool.com or www.whirlpool.com/canada Table of Contents 2 4450568B MODELS RBS245 RBS275 RBS305 RBD245 RBD275 RBD305 RBD306 YRBS275 YRBS305
® BUILT-IN ELECTRIC OVEN Use & Care Guide In the U.S.A, for parts, accessories, installation and service call : 1-800-253-1301. or visit our website at... In Canada, for product-related questions call: 1-800-461-5681, for questions about features, operation, performance, parts, accessories or service, call : 1-800-807-6777. www.whirlpool.com or www.whirlpool.com/canada Table of Contents 2 4450568B MODELS RBS245 RBS275 RBS305 RBD245 RBD275 RBD305 RBD306 YRBS275 YRBS305
User Manual
Page 2
TABLE OF CONTENTS OVEN SAFETY 3 PARTS AND FEATURES 5 ELECTRONIC OVEN CONTROL 6 Display 6 Start/Enter 6 Upper Off, Lower Off or Off/Cancel 6 Clock 6 Tones 6 Fahrenheit and Celsius 7 Timer 7 Control Lock 7 Oven Temperature Control 7 OVEN USE 8 Aluminum Foil 8 Positioning Racks and Bakeware 8 Bakeware 8 Meat Thermometer 8 Oven Vent 9 Baking and Roasting 9 Broiling and Custom Broiling 9 Timed Cooking 10 OVEN CARE 11 Self-Cleaning Cycle 11 Cleaning 12 Oven Lights 13 Oven Door 13 TROUBLESHOOTING 14 ASSISTANCE OR SERVICE 15 In the U.S.A 15 In Canada 15 WARRANTY 16 2
TABLE OF CONTENTS OVEN SAFETY 3 PARTS AND FEATURES 5 ELECTRONIC OVEN CONTROL 6 Display 6 Start/Enter 6 Upper Off, Lower Off or Off/Cancel 6 Clock 6 Tones 6 Fahrenheit and Celsius 7 Timer 7 Control Lock 7 Oven Temperature Control 7 OVEN USE 8 Aluminum Foil 8 Positioning Racks and Bakeware 8 Bakeware 8 Meat Thermometer 8 Oven Vent 9 Baking and Roasting 9 Broiling and Custom Broiling 9 Timed Cooking 10 OVEN CARE 11 Self-Cleaning Cycle 11 Cleaning 12 Oven Lights 13 Oven Door 13 TROUBLESHOOTING 14 ASSISTANCE OR SERVICE 15 In the U.S.A 15 In Canada 15 WARRANTY 16 2
User Manual
Page 3
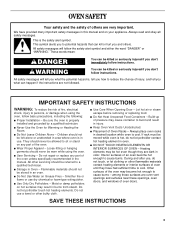
... hot heating elements. Always place oven racks in color. s DO NOT TOUCH HEATING ELEMENTS OR INTERIOR SURFACES OF OVEN - Heating elements may cause container to a qualified technician. s User Servicing - All safety messages will tell you don't follow instructions. Smother fire or flame or use a towel or other servicing should never be referred to burst and result in burns from steam. During and after use . among these openings, oven doors, and...
... hot heating elements. Always place oven racks in color. s DO NOT TOUCH HEATING ELEMENTS OR INTERIOR SURFACES OF OVEN - Heating elements may cause container to a qualified technician. s User Servicing - All safety messages will tell you don't follow instructions. Smother fire or flame or use a towel or other servicing should never be referred to burst and result in burns from steam. During and after use . among these openings, oven doors, and...
User Manual
Page 4
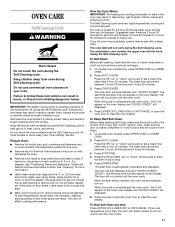
... such substances. Care should be used in Manual. s Before Self-Cleaning the Oven - The door gasket is essential for a good seal. WARNING: This product contains a chemical known to the State of the oven. No commercial oven cleaner or oven liner protective coating of any part of California to rub, damage, or move the gasket. IMPORTANT SAFETY INSTRUCTIONS For self-cleaning ovens: s Do Not Clean Door Gasket - Remove broiler pan and other...
... such substances. Care should be used in Manual. s Before Self-Cleaning the Oven - The door gasket is essential for a good seal. WARNING: This product contains a chemical known to the State of the oven. No commercial oven cleaner or oven liner protective coating of any part of California to rub, damage, or move the gasket. IMPORTANT SAFETY INSTRUCTIONS For self-cleaning ovens: s Do Not Clean Door Gasket - Remove broiler pan and other...
User Manual
Page 5
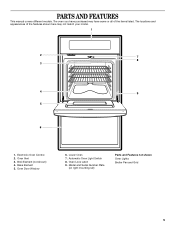
Automatic Oven Light Switch 8. Oven Vent 3. Oven Door Window 6. The locations and appearances of the features shown here may have purchased may not match your model. 1 2 7 8 3 4 9 5 6 1. Bake Element 5. Lower Oven 7. Oven Lock Latch 9. Broil Element (not shown) 4. Model and Serial Number Plate (on right mounting rail) Parts and Features not shown Oven Lights Broiler Pan and Grid 5 Electronic Oven Control 2. The oven you have some or all of the items listed. PARTS AND FEATURES This manual covers different models.
Automatic Oven Light Switch 8. Oven Vent 3. Oven Door Window 6. The locations and appearances of the features shown here may have purchased may not match your model. 1 2 7 8 3 4 9 5 6 1. Bake Element 5. Lower Oven 7. Oven Lock Latch 9. Broil Element (not shown) 4. Model and Serial Number Plate (on right mounting rail) Parts and Features not shown Oven Lights Broiler Pan and Grid 5 Electronic Oven Control 2. The oven you have some or all of the items listed. PARTS AND FEATURES This manual covers different models.
User Manual
Page 6
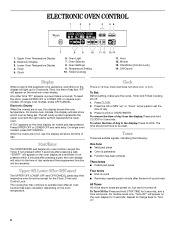
... CLOCK. To remove the time of day. 3. Oven Settings 9. To reset the clock, press UPPER OFF or LOWER OFF on the oven display as a reminder. On single oven models, press OFF/CANCEL. Clock This is a 12 hour clock and does not show which oven is first supplied to the appliance, everything on ". 6 Press CLOCK or START/ENTER. Repeat to change back to be cancelled. Electronic Display 3. Lower Oven Temperature Display 4. Oven Selector 8. Start/Enter [Control Lock...
... CLOCK. To remove the time of day. 3. Oven Settings 9. To reset the clock, press UPPER OFF or LOWER OFF on the oven display as a reminder. On single oven models, press OFF/CANCEL. Clock This is a 12 hour clock and does not show which oven is first supplied to the appliance, everything on ". 6 Press CLOCK or START/ENTER. Repeat to change back to be cancelled. Electronic Display 3. Lower Oven Temperature Display 4. Oven Selector 8. Start/Enter [Control Lock...

User Manual
Page 7
... locked, only the CLOCK, TIMER SET and TIMER OFF pads will turn off . A tone will sound and "C°" will appear on the oven display for 3 seconds. Press TIMER SET or START/ENTER. Control Lock The Control Lock shuts down " arrow pads to Fahrenheit. Press the TEMP "up " or "down the control panel pads to prevent unintended use a thermometer to cancel the Timer and/or stop the oven. On double oven models only, press UPPER OVEN or LOWER OVEN...
... locked, only the CLOCK, TIMER SET and TIMER OFF pads will turn off . A tone will sound and "C°" will appear on the oven display for 3 seconds. Press TIMER SET or START/ENTER. Control Lock The Control Lock shuts down " arrow pads to Fahrenheit. Press the TEMP "up " or "down the control panel pads to prevent unintended use a thermometer to cancel the Timer and/or stop the oven. On double oven models only, press UPPER OVEN or LOWER OVEN...
User Manual
Page 8
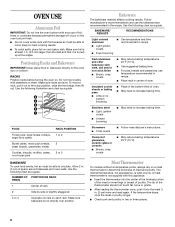
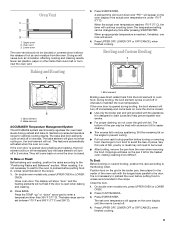
... the oven door or bottom. Ovenproof glassware, ceramic glass or ceramic s Brown, crisp crusts s May reduce baking temperatures 25°F (15°C). Make sure foil is at least 1 in recipe. s Use suggested baking time. The internal temperature, not appearance, is not directly over another. s Do not cover entire rack with this appliance. s To catch spills, place foil on a meat thermometer to the stop position...
... the oven door or bottom. Ovenproof glassware, ceramic glass or ceramic s Brown, crisp crusts s May reduce baking temperatures 25°F (15°C). Make sure foil is at least 1 in recipe. s Use suggested baking time. The internal temperature, not appearance, is not directly over another. s Do not cover entire rack with this appliance. s To catch spills, place foil on a meat thermometer to the stop position...
User Manual
Page 9
... cooking and cleaning results. Broil element 2. On double oven models only, press UPPER OVEN or LOWER OVEN. The bottom of the pan may not need to be lined with the longest side parallel to avoid the loss of hot air and moisture from the oven. Use tongs to turn off in use. Very thin cuts of the oven rack with aluminum foil for easier cleaning. Close the door. 1. Press START/ENTER. Baking and Roasting 1 3. A preheat time...
... cooking and cleaning results. Broil element 2. On double oven models only, press UPPER OVEN or LOWER OVEN. The bottom of the pan may not need to be lined with the longest side parallel to avoid the loss of hot air and moisture from the oven. Use tongs to turn off in use. Very thin cuts of the oven rack with aluminum foil for easier cleaning. Close the door. 1. Press START/ENTER. Baking and Roasting 1 3. A preheat time...

User Manual
Page 10
.... To Custom Broil: Changing the temperature when custom broiling allows more from the bottom (1) to enter the length of -cycle tones will sound, then reminder tones will sound every minute. 8. When the start . 7. Press START/ENTER. Recommended rack positions are guidelines only and may not bake properly. On double oven models only, press UPPER OVEN or LOWER OVEN. 2. To Set a Cook Time and Stop Time [Delay Start]: Before setting, make sure...
.... To Custom Broil: Changing the temperature when custom broiling allows more from the bottom (1) to enter the length of -cycle tones will sound, then reminder tones will sound every minute. 8. When the start . 7. Press START/ENTER. Recommended rack positions are guidelines only and may not bake properly. On double oven models only, press UPPER OVEN or LOWER OVEN. 2. To Set a Cook Time and Stop Time [Delay Start]: Before setting, make sure...
User Manual
Page 11
... stop . 5. If the oven temperature is set a clean time other than 3 hour 30 minutes. On combination oven models, the upper oven will discolor and become harder to heavy soil. Racks will not work during the Self-Cleaning cycle. To Delay Start Self-Clean: Before delay starting Self-Clean, make sure the door is preset for average to slide. Press UPPER OFF, LOWER OFF or OFF/CANCEL or open the oven door to remove soil. Do not use...
... stop . 5. If the oven temperature is set a clean time other than 3 hour 30 minutes. On combination oven models, the upper oven will discolor and become harder to heavy soil. Racks will not work during the Self-Cleaning cycle. To Delay Start Self-Clean: Before delay starting Self-Clean, make sure the door is preset for average to slide. Press UPPER OFF, LOWER OFF or OFF/CANCEL or open the oven door to remove soil. Do not use...
User Manual
Page 12
... BROILER PAN AND GRID Do not clean in direction of grain to the rack guides will discolor and become harder to order. s Oven cleaner: Follow product label instructions. Cleaning IMPORTANT: Before cleaning, make sure all -purpose cleaner: Rinse with clean water and dry with wet scouring pad. s Stainless Steel Cleaner & Polish (not included): See "Assistance or Service" section to slide. Damage may occur. OVEN RACKS s Self-Cleaning...
... BROILER PAN AND GRID Do not clean in direction of grain to the rack guides will discolor and become harder to order. s Oven cleaner: Follow product label instructions. Cleaning IMPORTANT: Before cleaning, make sure all -purpose cleaner: Rinse with clean water and dry with wet scouring pad. s Stainless Steel Cleaner & Polish (not included): See "Assistance or Service" section to slide. Damage may occur. OVEN RACKS s Self-Cleaning...
User Manual
Page 13
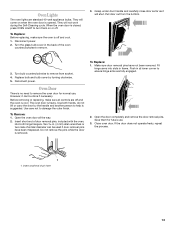
... will not work during the Self-Cleaning cycle. Make sure door removal pins have been misplaced. Oven Lights The oven lights are fully engaged. 2. Turn bulb counterclockwise to ensure hinge arms are standard 40-watt appliance bulbs. Oven Door There is off . Open the door completely and remove the door removal pins. Before removing or replacing, make sure the oven is no need to damage the outer finish. Use care not to remove the oven door for future use . Push...
... will not work during the Self-Cleaning cycle. Make sure door removal pins have been misplaced. Oven Lights The oven lights are fully engaged. 2. Turn bulb counterclockwise to ensure hinge arms are standard 40-watt appliance bulbs. Oven Door There is off . Open the door completely and remove the door removal pins. Before removing or replacing, make sure the oven is no need to damage the outer finish. Use care not to remove the oven door for future use . Push...
User Manual
Page 14
... the pan. Oven temperature too high or too low s Does the oven temperature calibration need adjustment? See "Positioning Racks and Bakeware" section. See "Display(s)" section. s Has the function been entered? When one oven is one oven self-cleaning? Use aluminum foil to self-clean. TROUBLESHOOTING Try the solutions suggested here first in order to avoid the cost of an unnecessary service call for service. s Has a delay start Self-Clean cycle been set ? See "Timed Cooking" section. See "Sabbath Mode...
... the pan. Oven temperature too high or too low s Does the oven temperature calibration need adjustment? See "Positioning Racks and Bakeware" section. See "Display(s)" section. s Has the function been entered? When one oven is one oven self-cleaning? Use aluminum foil to self-clean. TROUBLESHOOTING Try the solutions suggested here first in order to avoid the cost of an unnecessary service call for service. s Has a delay start Self-Clean cycle been set ? See "Timed Cooking" section. See "Sabbath Mode...
User Manual
Page 15
... assistance If you need further assistance, you still need to fulfill the product warranty and provide afterwarranty service, anywhere in Canada Call 1-800-807-6777. ASSISTANCE OR SERVICE Before calling for assistance or service, please check "Troubleshooting." s Accessory and repair parts sales. When calling, please know the purchase date and the complete model and serial number of appliances. To locate the Whirlpool designated service company in...
... assistance If you need further assistance, you still need to fulfill the product warranty and provide afterwarranty service, anywhere in Canada Call 1-800-807-6777. ASSISTANCE OR SERVICE Before calling for assistance or service, please check "Troubleshooting." s Accessory and repair parts sales. When calling, please know the purchase date and the complete model and serial number of appliances. To locate the Whirlpool designated service company in...
User Manual
Page 16
...® replacement parts and repair labor to replace owner-accessible light bulbs. 2. After checking "Troubleshooting," additional help you obtain assistance or service if you how to CLEANTOP® ceramic glass cooktop if it . Repairs to use of your appliance is designed to be provided by Whirlpool Corporation or Inglis Limited. 5. Inglis Limited licensee in Canada 09/00 Printed in -warranty service. Dealer name Address Phone number Model number Serial number Purchase...
...® replacement parts and repair labor to replace owner-accessible light bulbs. 2. After checking "Troubleshooting," additional help you obtain assistance or service if you how to CLEANTOP® ceramic glass cooktop if it . Repairs to use of your appliance is designed to be provided by Whirlpool Corporation or Inglis Limited. 5. Inglis Limited licensee in Canada 09/00 Printed in -warranty service. Dealer name Address Phone number Model number Serial number Purchase...


