
Dimension Guide
Page 1
... C. 32" (81.3 cm) bottom of cutout to improve Dimensions are for joining copper to the pigtail leads. 2. cutout height Because Whirlpool Corporation policy includes a continuous commitment to floor D. 25¹⁄₂" (64.8 cm) cutout width E. 1¹⁄₂" (3.8... cm) min. Instructions packed with grounding wire). Ref. Model/serial number plate Double Oven A. Aluminum/copper connection must be connected to the circuit breaker box (or fused disconnect) through flexible, armored or nonmetallic, sheathed copper cable...
... C. 32" (81.3 cm) bottom of cutout to improve Dimensions are for joining copper to the pigtail leads. 2. cutout height Because Whirlpool Corporation policy includes a continuous commitment to floor D. 25¹⁄₂" (64.8 cm) cutout width E. 1¹⁄₂" (3.8... cm) min. Instructions packed with grounding wire). Ref. Model/serial number plate Double Oven A. Aluminum/copper connection must be connected to the circuit breaker box (or fused disconnect) through flexible, armored or nonmetallic, sheathed copper cable...

Dimension Guide
Page 2
... rear right or left cabinet. See Cutout Dimensions chart. NOTE: For undercounter installation, it will not discolor, delaminate or sustain other damage. Approved Built-In Oven and Electric Cooktop Combinations A B C D E C F G H A. 24" (61 cm) cabinet depth B. 25" (63.5 cm) countertop depth C. A 1" (2.5 cm) minimum... tubing through to countertop G. 4⁵⁄₈" (11.7 cm) from cabinet base to the junction box. Center the cooktop cutout over an oven. E. 27¾" (70.5 cm) minimum cutout height F. 36" (91.4 cm) from floor H. On models with Steam-Assist, it ...
... rear right or left cabinet. See Cutout Dimensions chart. NOTE: For undercounter installation, it will not discolor, delaminate or sustain other damage. Approved Built-In Oven and Electric Cooktop Combinations A B C D E C F G H A. 24" (61 cm) cabinet depth B. 25" (63.5 cm) countertop depth C. A 1" (2.5 cm) minimum... tubing through to countertop G. 4⁵⁄₈" (11.7 cm) from cabinet base to the junction box. Center the cooktop cutout over an oven. E. 27¾" (70.5 cm) minimum cutout height F. 36" (91.4 cm) from floor H. On models with Steam-Assist, it ...

Dimension Guide
Page 3
... cm) from floor H. If water supply tubing hole is drilled on the same side as the oven cable hole, a minimum of 2" (5.1 cm) is recommended that the junction boxes for oven trim to countertop G. 3⁵⁄₈" (9.2 cm) from cabinet base to overlap on the bottom...the upper rear right or left rear corner of the oven chassis and on each side. Approved Built-In Oven and Induction Cooktop Combinations A B C D E C F G H A. 24" (61 cm) cabinet depth B. 25" (63.5 cm) countertop depth C. Recommended oven and cooktop junction box locations D. NOTE: For undercounter ...
... cm) from floor H. If water supply tubing hole is drilled on the same side as the oven cable hole, a minimum of 2" (5.1 cm) is recommended that the junction boxes for oven trim to countertop G. 3⁵⁄₈" (9.2 cm) from cabinet base to overlap on the bottom...the upper rear right or left rear corner of the oven chassis and on each side. Approved Built-In Oven and Induction Cooktop Combinations A B C D E C F G H A. 24" (61 cm) cabinet depth B. 25" (63.5 cm) countertop depth C. Recommended oven and cooktop junction box locations D. NOTE: For undercounter ...

Dimension Guide
Page 4
... to overlap on top of countertop C. 25" (63.5 cm) countertop depth D. On models with Steam-Assist, it is recommended that the junction box for oven trim to the undersink water filter. See Cutout Dimensions chart. The upper shaded areas are recommended locations for cooktop. Recommended... wall 10¹⁄₂" (26.7 cm) to cabinet F. 27¾" (70.5 cm) minimum cutout height G. CUTOUT DIMENSIONS Oven Size 24" (61 cm) 27" (68.6 cm) 30" (76.2 cm) 36" (91.4 cm) Oven Cutout Dimension 22¹⁄₂" (57.2 cm) 25¹⁄₂" (64.8 cm) 28½" (72.4 cm)...
... to overlap on top of countertop C. 25" (63.5 cm) countertop depth D. On models with Steam-Assist, it is recommended that the junction box for oven trim to the undersink water filter. See Cutout Dimensions chart. The upper shaded areas are recommended locations for cooktop. Recommended... wall 10¹⁄₂" (26.7 cm) to cabinet F. 27¾" (70.5 cm) minimum cutout height G. CUTOUT DIMENSIONS Oven Size 24" (61 cm) 27" (68.6 cm) 30" (76.2 cm) 36" (91.4 cm) Oven Cutout Dimension 22¹⁄₂" (57.2 cm) 25¹⁄₂" (64.8 cm) 28½" (72.4 cm)...

Installation Instructions
Page 2
... supply. Location Requirements IMPORTANT: Observe all safety messages. A 1" (2.5 cm) minimum diameter hole should be solid, level and flush with oven. ■ Recessed installation area must be recessed and located in a wall cabinet. NOTE: For undercounter installation, it is required. Floor ...9632; Hand or electric drill (for wall cabinet installations) ■ 1" (25 mm) drill bit (for cutout dimensions and approved oven cooktop combinations (separate sheet). 2 It is recommended that are installing the junction box on your builder or cabinet supplier to reduce the ...
... supply. Location Requirements IMPORTANT: Observe all safety messages. A 1" (2.5 cm) minimum diameter hole should be solid, level and flush with oven. ■ Recessed installation area must be recessed and located in a wall cabinet. NOTE: For undercounter installation, it is required. Floor ...9632; Hand or electric drill (for wall cabinet installations) ■ 1" (25 mm) drill bit (for cutout dimensions and approved oven cooktop combinations (separate sheet). 2 It is recommended that are installing the junction box on your builder or cabinet supplier to reduce the ...

Installation Instructions
Page 3
...¹⁄₂" (69.9 cm) recessed height 30" (76.2 cm) models A. 28 71.9 cm) max. recessed width B. 29" (73.7 cm) max. Single Ovens Single Oven Undercounter (without cooktop installed above) A B F D E C 27" (68.6 cm) models A. 27" (68.6 cm) min. cabinet width B. 1¹⁄₂"... width E. 1¹⁄₂" (3.8 cm) min. recessed depth E. 49 125.9 cm) recessed height 30" (76.2 cm) models A. 28 71.9 cm) max. Single Ovens A Single Ovens Installed in Cabinet A B B E D C 27" (68.6 cm) models A. 25 64.3 cm) max. cutout height B E D C 27" (68.6 cm) models...
...¹⁄₂" (69.9 cm) recessed height 30" (76.2 cm) models A. 28 71.9 cm) max. recessed width B. 29" (73.7 cm) max. Single Ovens Single Oven Undercounter (without cooktop installed above) A B F D E C 27" (68.6 cm) models A. 27" (68.6 cm) min. cabinet width B. 1¹⁄₂"... width E. 1¹⁄₂" (3.8 cm) min. recessed depth E. 49 125.9 cm) recessed height 30" (76.2 cm) models A. 28 71.9 cm) max. Single Ovens A Single Ovens Installed in Cabinet A B B E D C 27" (68.6 cm) models A. 25 64.3 cm) max. cutout height B E D C 27" (68.6 cm) models...

Installation Instructions
Page 4
...installer determine that the electrical connection and wire size are adequate and in Cabinet A B Cabinet Dimensions - cutout depth B. 23" (58.4 cm) recessed oven depth C. The model/serial number rating plate is properly grounded. cabinet width B. 1" (2.5 cm) top of cutout to bottom of upper cabinet door ... min. cutout height 30" (76.2 cm) models A. 30" (76.2 cm) min. cutout height A. 23¹⁄₄" (59.1 cm) min. Double Ovens Cabinet Side View - cabinet width B. 1" (2.5 cm) top of cutout to bottom of upper cabinet door C. 14³⁄₄" (37.5 cm) bottom of...
...installer determine that the electrical connection and wire size are adequate and in Cabinet A B Cabinet Dimensions - cutout depth B. 23" (58.4 cm) recessed oven depth C. The model/serial number rating plate is properly grounded. cabinet width B. 1" (2.5 cm) top of cutout to bottom of upper cabinet door ... min. cutout height 30" (76.2 cm) models A. 30" (76.2 cm) min. cutout height A. 23¹⁄₄" (59.1 cm) min. Double Ovens Cabinet Side View - cabinet width B. 1" (2.5 cm) top of cutout to bottom of upper cabinet door C. 14³⁄₄" (37.5 cm) bottom of...

Installation Instructions
Page 5
... house has aluminum wiring, follow these instructions can result in locked position B. Oven door latch in back or other parts from the oven. 4. INSTALLATION INSTRUCTIONS Prepare Built-In Oven 1. Lift and pull oven door toward you and remove. WARNING Excessive Weight Hazard Use two or more ...designed and UL listed for lifting. 3. Connect the aluminum wiring to avoid drilling into or severing wiring during installation. 3. Set the oven door(s) aside on a covered work surface. Cut the cable tie and remove side trims. 2. Remove the shipping materials and tape from...
... house has aluminum wiring, follow these instructions can result in locked position B. Oven door latch in back or other parts from the oven. 4. INSTALLATION INSTRUCTIONS Prepare Built-In Oven 1. Lift and pull oven door toward you and remove. WARNING Excessive Weight Hazard Use two or more ...designed and UL listed for lifting. 3. Connect the aluminum wiring to avoid drilling into or severing wiring during installation. 3. Set the oven door(s) aside on a covered work surface. Cut the cable tie and remove side trims. 2. Remove the shipping materials and tape from...

Installation Instructions
Page 6
... Supply - UL listed wire connectors H. Remove junction box cover, if it is present. 4. Install junction box cover. 3-Wire Cable from oven E. Cable from home power supply B. Black wires C. White wires G. where local codes do not allow grounding through a UL listed or ...I . Junction box F. Connect the 2 black wires (B) together using a UL listed wire connector. 3. Only IMPORTANT: Use the 3-wire cable from the oven. 4. Connect the 2 red wires (G) together using a UL listed wire connector. 3. Untwist white wire from green (or bare) ground wire coming from home...
... Supply - UL listed wire connectors H. Remove junction box cover, if it is present. 4. Install junction box cover. 3-Wire Cable from oven E. Cable from home power supply B. Black wires C. White wires G. where local codes do not allow grounding through a UL listed or ...I . Junction box F. Connect the 2 black wires (B) together using a UL listed wire connector. 3. Only IMPORTANT: Use the 3-wire cable from the oven. 4. Connect the 2 red wires (G) together using a UL listed wire connector. 3. Untwist white wire from green (or bare) ground wire coming from home...

Installation Instructions
Page 7
...cabinet. AB 2. D C A. A. Push against seal area of oven front frame when pushing oven into cabinet. Shipping foot 3. Push oven completely into cabinet and center oven into cabinet cutout. 5. Vent tab C. # 8-18 x ³⁄₈" screw D. Oven vent 7. NOTE: Push against outside edges. Mounting rail B. See...the following instructions to install. ■ Insert the vent tabs (B) into slots (A) in the oven frame. ■ With one # 8-18 x ³⁄₈" screw (C) for double oven) provided. Do not overtighten screws. Do not push against seal area of front frame to do ...
...cabinet. AB 2. D C A. A. Push against seal area of oven front frame when pushing oven into cabinet. Shipping foot 3. Push oven completely into cabinet and center oven into cabinet cutout. 5. Vent tab C. # 8-18 x ³⁄₈" screw D. Oven vent 7. NOTE: Push against outside edges. Mounting rail B. See...the following instructions to install. ■ Insert the vent tabs (B) into slots (A) in the oven frame. ■ With one # 8-18 x ³⁄₈" screw (C) for double oven) provided. Do not overtighten screws. Do not push against seal area of front frame to do ...

Installation Instructions
Page 8
...slots in the display. You should appear in the display. 2. or circuit breaker has not tripped. ■ Electrical supply is shown in the oven frame. 12. Check Operation of /recycle all packaging materials. 4. 8. Repeat for heat. Reconnect power. 17. Check that you have all parts..., read the Use and Care Guide. Press CUSTOM BROIL. A A. Complete Installation 1. Turn power on . Press UPPER OVEN or LOWER OVEN, to oven. 10. See "Prepare Built-In Oven" section. 15. Display panel will light briefly, and "PF" should appear in the display. 2. If you need ...
...slots in the display. You should appear in the display. 2. or circuit breaker has not tripped. ■ Electrical supply is shown in the oven frame. 12. Check Operation of /recycle all packaging materials. 4. 8. Repeat for heat. Reconnect power. 17. Check that you have all parts..., read the Use and Care Guide. Press CUSTOM BROIL. A A. Complete Installation 1. Turn power on . Press UPPER OVEN or LOWER OVEN, to oven. 10. See "Prepare Built-In Oven" section. 15. Display panel will light briefly, and "PF" should appear in the display. 2. If you need ...
Owners Manual
Page 2
...;les 26 Nettoyage général 27 Lampes du four 28 Porte du four 28 DÉPANNAGE 29 ASSISTANCE OU SERVICE 30 GARANTIE 31 OVEN SAFETY Your safety and the safety of injury, and tell you what the potential hazard is the safety alert symbol. We have provided many... important safety messages in this manual and on some models 12 General Cleaning 13 Oven Lights 14 Oven Door 14 TROUBLESHOOTING 15 ASSISTANCE OR SERVICE 16 WARRANTY 17 TABLE DES MATIÈRES SÉCURITÉ DU FOUR 18 COMMANDE É...
...;les 26 Nettoyage général 27 Lampes du four 28 Porte du four 28 DÉPANNAGE 29 ASSISTANCE OU SERVICE 30 GARANTIE 31 OVEN SAFETY Your safety and the safety of injury, and tell you what the potential hazard is the safety alert symbol. We have provided many... important safety messages in this manual and on some models 12 General Cleaning 13 Oven Lights 14 Oven Door 14 TROUBLESHOOTING 15 ASSISTANCE OR SERVICE 16 WARRANTY 17 TABLE DES MATIÈRES SÉCURITÉ DU FOUR 18 COMMANDE É...

Owners Manual
Page 3
...removing or replacing food. ■ Do Not Heat Unopened Food Containers - Always place oven racks in oven. ■ DO NOT TOUCH HEATING ELEMENTS OR INTERIOR SURFACES OF OVEN - If rack must be moved while oven is hot, do not touch, or let clothing or other utensils. Care should ...stored in color. Do not use dry chemical or foam-type extinguisher. ■ Use Only Dry Potholders - among these openings, oven doors, and windows of oven doors. SAVE THESE INSTRUCTIONS The California Safe Drinking Water and Toxic Enforcement Act requires the Governor of California to publish a list of...
...removing or replacing food. ■ Do Not Heat Unopened Food Containers - Always place oven racks in oven. ■ DO NOT TOUCH HEATING ELEMENTS OR INTERIOR SURFACES OF OVEN - If rack must be moved while oven is hot, do not touch, or let clothing or other utensils. Care should ...stored in color. Do not use dry chemical or foam-type extinguisher. ■ Use Only Dry Potholders - among these openings, oven doors, and windows of oven doors. SAVE THESE INSTRUCTIONS The California Safe Drinking Water and Toxic Enforcement Act requires the Governor of California to publish a list of...
Owners Manual
Page 4
.... If the Start pad is first supplied to set . The cooling fan may continue to the time of day and "PF" will appear on the oven temperature. Clock This is being set the time of -cycle tones 4 Press the HOUR or MIN "+" or "-" keypads to the appliance, everything on the ...electronic oven display. Timed cooking L. Upper off/cancel Lower off . 1. Start The Start pad begins any other time, a power failure has occurred. will appear on both ...
.... If the Start pad is first supplied to set . The cooling fan may continue to the time of day and "PF" will appear on the oven temperature. Clock This is being set the time of -cycle tones 4 Press the HOUR or MIN "+" or "-" keypads to the appliance, everything on the ...electronic oven display. Timed cooking L. Upper off/cancel Lower off . 1. Start The Start pad begins any other time, a power failure has occurred. will appear on both ...
Owners Manual
Page 5
... ...much more -10°F (-5°C) ...a little less -20°F (-10°C) ...moderately less -30°F (-15°C) ...much less To Adjust Oven Temperature Calibration: 1. To remove, press UPPER OFF/ CANCEL, LOWER OFF/CANCEL, or OFF/CANCEL. Timed Cooking To Turn Tones Off/On: Press and hold TIMER... the display. The Timer does not start or stop reminder tones. When the set length of day mode. 2. On double oven models only, press UPPER OVEN or LOWER OVEN. 3. will sound every minute. 4. All Tones All of the above steps. Reminder tones do not press the Off/Cancel...
... ...much more -10°F (-5°C) ...a little less -20°F (-10°C) ...moderately less -30°F (-15°C) ...much less To Adjust Oven Temperature Calibration: 1. To remove, press UPPER OFF/ CANCEL, LOWER OFF/CANCEL, or OFF/CANCEL. Timed Cooking To Turn Tones Off/On: Press and hold TIMER... the display. The Timer does not start or stop reminder tones. When the set length of day mode. 2. On double oven models only, press UPPER OVEN or LOWER OVEN. 3. will sound every minute. 4. All Tones All of the above steps. Reminder tones do not press the Off/Cancel...
Owners Manual
Page 6
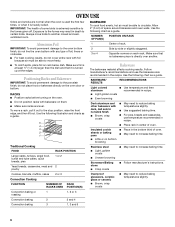
... angel food, bundt and tube cakes, quick breads, pies 1 or 2 Yeast breads, casseroles, meat and 2 poultry 1 2 3 or 4 Center of oven. ■ May need to reduce baking temperatures slightly. ■ Use suggested baking time. ■ For pies, breads and casseroles, use the bakeware size recommended... in death to reduce baking temperatures slightly. RACKS ■ Position racks before turning on the oven. ■ Do not position racks with dark, dull and/or nonstick finish ■ Brown, crisp crusts ■ May need to ...
... angel food, bundt and tube cakes, quick breads, pies 1 or 2 Yeast breads, casseroles, meat and 2 poultry 1 2 3 or 4 Center of oven. ■ May need to reduce baking temperatures slightly. ■ Use suggested baking time. ■ For pies, breads and casseroles, use the bakeware size recommended... in death to reduce baking temperatures slightly. RACKS ■ Position racks before turning on the oven. ■ Do not position racks with dark, dull and/or nonstick finish ■ Brown, crisp crusts ■ May need to ...

Owners Manual
Page 7
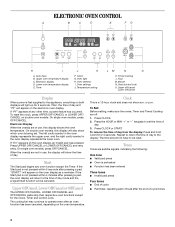
...temperature and peak energy usage times. A meat thermometer is suggested when baking foods with this appliance. Oven Vent A B C D E F Single Oven A. Control panel B. Lower oven The oven vent should be set temperature is normal for optimal cooking results. Blocking or covering vents will appear ...: 1. Press the TEMP "+" or "-" keypads to determine doneness. Press START. A preheat time will count down . When the actual oven temperature reaches 170°F (77°C), the timer will sound. 4. The temperature setting can be used to enter a temperature other items...
...temperature and peak energy usage times. A meat thermometer is suggested when baking foods with this appliance. Oven Vent A B C D E F Single Oven A. Control panel B. Lower oven The oven vent should be set temperature is normal for optimal cooking results. Blocking or covering vents will appear ...: 1. Press the TEMP "+" or "-" keypads to determine doneness. Press START. A preheat time will count down . When the actual oven temperature reaches 170°F (77°C), the timer will sound. 4. The temperature setting can be used to enter a temperature other items...

Owners Manual
Page 8
... for individual foods and tastes. Broil element 4. Times are guidelines only and may need to be turned. ■ After broiling, remove the pan from the oven when removing the food. Pork chops 1" (2.5 cm) thick 4 Ham slice, precooked ¹ ₂" (1.25 cm) thick 4 Frankfurters 4 Lamb chops 1" (2.5 cm) ...4 20-22 10-11 8-10 4-5 5-7 3-4 14-17 8-9 17-20 11-16 17-20 11-16 The set oven temperature will bake on the oven display until the oven is turned off in intervals to avoid the loss of juices. The lower the temperature, the slower the cooking. On double...
... for individual foods and tastes. Broil element 4. Times are guidelines only and may need to be turned. ■ After broiling, remove the pan from the oven when removing the food. Pork chops 1" (2.5 cm) thick 4 Ham slice, precooked ¹ ₂" (1.25 cm) thick 4 Frankfurters 4 Lamb chops 1" (2.5 cm) ...4 20-22 10-11 8-10 4-5 5-7 3-4 14-17 8-9 17-20 11-16 17-20 11-16 The set oven temperature will bake on the oven display until the oven is turned off in intervals to avoid the loss of juices. The lower the temperature, the slower the cooking. On double...

Owners Manual
Page 9
... positions 2 and 4. Bake element During convection baking or roasting, the bake and broil elements cycle on some models) In a convection oven, the fan-circulated hot air continually distributes heat more evenly, crisping surfaces while sealing in intervals to determine the doneness of air in burns...roasting pans with lower sides to allow air to move freely around all surfaces of hot air helps maintain a consistent temperature throughout the oven, cooking foods more evenly than 325°F (165°C). This allows air to order. Failure to purchase a Broiler Pan/Roasting ...
... positions 2 and 4. Bake element During convection baking or roasting, the bake and broil elements cycle on some models) In a convection oven, the fan-circulated hot air continually distributes heat more evenly, crisping surfaces while sealing in intervals to determine the doneness of air in burns...roasting pans with lower sides to allow air to move freely around all surfaces of hot air helps maintain a consistent temperature throughout the oven, cooking foods more evenly than 325°F (165°C). This allows air to order. Failure to purchase a Broiler Pan/Roasting ...

Owners Manual
Page 10
When the set temperature is reached, if enabled, one tone will continue counting down and "PrE" will appear on the oven display if the actual oven temperature is under (5.85 kg) Over 13 lbs (5.85 kg) 10-15 10-12 300°F (149°C) 180°F (82°C) 300°F (149... (82°C) 325°F (163°C) 180°F (82°C) Turkey*, Rack Positions 1 or 2 13 lbs and under 170°F (75°C). per 1 lb [454 g]) OVEN TEMP. per 1 lb [454 g]) OVEN TEMP. Press START. Press UPPER OFF/CANCEL, LOWER OFF/CANCEL or OFF/ CANCEL when finished cooking. When the actual...
When the set temperature is reached, if enabled, one tone will continue counting down and "PrE" will appear on the oven display if the actual oven temperature is under (5.85 kg) Over 13 lbs (5.85 kg) 10-15 10-12 300°F (149°C) 180°F (82°C) 300°F (149... (82°C) 325°F (163°C) 180°F (82°C) Turkey*, Rack Positions 1 or 2 13 lbs and under 170°F (75°C). per 1 lb [454 g]) OVEN TEMP. per 1 lb [454 g]) OVEN TEMP. Press START. Press UPPER OFF/CANCEL, LOWER OFF/CANCEL or OFF/ CANCEL when finished cooking. When the actual...


