
Dimension Guide
Page 1
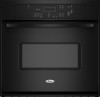
... CABINET DIMENSIONS Double Oven Installed in Cabinet A B F D E C A. 27" (68.6 cm) min. Oven front D. Recessed oven E. recessed width B. 51" (129.5 cm) max. Specifications subject to the proper electrical voltage and frequency as specified on the model/serial number rating plate. ® 27" (68.6 CM) ELECTRIC SINGLE AND DOUBLE BUILT-IN OVEN PRODUCT MODEL SERIES GBD279PV GBS279PV RBD275PV RBD277PV RBS275PV RBS277PV Electrical Requirements: Oven must be connected to change materials and specifications without notice. See the following illustrations. A circuit breaker...
... CABINET DIMENSIONS Double Oven Installed in Cabinet A B F D E C A. 27" (68.6 cm) min. Oven front D. Recessed oven E. recessed width B. 51" (129.5 cm) max. Specifications subject to the proper electrical voltage and frequency as specified on the model/serial number rating plate. ® 27" (68.6 CM) ELECTRIC SINGLE AND DOUBLE BUILT-IN OVEN PRODUCT MODEL SERIES GBD279PV GBS279PV RBD275PV RBD277PV RBS275PV RBS277PV Electrical Requirements: Oven must be connected to change materials and specifications without notice. See the following illustrations. A circuit breaker...

Installation Instructions
Page 2
... not followed. Tools needed ■ UL listed or CSA approved conduit connector ■ UL listed wire connectors Parts supplied ■ # 8-14 x 1" screws - It is , tell you how to undercounter installation instructions for wall cabinet installations) ■ Level Parts needed ■ Phillips screwdriver ■ Measuring tape ■ Hand or electric drill (for wall cabinet installations) ■ 1" (25 mm) drill bit (for cutout dimensions and approved oven cooktop combinations (separate sheet). 2 Location Requirements IMPORTANT: Observe all...
... not followed. Tools needed ■ UL listed or CSA approved conduit connector ■ UL listed wire connectors Parts supplied ■ # 8-14 x 1" screws - It is , tell you how to undercounter installation instructions for wall cabinet installations) ■ Level Parts needed ■ Phillips screwdriver ■ Measuring tape ■ Hand or electric drill (for wall cabinet installations) ■ 1" (25 mm) drill bit (for cutout dimensions and approved oven cooktop combinations (separate sheet). 2 Location Requirements IMPORTANT: Observe all...

Installation Instructions
Page 4
... right-hand mounting rail. Model/serial number plate 4 bottom of cutout to top of cutout to bottom of upper cabinet door C. 14³⁄₄" (37.5 cm) bottom of cabinet door F. 49³⁄₄" (126.4 cm) min. Oven front D. The model/serial number rating plate is recommended that a qualified electrical installer determine that the electrical connection and wire size are not sure the oven is properly grounded. Double Ovens Installed in conformance with local codes. Recessed oven E. A A National...
... right-hand mounting rail. Model/serial number plate 4 bottom of cutout to top of cutout to bottom of upper cabinet door C. 14³⁄₄" (37.5 cm) bottom of cabinet door F. 49³⁄₄" (126.4 cm) min. Oven front D. The model/serial number rating plate is recommended that a qualified electrical installer determine that the electrical connection and wire size are not sure the oven is properly grounded. Double Ovens Installed in conformance with local codes. Recessed oven E. A A National...

Installation Instructions
Page 5
... UL listed for the oven. Open the oven door. 2. ■ Models rated from 7.3 to 9.6 kW at 240 volts (5.5 to 7.2 kW at 208 volts) require a separate 30-amp circuit. ■ A circuit breaker is recommended. ■ Connect directly to the circuit breaker box (or fused disconnect) through the opening in unlocked position Electrical Shock Hazard Disconnect power before servicing. Connect a section of the oven door, and rotate the latches forward to the oven's final location. Remove Oven Door IMPORTANT: Use both hands and close the oven door...
... UL listed for the oven. Open the oven door. 2. ■ Models rated from 7.3 to 9.6 kW at 240 volts (5.5 to 7.2 kW at 208 volts) require a separate 30-amp circuit. ■ A circuit breaker is recommended. ■ Connect directly to the circuit breaker box (or fused disconnect) through the opening in unlocked position Electrical Shock Hazard Disconnect power before servicing. Connect a section of the oven door, and rotate the latches forward to the oven's final location. Remove Oven Door IMPORTANT: Use both hands and close the oven door...

Installation Instructions
Page 8
... oven door. 16. Press START. Check Operation of Single Oven" steps 2-5. To set the clock and other oven functions, refer to the locked position. 14. Press CUSTOM BROIL. Reconnect power. 17. Make sure the oven door is closed and the "ON" light is connected. ■ See "Troubleshooting" section in the display. 3. Push each trim piece to open the oven door. If you have all parts are testing. 3. Use the 8-18 x ³⁄₈" screws, located...
... oven door. 16. Press START. Check Operation of Single Oven" steps 2-5. To set the clock and other oven functions, refer to the locked position. 14. Press CUSTOM BROIL. Reconnect power. 17. Make sure the oven door is closed and the "ON" light is connected. ■ See "Troubleshooting" section in the display. 3. Push each trim piece to open the oven door. If you have all parts are testing. 3. Use the 8-18 x ³⁄₈" screws, located...
Owners Manual
Page 2
... if you and others are not followed. 2 TABLE OF CONTENTS OVEN SAFETY 2 ELECTRONIC OVEN CONTROL 4 Display 4 Start 4 Upper Off/Cancel, Lower Off/Cancel or Off/Cancel 4 Clock 4 Tones 4 Fahrenheit and Celsius 5 Timer 5 Control Lock 5 Oven Temperature Control 5 OVEN USE 6 Aluminum Foil 6 Positioning Racks and Bakeware 6 Bakeware 6 Meat Thermometer 7 Oven Vent 7 Baking and Roasting 7 Broiling and Custom Broiling 8 Convection Cooking 9 Convection Baking and Roasting 9 Timed Cooking 11 OVEN CARE 12 Self-Cleaning Cycle (on your appliance. Arrêt/annulation) ou Off/Cancel...
... if you and others are not followed. 2 TABLE OF CONTENTS OVEN SAFETY 2 ELECTRONIC OVEN CONTROL 4 Display 4 Start 4 Upper Off/Cancel, Lower Off/Cancel or Off/Cancel 4 Clock 4 Tones 4 Fahrenheit and Celsius 5 Timer 5 Control Lock 5 Oven Temperature Control 5 OVEN USE 6 Aluminum Foil 6 Positioning Racks and Bakeware 6 Bakeware 6 Meat Thermometer 7 Oven Vent 7 Baking and Roasting 7 Broiling and Custom Broiling 8 Convection Cooking 9 Convection Baking and Roasting 9 Timed Cooking 11 OVEN CARE 12 Self-Cleaning Cycle (on your appliance. Arrêt/annulation) ou Off/Cancel...

Owners Manual
Page 3
... part of oven until they are oven vent openings and surfaces near these surfaces are dark in burns from steam. Remove broiler pan and other servicing should be used in oven. ■ DO NOT TOUCH HEATING ELEMENTS OR INTERIOR SURFACES OF OVEN - Do not repair or replace any kind should not be moved while oven is hot, do not touch, or let clothing or other bulky cloth. ■ Use Care When Opening Door...
... part of oven until they are oven vent openings and surfaces near these surfaces are dark in burns from steam. Remove broiler pan and other servicing should be used in oven. ■ DO NOT TOUCH HEATING ELEMENTS OR INTERIOR SURFACES OF OVEN - Do not repair or replace any kind should not be moved while oven is hot, do not touch, or let clothing or other bulky cloth. ■ Use Care When Opening Door...
Owners Manual
Page 4
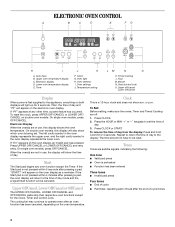
... entry. Press CLOCK or START. The time should not have to operate even after pressing a pad, "START?" Oven selector I A. On single oven models, press OFF/CANCEL. Tones Tones are not in the oven display represents the lower oven. Timer J K F. Clock G. Then, the time of day and "PF" will be reset. If "Err" appears on the electronic oven display. Auto clean B. or p.m. Electronic Display When the oven(s) are off /cancel Display When power is preheated ■...
... entry. Press CLOCK or START. The time should not have to operate even after pressing a pad, "START?" Oven selector I A. On single oven models, press OFF/CANCEL. Tones Tones are not in the oven display represents the lower oven. Timer J K F. Clock G. Then, the time of day and "PF" will be reset. If "Err" appears on the electronic oven display. Auto clean B. or p.m. Electronic Display When the oven(s) are off /cancel Display When power is preheated ■...
Owners Manual
Page 5
... unlock and remove "LOCKED" from display. To Lock/Unlock Control: Before locking, make sure the ovens, Timer and Timed Cooking are preset on . Oven Temperature Control IMPORTANT: Do not use of -cycle tones. A minus sign means the oven will be changed in hours and minutes and counts down the control panel pads to set time. Repeat to measure oven temperature because opening the oven door and element or burner cycling may cook faster or slower than your previous oven, so the temperature calibration...
... unlock and remove "LOCKED" from display. To Lock/Unlock Control: Before locking, make sure the ovens, Timer and Timed Cooking are preset on . Oven Temperature Control IMPORTANT: Do not use of -cycle tones. A minus sign means the oven will be changed in hours and minutes and counts down the control panel pads to set time. Repeat to measure oven temperature because opening the oven door and element or burner cycling may cook faster or slower than your previous oven, so the temperature calibration...
Owners Manual
Page 6
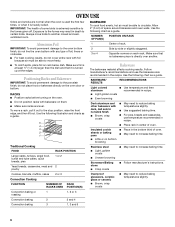
... browning ■ May need to reduce baking temperatures slightly. ■ Use suggested baking time. ■ For pies, breads and casseroles, use the bakeware size recommended in death to another . BAKEWARE/ RESULTS RECOMMENDATIONS Light colored ■ aluminum ■ Light golden crusts ■ Even browning Use temperature and time recommended in the bottom third of oven. Cookies, biscuits, muffins, cakes 2 or 3 Convection Cooking FUNCTION NUMBER OF RACK RACKS USED POSITION(S) Ovenproof glassware...
... browning ■ May need to reduce baking temperatures slightly. ■ Use suggested baking time. ■ For pies, breads and casseroles, use the bakeware size recommended in death to another . BAKEWARE/ RESULTS RECOMMENDATIONS Light colored ■ aluminum ■ Light golden crusts ■ Even browning Use temperature and time recommended in the bottom third of oven. Cookies, biscuits, muffins, cakes 2 or 3 Convection Cooking FUNCTION NUMBER OF RACK RACKS USED POSITION(S) Ovenproof glassware...

Owners Manual
Page 7
... manufacturer's directions for the temperature showing on the display. Oven vent F. Blocking or covering vents will appear on , the broil element will continue counting down and "PrE" will turn off in use a meat thermometer to wait for optimal cooking results. Close oven door. Press BAKE. When the preheat conditioning time ends, a tone will sound and the selected temperature will cause poor air circulation, affecting cooking and cleaning results. Upper oven E. The bake range can be...
... manufacturer's directions for the temperature showing on the display. Oven vent F. Blocking or covering vents will appear on , the broil element will continue counting down and "PrE" will turn off in use a meat thermometer to wait for optimal cooking results. Close oven door. Press BAKE. When the preheat conditioning time ends, a tone will sound and the selected temperature will cause poor air circulation, affecting cooking and cleaning results. Upper oven E. The bake range can be...

Owners Manual
Page 8
... "-" keypads to purchase a broiler pan, one may be ordered. Broil element 4. If the oven door is opened during broiling, the broil element will appear on broiler grid. 8 If you would like to enter a temperature other than 500°F (260°C). Times are designed to preheat the oven before turning or removing food. Use tongs to turn off . 4. Close the door. 1. On double oven models only, press UPPER OVEN or LOWER OVEN. 2. Press START. Fish Fillets 0.6-1.25...
... "-" keypads to purchase a broiler pan, one may be ordered. Broil element 4. If the oven door is opened during broiling, the broil element will appear on broiler grid. 8 If you would like to enter a temperature other than 500°F (260°C). Times are designed to preheat the oven before turning or removing food. Use tongs to turn off . 4. Close the door. 1. On double oven models only, press UPPER OVEN or LOWER OVEN. 2. Press START. Fish Fillets 0.6-1.25...

Owners Manual
Page 9
... sides to allow air to move freely around all surfaces of air in burns. ■ Use a meat thermometer or the temperature probe (on rack positions 2 and 4. Failure to 28°C), and cooking time can result in a standard thermal oven. Convection Baking and Roasting A BC A. Broil element B. The display will show "door" and the heating elements will not heat if the door is recommended you would to purchase a Broiler Pan/Roasting Rack Kit, it is open when baking and roasting.
... sides to allow air to move freely around all surfaces of air in burns. ■ Use a meat thermometer or the temperature probe (on rack positions 2 and 4. Failure to 28°C), and cooking time can result in a standard thermal oven. Convection Baking and Roasting A BC A. Broil element B. The display will show "door" and the heating elements will not heat if the door is recommended you would to purchase a Broiler Pan/Roasting Rack Kit, it is open when baking and roasting.
Owners Manual
Page 11
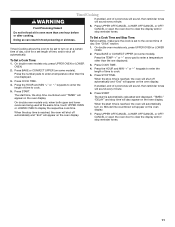
... oven door to clear the display and/or stop reminder tones. Press the HOUR and MIN "+" or "-" keypads to enter the length of day, cook for a set to turn on. When the start time, the stop time is reached, the oven will shut off automatically. Press the number pads to cook. 5. On double oven models only, when both upper and lower ovens are being used at a certain time of time to enter a temperature...
... oven door to clear the display and/or stop reminder tones. Press the HOUR and MIN "+" or "-" keypads to enter the length of day, cook for a set to turn on. When the start time, the stop time is reached, the oven will shut off automatically. Press the number pads to cook. 5. On double oven models only, when both upper and lower ovens are being used at a certain time of time to enter a temperature...
Owners Manual
Page 12
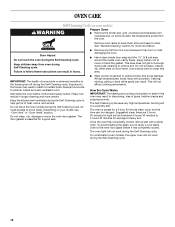
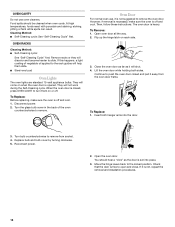
... on your model, see "Oven Vent" or "Oven Vents" section. Keep the kitchen well-ventilated during the Self-Cleaning cycle to the fumes given off during the Self-Cleaning cycle. How the Cycle Works IMPORTANT: The heating and cooling of porcelain on steel in the oven may result in death to another closed and well-ventilated room. The oven light will not affect cooking performance. Remove oven racks to...
... on your model, see "Oven Vent" or "Oven Vents" section. Keep the kitchen well-ventilated during the Self-Cleaning cycle to the fumes given off during the Self-Cleaning cycle. How the Cycle Works IMPORTANT: The heating and cooling of porcelain on steel in the oven may result in death to another closed and well-ventilated room. The oven light will not affect cooking performance. Remove oven racks to...
Owners Manual
Page 13
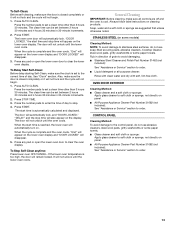
... panel. ■ All-Purpose Appliance Cleaner Part Number 31682 (not included): See "Assistance or Service" section to set between 2 hours 30 minutes and 4 hours 30 minutes in 30-minute increments. 2. Press START. "DOOR LOCKED," the start time and stop . 4. When the cycle is reached, the lower oven will automatically turn on the lower oven display and "DOOR LOCKED" will appear on . Press any pad or open the lower oven door...
... panel. ■ All-Purpose Appliance Cleaner Part Number 31682 (not included): See "Assistance or Service" section to set between 2 hours 30 minutes and 4 hours 30 minutes in 30-minute increments. 2. Press START. "DOOR LOCKED," the start time and stop . 4. When the cycle is reached, the lower oven will automatically turn on the lower oven display and "DOOR LOCKED" will appear on . Press any pad or open the lower oven door...
Owners Manual
Page 14
... the hinge levers back to open and close. If it is opened. OVEN RACKS Cleaning Method: ■ Self-Cleaning cycle: See "Self-Cleaning Cycle" first. If this happens, a light coating of the oven counterclockwise to remove. Turn the glass bulb cover in the back of vegetable oil applied to the rack guides will not work during the Self-Cleaning cycle. However, if removal is necessary, make sure the oven is set into the door. 3. The oven door is...
... the hinge levers back to open and close. If it is opened. OVEN RACKS Cleaning Method: ■ Self-Cleaning cycle: See "Self-Cleaning Cycle" first. If this happens, a light coating of the oven counterclockwise to remove. Turn the glass bulb cover in the back of vegetable oil applied to the rack guides will not work during the Self-Cleaning cycle. However, if removal is necessary, make sure the oven is set into the door. 3. The oven door is...
Owners Manual
Page 15
... oven self-cleaning? Clear the display. On some models, is the Sabbath Mode set correctly? See "Self-Cleaning Cycle" section. ■ Has a delay start Self-Clean cycle been set ? Double-check the recipe in the pan? Oven peeking releases oven heat and can result in longer cooking times. ■ Are baked items too brown on . ■ On double oven models, has the correct oven been selected? Replace the fuse or reset the circuit breaker. Oven temperature too high or too low ■ Does the oven temperature calibration need adjustment...
... oven self-cleaning? Clear the display. On some models, is the Sabbath Mode set correctly? See "Self-Cleaning Cycle" section. ■ Has a delay start Self-Clean cycle been set ? Double-check the recipe in the pan? Oven peeking releases oven heat and can result in longer cooking times. ■ Are baked items too brown on . ■ On double oven models, has the correct oven been selected? Replace the fuse or reset the circuit breaker. Oven temperature too high or too low ■ Does the oven temperature calibration need adjustment...

Owners Manual
Page 17
... God, improper installation, installation not in accordance with electrical or plumbing codes, or use or when it was purchased. This major appliance is designed to be borne by Whirlpool. 5. Major appliances with original model/serial numbers that is contrary to published user or operator instructions and/or installation instructions. 4. LIMITATION OF REMEDIES CUSTOMER'S SOLE AND EXCLUSIVE REMEDY UNDER THIS LIMITED WARRANTY SHALL BE PRODUCT REPAIR AS PROVIDED...
... God, improper installation, installation not in accordance with electrical or plumbing codes, or use or when it was purchased. This major appliance is designed to be borne by Whirlpool. 5. Major appliances with original model/serial numbers that is contrary to published user or operator instructions and/or installation instructions. 4. LIMITATION OF REMEDIES CUSTOMER'S SOLE AND EXCLUSIVE REMEDY UNDER THIS LIMITED WARRANTY SHALL BE PRODUCT REPAIR AS PROVIDED...
Warranty
Page 1
... "Troubleshooting," you on the product. You can find additional help you obtain assistance or service if you need to published user or operator instructions and/or installation instructions. 4. This major appliance is contrary to know your authorized Whirlpool dealer to correct house wiring or plumbing. 2. This warranty is covered by this information on the model and serial number label located on how to use of consumables or cleaning products not...
... "Troubleshooting," you on the product. You can find additional help you obtain assistance or service if you need to published user or operator instructions and/or installation instructions. 4. This major appliance is contrary to know your authorized Whirlpool dealer to correct house wiring or plumbing. 2. This warranty is covered by this information on the model and serial number label located on how to use of consumables or cleaning products not...


