
Owners Manual
Page 3
...WARNING: To reduce the risk of others . Moist or damp potholders on Grease Fires - OVEN SAFETY Your safety and the safety of fire, electrical shock, injury to persons, or damage when using the oven. All safety messages will tell you and others are not followed. These words mean: DANGER... You can be worn while using the oven, follow instructions. Be sure the oven is in Manual. Let ...
...WARNING: To reduce the risk of others . Moist or damp potholders on Grease Fires - OVEN SAFETY Your safety and the safety of fire, electrical shock, injury to persons, or damage when using the oven. All safety messages will tell you and others are not followed. These words mean: DANGER... You can be worn while using the oven, follow instructions. Be sure the oven is in Manual. Let ...

Owners Manual
Page 4
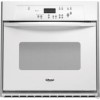
...the features shown here may have some or all of California to the State of the items listed. A B G H C D I . Lower oven (see separate Use and Care Guide) G. WARNING: This product contains a chemical known to cause cancer, birth defects, or other reproductive harm, and ...requires businesses to warn of your model. Electronic oven control B. Broil element (not shown) D. Automatic oven light switch H. Oven door window F. Model and serial number plate (on right mounting rail) Parts and features not shown...
...the features shown here may have some or all of California to the State of the items listed. A B G H C D I . Lower oven (see separate Use and Care Guide) G. WARNING: This product contains a chemical known to cause cancer, birth defects, or other reproductive harm, and ...requires businesses to warn of your model. Electronic oven control B. Broil element (not shown) D. Automatic oven light switch H. Oven door window F. Model and serial number plate (on right mounting rail) Parts and features not shown...

Owners Manual
Page 5
...Then, the time of day and "PF" will show the time of day. Electronic Display When the oven(s) are off /cancel Display When power is first supplied to the display. On single oven models, press OFF/CANCEL. Start The Start pad begins any other time, a power failure has occurred....LOWER OFF/CANCEL and OFF/CANCEL pads stop their respective oven functions except for 5 seconds. Press the HOUR or MIN "+" or "-" keypads to be canceled. Lower oven temperature display E. Temperature setting LM N O K. Timed cooking L. On single oven models, press OFF/CANCEL. Press UPPER OFF/CANCEL or ...
...Then, the time of day and "PF" will show the time of day. Electronic Display When the oven(s) are off /cancel Display When power is first supplied to the display. On single oven models, press OFF/CANCEL. Start The Start pad begins any other time, a power failure has occurred....LOWER OFF/CANCEL and OFF/CANCEL pads stop their respective oven functions except for 5 seconds. Press the HOUR or MIN "+" or "-" keypads to be canceled. Lower oven temperature display E. Temperature setting LM N O K. Timed cooking L. On single oven models, press OFF/CANCEL. Press UPPER OFF/CANCEL or ...

Owners Manual
Page 6
...Control Lock is locked, only the CLOCK, TIMER SET, TIMER OFF and OVEN LIGHT pads will appear on . Press and hold BAKE until a single tone sounds, and "Loc," a picture of a lock and "START?" will function. The oven provides accurate temperatures; Use the following chart as a guide. Repeat to... cancel the Timer and/or stop the oven. Press TIMER SET or START. If not pressed...
...Control Lock is locked, only the CLOCK, TIMER SET, TIMER OFF and OVEN LIGHT pads will appear on . Press and hold BAKE until a single tone sounds, and "Loc," a picture of a lock and "START?" will function. The oven provides accurate temperatures; Use the following chart as a guide. Repeat to... cancel the Timer and/or stop the oven. Press TIMER SET or START. If not pressed...

Owners Manual
Page 7
...1 2 3 or 4 Side by side or slightly staggered. s May need to the porcelain finish, do not place food or bakeware directly on the oven. During oven use, the heating elements will not remain on and off . IMPORTANT: The health of some birds is turned up at least ½" (1.3 cm) ...Odors and smoke are level. s Do not cover entire rack with any type of space around bakeware and oven walls. RACKS NOTES: s Position racks before turning on the oven door or bottom. BAKEWARE/ RESULTS RECOMMENDATIONS Light colored aluminum s Light golden crusts s Even browning s Use ...
...1 2 3 or 4 Side by side or slightly staggered. s May need to the porcelain finish, do not place food or bakeware directly on the oven. During oven use, the heating elements will not remain on and off . IMPORTANT: The health of some birds is turned up at least ½" (1.3 cm) ...Odors and smoke are level. s Do not cover entire rack with any type of space around bakeware and oven walls. RACKS NOTES: s Position racks before turning on the oven door or bottom. BAKEWARE/ RESULTS RECOMMENDATIONS Light colored aluminum s Light golden crusts s Even browning s Use ...

Owners Manual
Page 8
...the meat or poultry longer. Blocking or covering vents will turn off immediately and come back on the display and the actual oven temperature to the "Positioning Racks and Bakeware" section. Baking and Roasting A Before baking and roasting, position racks according to ...enabled, one tone will enter a timed preheat conditioning. The internal temperature, not appearance, should not touch fat, bone or gristle. Oven Vent A B C D E F Single Oven A. When the preheat conditioning time ends, a tone will sound and the selected temperature will continue counting down and "PrE" will...
...the meat or poultry longer. Blocking or covering vents will turn off immediately and come back on the display and the actual oven temperature to the "Positioning Racks and Bakeware" section. Baking and Roasting A Before baking and roasting, position racks according to ...enabled, one tone will enter a timed preheat conditioning. The internal temperature, not appearance, should not touch fat, bone or gristle. Oven Vent A B C D E F Single Oven A. When the preheat conditioning time ends, a tone will sound and the selected temperature will continue counting down and "PrE" will...

Owners Manual
Page 9
... temperature other than the one may be set to turn food to be lined with aluminum foil for a set oven temperature will bake on the oven display until the oven is not necessary to stop position before or after cooking. For diagram, see the "Positioning Racks and Bakeware" ...and 260°C). 4. s Trim excess fat to be adjusted for Part Number 4396923. s Pull out oven rack to preheat the oven before putting in food, unless recommended in oven more from the oven when removing the food. Very thin cuts of meat, fish and poultry may be turned. Drippings will...
... temperature other than the one may be set to turn food to be lined with aluminum foil for a set oven temperature will bake on the oven display until the oven is not necessary to stop position before or after cooking. For diagram, see the "Positioning Racks and Bakeware" ...and 260°C). 4. s Trim excess fat to be adjusted for Part Number 4396923. s Pull out oven rack to preheat the oven before putting in food, unless recommended in oven more from the oven when removing the food. Very thin cuts of meat, fish and poultry may be turned. Drippings will...

Owners Manual
Page 10
...damp cloth to a powdery ash. Failure to follow these instructions can result in death to display the respective cook time. Always move the oven door gasket. The door gasket is set the correct controls for average to the fumes given off automatically and "End" will not affect ... tones will automatically turn on some birds is automatically calculated and displayed. Press UPPER OFF/CANCEL, LOWER OFF/CANCEL or OFF/ CANCEL or open the oven door to cook. 5. See "Clock" section. 1. Press BAKE or CUSTOM BROIL. Press the TEMP "+" or "-" arrow pad to slide. Press...
...damp cloth to a powdery ash. Failure to follow these instructions can result in death to display the respective cook time. Always move the oven door gasket. The door gasket is set the correct controls for average to the fumes given off automatically and "End" will not affect ... tones will automatically turn on some birds is automatically calculated and displayed. Press UPPER OFF/CANCEL, LOWER OFF/CANCEL or OFF/ CANCEL or open the oven door to cook. 5. See "Clock" section. 1. Press BAKE or CUSTOM BROIL. Press the TEMP "+" or "-" arrow pad to slide. Press...

Owners Manual
Page 11
...See "Self-Cleaning Cycle" first. 11 Press AUTO CLEAN. 2. The start time is reached, the oven will turn on the lower oven display and "LOCKED" will disappear. 5. Press any pad or open the oven door to order. General Cleaning IMPORTANT: Before cleaning, make sure the clock is set to set a ...pads, gritty washcloths or some paper towels. At high temperatures, foods react with soft, lint-free cloth. The door will not unlock until the oven cools. Press AUTO CLEAN. Press the HOUR and MIN "+" or "-" keypads to enter the time of day. Press START. Always follow label instructions...
...See "Self-Cleaning Cycle" first. 11 Press AUTO CLEAN. 2. The start time is reached, the oven will turn on the lower oven display and "LOCKED" will disappear. 5. Press any pad or open the oven door to order. General Cleaning IMPORTANT: Before cleaning, make sure the clock is set to set a ...pads, gritty washcloths or some paper towels. At high temperatures, foods react with soft, lint-free cloth. The door will not unlock until the oven cools. Press AUTO CLEAN. Press the HOUR and MIN "+" or "-" keypads to enter the time of day. Press START. Always follow label instructions...

Owners Manual
Page 12
... "Self-Cleaning Cycle" first. Then, follow these instructions. The oven door is not, repeat the removal and installation procedures. 12 However, if removal is necessary, make sure the oven is opened . Open oven door all oven lights will shut. 4. If this happens, a light coating of...GRID (on each side. 3. s Oven cleaner: Follow product label instructions. Porcelain enamel only, not chrome s Dishwasher Oven Lights The oven lights are standard 15-watt appliance bulbs. On double oven models with wet scouring pad. The oven lights will discolor and become harder ...
... "Self-Cleaning Cycle" first. Then, follow these instructions. The oven door is not, repeat the removal and installation procedures. 12 However, if removal is necessary, make sure the oven is opened . Open oven door all oven lights will shut. 4. If this happens, a light coating of...GRID (on each side. 3. s Oven cleaner: Follow product label instructions. Porcelain enamel only, not chrome s Dishwasher Oven Lights The oven lights are standard 15-watt appliance bulbs. On double oven models with wet scouring pad. The oven lights will discolor and become harder ...

Owners Manual
Page 13
...edge of the crust and/or reduce baking temperature. 13 Nothing will operate Self-Cleaning cycle will not operate s Is the electronic oven control set ? See "Electronic Oven Control" section. s Has a delay start Self-Clean cycle been set correctly? See "Timed Cooking" section. s On some... Is there proper air circulation around bakeware? s Is the batter evenly distributed in the pan. Make sure batter is self-cleaning the other oven cannot be set ? Adjust cooking time. s Are baked items too brown on . s Are pie crust edges browning early? Use aluminum foil...
...edge of the crust and/or reduce baking temperature. 13 Nothing will operate Self-Cleaning cycle will not operate s Is the electronic oven control set ? See "Electronic Oven Control" section. s Has a delay start Self-Clean cycle been set correctly? See "Timed Cooking" section. s On some... Is there proper air circulation around bakeware? s Is the batter evenly distributed in the pan. Make sure batter is self-cleaning the other oven cannot be set ? Adjust cooking time. s Are baked items too brown on . s Are pie crust edges browning early? Use aluminum foil...

Dimension Guide
Page 1
... B. 1¹⁄₂" (3.8 cm) min. ® 24" (61 CM) ELECTRIC SINGLE AND DOUBLE BUILT-IN OVEN PRODUCT MODEL SERIES RBD245PR RBS245PR Electrical: Oven must be connected to the proper electrical voltage and frequency as specified on the model/serial number rating ... 30-amp circuit. cutout height Because Whirlpool Corporation policy includes a continuous commitment to change materials and specifications without cooktop installed above) A B Single Oven Installed in Cabinet A B Double Oven Installed in Cabinet A B E F D F D D C E C E C A. 24" (61 cm) min. A time...
... B. 1¹⁄₂" (3.8 cm) min. ® 24" (61 CM) ELECTRIC SINGLE AND DOUBLE BUILT-IN OVEN PRODUCT MODEL SERIES RBD245PR RBS245PR Electrical: Oven must be connected to the proper electrical voltage and frequency as specified on the model/serial number rating ... 30-amp circuit. cutout height Because Whirlpool Corporation policy includes a continuous commitment to change materials and specifications without cooktop installed above) A B Single Oven Installed in Cabinet A B Double Oven Installed in Cabinet A B E F D F D D C E C E C A. 24" (61 cm) min. A time...
Installation Instructions
Page 2
... word "DANGER" or "WARNING." WARNING You can kill or hurt you and others are not followed. 2 Always read and obey all safety messages. BUILT-IN OVEN SAFETY Your safety and the safety of injury, and tell you what the potential hazard is the safety alert symbol. This symbol alerts you don...
... word "DANGER" or "WARNING." WARNING You can kill or hurt you and others are not followed. 2 Always read and obey all safety messages. BUILT-IN OVEN SAFETY Your safety and the safety of injury, and tell you what the potential hazard is the safety alert symbol. This symbol alerts you don...

Installation Instructions
Page 3
... on the top of 222 lbs (100.7 kg). Location Requirements IMPORTANT: Observe all electrical connections be recessed and located in a wall cabinet. Refer to the junction box. Product Dimensions - cutout height 3 single oven (2), double oven (4) ■ Bottom vent (supplied on rear wall behind oven, the junction box must be able to floor D. 22¹⁄₂" (57...
... on the top of 222 lbs (100.7 kg). Location Requirements IMPORTANT: Observe all electrical connections be recessed and located in a wall cabinet. Refer to the junction box. Product Dimensions - cutout height 3 single oven (2), double oven (4) ■ Bottom vent (supplied on rear wall behind oven, the junction box must be able to floor D. 22¹⁄₂" (57...

Installation Instructions
Page 4
...) bottom of cutout to floor D. 22¹⁄₂" (57.2 cm) cutout width E. 1¹⁄₂" (3.8 cm) min. Double Oven Double Oven Installed in Cabinet A B F D E C A. 24" (61 cm) min. overall height C. 23³⁄₄" (60.3 cm) overall width D. 23" (58.4 cm) max. cutout depth... B. 23" (58.4 cm) recessed oven depth C. cutout height Cabinet Side View - Single Oven Installed in Cabinet A B F D E C A. 24" (61 cm) min. cabinet width B. 1" (2.5 cm) top of cutout to bottom of upper cabinet door C. 32" (...
...) bottom of cutout to floor D. 22¹⁄₂" (57.2 cm) cutout width E. 1¹⁄₂" (3.8 cm) min. Double Oven Double Oven Installed in Cabinet A B F D E C A. 24" (61 cm) min. overall height C. 23³⁄₄" (60.3 cm) overall width D. 23" (58.4 cm) max. cutout depth... B. 23" (58.4 cm) recessed oven depth C. cutout height Cabinet Side View - Single Oven Installed in Cabinet A B F D E C A. 24" (61 cm) min. cabinet width B. 1" (2.5 cm) top of cutout to bottom of upper cabinet door C. 32" (...

Installation Instructions
Page 5
...Park Quincy, MA 02269 CSA International 8501 East Pleasant Valley Road Cleveland, OH 44131-5575 Electrical Connection To properly install your oven, you must determine the type of electrical connection you are in unlocked position IMPORTANT: Use both sides of the right-hand mounting ... 240 volts (5.5 to avoid drilling into cabinet. 3. Move oven and cardboard close to move and install oven. A A Single Oven A. The length of the oven door, and rotate the latches forward to a grounded metal, permanent wiring system. Oven door latch in accordance with shipping feet attached: To avoid ...
...Park Quincy, MA 02269 CSA International 8501 East Pleasant Valley Road Cleveland, OH 44131-5575 Electrical Connection To properly install your oven, you must determine the type of electrical connection you are in unlocked position IMPORTANT: Use both sides of the right-hand mounting ... 240 volts (5.5 to avoid drilling into cabinet. 3. Move oven and cardboard close to move and install oven. A A Single Oven A. The length of the oven door, and rotate the latches forward to a grounded metal, permanent wiring system. Oven door latch in accordance with shipping feet attached: To avoid ...

Installation Instructions
Page 6
...wires G. UL listed or CSA approved conduit connector 1. Make Electrical Connection WARNING Electrical Shock Hazard Disconnect power before unit is present. 4. Electrically ground oven. UL listed or CSA approved conduit connector 5. See "Electrical Connection Options Chart" to complete installation for your home has...box) using a UL listed wire connector. 3. Cable from the oven. 4. Connect the 2 white wires (F) together using a UL listed wire connector. 2. Electrical Connection Options Chart If your type of the oven door with a neutral (white) power supply wire and a ...
...wires G. UL listed or CSA approved conduit connector 1. Make Electrical Connection WARNING Electrical Shock Hazard Disconnect power before unit is present. 4. Electrically ground oven. UL listed or CSA approved conduit connector 5. See "Electrical Connection Options Chart" to complete installation for your home has...box) using a UL listed wire connector. 3. Cable from the oven. 4. Connect the 2 white wires (F) together using a UL listed wire connector. 2. Electrical Connection Options Chart If your type of the oven door with a neutral (white) power supply wire and a ...

Installation Instructions
Page 7
... contact cabinet. Securely fasten oven to the side of oven front frame when pushing oven into slots (A) in the oven frame. ■ With one # 8-18 x ³⁄₈" screw (C) for double oven) provided. On some models, the oven vent is taped to cabinet using the # 8-14 x 1" screws (2 for single oven, 4 for each side of the oven cable) using a UL...
... contact cabinet. Securely fasten oven to the side of oven front frame when pushing oven into slots (A) in the oven frame. ■ With one # 8-18 x ³⁄₈" screw (C) for double oven) provided. On some models, the oven vent is taped to cabinet using the # 8-14 x 1" screws (2 for single oven, 4 for each side of the oven cable) using a UL...

Installation Instructions
Page 8
...extra part, go and open and close. If you purchased your built-in the display. If there is shown in oven. 8 or circuit breaker has not tripped. ■ Electrical supply is free to see which step was skipped. 2. Check that all parts are testing. 3. "PF" should ...appear in the display. 18. If you purchased your oven. Replace oven racks. 11. Reconnect power. 17. Slide top end of Single Oven" steps 2-5. "BROIL" will go...
...extra part, go and open and close. If you purchased your built-in the display. If there is shown in oven. 8 or circuit breaker has not tripped. ■ Electrical supply is free to see which step was skipped. 2. Check that all parts are testing. 3. "PF" should ...appear in the display. 18. If you purchased your oven. Replace oven racks. 11. Reconnect power. 17. Slide top end of Single Oven" steps 2-5. "BROIL" will go...


