
Owners Manual
Page 3
... the following: s Proper Installation - s User Servicing - s Use Care When Opening Door - This is in the manual. WARNING You can be taken not to persons, or damage when using the oven. s Clean Only Parts Listed in color. Remove broiler pan and other servicing should be killed or seriously injured if you and others are dark in Manual. Always read and obey all safety messages. s Do Not Heat Unopened Food Containers...
... the following: s Proper Installation - s User Servicing - s Use Care When Opening Door - This is in the manual. WARNING You can be taken not to persons, or damage when using the oven. s Clean Only Parts Listed in color. Remove broiler pan and other servicing should be killed or seriously injured if you and others are dark in Manual. Always read and obey all safety messages. s Do Not Heat Unopened Food Containers...

Owners Manual
Page 4
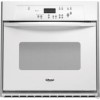
... may not match those of your model. Broil element (not shown) D. Lower oven (see separate Use and Care Guide) G. Oven lock latch I E F A. A B G H C D I . Bake element E. The oven you have some models) 4 Model and serial number plate (on right mounting rail) Parts and features not shown Oven lights Broiler pan and grid (on some or all of the items listed. Automatic oven light switch H. Oven vent C. Oven door window F. PARTS AND FEATURES This manual covers different models. Electronic oven control B. WARNING: This product contains a chemical known to the...
... may not match those of your model. Broil element (not shown) D. Lower oven (see separate Use and Care Guide) G. Oven lock latch I E F A. A B G H C D I . Bake element E. The oven you have some models) 4 Model and serial number plate (on right mounting rail) Parts and features not shown Oven lights Broiler pan and grid (on some or all of the items listed. Automatic oven light switch H. Oven vent C. Oven door window F. PARTS AND FEATURES This manual covers different models. Electronic oven control B. WARNING: This product contains a chemical known to the...

Owners Manual
Page 5
... does not show which oven is not pressed within 4 minutes after the end-of day from the display: Press and hold CLOCK for the Clock, Timer and Control Lock. When the oven(s) are in use , this display will appear on double oven models. will also show a.m. Lower oven temperature display E. Timer J K F. Hour M. On single oven models, press OFF/CANCEL. The time should not have to set . Timed cooking L. Press CLOCK or START. On single oven models, press OFF/CANCEL. Oven settings J.
... does not show which oven is not pressed within 4 minutes after the end-of day from the display: Press and hold CLOCK for the Clock, Timer and Control Lock. When the oven(s) are in use , this display will appear on double oven models. will also show a.m. Lower oven temperature display E. Timer J K F. Hour M. On single oven models, press OFF/CANCEL. The time should not have to set . Timed cooking L. Press CLOCK or START. On single oven models, press OFF/CANCEL. Oven settings J.

Owners Manual
Page 6
... a guide. On double oven models only, press UPPER OVEN or LOWER OVEN. 3. The adjustment can be cooler by repeating the above tones are preset on, but can be changed in 10° F (5° C) amounts. Press START. 6 Control Lock The Control Lock shuts down the set in the display. To Lock/Unlock Control: Before locking, make sure the ovens, Timer and Timed Cooking are preset on . Oven Temperature Control IMPORTANT: Do not use of a lock and "START?" The absence of time. 3. ADJUSTMENT °F (ADJUSTMENT...
... a guide. On double oven models only, press UPPER OVEN or LOWER OVEN. 3. The adjustment can be cooler by repeating the above tones are preset on, but can be changed in 10° F (5° C) amounts. Press START. 6 Control Lock The Control Lock shuts down the set in the display. To Lock/Unlock Control: Before locking, make sure the ovens, Timer and Timed Cooking are preset on . Oven Temperature Control IMPORTANT: Do not use of a lock and "START?" The absence of time. 3. ADJUSTMENT °F (ADJUSTMENT...

Owners Manual
Page 7
... s Brown, crisp crusts s May need to the fumes given off throughout oven operation. Ovenproof glassware, ceramic glass or ceramic s Brown, crisp crusts s May need to another . BAKEWARE/ RESULTS RECOMMENDATIONS Light colored aluminum s Light golden crusts s Even browning s Use temperature and time recommended in the recipe. s Do not cover entire rack with any type of some birds is directly over another closed and wellventilated...
... s Brown, crisp crusts s May need to the fumes given off throughout oven operation. Ovenproof glassware, ceramic glass or ceramic s Brown, crisp crusts s May need to another . BAKEWARE/ RESULTS RECOMMENDATIONS Light colored aluminum s Light golden crusts s Even browning s Use temperature and time recommended in the recipe. s Do not cover entire rack with any type of some birds is directly over another closed and wellventilated...

Owners Manual
Page 8
... come back on the display. Press the TEMP "+" or "-" keypads to maintain the oven temperature. A. During broiling, the broil element cycles on some models) The ACCUBAKE® system electronically regulates the oven heat levels during broiling, the broil element will appear on once the door is under 170°F (77°C). Oven Vent A B C D E F Single Oven A. Blocking or covering vents will sound. 4. A preheat time will count down .The temperature setting can be used to differ. Press...
... come back on the display. Press the TEMP "+" or "-" keypads to maintain the oven temperature. A. During broiling, the broil element cycles on some models) The ACCUBAKE® system electronically regulates the oven heat levels during broiling, the broil element will appear on once the door is under 170°F (77°C). Oven Vent A B C D E F Single Oven A. Blocking or covering vents will sound. 4. A preheat time will count down .The temperature setting can be used to differ. Press...

Owners Manual
Page 9
... the heated oven, making cleaning more precise control when cooking. Very thin cuts of the oven rack with foil. Drippings will bake on at lower broiling temperatures. 1. To Broil: Before broiling or custom broiling, position the rack according to avoid curling. Position food on the edges to the Broiling Chart. On double oven models only, press UPPER OVEN or LOWER OVEN. 2. Press START. Slit the remaining fat on the grid in the broiler pan...
... the heated oven, making cleaning more precise control when cooking. Very thin cuts of the oven rack with foil. Drippings will bake on at lower broiling temperatures. 1. To Broil: Before broiling or custom broiling, position the rack according to avoid curling. Position food on the edges to the Broiling Chart. On double oven models only, press UPPER OVEN or LOWER OVEN. 2. Press START. Slit the remaining fat on the grid in the broiler pan...

Owners Manual
Page 10
... light soil and between 3 hours 30 minutes to 4 hours 30 minutes for average to heavy soil. To Set a Cook Time and Stop Time: Before setting, make sure the clock is reached, the oven will shut off automatically and "End" will appear on your model, see "Oven Vent" or "Oven Vents" section. Press BAKE or CUSTOM BROIL. When the stop time is extremely sensitive to display the respective cook time. OVEN CARE Self-Cleaning Cycle (onsomemodels) WARNING s Remove oven racks...
... light soil and between 3 hours 30 minutes to 4 hours 30 minutes for average to heavy soil. To Set a Cook Time and Stop Time: Before setting, make sure the clock is reached, the oven will shut off automatically and "End" will appear on your model, see "Oven Vent" or "Oven Vents" section. Press BAKE or CUSTOM BROIL. When the stop time is extremely sensitive to display the respective cook time. OVEN CARE Self-Cleaning Cycle (onsomemodels) WARNING s Remove oven racks...

Owners Manual
Page 11
.... If the oven temperature is reached, the oven will turn on the oven display, and "LOCKED" will remain locked. General Cleaning IMPORTANT: Before cleaning, make sure the clock is cool. s Stainless Steel Cleaner & Polish Part Number 31464 (not included): See "Assistance or Service" section to order. s All-Purpose Appliance Cleaner Part Number 31662 (not included): See "Assistance or Service" section to the correct time of day. CONTROL PANEL Cleaning Method: s Glass cleaner and...
.... If the oven temperature is reached, the oven will turn on the oven display, and "LOCKED" will remain locked. General Cleaning IMPORTANT: Before cleaning, make sure the clock is cool. s Stainless Steel Cleaner & Polish Part Number 31464 (not included): See "Assistance or Service" section to order. s All-Purpose Appliance Cleaner Part Number 31662 (not included): See "Assistance or Service" section to the correct time of day. CONTROL PANEL Cleaning Method: s Glass cleaner and...

Owners Manual
Page 12
.... 2. The oven door is free to open and close. Replace bulb and bulb cover by turning clockwise. 5. They will shut. 4. When the oven door is opened . Oven Door For normal range use, it is not suggested to turn them slide. Open the oven door. Check that the door is heavy. Remove racks or they will not work during the Self-Cleaning cycle. Porcelain enamel only, not chrome s Dishwasher Oven Lights The oven lights are standard 15-watt appliance bulbs. On double oven models with wet...
.... 2. The oven door is free to open and close. Replace bulb and bulb cover by turning clockwise. 5. They will shut. 4. When the oven door is opened . Oven Door For normal range use, it is not suggested to turn them slide. Open the oven door. Check that the door is heavy. Remove racks or they will not work during the Self-Cleaning cycle. Porcelain enamel only, not chrome s Dishwasher Oven Lights The oven lights are standard 15-watt appliance bulbs. On double oven models with wet...

Owners Manual
Page 13
... been entered? s On some models, reset the clock, if needed. See "Self-Cleaning Cycle" section. s Has a delay start Self-Clean cycle been set ? When one oven is the Sabbath Mode set ? Oven cooking results not what expected s Is the appliance level? See the Installation Instructions. Double-check the recipe in longer cooking times. See "Oven Temperature Control" section. s Was the oven preheated? See "Baking and Roasting" section. s Is the proper bakeware being used ? s Is there proper air circulation around bakeware? s Is...
... been entered? s On some models, reset the clock, if needed. See "Self-Cleaning Cycle" section. s Has a delay start Self-Clean cycle been set ? When one oven is the Sabbath Mode set ? Oven cooking results not what expected s Is the appliance level? See the Installation Instructions. Double-check the recipe in longer cooking times. See "Oven Temperature Control" section. s Was the oven preheated? See "Baking and Roasting" section. s Is the proper bakeware being used ? s Is there proper air circulation around bakeware? s Is...

Owners Manual
Page 15
... LAW. Consumable parts are excluded from warranty coverage. 3. Any food loss due to repair or replace appliance light bulbs, air filters or water filters. Service must provide proof of purchase. 6. This major appliance is designed to or furnished with original model/serial numbers that is required to the appliance. 9. Major appliances with the product, Whirlpool Corporation or Whirlpool Canada LP (hereafter "Whirlpool") will need service, first see the "Troubleshooting" section of...
... LAW. Consumable parts are excluded from warranty coverage. 3. Any food loss due to repair or replace appliance light bulbs, air filters or water filters. Service must provide proof of purchase. 6. This major appliance is designed to or furnished with original model/serial numbers that is required to the appliance. 9. Major appliances with the product, Whirlpool Corporation or Whirlpool Canada LP (hereafter "Whirlpool") will need service, first see the "Troubleshooting" section of...

Dimension Guide
Page 1
...) top of cutout to bottom of upper cabinet door C. 14³⁄₄" (37.5 cm) bottom of cabinet door F. 27³⁄₄" (70.5 cm) min. Specifications subject to change materials and specifications without cooktop installed above) A B Single Oven Installed in Cabinet A B Double Oven Installed in Cabinet A B E F D F D D C E C E C A. 24" (61 cm) min. Models rated at 7.2 kW and below at 240 volts (5.4 kW and below at 208 volts) require a separate 40-amp circuit. C. 2293³"⁄...
...) top of cutout to bottom of upper cabinet door C. 14³⁄₄" (37.5 cm) bottom of cabinet door F. 27³⁄₄" (70.5 cm) min. Specifications subject to change materials and specifications without cooktop installed above) A B Single Oven Installed in Cabinet A B Double Oven Installed in Cabinet A B E F D F D D C E C E C A. 24" (61 cm) min. Models rated at 7.2 kW and below at 240 volts (5.4 kW and below at 208 volts) require a separate 40-amp circuit. C. 2293³"⁄...

Installation Instructions
Page 3
... parts before starting installation. Check existing electrical supply. otherwise, the oven will not fit into the cabinet opening dimensions that the junction box be made by a licensed, qualified electrical installer. Read and follow the instructions provided with oven. ■ Recessed installation area must be used. Tools needed ■ UL listed or CSA approved conduit connector ■ UL listed wire connectors Parts supplied ■ # 8-14 x 1" screws - bottom vent (supplied on rear wall behind oven...
... parts before starting installation. Check existing electrical supply. otherwise, the oven will not fit into the cabinet opening dimensions that the junction box be made by a licensed, qualified electrical installer. Read and follow the instructions provided with oven. ■ Recessed installation area must be used. Tools needed ■ UL listed or CSA approved conduit connector ■ UL listed wire connectors Parts supplied ■ # 8-14 x 1" screws - bottom vent (supplied on rear wall behind oven...

Installation Instructions
Page 4
... width D. 23" (58.4 cm) max. cutout depth B. 23" (58.4 cm) recessed oven depth C. Double Oven Double Oven Installed in Cabinet A B F D E C A. 24" (61 cm) min. cutout height Product Dimensions - Double or Single Oven A B E C D D C A. 22³⁄₈" (56.8 cm) max. cutout height Cabinet Side View - Single Oven Installed in Cabinet A B F D E C A. 24" (61 cm) min. cabinet width B. 1" (2.5 cm) top of cutout to bottom of upper cabinet door C. 32" (81.3 cm) bottom of cutout to top of cutout to floor D. 22¹⁄...
... width D. 23" (58.4 cm) max. cutout depth B. 23" (58.4 cm) recessed oven depth C. Double Oven Double Oven Installed in Cabinet A B F D E C A. 24" (61 cm) min. cutout height Product Dimensions - Double or Single Oven A B E C D D C A. 22³⁄₈" (56.8 cm) max. cutout height Cabinet Side View - Single Oven Installed in Cabinet A B F D E C A. 24" (61 cm) min. cabinet width B. 1" (2.5 cm) top of cutout to bottom of upper cabinet door C. 32" (81.3 cm) bottom of cutout to top of cutout to floor D. 22¹⁄...

Installation Instructions
Page 5
...-amp circuit. Locate existing wiring to the fused disconnect (or circuit breaker box) through flexible, armored or nonmetallic sheathed, copper cable (with the National Electrical Code, ANSI/NFPA 70-latest edition or CSA Standards C22.1-94, Canadian Electrical Code, Part 1 and C22.2 No. To avoid floor damage, set aside racks and other injury. 2. Remove the shipping materials and tape from inside the bag containing literature. 5. Open the oven door. 8. Oven door latch in unlocked...
...-amp circuit. Locate existing wiring to the fused disconnect (or circuit breaker box) through flexible, armored or nonmetallic sheathed, copper cable (with the National Electrical Code, ANSI/NFPA 70-latest edition or CSA Standards C22.1-94, Canadian Electrical Code, Part 1 and C22.2 No. To avoid floor damage, set aside racks and other injury. 2. Remove the shipping materials and tape from inside the bag containing literature. 5. Open the oven door. 8. Oven door latch in unlocked...

Installation Instructions
Page 6
... box through the opening in the cabinet. Lift and pull oven door toward you and remove. Side trims must be removed before servicing. Connect the 2 black wires (B) together using a UL listed wire connector. 3. Feed the flexible cable conduit from home power supply in death, fire, or electrical shock. A A. A B E F G C H D I . Junction box F. UL listed wire connectors H. Connect the 2 white wires (F) together using a UL listed wire connector. 6. Electrical Connection Options Chart If your type of the unit. Make Electrical Connection WARNING Electrical...
... box through the opening in the cabinet. Lift and pull oven door toward you and remove. Side trims must be removed before servicing. Connect the 2 black wires (B) together using a UL listed wire connector. 3. Feed the flexible cable conduit from home power supply in death, fire, or electrical shock. A A. A B E F G C H D I . Junction box F. UL listed wire connectors H. Connect the 2 white wires (F) together using a UL listed wire connector. 6. Electrical Connection Options Chart If your type of the unit. Make Electrical Connection WARNING Electrical...

Installation Instructions
Page 7
... - Cable from oven G. White wires E. Connect the 2 red wires (G) together using a UL listed wire connector. 2. Failure to remove screws attaching the shipping feet. 4. A A. On models with shipping feet, use a Phillips screwdriver to do so can result in back or other injury. 1. Securely fasten oven to grip. Mounting rail B. Oven frame slot B. U.S. Install junction box cover. Use the oven opening as an area to cabinet using the # 8-14 x 1" screws (2 for single oven, 4 for each...
... - Cable from oven G. White wires E. Connect the 2 red wires (G) together using a UL listed wire connector. 2. Failure to remove screws attaching the shipping feet. 4. A A. On models with shipping feet, use a Phillips screwdriver to do so can result in back or other injury. 1. Securely fasten oven to grip. Mounting rail B. Oven frame slot B. U.S. Install junction box cover. Use the oven opening as an area to cabinet using the # 8-14 x 1" screws (2 for single oven, 4 for each...

Installation Instructions
Page 8
... display. If oven(s) does not operate, check the following: ■ Household fuse is connected. ■ See "Troubleshooting" section in the display. 3. Repeat "Check Operation of Single Oven 1. Check that you have all of your oven. If there is free to open the oven door. Check Operation of Single Oven" steps 2-5. Turn power on . Press START. Turn power on . Replace oven racks. 11. Push hinges in as far as they will appear in the Use and Care Guide. 4. Dispose of trim. or circuit breaker...
... display. If oven(s) does not operate, check the following: ■ Household fuse is connected. ■ See "Troubleshooting" section in the display. 3. Repeat "Check Operation of Single Oven 1. Check that you have all of your oven. If there is free to open the oven door. Check Operation of Single Oven" steps 2-5. Turn power on . Press START. Turn power on . Replace oven racks. 11. Push hinges in as far as they will appear in the Use and Care Guide. 4. Dispose of trim. or circuit breaker...

Warranty
Page 1
... or removed from your home of your major appliance. WHIRLPOOL SHALL NOT BE LIABLE FOR INCIDENTAL OR CONSEQUENTIAL DAMAGES. If you may find this information on the model and serial number label located on how to use or when it is installed in an inaccessible location or is not installed in materials or workmanship and is reported to repair or replace appliance light bulbs, air filters...
... or removed from your home of your major appliance. WHIRLPOOL SHALL NOT BE LIABLE FOR INCIDENTAL OR CONSEQUENTIAL DAMAGES. If you may find this information on the model and serial number label located on how to use or when it is installed in an inaccessible location or is not installed in materials or workmanship and is reported to repair or replace appliance light bulbs, air filters...


