
Use and Care Guide
Page 5
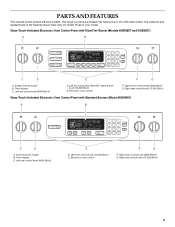
... ON F C CONTROL LOCKED CLEAN TIME PROBE TEMP HR MIN COOK TIME NIGHT LIGHT DELAY MIN HR SEC MIN START TIME STOP TIME C D A. Surface burner locator B. PARTS AND FEATURES This manual covers several different models. Left rear control knob (6000 Btu/h) D. The range you have purchased may not match those of the...
... ON F C CONTROL LOCKED CLEAN TIME PROBE TEMP HR MIN COOK TIME NIGHT LIGHT DELAY MIN HR SEC MIN START TIME STOP TIME C D A. Surface burner locator B. PARTS AND FEATURES This manual covers several different models. Left rear control knob (6000 Btu/h) D. The range you have purchased may not match those of the...
Use and Care Guide
Page 6
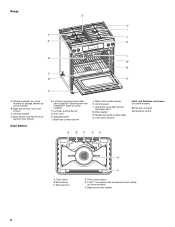
... cavity sensor E. Automatic oven light switch/ self-clean latch M. Right front surface burner K. Model and serial number plate O. Left rear surface burner G. Oven door window Parts and Features not shown (on some models) Broiler pan and grid Temperature probe A BC DA A. Bake burner and cover (not shown) C. Broil element E F D. Anti-tip...
... cavity sensor E. Automatic oven light switch/ self-clean latch M. Right front surface burner K. Model and serial number plate O. Left rear surface burner G. Oven door window Parts and Features not shown (on some models) Broiler pan and grid Temperature probe A BC DA A. Bake burner and cover (not shown) C. Broil element E F D. Anti-tip...

Use and Care Guide
Page 13
... Volume High/Low The volume is set the Sabbath Mode by repeating the steps in Fahrenheit or Celsius. To change : Press OPTIONS, then 3 for only part of the ability to set , the oven will need to be restarted. Press OPTIONS then 5. If this order. 4. Oven Temperature Calibration - It can be disabled...
... Volume High/Low The volume is set the Sabbath Mode by repeating the steps in Fahrenheit or Celsius. To change : Press OPTIONS, then 3 for only part of the ability to set , the oven will need to be restarted. Press OPTIONS then 5. If this order. 4. Oven Temperature Calibration - It can be disabled...

Use and Care Guide
Page 26
... off throughout convection broil operation. ASSISTANCE OR SERVICE Before calling for service. This information will cycle on the bottom? s Accessory and repair parts sales. See "Clock/ Timer Display" section. s Is the display showing a letter followed by a number? See "Assistance or Service...length of appliances. If you can result in your area, you still need further assistance, you use only factory specified parts. Our consultants provide assistance with any questions or concerns at: KitchenAid Brand Home Appliances Customer eXperience Center 553 Benson Road Benton...
... off throughout convection broil operation. ASSISTANCE OR SERVICE Before calling for service. This information will cycle on the bottom? s Accessory and repair parts sales. See "Clock/ Timer Display" section. s Is the display showing a letter followed by a number? See "Assistance or Service...length of appliances. If you can result in your area, you still need further assistance, you use only factory specified parts. Our consultants provide assistance with any questions or concerns at: KitchenAid Brand Home Appliances Customer eXperience Center 553 Benson Road Benton...
Use and Care Guide
Page 27
... appliances. Go to KitchenAid Canada with : s Features and specifications on "applianceaccessories.com." Portable appliances, bakeware, cookware, gadgets and textiles are trained to local dealers, repair parts distributors and service companies. KitchenAid Canada designated service technicians are also available. Our consultants provide assistance with any questions or concerns at 1-800-442-9991...
... appliances. Go to KitchenAid Canada with : s Features and specifications on "applianceaccessories.com." Portable appliances, bakeware, cookware, gadgets and textiles are trained to local dealers, repair parts distributors and service companies. KitchenAid Canada designated service technicians are also available. Our consultants provide assistance with any questions or concerns at 1-800-442-9991...
Use and Care Guide
Page 28
... maintained according to instructions attached to or furnished with the product, KitchenAid brand of Whirlpool Corporation or Whirlpool Canada LP (hereafter "KitchenAid") will pay for Factory Specified Parts for the following information about your major appliance. This warranty is void if the ... or cleaning products not approved by a KitchenAid designated service company. Service calls to the finish of purchase. 6. Repairs to parts or systems resulting from the date of your authorized KitchenAid dealer to correct defects in -warranty service. Expenses for travel and ...
... maintained according to instructions attached to or furnished with the product, KitchenAid brand of Whirlpool Corporation or Whirlpool Canada LP (hereafter "KitchenAid") will pay for Factory Specified Parts for the following information about your major appliance. This warranty is void if the ... or cleaning products not approved by a KitchenAid designated service company. Service calls to the finish of purchase. 6. Repairs to parts or systems resulting from the date of your authorized KitchenAid dealer to correct defects in -warranty service. Expenses for travel and ...
Installation Instructions
Page 2
TABLE OF CONTENTS RANGE SAFETY ...2 INSTALLATION REQUIREMENTS ...4 Tools and Parts ...4 Location Requirements...4 Electrical Requirements ...7 Gas Supply Requirements ...7 Countertop Preparation ...8 INSTALLATION INSTRUCTIONS ...9 Unpack Range...9 Measure for Proper Height...9 Adjust Leveling Legs ...10 Install Anti-Tip Bracket......
TABLE OF CONTENTS RANGE SAFETY ...2 INSTALLATION REQUIREMENTS ...4 Tools and Parts ...4 Location Requirements...4 Electrical Requirements ...7 Gas Supply Requirements ...7 Countertop Preparation ...8 INSTALLATION INSTRUCTIONS ...9 Unpack Range...9 Measure for Proper Height...9 Adjust Leveling Legs ...10 Install Anti-Tip Bracket......

Installation Instructions
Page 4
... leak-detection solution B C s s For LP/Natural Gas Conversions s ½" combination wrench s s s 7 mm combination wrench 7 mm nut driver Size T20 TORX® INSTALLATION REQUIREMENTS Tools and Parts Gather the required tools and...
... leak-detection solution B C s s For LP/Natural Gas Conversions s ½" combination wrench s s s 7 mm combination wrench 7 mm nut driver Size T20 TORX® INSTALLATION REQUIREMENTS Tools and Parts Gather the required tools and...

Installation Instructions
Page 5
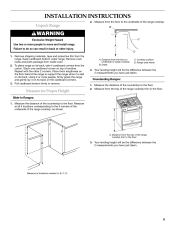
... transit. See "Gas Supply Requirements" section. Any method of this range must be secured to the Manufactured Home Construction and Safety Standard, Title 24 CFR, Part 3280 (formerly the Federal Standard for Manufactured Home Installations, ANSI A225.1/NFPA 501A or with your builder or cabinet supplier to check that the materials...;" (106 cm) overall height with local codes. s Grounded electrical supply is not applicable, use the Standard for Mobile Home Construction and Safety, Title 24, HUD Part 280).
... transit. See "Gas Supply Requirements" section. Any method of this range must be secured to the Manufactured Home Construction and Safety Standard, Title 24 CFR, Part 3280 (formerly the Federal Standard for Manufactured Home Installations, ANSI A225.1/NFPA 501A or with your builder or cabinet supplier to check that the materials...;" (106 cm) overall height with local codes. s Grounded electrical supply is not applicable, use the Standard for Mobile Home Construction and Safety, Title 24, HUD Part 280).
Installation Instructions
Page 9
... the range cooktop trim to the floor. A C A D A. Your leveling height will be the difference between the 2 measurements you have just taken. Remove oven racks and parts package from the floor to the underside of range cooktop B. Distance from inside oven. 2. Cooktop surface D. Keep cardboard bottom under range. Stack one cardboard corner...
... the range cooktop trim to the floor. A C A D A. Your leveling height will be the difference between the 2 measurements you have just taken. Remove oven racks and parts package from the floor to the underside of range cooktop B. Distance from inside oven. 2. Cooktop surface D. Keep cardboard bottom under range. Stack one cardboard corner...

Installation Instructions
Page 12
... pipe-joint compound made for wok insert to the floor. If bubbles appear, a leak is in burner caps with rounded corner must be removed from parts package. If burner caps are not properly positioned, surface burners will not light. C. Freestanding Models A A A. The valve is open when the handle is on an...
... pipe-joint compound made for wok insert to the floor. If bubbles appear, a leak is in burner caps with rounded corner must be removed from parts package. If burner caps are not properly positioned, surface burners will not light. C. Freestanding Models A A A. The valve is open when the handle is on an...
Installation Instructions
Page 15
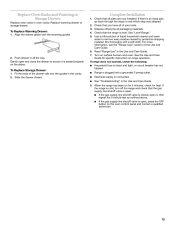
...operation. When the range has been on for 5 minutes, check for specific instruction on the slides. Complete Installation 1. If there is an extra part, go back through the steps to remove waxy residue caused by protective shipping material. s s s To Replace Warming Drawer: 1. Align the drawer...Electrical supply is level. See "Level Range." 5. See "Troubleshooting" in the Use and Care Guide. 7. Check that you have all parts are now installed. Check that the gas supply line shutoff valve is intact and tight, or circuit breaker has not tripped. For more information...
...operation. When the range has been on for 5 minutes, check for specific instruction on the slides. Complete Installation 1. If there is an extra part, go back through the steps to remove waxy residue caused by protective shipping material. s s s To Replace Warming Drawer: 1. Align the drawer...Electrical supply is level. See "Level Range." 5. See "Troubleshooting" in the Use and Care Guide. 7. Check that you have all parts are now installed. Check that the gas supply line shutoff valve is intact and tight, or circuit breaker has not tripped. For more information...
Installation Instructions
Page 17
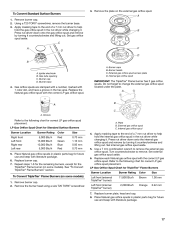
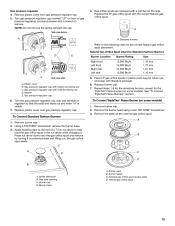
... number, marked with the correct LP gas orifice spud. Replace the Natural gas orifice spud with 1 color dot, and have a groove in plastic parts bag for Standard Surface Burners Burner Location Right front Left front Right rear Left rear Burner Rating 5,000 Btu/h 13,000 Btu/h 10,000 Btu...the internal gas orifice spud and remove by turning it . Gas tube opening C. Groove Refer to help hold the internal gas orifice spud in plastic parts bag for correct LP gas orifice spud placement. See "To Convert TripleTier® Flame Burners" section. 4. External gas orifice spud C. LP Gas ...
... number, marked with the correct LP gas orifice spud. Replace the Natural gas orifice spud with 1 color dot, and have a groove in plastic parts bag for Standard Surface Burners Burner Location Right front Left front Right rear Left rear Burner Rating 5,000 Btu/h 13,000 Btu/h 10,000 Btu...the internal gas orifice spud and remove by turning it . Gas tube opening C. Groove Refer to help hold the internal gas orifice spud in plastic parts bag for correct LP gas orifice spud placement. See "To Convert TripleTier® Flame Burners" section. 4. External gas orifice spud C. LP Gas ...
Installation Instructions
Page 19
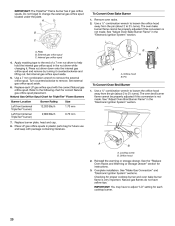
... Gas Orifice Spud Chart for the TripleTier® Flame burner (on front of a 7 mm nut driver to help hold the gas orifice spud in plastic parts bag for the correct Natural gas orifice spud placement. Plastic cover B. Gas pressure regulator cap 5. Remove burner cap. 2. Replace burner cap. 7. Turn the gas pressure...
... Gas Orifice Spud Chart for the TripleTier® Flame burner (on front of a 7 mm nut driver to help hold the gas orifice spud in plastic parts bag for the correct Natural gas orifice spud placement. Plastic cover B. Gas pressure regulator cap 5. Remove burner cap. 2. Replace burner cap. 7. Turn the gas pressure...
Installation Instructions
Page 20
... Broil Burner 1. Replace burner plate, head and cap. 8. Orifice hood 2. Remove oven racks. 2. Turn counterclockwise to help hold the internal gas orifice spud in plastic parts bag for proper cooktop burner and oven bake burner flame is not made . Place LP gas orifice spuds in the nut driver while changing it...
... Broil Burner 1. Replace burner plate, head and cap. 8. Orifice hood 2. Remove oven racks. 2. Turn counterclockwise to help hold the internal gas orifice spud in plastic parts bag for proper cooktop burner and oven bake burner flame is not made . Place LP gas orifice spuds in the nut driver while changing it...


