

Use and Care Guide
Page 3
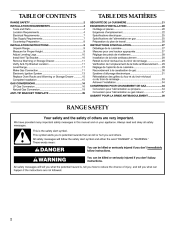
... a chemical known to the State of potential exposure to reduce the chance of injury, and tell you cannot reach your gas supplier, call your appliance. RANGE SAFETY Your safety and the safety of others . Do not store or use any other appliance. - WHAT TO DO IF YOU SMELL GAS: • Do...
... a chemical known to the State of potential exposure to reduce the chance of injury, and tell you cannot reach your gas supplier, call your appliance. RANGE SAFETY Your safety and the safety of others . Do not store or use any other appliance. - WHAT TO DO IF YOU SMELL GAS: • Do...
Use and Care Guide
Page 4
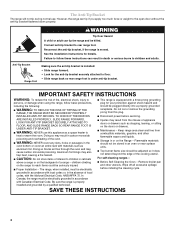
... so may cause carbon monoxide poisoning. Aluminum foil linings may result from this appliance as aluminum foil. children climbing on the Range - s This range is under anti-tip bracket. s Maintenance - s Storage in death or serious burns to follow basic precautions, including the ...following: s WARNING: TO REDUCE THE RISK OF TIPPING OF THE RANGE, THE RANGE MUST BE SECURED BY PROPERLY INSTALLED ANTI-TIP DEVICES. s Top burner flame size should be electrically grounded in accordance with local...
... so may cause carbon monoxide poisoning. Aluminum foil linings may result from this appliance as aluminum foil. children climbing on the Range - s This range is under anti-tip bracket. s Maintenance - s Storage in death or serious burns to follow basic precautions, including the ...following: s WARNING: TO REDUCE THE RISK OF TIPPING OF THE RANGE, THE RANGE MUST BE SECURED BY PROPERLY INSTALLED ANTI-TIP DEVICES. s Top burner flame size should be electrically grounded in accordance with local...
Use and Care Guide
Page 5
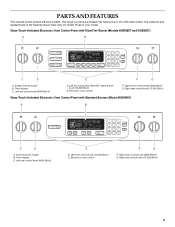
... locator B. Oven display C. Oven display C. Right front control knob (6000 Btu/h) G. Right rear control knob (12,500 Btu/h) 5 Surface burner locator B. Electronic oven control F. The range you have some or all of your model. Electronic oven control F G F. Left front dual valve TripleTier® flame burner knob (15,000 Btu/h) E. The locations...
... locator B. Oven display C. Oven display C. Right front control knob (6000 Btu/h) G. Right rear control knob (12,500 Btu/h) 5 Surface burner locator B. Electronic oven control F. The range you have some or all of your model. Electronic oven control F G F. Left front dual valve TripleTier® flame burner knob (15,000 Btu/h) E. The locations...
Use and Care Guide
Page 6
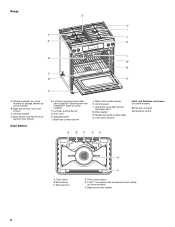
... D. Oven vent H. Broil burner with InstaWok™ Grate on some models) F. Warming drawer (on some models) or storage drawer (on some models) B. Oven cavity sensor E. Range G H I . Right front surface burner K. Door gasket N. Broil burner C. Broil element E F D.
... D. Oven vent H. Broil burner with InstaWok™ Grate on some models) F. Warming drawer (on some models) or storage drawer (on some models) B. Oven cavity sensor E. Range G H I . Right front surface burner K. Door gasket N. Broil burner C. Broil element E F D.
Use and Care Guide
Page 7
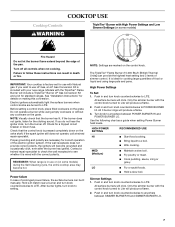
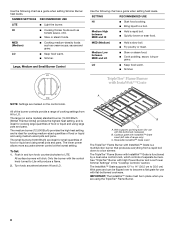
IMPORTANT: Your cooktop is factory-set for use LP Gas, an LP Gas Conversion Kit is included with your new range. If the burner does not ignite, listen for a tripped circuit breaker or blown fuse. If you wish to Lite will become hot. After burner lights,...® Flame Burner will click. Do not operate a burner while using large pots and pans. Check that the burner has lit. REMEMBER: When range is ideal for standard ranges. Hold a lit match near a burner and turn knob counterclockwise to POWER BURNER HI. All surface burners will include a TripleTier® Burner LP ...
IMPORTANT: Your cooktop is factory-set for use LP Gas, an LP Gas Conversion Kit is included with your new range. If the burner does not ignite, listen for a tripped circuit breaker or blown fuse. If you wish to Lite will become hot. After burner lights,...® Flame Burner will click. Do not operate a burner while using large pots and pans. Check that the burner has lit. REMEMBER: When range is ideal for standard ranges. Hold a lit match near a burner and turn knob counterclockwise to POWER BURNER HI. All surface burners will include a TripleTier® Burner LP ...
Use and Care Guide
Page 8
... USE LITE s Light the burner. LO s Keep food warm. MED (Medium) s Hold a slow boil. s Fry poultry or meat. All of the burner controls provide a range of range only) C. All surface burners will produce a flame. 2. MED (Medium) s Cooking medium-density foods such as tomato sauce, chili. Use the following chart as a guide when...
... USE LITE s Light the burner. LO s Keep food warm. MED (Medium) s Hold a slow boil. s Fry poultry or meat. All of the burner controls provide a range of range only) C. All surface burners will produce a flame. 2. MED (Medium) s Cooking medium-density foods such as tomato sauce, chili. Use the following chart as a guide when...
Use and Care Guide
Page 9
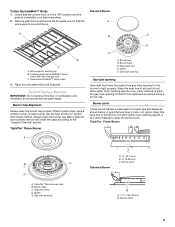
Sealed Surface Burners IMPORTANT: Do not obstruct the flow of range only) C. Burner Cap Alignment Always keep the burner cap properly fitted in color, not yellow. TripleTier® Flame Burner E C A. TripleTier® flame burner caps B. Gas ...
Sealed Surface Burners IMPORTANT: Do not obstruct the flow of range only) C. Burner Cap Alignment Always keep the burner cap properly fitted in color, not yellow. TripleTier® Flame Burner E C A. TripleTier® flame burner caps B. Gas ...

Use and Care Guide
Page 12
If a function has been started function. The Control Lock feature may be used either when the range is a 12-hour clock. When the control is selected, "START?" Press CLOCK SET/START. 2. Press number pads to avoid unintended use or turned off . Press ...
If a function has been started function. The Control Lock feature may be used either when the range is a 12-hour clock. When the control is selected, "START?" Press CLOCK SET/START. 2. Press number pads to avoid unintended use or turned off . Press ...

Use and Care Guide
Page 13
...;F (-10°C) ...moderately less -30°F (-15°C) ...much less To Adjust Oven Temperature Calibration: 1. Use the following chart. Close the oven door. 2. The dehydrating range can be disabled of a minus sign means the oven will appear lit on in the previous "To Activate" section. Press START. 4. However, some foods may...
...;F (-10°C) ...moderately less -30°F (-15°C) ...much less To Adjust Oven Temperature Calibration: 1. Use the following chart. Close the oven door. 2. The dehydrating range can be disabled of a minus sign means the oven will appear lit on in the previous "To Activate" section. Press START. 4. However, some foods may...
Use and Care Guide
Page 14
The bake range can be set between 170°F and 500°F (77°C and 260°C). 2. Temperature Change The oven temperature can be changed until desired temperature ...°C) 0 450°F (232°C) To Change Temperature: 1. The oven will begin a bake cycle. 3. The oven control will not turn off . Press BAKE. The bake range can result in death to the oven bottom finish, do not block or cover the oven bottom vents. s Do not cover entire rack with bottom...
The bake range can be set between 170°F and 500°F (77°C and 260°C). 2. Temperature Change The oven temperature can be changed until desired temperature ...°C) 0 450°F (232°C) To Change Temperature: 1. The oven will begin a bake cycle. 3. The oven control will not turn off . Press BAKE. The bake range can result in death to the oven bottom finish, do not block or cover the oven bottom vents. s Do not cover entire rack with bottom...

Use and Care Guide
Page 16
.... Make sure that could melt or burn near the oven vent. They will come back on the oven door or bottom. For baking, allow the range to circulate. See "General Cleaning" section to preheat before turning on each rack. s Make sure racks are level. When roasting, it out to 2 minutes. Press...
.... Make sure that could melt or burn near the oven vent. They will come back on the oven door or bottom. For baking, allow the range to circulate. See "General Cleaning" section to preheat before turning on each rack. s Make sure racks are level. When roasting, it out to 2 minutes. Press...
Use and Care Guide
Page 17
Broil This range has both a gas burner and an electric halo element that surface areas remain exposed to the circulating air, allowing browning and crisping. s Use only the ... loss of food using both the gas burner and electric halo elements for CENTER BROIL. s For proper draining, do not cover the grid with the range. s Trim excess fat to ensure proper broiling operation. Very thin cuts of foods. Press BROIL once for FULL BROIL or twice for maximum browning coverage...
Broil This range has both a gas burner and an electric halo element that surface areas remain exposed to the circulating air, allowing browning and crisping. s Use only the ... loss of food using both the gas burner and electric halo elements for CENTER BROIL. s For proper draining, do not cover the grid with the range. s Trim excess fat to ensure proper broiling operation. Very thin cuts of foods. Press BROIL once for FULL BROIL or twice for maximum browning coverage...

Use and Care Guide
Page 18
...convection baking, position racks according to enter standard cook temperature. 3. Press CONVECT BAKE. It is under 170°F (77°C). The convection roast range can be set between 170°F and 500°F (77°C and 260°C). 18 Press number pads to the "Positioning Racks and ... 325°F (162°C). This holds the food above the grid and allows air to circulate completely around all surfaces. Allow the range to preheat before placing food in the display until the set temperature is opened during convection baking or preheating, the convection burner and fan...
...convection baking, position racks according to enter standard cook temperature. 3. Press CONVECT BAKE. It is under 170°F (77°C). The convection roast range can be set between 170°F and 500°F (77°C and 260°C). 18 Press number pads to the "Positioning Racks and ... 325°F (162°C). This holds the food above the grid and allows air to circulate completely around all surfaces. Allow the range to preheat before placing food in the display until the set temperature is opened during convection baking or preheating, the convection burner and fan...

Use and Care Guide
Page 19
... rack position and temperature and may need to maintain oven temperature, while the fan constantly circulates the hot air. INTERNAL FOOD TEMP. The convection broil range can be adjusted. 2. Press CONVECT BROIL. Press START. "Preheating" will also appear in intervals to be set temperature is closed. When the set between 300...
... rack position and temperature and may need to maintain oven temperature, while the fan constantly circulates the hot air. INTERNAL FOOD TEMP. The convection broil range can be adjusted. 2. Press CONVECT BROIL. Press START. "Preheating" will also appear in intervals to be set temperature is closed. When the set between 300...

Use and Care Guide
Page 21
... Crust Double Crust LOW LOW Pizza MED HI Potatoes, Baked MED HI Quiche MED Roast, Boneless MED HI Roasted Chicken MED HI Soft Rolls LOW RANGE CARE Self-Cleaning Cycle WARNING Burn Hazard Do not touch the oven during the Self-Cleaning cycle. See "General Cleaning" section for a good seal. Do...
... Crust Double Crust LOW LOW Pizza MED HI Potatoes, Baked MED HI Quiche MED Roast, Boneless MED HI Roasted Chicken MED HI Soft Rolls LOW RANGE CARE Self-Cleaning Cycle WARNING Burn Hazard Do not touch the oven during the Self-Cleaning cycle. See "General Cleaning" section for a good seal. Do...
Use and Care Guide
Page 23
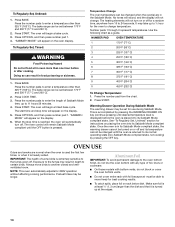
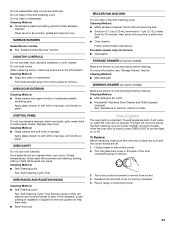
... s Steel-wool pad BROILER PAN AND GRID Do not clean in dishwasher. It will not work during the Self-Cleaning cycle (on or off . 1. Unplug range or disconnect power. 2. Plug in the Self-Cleaning cycle. Cleaning Method: s Glass cleaner and soft cloth or sponge: Apply glass cleaner to soft cloth or...CONTROLS Do not use oven cleaners. s Solution of the oven counterclockwise to remove. Replace bulb and bulb cover by turning clockwise. 5. Do not clean in range or reconnect power. 23 Cleaning Method: s Soap and water or dishwasher: Pull knobs straight away from socket. 4.
... s Steel-wool pad BROILER PAN AND GRID Do not clean in dishwasher. It will not work during the Self-Cleaning cycle (on or off . 1. Unplug range or disconnect power. 2. Plug in the Self-Cleaning cycle. Cleaning Method: s Glass cleaner and soft cloth or sponge: Apply glass cleaner to soft cloth or...CONTROLS Do not use oven cleaners. s Solution of the oven counterclockwise to remove. Replace bulb and bulb cover by turning clockwise. 5. Do not clean in range or reconnect power. 23 Cleaning Method: s Soap and water or dishwasher: Pull knobs straight away from socket. 4.

Use and Care Guide
Page 24
Oven Door For normal range use, it is not suggested to remove the drawer. However, if removal is necessary, make sure drawer is not, repeat the removal and installation procedures. 4. ...
Oven Door For normal range use, it is not suggested to remove the drawer. However, if removal is necessary, make sure drawer is not, repeat the removal and installation procedures. 4. ...
Use and Care Guide
Page 25
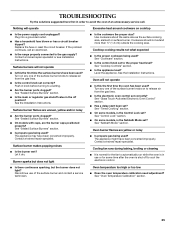
s Has a household fuse blown or has a circuit breaker tripped? s Is the range properly connected to a setting. s Are the burner ports clogged? Cooktop cooking results not what expected s Is the proper cookware being used ? See "Cooktop Controls" section. ...
s Has a household fuse blown or has a circuit breaker tripped? s Is the range properly connected to a setting. s Are the burner ports clogged? Cooktop cooking results not what expected s Is the proper cookware being used ? See "Cooktop Controls" section. ...
Use and Care Guide
Page 28
... or other than normal, single-family household use your major appliance, to instruct you on the product. KITCHENAID® GAS RANGE WARRANTY LIMITED WARRANTY For one year from the date of purchase, when this major appliance is operated and maintained according to instructions... attached to or furnished with the product, KitchenAid brand of Whirlpool Corporation or Whirlpool Canada LP (hereafter "KitchenAid") will pay for Factory Specified Parts for the following information about your major appliance for repairs...
... or other than normal, single-family household use your major appliance, to instruct you on the product. KITCHENAID® GAS RANGE WARRANTY LIMITED WARRANTY For one year from the date of purchase, when this major appliance is operated and maintained according to instructions... attached to or furnished with the product, KitchenAid brand of Whirlpool Corporation or Whirlpool Canada LP (hereafter "KitchenAid") will pay for Factory Specified Parts for the following information about your major appliance for repairs...
Installation Instructions
Page 2
... for Proper Height...9 Adjust Leveling Legs ...10 Install Anti-Tip Bracket...10 Remove Warming or Storage Drawer...11 Verify Anti-Tip Bracket Location ...11 Level Range...11 Make Gas Connection ...11 Electronic Ignition System ...13 Replace Oven Racks and Warming or Storage Drawer ...15 Complete Installation ...15 GAS CONVERSIONS...16 LP...
... for Proper Height...9 Adjust Leveling Legs ...10 Install Anti-Tip Bracket...10 Remove Warming or Storage Drawer...11 Verify Anti-Tip Bracket Location ...11 Level Range...11 Make Gas Connection ...11 Electronic Ignition System ...13 Replace Oven Racks and Warming or Storage Drawer ...15 Complete Installation ...15 GAS CONVERSIONS...16 LP...


