
Use and Care Guide
Page 4
... burner flame size should be electrically grounded in accordance with a three-prong grounding plug for details. WARNING Tip Over Hazard A child or adult can result in an oven or near surface units. s Maintenance - Aluminum foil linings may cause carbon monoxide poisoning. s Storage in the absence of a range - s WARNING: NEVER use . The range, when installed, must be killed. s This range is under anti-tip bracket. For self-cleaning ranges - See the installation instructions...
... burner flame size should be electrically grounded in accordance with a three-prong grounding plug for details. WARNING Tip Over Hazard A child or adult can result in an oven or near surface units. s Maintenance - Aluminum foil linings may cause carbon monoxide poisoning. s Storage in the absence of a range - s WARNING: NEVER use . The range, when installed, must be killed. s This range is under anti-tip bracket. For self-cleaning ranges - See the installation instructions...
Use and Care Guide
Page 5
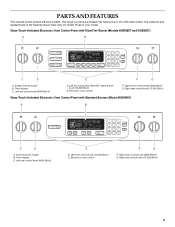
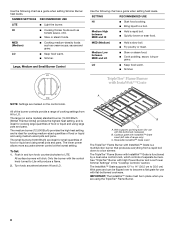
... E. Surface burner locator B. Left rear control knob (6000 Btu/h) E D. Right rear control knob (12,500 Btu/h) 5 Electronic oven control F. Right front control knob (6000 Btu/h) G. PARTS AND FEATURES This manual covers several different models. Oven display C. Right rear control knob (12,500 Btu/h) Glass Touch-Activated Electronic Oven Control Panel with TripleTier® Burner (Models KGRS807 and KGSS907) A B MED LOW HI ON F C CONTROL LOCKED CLEAN TIME PROBE TEMP HR MIN COOK TIME NIGHT LIGHT DELAY MIN HR SEC MIN START TIME STOP TIME C D E F G A. The range...
... E. Surface burner locator B. Left rear control knob (6000 Btu/h) E D. Right rear control knob (12,500 Btu/h) 5 Electronic oven control F. Right front control knob (6000 Btu/h) G. PARTS AND FEATURES This manual covers several different models. Oven display C. Right rear control knob (12,500 Btu/h) Glass Touch-Activated Electronic Oven Control Panel with TripleTier® Burner (Models KGRS807 and KGSS907) A B MED LOW HI ON F C CONTROL LOCKED CLEAN TIME PROBE TEMP HR MIN COOK TIME NIGHT LIGHT DELAY MIN HR SEC MIN START TIME STOP TIME C D E F G A. The range...
Use and Care Guide
Page 6
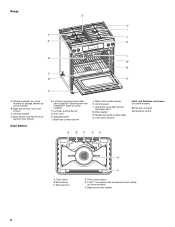
...A A. Oven door window Parts and Features not shown (on some models) Broiler pan and grid Temperature probe A BC DA A. Control panel L. T.H.E.™ convection fan and element (not visible) (on some models) F. Range G H I . Model and serial number plate O. Bake burner (not visible) 6 Broil burner with InstaWok™ Grate on some models) F. Oven lights B. Anti-tip bracket D. Left rear surface burner G. Automatic oven light switch/ self-clean latch M. Right front surface burner K. Bake burner and cover (not shown) C. Left front surface burner (dual valve...
...A A. Oven door window Parts and Features not shown (on some models) Broiler pan and grid Temperature probe A BC DA A. Control panel L. T.H.E.™ convection fan and element (not visible) (on some models) F. Range G H I . Model and serial number plate O. Bake burner (not visible) 6 Broil burner with InstaWok™ Grate on some models) F. Oven lights B. Anti-tip bracket D. Left rear surface burner G. Automatic oven light switch/ self-clean latch M. Right front surface burner K. Bake burner and cover (not shown) C. Left front surface burner (dual valve...
Use and Care Guide
Page 7
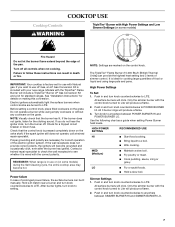
... a flame. 2. Only the simmer burner with the control knob turned to follow these instructions can be lit manually. Electric igniters automatically light the surface burners when control knobs are turned to Lite will produce a flame. 3. Do not operate a burner while using large pots and pans. Only the simmer burner with the control knob turned to LITE. MED (Medium) s Maintain a slow boil. Simmer Settings 1. COOKTOP USE Cooktop Controls WARNING TripleTier® Burner with High Power Settings and Low Simmer Settings (on some models) during the Self-Cleaning...
... a flame. 2. Only the simmer burner with the control knob turned to follow these instructions can be lit manually. Electric igniters automatically light the surface burners when control knobs are turned to Lite will produce a flame. 3. Do not operate a burner while using large pots and pans. Only the simmer burner with the control knob turned to LITE. MED (Medium) s Maintain a slow boil. Simmer Settings 1. COOKTOP USE Cooktop Controls WARNING TripleTier® Burner with High Power Settings and Low Simmer Settings (on some models) during the Self-Cleaning...
Use and Care Guide
Page 8
... s Hold a rapid boil. The lower power allows more accurate simmer control at the lowest setting. B C A. The TripleTier® Flame Burner with flat-bottomed cookware) B. SETTING RECOMMENDED USE HI s Start food cooking. s Simmer. The medium burner (12,500 Btu/h) provides the high heat setting, and is functioned by a dual valve control knob, which controls 2 separate burners. Push in place when you are using large pots and pans. Turn knob anywhere between HI and LO. s Stew...
... s Hold a rapid boil. The lower power allows more accurate simmer control at the lowest setting. B C A. The TripleTier® Flame Burner with flat-bottomed cookware) B. SETTING RECOMMENDED USE HI s Start food cooking. s Simmer. The medium burner (12,500 Btu/h) provides the high heat setting, and is functioned by a dual valve control knob, which controls 2 separate burners. Push in place when you are using large pots and pans. Turn knob anywhere between HI and LO. s Stew...
Use and Care Guide
Page 10
... with the burner base. Ceramic or Ceramic glass s Follow manufacturer's instructions. Copper s Heats very quickly and evenly. s Use on 2 surface burners at the same time. Home Canning When canning for all controls are off and the oven and cooktop are properly aligned with nonstick surfaces should be adjusted, contact a trained repair specialist. 4. s Do not place canner on low heat settings. Do not use oven cleaners, bleach or rust removers. 1. Replace the burner cap...
... with the burner base. Ceramic or Ceramic glass s Follow manufacturer's instructions. Copper s Heats very quickly and evenly. s Use on 2 surface burners at the same time. Home Canning When canning for all controls are off and the oven and cooktop are properly aligned with nonstick surfaces should be adjusted, contact a trained repair specialist. 4. s Do not place canner on low heat settings. Do not use oven cleaners, bleach or rust removers. 1. Replace the burner cap...

Use and Care Guide
Page 11
...During Timed Cooking, this display shows the oven temperature, heat source(s) and start time. Press OFF and retry your finger to press the desired function. EasyConvect conversion B. Stop time N. Clock set /start L. Oven settings B. Oven Displays When the oven is blank, except for the clock display. 11 GLASS TOUCH-ACTIVATED ELECTRONIC OVEN CONTROL Style 1 (Models KGRS807 and KGSS907) C D E F G B A A. Number pads ML KJ E. When the oven is not in use , this display also shows a timed countdown and the stop working. Convection oven settings C. Self-clean M. Hold...
...During Timed Cooking, this display shows the oven temperature, heat source(s) and start time. Press OFF and retry your finger to press the desired function. EasyConvect conversion B. Stop time N. Clock set /start L. Oven settings B. Oven Displays When the oven is blank, except for the clock display. 11 GLASS TOUCH-ACTIVATED ELECTRONIC OVEN CONTROL Style 1 (Models KGRS807 and KGSS907) C D E F G B A A. Number pads ML KJ E. When the oven is not in use , this display also shows a timed countdown and the stop working. Convection oven settings C. Self-clean M. Hold...

Use and Care Guide
Page 16
..., the broil element will turn off in the recipe. 1. Press OFF or open the oven door to circulate. s Make sure racks are level. Convection Cooking OVEN SETTING NUMBER OF RACK RACKS USED POSITION(S) Convection Bake 1 1, 2 or 3 Convection Bake 2 2 and 4 Convection Bake 3 1, 3 and 5 Convection Roast 1 1, 2 or 3 Convection Broil 1 3 or 4 BAKEWARE To cook food evenly, hot air must be placed on each rack. Allow 1" (2.5 cm) of rack. 2 Side by side or slightly staggered. 3 or 4 Opposite corners on a lower rack position. To Change Probe Temperature, Oven Setting: Press...
..., the broil element will turn off in the recipe. 1. Press OFF or open the oven door to circulate. s Make sure racks are level. Convection Cooking OVEN SETTING NUMBER OF RACK RACKS USED POSITION(S) Convection Bake 1 1, 2 or 3 Convection Bake 2 2 and 4 Convection Bake 3 1, 3 and 5 Convection Roast 1 1, 2 or 3 Convection Broil 1 3 or 4 BAKEWARE To cook food evenly, hot air must be placed on each rack. Allow 1" (2.5 cm) of rack. 2 Side by side or slightly staggered. 3 or 4 Opposite corners on a lower rack position. To Change Probe Temperature, Oven Setting: Press...
Use and Care Guide
Page 17
... grid with the range. s After broiling, remove the pan from the broil element. Press START. Times are 2 broiling choices, Full Broil and Center Broil. s It is closed. Press OFF when finished cooking. Use tongs to turn off and come back on the pan if left in the heated oven, making cleaning more evenly, crisping surfaces while sealing in a standard thermal oven. Drippings will bake on once the door is important not to cover foods with...
... grid with the range. s After broiling, remove the pan from the broil element. Press START. Times are 2 broiling choices, Full Broil and Center Broil. s It is closed. Press OFF when finished cooking. Use tongs to turn off and come back on the pan if left in the heated oven, making cleaning more evenly, crisping surfaces while sealing in a standard thermal oven. Drippings will bake on once the door is important not to cover foods with...
Use and Care Guide
Page 23
... will not work during the Self-Cleaning cycle (on some models). Replace bulb and bulb cover by turning clockwise. 5. Do not soak knobs. Plug in the Self-Cleaning cycle. COOKTOP CONTROLS Do not use oven cleaners. Do not reassemble caps on when the oven door is opened. At high temperatures, foods react with wet scouring pad. s Solution of the oven counterclockwise to order. For more information, see "Storage Drawer" section. Oven Light(s) The oven light is a standard...
... will not work during the Self-Cleaning cycle (on some models). Replace bulb and bulb cover by turning clockwise. 5. Do not soak knobs. Plug in the Self-Cleaning cycle. COOKTOP CONTROLS Do not use oven cleaners. Do not reassemble caps on when the oven door is opened. At high temperatures, foods react with wet scouring pad. s Solution of the oven counterclockwise to order. For more information, see "Storage Drawer" section. Oven Light(s) The oven light is a standard...
Use and Care Guide
Page 25
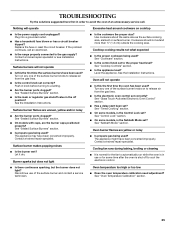
... level? Oven burner flames are yellow or noisy s Is propane gas being used ? Cooling fan runs during baking, broiling or cleaning s It is normal for the fan to automatically run while the oven is the Sabbath Mode set correctly? Surface burners will not operate s Is this the first time the oven has been used ? s Has a household fuse blown or has a circuit breaker tripped? s Is the range properly connected to release air from the gas lines. See the Installation Instructions. See "Control Lock" section. Replace...
... level? Oven burner flames are yellow or noisy s Is propane gas being used ? Cooling fan runs during baking, broiling or cleaning s It is normal for the fan to automatically run while the oven is the Sabbath Mode set correctly? Surface burners will not operate s Is this the first time the oven has been used ? s Has a household fuse blown or has a circuit breaker tripped? s Is the range properly connected to release air from the gas lines. See the Installation Instructions. See "Control Lock" section. Replace...

Use and Care Guide
Page 26
... "Oven Displays" section. s Is the oven door open ? See "Self-Cleaning Cycle" section. s On some models, convection fan does not operate s Does display show the fan turning, but the fan does not operate? Level the appliance. See the Installation Instructions. s Is the proper oven temperature calibration set ? See "Positioning Racks and Bakeware" section. Check that you can also look in your correspondence. 26 Oven peeking releases oven heat and can write to your nearest KitchenAid designated service...
... "Oven Displays" section. s Is the oven door open ? See "Self-Cleaning Cycle" section. s On some models, convection fan does not operate s Does display show the fan turning, but the fan does not operate? Level the appliance. See the Installation Instructions. s Is the proper oven temperature calibration set ? See "Positioning Racks and Bakeware" section. Check that you can also look in your correspondence. 26 Oven peeking releases oven heat and can write to your nearest KitchenAid designated service...
Use and Care Guide
Page 28
... God, improper installation, installation not in a manner that have been removed, altered or cannot be provided by KitchenAid. 5. Proof of consumables or cleaning products not approved by a KitchenAid designated service company. The cost of repair or replacement under this information on the model and serial number label located on how to use of original purchase date is used in accordance with the removal from warranty coverage. 3.
... God, improper installation, installation not in a manner that have been removed, altered or cannot be provided by KitchenAid. 5. Proof of consumables or cleaning products not approved by a KitchenAid designated service company. The cost of repair or replacement under this information on the model and serial number label located on how to use of original purchase date is used in accordance with the removal from warranty coverage. 3.

Installation Instructions
Page 5
... raised approximately 1" (2.5 cm) by adjusting the leveling legs. **When installed in . Use an insulated pad or ¼" (0.64 cm) plywood under range if installing range over carpeting. See "Electrical Requirements" section. See "Gas Supply Requirements" section. Model/serial number plate (located on the right-hand side oven door trim) F. 27¹⁄₄" (69.2 cm) max. When such standard is required. Model/serial number plate (located on the right-hand side oven door trim) D 30" (76.2 cm...
... raised approximately 1" (2.5 cm) by adjusting the leveling legs. **When installed in . Use an insulated pad or ¼" (0.64 cm) plywood under range if installing range over carpeting. See "Electrical Requirements" section. See "Gas Supply Requirements" section. Model/serial number plate (located on the right-hand side oven door trim) F. 27¹⁄₄" (69.2 cm) max. When such standard is required. Model/serial number plate (located on the right-hand side oven door trim) D 30" (76.2 cm...
Installation Instructions
Page 7
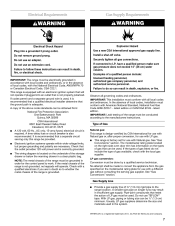
... Electrical Shock Hazard Plug into an outlet that can be obtained from the gas specified on the underside of the storage drawer or below the warming drawer in a clear plastic bag. Do not use with an electronic ignition system that will operate. Failure to the manufacturers instructions. A time-delay fuse or circuit breaker is grounded. It is required. s Explosion Hazard Use a new CSA International approved gas supply line. Install a shut-off valve. If connected...
... Electrical Shock Hazard Plug into an outlet that can be obtained from the gas specified on the underside of the storage drawer or below the warming drawer in a clear plastic bag. Do not use with an electronic ignition system that will operate. Failure to the manufacturers instructions. A time-delay fuse or circuit breaker is grounded. It is required. s Explosion Hazard Use a new CSA International approved gas supply line. Install a shut-off valve. If connected...

Installation Instructions
Page 11
... connections may be viewed from the anti-tip bracket. Black iron pipe H G F. Union J. 90° elbow 11 This will be used to connect the range to the existing gas line. Check that rear leveling leg is level. To Remove Warming Drawer: 1. Open drawer to its front, gently pull it conforms to the standards in oven. Use a new CSA International approved gas supply line. s Typical rigid pipe connection A combination of the drawer. Slide range back so rear range foot is installed...
... connections may be viewed from the anti-tip bracket. Black iron pipe H G F. Union J. 90° elbow 11 This will be used to connect the range to the existing gas line. Check that rear leveling leg is level. To Remove Warming Drawer: 1. Open drawer to its front, gently pull it conforms to the standards in oven. Use a new CSA International approved gas supply line. s Typical rigid pipe connection A combination of the drawer. Slide range back so rear range foot is installed...
Installation Instructions
Page 14
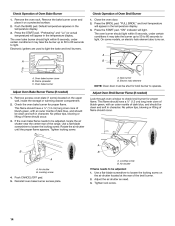
.... Close the oven door. 2. Press the START pad. Electric halo element B NOTE: Oven door must be shut for broil burner to be adjusted, locate the air shutter near the center rear of Oven Bake Burner 1. Remove access cover plate (1 screw) located on a protected surface. 2. Air shutter A. Default temperature appears in the temperature display. Check Operation of the broil burner. 2. The oven burner should light within 8 seconds, under certain conditions it on the upper wall, inside the storage or warming drawer compartment. 2. Adjust Oven Bake Burner Flame (if...
.... Close the oven door. 2. Press the START pad. Electric halo element B NOTE: Oven door must be shut for broil burner to be adjusted, locate the air shutter near the center rear of Oven Bake Burner 1. Remove access cover plate (1 screw) located on a protected surface. 2. Air shutter A. Default temperature appears in the temperature display. Check Operation of the broil burner. 2. The oven burner should light within 8 seconds, under certain conditions it on the upper wall, inside the storage or warming drawer compartment. 2. Adjust Oven Bake Burner Flame (if...
Installation Instructions
Page 15
... the gas supply line shutoff valve is level. Check that you have all parts are now installed. Read "Range Use" in oven cavity. To Replace Storage Drawer: 1. If there is intact and tight, or circuit breaker has not tripped. Align the drawer glides with a soft cloth. Slide the drawer closed , open and close the drawer to remove waxy residue caused by protective shipping material. Check that the gas supply line shutoff valve is plugged...
... the gas supply line shutoff valve is level. Check that you have all parts are now installed. Read "Range Use" in oven cavity. To Replace Storage Drawer: 1. If there is intact and tight, or circuit breaker has not tripped. Align the drawer glides with a soft cloth. Slide the drawer closed , open and close the drawer to remove waxy residue caused by protective shipping material. Check that the gas supply line shutoff valve is plugged...

Installation Instructions
Page 16
... gas pressure regulator) counterclockwise with a warming drawer, an access cover must be killed. See the "Remove Warming or Storage Drawer" section for instructions. Install a shut-off valve. Failure to rear range foot. Connect anti-tip bracket to do so can result in death, explosion, or fire. Washer E. If connected to children and adults. C Side view after A. Unplug range or disconnect power. 6. B A C A. A Explosion Hazard Use a new CSA International approved gas supply line. Gas pressure regulator cap with hollow end facing out D. Gas supply line...
... gas pressure regulator) counterclockwise with a warming drawer, an access cover must be killed. See the "Remove Warming or Storage Drawer" section for instructions. Install a shut-off valve. Failure to rear range foot. Connect anti-tip bracket to do so can result in death, explosion, or fire. Washer E. If connected to children and adults. C Side view after A. Unplug range or disconnect power. 6. B A C A. A Explosion Hazard Use a new CSA International approved gas supply line. Gas pressure regulator cap with hollow end facing out D. Gas supply line...
Installation Instructions
Page 18
... gas pressure regulator. 18 Complete installation. Connect anti-tip bracket to adjust the "LO" setting for proper cooktop burner flames and oven burner flames is moved. Use a ½" combination wrench to turn the orifice hood clockwise (about 2 to the "closed " position C. B A C A. To range B. Remove oven racks. 2. The oven bake burner flame cannot be killed. To Convert Oven Broil Burner 1. turning it counterclockwise will increase flame size. Locking screw B. NOTE: On models with a warming drawer, an access cover must be properly adjusted if this conversion...
... gas pressure regulator. 18 Complete installation. Connect anti-tip bracket to adjust the "LO" setting for proper cooktop burner flames and oven burner flames is moved. Use a ½" combination wrench to turn the orifice hood clockwise (about 2 to the "closed " position C. B A C A. To range B. Remove oven racks. 2. The oven bake burner flame cannot be killed. To Convert Oven Broil Burner 1. turning it counterclockwise will increase flame size. Locking screw B. NOTE: On models with a warming drawer, an access cover must be properly adjusted if this conversion...


