
Use and Care Guide
Page 5
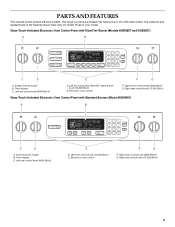
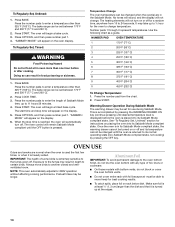
... TIME STOP TIME C D E F G A. Oven display C. Right front control knob (6000 Btu/h) G. PARTS AND FEATURES This manual covers several different models. Surface burner locator B. Electronic oven control F. Right rear control knob (12,500 Btu/h) 5 Left front control knob (14,000 Btu/h) E. Electronic oven... control F G F. Glass Touch-Activated Electronic Oven Control Panel with Standard Burners (Model KGSK901) A B MED LOW HI ON F C CONTROL LOCKED CLEAN TIME PROBE TEMP HR MIN COOK TIME NIGHT LIGHT DELAY MIN HR ...
... TIME STOP TIME C D E F G A. Oven display C. Right front control knob (6000 Btu/h) G. PARTS AND FEATURES This manual covers several different models. Surface burner locator B. Electronic oven control F. Right rear control knob (12,500 Btu/h) 5 Left front control knob (14,000 Btu/h) E. Electronic oven... control F G F. Glass Touch-Activated Electronic Oven Control Panel with Standard Burners (Model KGSK901) A B MED LOW HI ON F C CONTROL LOCKED CLEAN TIME PROBE TEMP HR MIN COOK TIME NIGHT LIGHT DELAY MIN HR ...
Use and Care Guide
Page 6
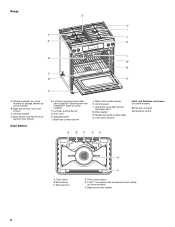
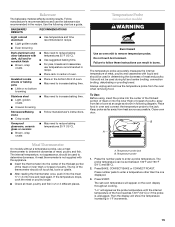
... A BC DA A. T.H.E.™ convection fan and element (not visible) (on some models) F. Bake burner (not visible) 6 Warming drawer (on some models) or storage drawer (on some models) B. Broil burner with InstaWok™ Grate on some models) F. Automatic oven light switch/ self-clean latch M. Model and serial number plate O. Broil element E F D. Range G H I . Oven vent H. Oven cavity...
... A BC DA A. T.H.E.™ convection fan and element (not visible) (on some models) F. Bake burner (not visible) 6 Warming drawer (on some models) or storage drawer (on some models) B. Broil burner with InstaWok™ Grate on some models) F. Automatic oven light switch/ self-clean latch M. Model and serial number plate O. Broil element E F D. Range G H I . Oven vent H. Oven cavity...
Use and Care Guide
Page 7
... a burner while using large pots and pans. Check for details on making this conversion. REMEMBER: When range is pressed completely down on some models) OFF Lite SHIMi MEMReBdURLNoER R Lo Fire Hazard Do not let the burner flame extend beyond the edge of the pan. It is included with.... 2. If you do not hear the igniter click, turn the burner off all controls when not cooking. Models with Natural gas. Before setting a control knob, place filled cookware on some models) during the Self-Cleaning cycle, the entire cooktop area may become grounded and occasionally click, even after the ...
... a burner while using large pots and pans. Check for details on making this conversion. REMEMBER: When range is pressed completely down on some models) OFF Lite SHIMi MEMReBdURLNoER R Lo Fire Hazard Do not let the burner flame extend beyond the edge of the pan. It is included with.... 2. If you do not hear the igniter click, turn the burner off all controls when not cooking. Models with Natural gas. Before setting a control knob, place filled cookware on some models) during the Self-Cleaning cycle, the entire cooktop area may become grounded and occasionally click, even after the ...
Use and Care Guide
Page 8
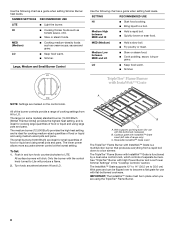
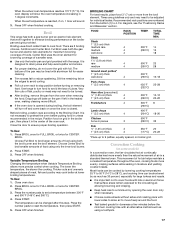
... range only) C. SIMMER SETTINGS RECOMMENDED USE LITE s Light the burner. All surface burners will produce a flame. 2. The small burners (6,000 Btu/h) are marked on some models) standard burner (14,000 Btu/h [British Thermal Units]) provides the highest heat setting, and is a multifunction burner that produces everything from HI to LO. Cooktop...
... range only) C. SIMMER SETTINGS RECOMMENDED USE LITE s Light the burner. All surface burners will produce a flame. 2. The small burners (6,000 Btu/h) are marked on some models) standard burner (14,000 Btu/h [British Thermal Units]) provides the highest heat setting, and is a multifunction burner that produces everything from HI to LO. Cooktop...

Use and Care Guide
Page 11
... pad should function again as normal. Clock/time of day display D. Off J. Stop time N. Self-clean P. GLASS TOUCH-ACTIVATED ELECTRONIC OVEN CONTROL Style 1 (Models KGRS807 and KGSS907) C D E F G B A A. Start (control lock) F. If "Err" appears on the Electronic Oven Control, use this display... I Q P O NM L G. Oven settings D. Oven display C. EasyConvect conversion B. Clock set /start L. Clock/time of day display Style 2 (Model KGSK901) MED LOW HI ON F C CONTROL LOCKED CLEAN TIME PROBE TEMP HR MIN COOK TIME NIGHT LIGHT DELAY MIN HR SEC MIN START TIME STOP...
... pad should function again as normal. Clock/time of day display D. Off J. Stop time N. Self-clean P. GLASS TOUCH-ACTIVATED ELECTRONIC OVEN CONTROL Style 1 (Models KGRS807 and KGSS907) C D E F G B A A. Start (control lock) F. If "Err" appears on the Electronic Oven Control, use this display... I Q P O NM L G. Oven settings D. Oven display C. EasyConvect conversion B. Clock set /start L. Clock/time of day display Style 2 (Model KGSK901) MED LOW HI ON F C CONTROL LOCKED CLEAN TIME PROBE TEMP HR MIN COOK TIME NIGHT LIGHT DELAY MIN HR SEC MIN START TIME STOP...

Use and Care Guide
Page 12
... pressed within 5 seconds, the oven display will scroll through the various options, starting at 1 and ending in the display after 5 seconds. will appear on convection models. The Control Lock feature may be canceled. When the control is in minutes and seconds or hours and minutes and counts down the control panel...
... pressed within 5 seconds, the oven display will scroll through the various options, starting at 1 and ending in the display after 5 seconds. will appear on convection models. The Control Lock feature may be canceled. When the control is in minutes and seconds or hours and minutes and counts down the control panel...

Use and Care Guide
Page 13
... cycling may cook faster or slower than 12 hours to clear the display. To Deactivate: The oven can also be turned OFF. Option 5 (on convection models, closed , the oven light will not turn on for LOW. To Dehydrate: Position the racks according to LOW. Tone Volume High/Low The volume is...
... cycling may cook faster or slower than 12 hours to clear the display. To Deactivate: The oven can also be turned OFF. Option 5 (on convection models, closed , the oven light will not turn on for LOW. To Dehydrate: Position the racks according to LOW. Tone Volume High/Low The volume is...
Use and Care Guide
Page 14
... when the oven(s) are normal when the oven is used the first few times, or when it is displayed) before or after cooking. s On those models with any type of Sabbath Mode time, up to the fumes may take up at least ¹⁄₂" (1.3 cm) larger than 325°F (163...
... when the oven(s) are normal when the oven is used the first few times, or when it is displayed) before or after cooking. s On those models with any type of Sabbath Mode time, up to the fumes may take up at least ¹⁄₂" (1.3 cm) larger than 325°F (163...
Use and Care Guide
Page 15
...°C). Keep probe as far away from heat source as the probe temperature until the internal temperature of poultry. B A Meat Thermometer On models without a temperature probe, use temperature recommended in following chart as shown in recipe. s After reading the thermometer once, push it into the...A. The set between 130°F and 190°F (54°C and 88°C). 2. Then the display will appear on convection models) WARNING Burn Hazard Use an oven mitt to follow these instructions can be used during full and center broiling, convection broiling, dehydrating or ...
...°C). Keep probe as far away from heat source as the probe temperature until the internal temperature of poultry. B A Meat Thermometer On models without a temperature probe, use temperature recommended in following chart as shown in recipe. s After reading the thermometer once, push it into the...A. The set between 130°F and 190°F (54°C and 88°C). 2. Then the display will appear on convection models) WARNING Burn Hazard Use an oven mitt to follow these instructions can be used during full and center broiling, convection broiling, dehydrating or ...

Use and Care Guide
Page 16
...* Large roasts, turkeys, angel food, bundt and tube cakes, quick breads, pies 1 or 2 Yeast breads, casseroles, meat and 2 poultry Cookies, biscuits, muffins, cakes 2 or 3 *On models with bakeware on once the door is unplugged from the probe jack. Do not set plastics, paper or other items that no bakeware piece is...
...* Large roasts, turkeys, angel food, bundt and tube cakes, quick breads, pies 1 or 2 Yeast breads, casseroles, meat and 2 poultry Cookies, biscuits, muffins, cakes 2 or 3 *On models with bakeware on once the door is unplugged from the probe jack. Do not set plastics, paper or other items that no bakeware piece is...
Use and Care Guide
Page 17
... evenly, crisping surfaces while sealing in the heated oven, making cleaning more evenly than the natural movement of the oven rack. Position food on some models) In a convection oven, the fan-circulated hot air continually distributes heat more difficult. Press OFF when finished. Press BROIL once for FULL BROIL or twice...
... evenly, crisping surfaces while sealing in the heated oven, making cleaning more evenly than the natural movement of the oven rack. Position food on some models) In a convection oven, the fan-circulated hot air continually distributes heat more difficult. Press OFF when finished. Press BROIL once for FULL BROIL or twice...

Use and Care Guide
Page 18
.... Broiler grid C. To ensure optimal cooking results, the oven will turn off in 1-degree increments. When the stop time will cycle on some models) Convection Bake can be cooked. If the oven is closed . If the oven door is not necessary to wait for BAKED GOODS and OTHER... pads to determine the doneness of foods, be set between 170°F and 500°F (77°C and 260°C). 2. Convection Bake (on some models) Convection cooking temperatures and times differ from those of pork and poultry in the oven. s Reduce recipe temperature 25°F (14°C). s Use a...
.... Broiler grid C. To ensure optimal cooking results, the oven will turn off in 1-degree increments. When the stop time will cycle on some models) Convection Bake can be cooked. If the oven is closed . If the oven door is not necessary to wait for BAKED GOODS and OTHER... pads to determine the doneness of foods, be set between 170°F and 500°F (77°C and 260°C). 2. Convection Bake (on some models) Convection cooking temperatures and times differ from those of pork and poultry in the oven. s Reduce recipe temperature 25°F (14°C). s Use a...

Use and Care Guide
Page 19
... the oven rack with the longest side parallel to enter a temperature other than 450°F (232°C). The set temperature is reached, if on some models) Convection Broil is reached. Press OFF when finished cooking. 19 Convection Broil (on , 1 tone will cycle on the rack position and temperature and may need...
... the oven rack with the longest side parallel to enter a temperature other than 450°F (232°C). The set temperature is reached, if on some models) Convection Broil is reached. Press OFF when finished cooking. 19 Convection Broil (on , 1 tone will cycle on the rack position and temperature and may need...

Use and Care Guide
Page 20
...be heated while the warming drawer is reached, the oven will shut off automatically. Doing so can result in warming drawer. 2. On some models) WARNING Food Poisoning Hazard Do not let food sit for baking by activating the yeast. Press BAKE, CONVECT BAKE or CONVECT ROAST. Proofing...BREAD PROOF. Timed Cooking WARNING Food Poisoning Hazard Do not let food sit in size, checking after 5 seconds. 3. When the stop . 6. On some models) Proofing bread prepares the dough for more than one displayed. 2. "WARM DRAWER ON" will show 100°F (38°C). 2. Press the number pads...
...be heated while the warming drawer is reached, the oven will shut off automatically. Doing so can result in warming drawer. 2. On some models) WARNING Food Poisoning Hazard Do not let food sit for baking by activating the yeast. Press BAKE, CONVECT BAKE or CONVECT ROAST. Proofing...BREAD PROOF. Timed Cooking WARNING Food Poisoning Hazard Do not let food sit in size, checking after 5 seconds. 3. When the stop . 6. On some models) Proofing bread prepares the dough for more than one displayed. 2. "WARM DRAWER ON" will show 100°F (38°C). 2. Press the number pads...

Use and Care Guide
Page 21
... inside door edge and the 1½" (3.8 cm) area around the inside oven cavity frame, being certain not to clean this area. enter slots on your model, see "Oven Vent" or "Oven Vents" section. Use a damp cloth to move freely. At high temperatures, foods react with porcelain. s Remove all items ...heat, odors, and smoke. Always move the oven door gasket. s Remove any loose soil to remove soil. This area does not get rid of some models): s Remove plastic items from the oven. s Wipe out any foil from the storage drawer. 21 Staining, etching, pitting or faint white spots can ...
... inside door edge and the 1½" (3.8 cm) area around the inside oven cavity frame, being certain not to clean this area. enter slots on your model, see "Oven Vent" or "Oven Vents" section. Use a damp cloth to move freely. At high temperatures, foods react with porcelain. s Remove all items ...heat, odors, and smoke. Always move the oven door gasket. s Remove any loose soil to remove soil. This area does not get rid of some models): s Remove plastic items from the oven. s Wipe out any foil from the storage drawer. 21 Staining, etching, pitting or faint white spots can ...

Use and Care Guide
Page 22
.... 2. It will appear in the display. Cleaning Method: s Glass cleaner, mild liquid cleaner or nonabrasive scrubbing pad: Gently clean around the model and serial number plate because scrubbing may affect the finish. STAINLESS STEEL (on cleaning products. s Liquid detergent or all controls are off and ...along with one-time or limited use soap-filled scouring pads, abrasive cleaners, Cooktop Polishing Creme, steel-wool pads, gritty washcloths or some models) Food spills containing acids, such as vinegar and tomato, should be set a clean time other than 3 hours 30 minutes, press ...
.... 2. It will appear in the display. Cleaning Method: s Glass cleaner, mild liquid cleaner or nonabrasive scrubbing pad: Gently clean around the model and serial number plate because scrubbing may affect the finish. STAINLESS STEEL (on cleaning products. s Liquid detergent or all controls are off and ...along with one-time or limited use soap-filled scouring pads, abrasive cleaners, Cooktop Polishing Creme, steel-wool pads, gritty washcloths or some models) Food spills containing acids, such as vinegar and tomato, should be set a clean time other than 3 hours 30 minutes, press ...
Use and Care Guide
Page 23
...-Cleaning cycle (on when the oven door is cool and empty before cleaning. Plug in the Self-Cleaning cycle. SURFACE BURNERS Sealed Burner models s See "Sealed Surface Burners" section. Cleaning Method: s Mildly abrasive cleanser: Scrub with porcelain and staining, etching, pitting or faint ...® Stainless Steel Cleaner and Polish (sample included): See "Assistance or Service" section to soft cloth or sponge, not directly on some models) Make sure drawer is a standard 15-watt appliance bulb. Porcelain enamel only, not chrome s Dishwasher STORAGE DRAWER (on panel. Oven Light...
...-Cleaning cycle (on when the oven door is cool and empty before cleaning. Plug in the Self-Cleaning cycle. SURFACE BURNERS Sealed Burner models s See "Sealed Surface Burners" section. Cleaning Method: s Mildly abrasive cleanser: Scrub with porcelain and staining, etching, pitting or faint ...® Stainless Steel Cleaner and Polish (sample included): See "Assistance or Service" section to soft cloth or sponge, not directly on some models) Make sure drawer is a standard 15-watt appliance bulb. Porcelain enamel only, not chrome s Dishwasher STORAGE DRAWER (on panel. Oven Light...

Use and Care Guide
Page 24
... while holding both hanger arms into the door. To Replace: 1. However, if removal is necessary, make sure drawer is heavy. Locate the blackloops on some models) Remove all the way. 2. Pull both sides of the drawer and pull out. Lift up the hinge latch on the slides. 24 Oven Door For...
... while holding both hanger arms into the door. To Replace: 1. However, if removal is necessary, make sure drawer is heavy. Locate the blackloops on some models) Remove all the way. 2. Pull both sides of the drawer and pull out. Lift up the hinge latch on the slides. 24 Oven Door For...
Use and Care Guide
Page 25
...burner knobs to the proper heat level? See the Installation Instructions. s Is propane gas being used ? See the Installation Instructions. s On some models, is in the off to the gas supply? Contact a trained repair specialist. s Is the range properly connected to cool the electronic control....extend more than ½" (1.3 cm) outside the cooking area. s Is the control knob set correctly? See "Timed Cooking" section. s On models with caps, are uneven, yellow and/or noisy s Are the burner ports clogged? Oven temperature too high or too low s Does the oven temperature...
...burner knobs to the proper heat level? See the Installation Instructions. s Is propane gas being used ? See the Installation Instructions. s On some models, is in the off to the gas supply? Contact a trained repair specialist. s Is the range properly connected to cool the electronic control....extend more than ½" (1.3 cm) outside the cooking area. s Is the control knob set correctly? See "Timed Cooking" section. s On models with caps, are uneven, yellow and/or noisy s Are the burner ports clogged? Oven temperature too high or too low s Does the oven temperature...

Use and Care Guide
Page 26
...the instructions below. In the U.S.A. For further assistance If you need help us or your nearest KitchenAid designated service center. On some models, has a delay start Self-Clean cycle been set ? Close the oven door all the way. See "Bakeware" section. s Is... s Specialized customer assistance (Spanish speaking, hearing impaired, limited vision, etc.). Display shows messages s Is the display showing "SET CLOCK"? On some models, reset the clock, if needed. Use aluminum foil to your appliance. Decrease oven temperature 15° F to 25°F (5°C to 15...
...the instructions below. In the U.S.A. For further assistance If you need help us or your nearest KitchenAid designated service center. On some models, has a delay start Self-Clean cycle been set ? Close the oven door all the way. See "Bakeware" section. s Is... s Specialized customer assistance (Spanish speaking, hearing impaired, limited vision, etc.). Display shows messages s Is the display showing "SET CLOCK"? On some models, reset the clock, if needed. Use aluminum foil to your appliance. Decrease oven temperature 15° F to 25°F (5°C to 15...


