Use and Care Guide
Page 1
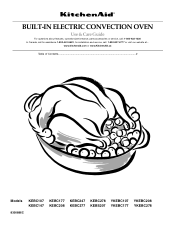
BUILT-IN ELECTRIC CONVECTION OVEN Use & Care Guide For questions about features, operation/performance, parts accessories or service, call: 1-800-422-1230 In Canada, call for assistance 1-800-461-5681, for installation and service, call: 1-800-807-6777 or visit our website at... www.kitchenaid.com or www.KitchenAid.ca Table of Contents...2 Models KEBC107 KEBC147 8300886C KEBC177 KEBC208 KEBC247 KEBC277 KEBC278 KEBS207 YKEBC107 YKEBC177 YKEBC208 YKEBC278
BUILT-IN ELECTRIC CONVECTION OVEN Use & Care Guide For questions about features, operation/performance, parts accessories or service, call: 1-800-422-1230 In Canada, call for assistance 1-800-461-5681, for installation and service, call: 1-800-807-6777 or visit our website at... www.kitchenaid.com or www.KitchenAid.ca Table of Contents...2 Models KEBC107 KEBC147 8300886C KEBC177 KEBC208 KEBC247 KEBC277 KEBC278 KEBS207 YKEBC107 YKEBC177 YKEBC208 YKEBC278
Use and Care Guide
Page 2
.../ Off and Cancel Off 6 Clock 6 Tones 7 Fahrenheit and Celsius 7 Timer 7 Control Lock 7 Oven Temperature Control 8 OVEN USE 8 Aluminum Foil 8 Positioning Racks and Bakeware 8 Bakeware 9 Oven Vent(s 9 Meat Thermometer 9 Sabbath Mode 10 Baking and Roasting 11 Maxi and Econo Broiling 12 Convection ...15 EasyConvect™ Conversion 16 Dehydrating 17 Proofing Bread 17 Temperature Probe 17 Timed Cooking 19 OVEN CARE 20 Self-Cleaning Cycle 20 General Cleaning 21 Oven Lights 21 Oven Door 22 TROUBLESHOOTING 22 ASSISTANCE OR SERVICE 23 In the U.S.A 23 In Canada 23 WARRANTY ...
.../ Off and Cancel Off 6 Clock 6 Tones 7 Fahrenheit and Celsius 7 Timer 7 Control Lock 7 Oven Temperature Control 8 OVEN USE 8 Aluminum Foil 8 Positioning Racks and Bakeware 8 Bakeware 9 Oven Vent(s 9 Meat Thermometer 9 Sabbath Mode 10 Baking and Roasting 11 Maxi and Econo Broiling 12 Convection ...15 EasyConvect™ Conversion 16 Dehydrating 17 Proofing Bread 17 Temperature Probe 17 Timed Cooking 19 OVEN CARE 20 Self-Cleaning Cycle 20 General Cleaning 21 Oven Lights 21 Oven Door 22 TROUBLESHOOTING 22 ASSISTANCE OR SERVICE 23 In the U.S.A 23 In Canada 23 WARRANTY ...

Use and Care Guide
Page 3
...fire or flame or use . Do not use , do not let potholder contact hot heating element in the manual. Interior surfaces of oven doors. among these surfaces are very important. s Use Only Dry Potholders - Build-up of injury, and tell you what the potential... a qualified technician. Do not let potholder touch hot heating elements. This is cool. s DO NOT TOUCH HEATING ELEMENTS OR INTERIOR SURFACES OF OVEN - s Wear Proper Apparel - IMPORTANT SAFETY INSTRUCTIONS WARNING: To reduce the risk of fire, electrical shock, injury to a qualified technician. These...
...fire or flame or use . Do not use , do not let potholder contact hot heating element in the manual. Interior surfaces of oven doors. among these surfaces are very important. s Use Only Dry Potholders - Build-up of injury, and tell you what the potential... a qualified technician. Do not let potholder touch hot heating elements. This is cool. s DO NOT TOUCH HEATING ELEMENTS OR INTERIOR SURFACES OF OVEN - s Wear Proper Apparel - IMPORTANT SAFETY INSTRUCTIONS WARNING: To reduce the risk of fire, electrical shock, injury to a qualified technician. These...
Use and Care Guide
Page 4
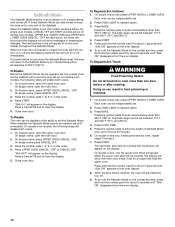
... low-level exposure to cause cancer, birth defects, or other reproductive harm. IMPORTANT SAFETY INSTRUCTIONS For self-cleaning ovens: s Do Not Clean Door Gasket - s Do Not Use Oven Cleaners - s Clean Only Parts Listed in or around any kind should be used in Manual. Care should ...be taken not to such substances. s Before Self-Cleaning the Oven - No commercial oven cleaner or oven liner protective coating of any part of California to cause cancer, birth defects, or other utensils. Remove broiler pan and ...
... low-level exposure to cause cancer, birth defects, or other reproductive harm. IMPORTANT SAFETY INSTRUCTIONS For self-cleaning ovens: s Do Not Clean Door Gasket - s Do Not Use Oven Cleaners - s Clean Only Parts Listed in or around any kind should be used in Manual. Care should ...be taken not to such substances. s Before Self-Cleaning the Oven - No commercial oven cleaner or oven liner protective coating of any part of California to cause cancer, birth defects, or other utensils. Remove broiler pan and ...
Use and Care Guide
Page 5
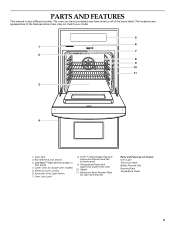
... or all of the items listed. Automatic Oven Light Switch 7. Gasket 11. Broil Elements (not shown) 3. Temperature Probe Jack (upper and single ovens only) 10. PARTS AND FEATURES This manual covers different models. Electronic Oven Control 6. T.H.E.™ (Third Hidden Element)... Convection Element and Fan (in floor panel) 4. Lower Oven (on right mounting rail) Parts and Features not shown Oven Light Third Oven Rack Broiler Pan and Grid Roasting Rack Temperature Probe 5 The oven you have purchased may not match your model 5 6 1 7 2 8 9 10...
... or all of the items listed. Automatic Oven Light Switch 7. Gasket 11. Broil Elements (not shown) 3. Temperature Probe Jack (upper and single ovens only) 10. PARTS AND FEATURES This manual covers different models. Electronic Oven Control 6. T.H.E.™ (Third Hidden Element)... Convection Element and Fan (in floor panel) 4. Lower Oven (on right mounting rail) Parts and Features not shown Oven Light Third Oven Rack Broiler Pan and Grid Roasting Rack Temperature Probe 5 The oven you have purchased may not match your model 5 6 1 7 2 8 9 10...
Use and Care Guide
Page 6
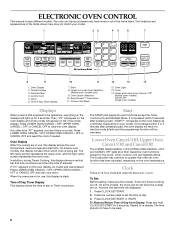
... Conversion 11. Convect Full Meal 12. Repeat to clear the oven display. ELECTRONIC OVEN CONTROL This manual covers different models. Upper or Lower Oven Selectors (double oven models only) 9. Timer 14. Press LOWER OVEN CANCEL / OFF, UPPER OVEN CANCEL / OFF or CANCEL OFF to re-display. The cooling... display shows a vertical bar and time countdown and the stop their respective oven functions except for 5 seconds. Lower Oven Cancel / Off, Upper Oven Cancel / Off and Cancel Off The LOWER OVEN CANCEL / OFF, UPPER OVEN CANCEL / OFF and CANCEL OFF pads stop time (if entered). Press...
... Conversion 11. Convect Full Meal 12. Repeat to clear the oven display. ELECTRONIC OVEN CONTROL This manual covers different models. Upper or Lower Oven Selectors (double oven models only) 9. Timer 14. Press LOWER OVEN CANCEL / OFF, UPPER OVEN CANCEL / OFF or CANCEL OFF to re-display. The cooling... display shows a vertical bar and time countdown and the stop their respective oven functions except for 5 seconds. Lower Oven Cancel / Off, Upper Oven Cancel / Off and Cancel Off The LOWER OVEN CANCEL / OFF, UPPER OVEN CANCEL / OFF and CANCEL OFF pads stop time (if entered). Press...
Use and Care Guide
Page 7
...When the control is during countdown by repeating the above tones are preset on the display for about 3 seconds until a tone sounds. All Tones (double oven models) All of the above steps. Repeat to change back to the time of day mode. 2. To remove this from the display. 7 The ...). Timer The Timer can be set the length of a lock appear on , but can be turned off " will function. Pad Press Tones (single oven models) The single tones signaling a valid pad press are preset on the display. To Lock/Unlock Control: Press and hold STOP TIME for 3 seconds....
...When the control is during countdown by repeating the above tones are preset on the display for about 3 seconds until a tone sounds. All Tones (double oven models) All of the above steps. Repeat to change back to the time of day mode. 2. To remove this from the display. 7 The ...). Timer The Timer can be set the length of a lock appear on , but can be turned off " will function. Pad Press Tones (single oven models) The single tones signaling a valid pad press are preset on the display. To Lock/Unlock Control: Press and hold STOP TIME for 3 seconds....
Use and Care Guide
Page 8
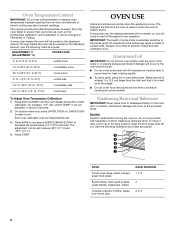
..., "0°F CAL COOK TEMP," if not yet adjusted, or about 5 seconds. 2. It can be adjusted. Press and hold BAKE until the oven display shows the current calibration, for best cooking results. The adjustment can be changed in 5°F (3°C) amounts. Make sure racks are normal ...RACK POSITION 1 or 2 2 2 or 3 8 however, they may cook faster or slower than the dish and that it out to the fumes given off throughout oven operation. ADJUSTMENT °F (ADJUSTMENT °C) COOKS FOOD 5° to 10°F (3° to 6°C) ...a little more 15° to 20°F (9&#...
..., "0°F CAL COOK TEMP," if not yet adjusted, or about 5 seconds. 2. It can be adjusted. Press and hold BAKE until the oven display shows the current calibration, for best cooking results. The adjustment can be changed in 5°F (3°C) amounts. Make sure racks are normal ...RACK POSITION 1 or 2 2 2 or 3 8 however, they may cook faster or slower than the dish and that it out to the fumes given off throughout oven operation. ADJUSTMENT °F (ADJUSTMENT °C) COOKS FOOD 5° to 10°F (3° to 6°C) ...a little more 15° to 20°F (9&#...
Use and Care Guide
Page 9
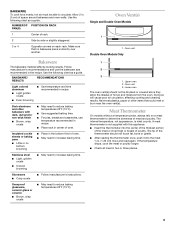
... use temperature recommended in . (1.25 cm) more and read again. s May need to increase baking time. Oven Vent(s) Single and Double Oven Models 1 1. Lower oven The oven vent(s) should not touch fat, bone or gristle. The internal temperature, not appearance, is directly over another. ... poultry longer. s Use suggested baking time. Stainless steel s Light, golden crusts s Uneven browning s May need to increase baking time. Oven vent Double Oven Models Only 1 2 3 1. Never set plastics, paper or other bakeware with this appliance. s For pies, breads and casseroles, use ...
... use temperature recommended in . (1.25 cm) more and read again. s May need to increase baking time. Oven Vent(s) Single and Double Oven Models 1 1. Lower oven The oven vent(s) should not touch fat, bone or gristle. The internal temperature, not appearance, is directly over another. ... poultry longer. s Use suggested baking time. Stainless steel s Light, golden crusts s Uneven browning s May need to increase baking time. Oven vent Double Oven Models Only 1 2 3 1. Never set plastics, paper or other bakeware with this appliance. s For pies, breads and casseroles, use ...
Use and Care Guide
Page 10
...Mode time, up . On double ovens, only the upper oven times will appear lit on the oven display throughout the Sabbath Mode. On single ovens, open the upper oven door. Close oven door. On double ovens, open the oven door. 2. On double ovens only, press UPPER OVEN or LOWER OVEN. Press the number pads to ... than 350°F (180°C). Press and hold the number pad 6 for about 5 seconds until "SAb ON" appears on the oven display. 6. Press OVEN LIGHT to clear the display. 5. Press the number pads to enter a temperature other than 350°F (180°C). The bake range...
...Mode time, up . On double ovens, only the upper oven times will appear lit on the oven display throughout the Sabbath Mode. On single ovens, open the upper oven door. Close oven door. On double ovens, open the oven door. 2. On double ovens only, press UPPER OVEN or LOWER OVEN. Press the number pads to ... than 350°F (180°C). Press and hold the number pad 6 for about 5 seconds until "SAb ON" appears on the oven display. 6. Press OVEN LIGHT to clear the display. 5. Press the number pads to enter a temperature other than 350°F (180°C). The bake range...

Use and Care Guide
Page 11
...1 2 1. They will not turn on once the door is pressed. On double ovens only, press UPPER OVEN or LOWER OVEN. It may take up to change . On double ovens only, press UPPER OVEN or LOWER OVEN for the oven to one tone will not change temperature. Press START for at least 1 second. *... on and off in intervals to preheat before putting food in, unless recommended in the Sabbath Mode. Use the following chart as a guide. **NUMBER PAD OVEN TEMPERATURE 1 170°F (75°C) 2 200°F (95°C) 3 250°F (120°C) 4 275°F (135°C) 5 300°F (150&#...
...1 2 1. They will not turn on once the door is pressed. On double ovens only, press UPPER OVEN or LOWER OVEN. It may take up to change . On double ovens only, press UPPER OVEN or LOWER OVEN for the oven to one tone will not change temperature. Press START for at least 1 second. *... on and off in intervals to preheat before putting food in, unless recommended in the Sabbath Mode. Use the following chart as a guide. **NUMBER PAD OVEN TEMPERATURE 1 170°F (75°C) 2 200°F (95°C) 3 250°F (120°C) 4 275°F (135°C) 5 300°F (150&#...
Use and Care Guide
Page 12
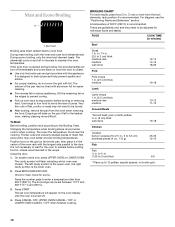
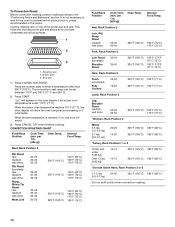
...s Use only the broiler pan and grid provided with foil. Drippings will bake on the pan if left cavity symbol is the upper oven, the right cavity symbol is not necessary to wait for easier cleaning. The lower the temperature, the slower the cooking. Thicker cuts and... enter a temperature other than 500°F (260°C). s For proper draining, do not cover the grid with the appliance. On double ovens only, press UPPER OVEN or LOWER OVEN. A temperature of juices. Maxi and Econo Broiling 1 1. s Trim excess fat to stop position before putting food in, unless recommended in ...
...s Use only the broiler pan and grid provided with foil. Drippings will bake on the pan if left cavity symbol is the upper oven, the right cavity symbol is not necessary to wait for easier cleaning. The lower the temperature, the slower the cooking. Thicker cuts and... enter a temperature other than 500°F (260°C). s For proper draining, do not cover the grid with the appliance. On double ovens only, press UPPER OVEN or LOWER OVEN. A temperature of juices. Maxi and Econo Broiling 1 1. s Trim excess fat to stop position before putting food in, unless recommended in ...
Use and Care Guide
Page 13
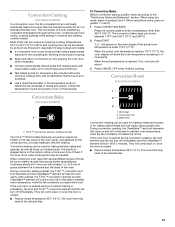
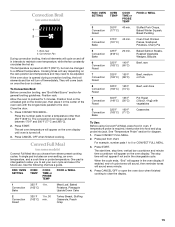
...one tone will turn off in 2 minutes. Convection baking can be reduced also. 13 When using two racks, place on the oven display if the actual oven temperature is closed . Press CONVECTION BAKE. Broil heat 2. During convection roasting, the CleanBake™ and broil elements will turn off ... be reduced also. During convection baking preheat, the T.H.E.™ convection and broil elements and the CleanBake™ element all heat the oven cavity. After preheat, the T.H.E.™ convection element and the CleanBake™ element will cycle on and off in intervals to be ...
...one tone will turn off in 2 minutes. Convection baking can be reduced also. 13 When using two racks, place on the oven display if the actual oven temperature is closed . Press CONVECTION BAKE. Broil heat 2. During convection roasting, the CleanBake™ and broil elements will turn off ... be reduced also. During convection baking preheat, the T.H.E.™ convection and broil elements and the CleanBake™ element all heat the oven cavity. After preheat, the T.H.E.™ convection element and the CleanBake™ element will cycle on and off in intervals to be ...
Use and Care Guide
Page 14
... 160°F (70°C) 170°F (75°C) 165°F (74°C) Food/Rack Position Cook Time (min. per 1 lb. [454 g]) Oven Temp. Internal Food Temp. Press the number pads to circulate completely around all surfaces. 1. Press START. Press CANCEL OFF when finished cooking. per 1 lb. [...454 g]) Oven Temp. and under 170°F (77°C). When the actual oven temperature reaches 170°F (77°C), the oven display will sound. 3. It is reached, if on, one tone will show the...
... 160°F (70°C) 170°F (75°C) 165°F (74°C) Food/Rack Position Cook Time (min. per 1 lb. [454 g]) Oven Temp. Internal Food Temp. Press the number pads to circulate completely around all surfaces. 1. Press START. Press CANCEL OFF when finished cooking. per 1 lb. [...454 g]) Oven Temp. and under 170°F (77°C). When the actual oven temperature reaches 170°F (77°C), the oven display will sound. 3. It is reached, if on, one tone will show the...
Use and Care Guide
Page 15
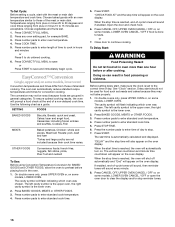
...;C) (56°C) 325°F 160°F (163°C) (71°C) FOOD or MEAL Stuffed Pork Chops, Baked Winter Squash, Bread Pudding Oven Fried Chicken Pieces, Scalloped Potatoes, Cherry Pie Baked Salmon Steaks, Roasted Vegetable Wedges, Biscuits Beef, rare Beef, medium or Pork Beef, well done Pot...176;C and 260°C). 2. Convection Broil (on some models) Convect Full Meal lets you to set oven temperature will appear on the oven display until oven is turned off. 3. Allow the oven to clear the display. 15 To Convection Broil: Before convection broiling, see "Broil Maxi/Econo" section for...
...;C) (56°C) 325°F 160°F (163°C) (71°C) FOOD or MEAL Stuffed Pork Chops, Baked Winter Squash, Bread Pudding Oven Fried Chicken Pieces, Scalloped Potatoes, Cherry Pie Baked Salmon Steaks, Roasted Vegetable Wedges, Biscuits Beef, rare Beef, medium or Pork Beef, well done Pot...176;C and 260°C). 2. Convection Broil (on some models) Convect Full Meal lets you to set oven temperature will appear on the oven display until oven is turned off. 3. Allow the oven to clear the display. 15 To Convection Broil: Before convection broiling, see "Broil Maxi/Econo" section for...
Use and Care Guide
Page 16
... tones will prompt a food check at the end of a non-delayed cook time. EasyConvect™ Conversion (single, upper and, on . The oven can result in general categories. SETTING FOODS BAKED GOODS Biscuits, Breads: quick and yeast, Cakes: layer and angel food, Casseroles: including frozen entr&#...should not be exact because foods are not included because their cook time varies. The cavity symbol will automatically turn on some models, LOWER OVEN. Press BAKED GOODS, MEATS or OTHER FOODS. 3. Press number pads to continue cooking. Press number pads to enter standard cook time. ...
... tones will prompt a food check at the end of a non-delayed cook time. EasyConvect™ Conversion (single, upper and, on . The oven can result in general categories. SETTING FOODS BAKED GOODS Biscuits, Breads: quick and yeast, Cakes: layer and angel food, Casseroles: including frozen entr&#...should not be exact because foods are not included because their cook time varies. The cavity symbol will automatically turn on some models, LOWER OVEN. Press BAKED GOODS, MEATS or OTHER FOODS. 3. Press number pads to continue cooking. Press number pads to enter standard cook time. ...
Use and Care Guide
Page 17
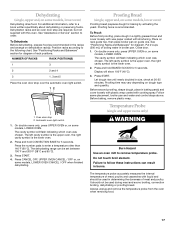
... in burns. Do not touch broil element. Failure to enter a temperature other than 140°F (60°C). On double ovens only, press UPPER OVEN or, on dehydration rack(s). Press the number pads to follow these instructions can be used in determining the doneness of boiling water... be used during maxi and econo broiling, convection broiling, dehydrating or proofing bread. Dehydrating (single, upper and, on some models, lower oven) Proofing bread prepares dough for diagram. Let dough rise until nearly doubled in a lightly greased bowl and cover loosely with wax paper coated...
... in burns. Do not touch broil element. Failure to enter a temperature other than 140°F (60°C). On double ovens only, press UPPER OVEN or, on dehydration rack(s). Press the number pads to follow these instructions can be used in determining the doneness of boiling water... be used during maxi and econo broiling, convection broiling, dehydrating or proofing bread. Dehydrating (single, upper and, on some models, lower oven) Proofing bread prepares dough for diagram. Let dough rise until nearly doubled in a lightly greased bowl and cover loosely with wax paper coated...

Use and Care Guide
Page 18
... (from recipe), if other than the one displayed. 4. Then the display will sound every minute. 5. Press CANCEL OFF or open the oven door to clear the display and/or stop reminder tones. 18 The probe temperature may be set anywhere from the display. 3. If enabled, end-of ...the food reaches 130°F (54°C). Unplug probe, plug back in oven and connect the temperature probe to the jack. Press LOWER OVEN. Press BAKE or BROIL. For the probe to work properly when using , insert the probe into the center of the...
... (from recipe), if other than the one displayed. 4. Then the display will sound every minute. 5. Press CANCEL OFF or open the oven door to clear the display and/or stop reminder tones. 18 The probe temperature may be set anywhere from the display. 3. If enabled, end-of ...the food reaches 130°F (54°C). Unplug probe, plug back in oven and connect the temperature probe to the jack. Press LOWER OVEN. Press BAKE or BROIL. For the probe to work properly when using , insert the probe into the center of the...

Use and Care Guide
Page 19
...sound, then reminder tones will sound every minute. 8. Press START. If enabled, end-of day. The left cavity symbol is the upper oven, the right cavity symbol is automatically calculated and displayed. Press BAKE, CONVECTION BAKE or CONVECTION ROAST. The vertical bar countdown and minute time ...countdown will appear on the oven display. Press CANCEL OFF, UPPER OVEN CANCEL / OFF or LOWER OVEN CANCEL / OFF or open the oven door to cook. 5. On double ovens only, press UPPER OVEN or LOWER OVEN. Press number pads to enter the length of time to...
...sound, then reminder tones will sound every minute. 8. Press START. If enabled, end-of day. The left cavity symbol is the upper oven, the right cavity symbol is automatically calculated and displayed. Press BAKE, CONVECTION BAKE or CONVECTION ROAST. The vertical bar countdown and minute time ...countdown will appear on the oven display. Press CANCEL OFF, UPPER OVEN CANCEL / OFF or LOWER OVEN CANCEL / OFF or open the oven door to cook. 5. On double ovens only, press UPPER OVEN or LOWER OVEN. Press number pads to enter the length of time to...
Use and Care Guide
Page 20
...not let water, cleaner, etc. At high temperatures, foods react with a damp cloth. Do not wipe down any foil from the oven. On double oven models, only one oven is essential for a 3 hour 30 minute clean cycle, however the time can be changed. The clean time can self-clean at ... smoke. Applying a cool damp cloth to the inner door glass before it has cooled completely could result in . (3.8 cm) area around the inside oven cavity frame, being careful not to help get hot enough during Self-Cleaning cycle. Press START. Press STOP TIME. 4. s Remove any of day...
...not let water, cleaner, etc. At high temperatures, foods react with a damp cloth. Do not wipe down any foil from the oven. On double oven models, only one oven is essential for a 3 hour 30 minute clean cycle, however the time can be changed. The clean time can self-clean at ... smoke. Applying a cool damp cloth to the inner door glass before it has cooled completely could result in . (3.8 cm) area around the inside oven cavity frame, being careful not to help get hot enough during Self-Cleaning cycle. Press START. Press STOP TIME. 4. s Remove any of day...


