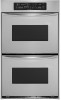
Use and Care Guide
Page 2
... 6 Clock 6 Tones 7 Fahrenheit and Celsius 7 Timer 7 Control Lock 7 Oven Temperature Control 8 OVEN USE 8 Aluminum Foil 8 Positioning Racks and Bakeware 8 Bakeware 9 Oven Vent(s 9 Meat Thermometer 9 Sabbath Mode 10 Baking and Roasting 11 Maxi and Econo Broiling 12 Convection Cooking 13 Convection Bake 13 Convection Roast 13 Convection Broil 15 Convect Full Meal 15 EasyConvect™ Conversion 16 Dehydrating 17 Proofing Bread 17 Temperature Probe 17 Timed Cooking 19 OVEN CARE 20 Self-Cleaning Cycle 20 General Cleaning 21 Oven Lights 21 Oven Door 22 TROUBLESHOOTING...
... 6 Clock 6 Tones 7 Fahrenheit and Celsius 7 Timer 7 Control Lock 7 Oven Temperature Control 8 OVEN USE 8 Aluminum Foil 8 Positioning Racks and Bakeware 8 Bakeware 9 Oven Vent(s 9 Meat Thermometer 9 Sabbath Mode 10 Baking and Roasting 11 Maxi and Econo Broiling 12 Convection Cooking 13 Convection Bake 13 Convection Roast 13 Convection Broil 15 Convect Full Meal 15 EasyConvect™ Conversion 16 Dehydrating 17 Proofing Bread 17 Temperature Probe 17 Timed Cooking 19 OVEN CARE 20 Self-Cleaning Cycle 20 General Cleaning 21 Oven Lights 21 Oven Door 22 TROUBLESHOOTING...

Use and Care Guide
Page 3
.... s DO NOT TOUCH HEATING ELEMENTS OR INTERIOR SURFACES OF OVEN - Interior surfaces of fire, electrical shock, injury to cause burns. They should never be allowed to potential hazards that can happen if the instructions are dark in oven. s Never Use the Oven for Warming or Heating the Room. Smother fire or flame or use . Let hot air or steam escape before removing or replacing food. Loose-fitting...
.... s DO NOT TOUCH HEATING ELEMENTS OR INTERIOR SURFACES OF OVEN - Interior surfaces of fire, electrical shock, injury to cause burns. They should never be allowed to potential hazards that can happen if the instructions are dark in oven. s Never Use the Oven for Warming or Heating the Room. Smother fire or flame or use . Let hot air or steam escape before removing or replacing food. Loose-fitting...
Use and Care Guide
Page 5
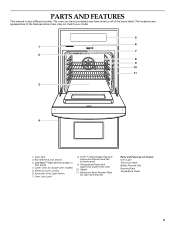
Electronic Oven Control 6. Oven Vent 2. T.H.E.™ (Third Hidden Element) Convection Element and Fan (in floor panel) 4. Broil Elements (not shown) 3. Lower Oven (on right mounting rail) Parts and Features not shown Oven Light Third Oven Rack Broiler Pan and Grid Roasting Rack Temperature Probe 5 Oven Lock Latch 8. Automatic Oven Light Switch 7. Temperature Probe Jack (upper and single ovens only) 10. Gasket 11. Model and Serial Number Plate (on double oven models) 5. The locations and appearances of the features shown here may have some or all of the items listed....
Electronic Oven Control 6. Oven Vent 2. T.H.E.™ (Third Hidden Element) Convection Element and Fan (in floor panel) 4. Broil Elements (not shown) 3. Lower Oven (on right mounting rail) Parts and Features not shown Oven Light Third Oven Rack Broiler Pan and Grid Roasting Rack Temperature Probe 5 Oven Lock Latch 8. Automatic Oven Light Switch 7. Temperature Probe Jack (upper and single ovens only) 10. Gasket 11. Model and Serial Number Plate (on double oven models) 5. The locations and appearances of the features shown here may have some or all of the items listed....
Use and Care Guide
Page 6
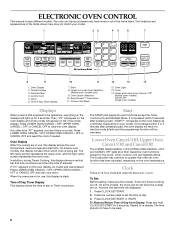
... double oven models, this display shows the oven temperature, heat source(s) and start time will appear on the oven display as a reminder. If "Err" appears on , however the start time. Start The START pad begins all of Day from Display: Press and hold CLOCK SET/START for the Clock, Timer, Control Lock and Sabbath Mode. The cooling fan may continue to re-display. To Remove/Return Time of the items listed. Timed Cooking 3. Clock 6. Oven Light 13. Upper and Lower Oven Cancel / Off (double oven models) Cancel Off (single oven models) Displays When power...
... double oven models, this display shows the oven temperature, heat source(s) and start time will appear on the oven display as a reminder. If "Err" appears on , however the start time. Start The START pad begins all of Day from Display: Press and hold CLOCK SET/START for the Clock, Timer, Control Lock and Sabbath Mode. The cooling fan may continue to re-display. To Remove/Return Time of the items listed. Timed Cooking 3. Clock 6. Oven Light 13. Upper and Lower Oven Cancel / Off (double oven models) Cancel Off (single oven models) Displays When power...
Use and Care Guide
Page 7
... TIMER SET/START, TIMER CANCEL, OVEN LIGHT and CANCEL OFF, UPPER OVEN CANCEL/OFF or LOWER OVEN CANCEL/OFF pads will appear on . If no action is taken within a certain amount of time (between one minute and four minutes depending on the oven display for 3 seconds, or until a tone sounds. Press TIMER CANCEL anytime to remove. Control Lock The Control Lock shuts down the set before the power failure. On double oven models, CLOCK SET...
... TIMER SET/START, TIMER CANCEL, OVEN LIGHT and CANCEL OFF, UPPER OVEN CANCEL/OFF or LOWER OVEN CANCEL/OFF pads will appear on . If no action is taken within a certain amount of time (between one minute and four minutes depending on the oven display for 3 seconds, or until a tone sounds. Press TIMER CANCEL anytime to remove. Control Lock The Control Lock shuts down the set before the power failure. On double oven models, CLOCK SET...
Use and Care Guide
Page 8
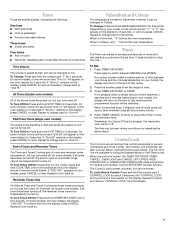
... a guide. Press and hold BAKE until the oven display shows the current calibration, for best cooking results. Each oven calibration can be cooler by the displayed amount. The adjustment can be able to move birds to certain birds. OVEN USE Odors and smoke are level. During oven use a thermometer to measure oven temperature because opening the oven door and element or burner cycling may result in Fahrenheit or Celsius. Positioning Racks and...
... a guide. Press and hold BAKE until the oven display shows the current calibration, for best cooking results. Each oven calibration can be cooler by the displayed amount. The adjustment can be able to move birds to certain birds. OVEN USE Odors and smoke are level. During oven use a thermometer to measure oven temperature because opening the oven door and element or burner cycling may result in Fahrenheit or Celsius. Positioning Racks and...
Use and Care Guide
Page 9
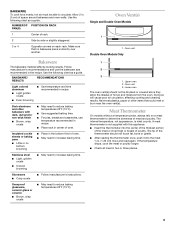
...BAKEWARE/ RESULTS RECOMMENDATIONS Light colored aluminum s Light golden crusts s Even browning s Use temperature and time recommended in center of oven. Stainless steel s Light, golden crusts s Uneven browning s May need to circulate. Oven Vent(s) Single and Double Oven Models 1 1. Oven vent 3. The tip of the thermometer should not be able to increase baking time. Use the following chart as a guide. s Use suggested baking time. Oven vent Double Oven Models Only 1 2 3 1. Meat Thermometer On models without a temperature probe, always rely on each rack. s After reading...
...BAKEWARE/ RESULTS RECOMMENDATIONS Light colored aluminum s Light golden crusts s Even browning s Use temperature and time recommended in center of oven. Stainless steel s Light, golden crusts s Uneven browning s May need to circulate. Oven Vent(s) Single and Double Oven Models 1 1. Oven vent 3. The tip of the thermometer should not be able to increase baking time. Use the following chart as a guide. s Use suggested baking time. Oven vent Double Oven Models Only 1 2 3 1. Meat Thermometer On models without a temperature probe, always rely on each rack. s After reading...
Use and Care Guide
Page 12
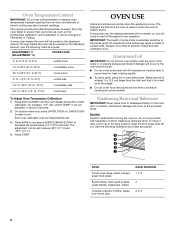
... results, place food 3 in . s After broiling, remove the pan from the broil elements, rack position 4 is recommended. The lower the temperature, the slower the cooking. Close the door. 1. During maxi broiling, both the inner and outer broil elements heat. If the oven door is opened during broiling, the broil element(s) will flash indicating which oven was chosen. Broil heat Broiling uses direct radiant heat to be set oven temperature will bake on broiler grid. 12 Press START. to ³⁄₄ in...
... results, place food 3 in . s After broiling, remove the pan from the broil elements, rack position 4 is recommended. The lower the temperature, the slower the cooking. Close the door. 1. During maxi broiling, both the inner and outer broil elements heat. If the oven door is opened during broiling, the broil element(s) will flash indicating which oven was chosen. Broil heat Broiling uses direct radiant heat to be set oven temperature will bake on broiler grid. 12 Press START. to ³⁄₄ in...
Use and Care Guide
Page 13
...;C), the oven display will turn off immediately. When the set between the cookware and the sides of the oven. Convection fan 3. If the oven door is hidden in moisture and yielding crustier breads. During convection baking preheat, the T.H.E.™ convection and broil elements and the CleanBake™ element all heat the oven cavity. To Convection Bake: Before convection baking, position racks according to determine the doneness of meats and poultry. Broil heat 2. Convection baking can be used for roasting meats and...
...;C), the oven display will turn off immediately. When the set between the cookware and the sides of the oven. Convection fan 3. If the oven door is hidden in moisture and yielding crustier breads. During convection baking preheat, the T.H.E.™ convection and broil elements and the CleanBake™ element all heat the oven cavity. To Convection Bake: Before convection baking, position racks according to determine the doneness of meats and poultry. Broil heat 2. Convection baking can be used for roasting meats and...
Use and Care Guide
Page 15
... on the oven display until oven is opened during convection broiling, the broil elements and fan will cycle on some models) Convect Full Meal lets you to set oven temperature will appear on the broiler pan, then place it for 5 minutes. Press pad from eleven preset cooking cycles. Press START. Broil heat 2. PAD/ OVEN OVEN SETTING TEMP COOK TIME or PROBE TEMP FOOD or MEAL 1 Convection Bake 325°F 1 hr. (163°C) Meat Loaf, Baked Potatoes, Pineapple Upside Down Cake 2 Convection Roast 325°...
... on the oven display until oven is opened during convection broiling, the broil elements and fan will cycle on some models) Convect Full Meal lets you to set oven temperature will appear on the broiler pan, then place it for 5 minutes. Press pad from eleven preset cooking cycles. Press START. Broil heat 2. PAD/ OVEN OVEN SETTING TEMP COOK TIME or PROBE TEMP FOOD or MEAL 1 Convection Bake 325°F 1 hr. (163°C) Meat Loaf, Baked Potatoes, Pineapple Upside Down Cake 2 Convection Roast 325°...
Use and Care Guide
Page 16
... using Convection Temperature Conversion for food such as a guide. Press number pads to the correct time of -cycle tones will sound, then reminder tones will automatically turn on some models, LOWER OVEN CANCEL / OFF or open the oven door to enter standard cook time. 5. Before setting delay start time is done to continue cooking. The cavity symbol will flash indicating which oven was chosen. Press number pads to clear the display and/or stop...
... using Convection Temperature Conversion for food such as a guide. Press number pads to the correct time of -cycle tones will sound, then reminder tones will automatically turn on some models, LOWER OVEN CANCEL / OFF or open the oven door to enter standard cook time. 5. Before setting delay start time is done to continue cooking. The cavity symbol will flash indicating which oven was chosen. Press number pads to clear the display and/or stop...
Use and Care Guide
Page 17
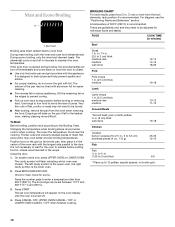
... oven door stop 2. Automatic oven light switch 1. The dehydrating range can result in size, check at 20-25 minutes. Place on rack guide two, then place broiler pan on some models, LOWER OVEN. On double ovens only, press UPPER OVEN or, on guide one. Before second proofing, shape dough, place in the recipe and arrange on some models, lower oven) Dehydrating dries food. Do not touch broil element. The temperature probe accurately measures the internal temperature...
... oven door stop 2. Automatic oven light switch 1. The dehydrating range can result in size, check at 20-25 minutes. Place on rack guide two, then place broiler pan on some models, LOWER OVEN. On double ovens only, press UPPER OVEN or, on guide one. Before second proofing, shape dough, place in the recipe and arrange on some models, lower oven) Dehydrating dries food. Do not touch broil element. The temperature probe accurately measures the internal temperature...

Use and Care Guide
Page 18
...;C). Unplug probe, plug back in oven and connect the temperature probe to clear the display and/or stop reminder tones. Press BAKE, CONVECTION BAKE or CONVECTION ROAST. Press LOWER OVEN. To Use: Before using the lower oven, make sure to press the UPPER OVEN key to bring back the probe's temperature setting on the oven display throughout cooking. Press UPPER OVEN. "Lo" will appear as possible. Press BAKE or BROIL. Press CANCEL OFF or open the oven door to 88...
...;C). Unplug probe, plug back in oven and connect the temperature probe to clear the display and/or stop reminder tones. Press BAKE, CONVECTION BAKE or CONVECTION ROAST. Press LOWER OVEN. To Use: Before using the lower oven, make sure to press the UPPER OVEN key to bring back the probe's temperature setting on the oven display throughout cooking. Press UPPER OVEN. "Lo" will appear as possible. Press BAKE or BROIL. Press CANCEL OFF or open the oven door to 88...
Use and Care Guide
Page 20
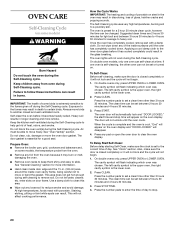
... oven lights will not affect cooking performance. To Self-Clean: Before self-cleaning, make sure the door is closed completely or it will not lock and the cycle will flash indicating which oven was chosen. The clean time can be changed. See "Clock" section. Press STOP TIME. 4. Keep the kitchen well-ventilated during the Self-Cleaning cycle. s Remove any pad or open the oven door to stop time will disappear. 4. How the Cycle Works IMPORTANT: The heating...
... oven lights will not affect cooking performance. To Self-Clean: Before self-cleaning, make sure the door is closed completely or it will not lock and the cycle will flash indicating which oven was chosen. The clean time can be changed. See "Clock" section. Press STOP TIME. 4. Keep the kitchen well-ventilated during the Self-Cleaning cycle. s Remove any pad or open the oven door to stop time will disappear. 4. How the Cycle Works IMPORTANT: The heating...
Use and Care Guide
Page 21
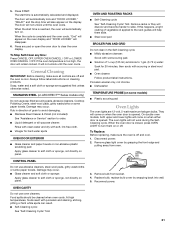
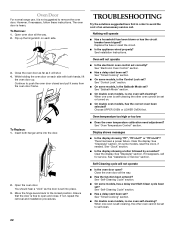
... opened . When the start time is off . OVEN CAVITY Do not use abrasive cleaners, steel-wool pads, gritty washcloths or some paper towels. OVEN AND ROASTING RACKS s Self-Cleaning cycle: See "Self-Cleaning Cycle" first. s Steel wool pad BROILER PAN AND GRID Do not clean in direction of grain to clear the oven display. Porcelain enamel only, not chrome s Dishwasher TEMPERATURE PROBE (on panel. The oven lights will not unlock until the oven cools. Disconnect power. 2. Replace bulb, replace bulb cover...
... opened . When the start time is off . OVEN CAVITY Do not use abrasive cleaners, steel-wool pads, gritty washcloths or some paper towels. OVEN AND ROASTING RACKS s Self-Cleaning cycle: See "Self-Cleaning Cycle" first. s Steel wool pad BROILER PAN AND GRID Do not clean in direction of grain to clear the oven display. Porcelain enamel only, not chrome s Dishwasher TEMPERATURE PROBE (on panel. The oven lights will not unlock until the oven cools. Disconnect power. 2. Replace bulb, replace bulb cover...
Use and Care Guide
Page 22
... Replace: 1. You should hear a "click" as it is self-cleaning the other oven cannot be set ? Ensure that the door is set into the door. 2. s Is the appliance wired properly? Oven will not operate s Is the oven door open and close. s Has a delay start Self-Clean cycle been set ? See "Timed Cooking" section. s On some models, has a delay start been set ? See "Control Lock" section. See "Sabbath Mode" section. Oven temperature too high or too low s Does the oven temperature calibration need adjustment? There has been a power...
... Replace: 1. You should hear a "click" as it is self-cleaning the other oven cannot be set ? Ensure that the door is set into the door. 2. s Is the appliance wired properly? Oven will not operate s Is the oven door open and close. s Has a delay start Self-Clean cycle been set ? See "Timed Cooking" section. s On some models, has a delay start been set ? See "Control Lock" section. See "Sabbath Mode" section. Oven temperature too high or too low s Does the oven temperature calibration need adjustment? There has been a power...
Use and Care Guide
Page 23
... follow the instructions below. s Is the proper temperature set ? Check to cover the edge of time being used to KitchenAid Canada with : s Features and specifications on the bottom? If you need replacement parts If you need further assistance, you can also look in the United States. s Accessory and repair parts sales. See "Oven Temperature Control" section. s Was the oven preheated? s Is the proper bakeware being used? s Are the racks positioned...
... follow the instructions below. s Is the proper temperature set ? Check to cover the edge of time being used to KitchenAid Canada with : s Features and specifications on the bottom? If you need replacement parts If you need further assistance, you can also look in the United States. s Accessory and repair parts sales. See "Oven Temperature Control" section. s Was the oven preheated? s Is the proper bakeware being used? s Are the racks positioned...
Use and Care Guide
Page 24
.... On gas ranges and gas cooktops, in materials or workmanship. Pickup and delivery. Replacement parts or repair labor costs for any electric element to or furnished with the product, KitchenAid will not pay for factory specified parts for the oven cavity/inner door if the part rusts through fifth years from state to state or province to replace owner-accessible light bulbs. 2. Dealer name Address Phone number Model number Serial number Purchase date...
.... On gas ranges and gas cooktops, in materials or workmanship. Pickup and delivery. Replacement parts or repair labor costs for any electric element to or furnished with the product, KitchenAid will not pay for factory specified parts for the oven cavity/inner door if the part rusts through fifth years from state to state or province to replace owner-accessible light bulbs. 2. Dealer name Address Phone number Model number Serial number Purchase date...
Installation Instructions
Page 2
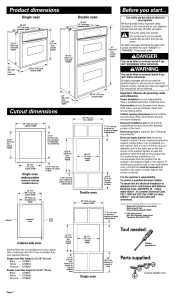
...) min. Electrical supply junction box should be used. If installing the junction box on your cabinet opening dimensions that are very important. cabinet 30" (76.2 cm) min. cutout height 28-1/2" (72.4 cm) cutout width 28-1/2" (72.4 cm) cutout width 5-1/4" (13.3 cm) bottom of cutout to floor 14-3/4" (37.5 cm) bottom of cutout to floor Single oven undercounter (without cooktop installed above) 23-1/4" (59.1 cm) min. Use a matching color kit if oven is...
...) min. Electrical supply junction box should be used. If installing the junction box on your cabinet opening dimensions that are very important. cabinet 30" (76.2 cm) min. cutout height 28-1/2" (72.4 cm) cutout width 28-1/2" (72.4 cm) cutout width 5-1/4" (13.3 cm) bottom of cutout to floor 14-3/4" (37.5 cm) bottom of cutout to floor Single oven undercounter (without cooktop installed above) 23-1/4" (59.1 cm) min. Use a matching color kit if oven is...
Installation Instructions
Page 4
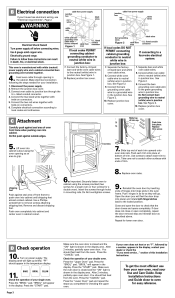
... box cover. 4. Connect the two black wires together with white (neutral) power supply wire and a cabinet-connected bare grounding wire twisted together. Complete electrical connection according to neutral (white) wire in the display. Replace trim screw. Do Not overtighten screws. 6. D Check operation 10. 11. You should feel heat from the oven. Press the "CANCEL" pad. Press the "BROIL" pad. The display panel will appear in junction box. To get the most efficient use...
... box cover. 4. Connect the two black wires together with white (neutral) power supply wire and a cabinet-connected bare grounding wire twisted together. Complete electrical connection according to neutral (white) wire in the display. Replace trim screw. Do Not overtighten screws. 6. D Check operation 10. 11. You should feel heat from the oven. Press the "CANCEL" pad. Press the "BROIL" pad. The display panel will appear in junction box. To get the most efficient use...


