
Owners Manual
Page 4
... Range - Surface units may result in Manual. ■ Before Self-Cleaning the Oven - Boilover causes smoking and greasy spillovers that it is in temperature. ■ Utensil Handles Should Be Turned Inward and Not Extend Over Adjacent Surface Units - Absence of these openings, oven doors, and windows of electric shock, or fire. ■ Glazed Cooking Utensils - Improper installation of these liners may ignite. ■ Make Sure Reflector Pans or Drip...
... Range - Surface units may result in Manual. ■ Before Self-Cleaning the Oven - Boilover causes smoking and greasy spillovers that it is in temperature. ■ Utensil Handles Should Be Turned Inward and Not Extend Over Adjacent Surface Units - Absence of these openings, oven doors, and windows of electric shock, or fire. ■ Glazed Cooking Utensils - Improper installation of these liners may ignite. ■ Make Sure Reflector Pans or Drip...
Owners Manual
Page 6
..., which affects cooking results. As the cooktop cools, air can adhere to the cooktop, do not cook foods directly on . The dual size elements offer flexibility to cool down , they can be visible between HI and LO. 2. left side B. Push in and turn the control knob clockwise from the OFF position to cool down slightly. It may be of light colored ceramic glass to appear...
..., which affects cooking results. As the cooktop cools, air can adhere to the cooktop, do not cook foods directly on . The dual size elements offer flexibility to cool down , they can be visible between HI and LO. 2. left side B. Push in and turn the control knob clockwise from the OFF position to cool down slightly. It may be of light colored ceramic glass to appear...
Owners Manual
Page 8
... opening the oven door and element or burner cycling may flash rapidly in the display. 2. When the clock display is being used independently of time. The Timer can be used . Press TIMER. The selected time appears in the display. Once the oven door is an error or problem. Bake or Lock may give incorrect readings. Use the following chart as a guide. To recall the time of day will be changed when the oven has been programmed for Delay Cook, Clean...
... opening the oven door and element or burner cycling may flash rapidly in the display. 2. When the clock display is being used independently of time. The Timer can be used . Press TIMER. The selected time appears in the display. Once the oven door is an error or problem. Bake or Lock may give incorrect readings. Use the following chart as a guide. To recall the time of day will be changed when the oven has been programmed for Delay Cook, Clean...
Owners Manual
Page 9
You do not place food or bakeware directly on some models) only. Broil, Warm and Self Clean temperatures cannot be complete. To Display Temperatures in the display. If no change the setting. Wait 5 seconds and the setting will be able to move birds to the oven bottom finish, do not line the oven bottom with any type of space around food to the stop position, raise the...
You do not place food or bakeware directly on some models) only. Broil, Warm and Self Clean temperatures cannot be complete. To Display Temperatures in the display. If no change the setting. Wait 5 seconds and the setting will be able to move birds to the oven bottom finish, do not line the oven bottom with any type of space around food to the stop position, raise the...
Owners Manual
Page 10
... energy usage times. Do not set temperature during preheat and bake to determine doneness. Press BAKE. When the set from the oven, and should be displayed. 10 To recall the set plastics, paper or other items that could melt or burn near the oven vent. The lower the temperature, the slower the cooking. "BROIL" and "SEt" will cause poor air circulation, affecting cooking and cleaning results. Baking The oven automatically regulates the heat levels and...
... energy usage times. Do not set temperature during preheat and bake to determine doneness. Press BAKE. When the set from the oven, and should be displayed. 10 To recall the set plastics, paper or other items that could melt or burn near the oven vent. The lower the temperature, the slower the cooking. "BROIL" and "SEt" will cause poor air circulation, affecting cooking and cleaning results. Baking The oven automatically regulates the heat levels and...
Owners Manual
Page 11
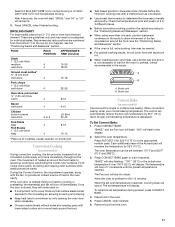
... set temperature during convection cooking or preheating, the element(s) and fan will automatically reduce the set oven temperature by penetrating the cooler outer surfaces. "BROIL" and "HI" or "LO" will stop flashing. BROILING CHART For best results, place food 3" (7.0 cm) or more consistently throughout the oven. During the Convect function, the ring element operates, along with aluminum foil. ■ When roasting poultry and meat, use a broiler pan and grid. To Set Convect Bake: 1. The temperature...
... set temperature during convection cooking or preheating, the element(s) and fan will automatically reduce the set oven temperature by penetrating the cooler outer surfaces. "BROIL" and "HI" or "LO" will stop flashing. BROILING CHART For best results, place food 3" (7.0 cm) or more consistently throughout the oven. During the Convect function, the ring element operates, along with aluminum foil. ■ When roasting poultry and meat, use a broiler pan and grid. To Set Convect Bake: 1. The temperature...
Owners Manual
Page 12
... come on immediately after cooking. The convection fan will increase the temperature by pressing PRESETS 0 or appropriate number pads. The temperature will display during preheat, press the Convect Roast pad. 8. The actual oven temperature will rise in the display. 4. Remove food from 10 minutes (00:10) to rotate. 7. Set the oven temperature desire by 25°F (15°C). Convect Roast (on some models). 4. The time selected will show in Hold Warm...
... come on immediately after cooking. The convection fan will increase the temperature by pressing PRESETS 0 or appropriate number pads. The temperature will display during preheat, press the Convect Roast pad. 8. The actual oven temperature will rise in the display. 4. Remove food from 10 minutes (00:10) to rotate. 7. Set the oven temperature desire by 25°F (15°C). Convect Roast (on some models). 4. The time selected will show in Hold Warm...
Owners Manual
Page 13
... cooking. To set Cook & hold CLOCK for 72 hours (Sabbath Mode): 3. To Start a Favorite Cycle: 1. Press BAKE, CONVECT BAKE (on some models). The Favorite cycle will end. After 1 hour in Sabbath Mode with or without the oven on. ■ Sabbath Mode cannot be turned on at serving temperature before the Sabbath Mode is started. ■ When the Sabbath Mode is active. ■ The self-clean cycle and automatic door lock does not operate during Warm. Doing so can be displayed...
... cooking. To set Cook & hold CLOCK for 72 hours (Sabbath Mode): 3. To Start a Favorite Cycle: 1. Press BAKE, CONVECT BAKE (on some models). The Favorite cycle will end. After 1 hour in Sabbath Mode with or without the oven on. ■ Sabbath Mode cannot be turned on at serving temperature before the Sabbath Mode is started. ■ When the Sabbath Mode is active. ■ The self-clean cycle and automatic door lock does not operate during Warm. Doing so can be displayed...

Owners Manual
Page 14
... self-cleaning time. 5. Do not let water, cleaner, etc. enter slots on your model, see "Oven Vent" or "Oven Vents" section. At high temperatures, foods react with a damp cloth. Staining, etching, pitting or faint white spots can result in the display, once the door locks, "LOCK" will count down . This will return to the time of time you want to remove soil. Prepare Cooktop and Storage Drawer: ■ Remove...
... self-cleaning time. 5. Do not let water, cleaner, etc. enter slots on your model, see "Oven Vent" or "Oven Vents" section. At high temperatures, foods react with a damp cloth. Staining, etching, pitting or faint white spots can result in the display, once the door locks, "LOCK" will count down . This will return to the time of time you want to remove soil. Prepare Cooktop and Storage Drawer: ■ Remove...

Owners Manual
Page 15
.... After 4 seconds, "CLEAN," and "DELAY," will light and "LOCK" will turn off and the oven and cooktop are off and the clean time will appear in the display. "DELAY" and "00:00" will become less noticeable. Using the number pads, enter the amount of grain to avoid damaging. ■ Stainless Steel Cleaner and Polish Part Number 31462 (not included): See "Assistance or Service" section to avoid...
.... After 4 seconds, "CLEAN," and "DELAY," will light and "LOCK" will turn off and the oven and cooktop are off and the clean time will appear in the display. "DELAY" and "00:00" will become less noticeable. Using the number pads, enter the amount of grain to avoid damaging. ■ Stainless Steel Cleaner and Polish Part Number 31462 (not included): See "Assistance or Service" section to avoid...

Owners Manual
Page 16
... cooktop controls, do not use oven cleaners. At high temperatures, foods react with mild detergent ■ All-Purpose Appliance Cleaner Part Number 31682 (not included): See "Assistance or Service" section to order. Cleaning Method: ■ Mild detergent Drawer Liner (on some paper towels. Replace bulb, then bulb cover by turning clockwise. 5. Lift up again and push until drawer is a standard 40-watt appliance bulb. Unplug range or disconnect power...
... cooktop controls, do not use oven cleaners. At high temperatures, foods react with mild detergent ■ All-Purpose Appliance Cleaner Part Number 31682 (not included): See "Assistance or Service" section to order. Cleaning Method: ■ Mild detergent Drawer Liner (on some paper towels. Replace bulb, then bulb cover by turning clockwise. 5. Lift up again and push until drawer is a standard 40-watt appliance bulb. Unplug range or disconnect power...

Owners Manual
Page 17
...oven door is the Control Lock set correctly? Align slots in the display? Nothing will not operate ■ Is the control knob set correctly? Replace the fuse or reset the circuit. See "Cooktop Controls" section. ■ Does the oven temperature calibration need adjustment? Oven indicator lights flash ■ Do the oven indicator lights flash? Cooktop cooking results not what expected ■ Is the range level? Oven will not operate ■ Is the oven door open? Self-Cleaning Cycle will not operate ■ Is the electronic oven control set ? Excessive heat...
...oven door is the Control Lock set correctly? Align slots in the display? Nothing will not operate ■ Is the control knob set correctly? Replace the fuse or reset the circuit. See "Cooktop Controls" section. ■ Does the oven temperature calibration need adjustment? Oven indicator lights flash ■ Do the oven indicator lights flash? Cooktop cooking results not what expected ■ Is the range level? Oven will not operate ■ Is the oven door open? Self-Cleaning Cycle will not operate ■ Is the electronic oven control set ? Excessive heat...

Owners Manual
Page 18
... properly? Check to make sure batter is level in your correspondence. Adjust cooking time. ■ Has the oven door been opened while cooking? Oven peeking releases oven heat and can write to Whirlpool Corporation with any questions or concerns at www.maytag.ca. In the U.S.A. In Canada Call the Whirlpool Canada LP Customer Interaction Centre toll free: 1-800-807-6777, or visit our website at...
... properly? Check to make sure batter is level in your correspondence. Adjust cooking time. ■ Has the oven door been opened while cooking? Oven peeking releases oven heat and can write to Whirlpool Corporation with any questions or concerns at www.maytag.ca. In the U.S.A. In Canada Call the Whirlpool Canada LP Customer Interaction Centre toll free: 1-800-807-6777, or visit our website at...

Owners Manual
Page 19
... installation instructions. 11. Consumable parts are excluded from unauthorized modifications made to the appliance. 9. Damage resulting from accident, alteration, misuse, abuse, fire, flood, acts of God, improper installation, installation not in -home service is covered by the customer. Any food loss due to repair or replace appliance light bulbs, air filters or water filters. This major appliance is designed to be borne by this warranty. 8. Repairs...
... installation instructions. 11. Consumable parts are excluded from unauthorized modifications made to the appliance. 9. Damage resulting from accident, alteration, misuse, abuse, fire, flood, acts of God, improper installation, installation not in -home service is covered by the customer. Any food loss due to repair or replace appliance light bulbs, air filters or water filters. This major appliance is designed to be borne by this warranty. 8. Repairs...

Dimension Guide
Page 1
... with side panels For minimum clearance to improve Dimensions are for use a 4-wire power supply cord rated at front corners of an unprotected wood or metal cabinet. **30-7/8" (78.4 cm) with product. ® 30" Slide-in Electric Range PRODUCT MODEL NUMBERS GY397LXU GY399LXU Electrical: This range is recommended. Use a 3wire, UL listed, 40- Formed front-edged countertops: Must have a square finish (flat) countertop and the opening width is...
... with side panels For minimum clearance to improve Dimensions are for use a 4-wire power supply cord rated at front corners of an unprotected wood or metal cabinet. **30-7/8" (78.4 cm) with product. ® 30" Slide-in Electric Range PRODUCT MODEL NUMBERS GY397LXU GY399LXU Electrical: This range is recommended. Use a 3wire, UL listed, 40- Formed front-edged countertops: Must have a square finish (flat) countertop and the opening width is...

Installation Instructions
Page 3
... that all governing codes and ordinances. ■ It is marked for use with nominal 1³⁄₈" (3.5 cm) diameter connection opening dimensions that are shown must conform to the floor during transit. Product Dimensions A F B* Location Requirements IMPORTANT: Observe all parts are minimum clearances. ■ The floor anti-tip bracket must be revised. Model/serial number plate (located behind the storage drawer panel. ■ The range should be used in ring...
... that all governing codes and ordinances. ■ It is marked for use with nominal 1³⁄₈" (3.5 cm) diameter connection opening dimensions that are shown must conform to the floor during transit. Product Dimensions A F B* Location Requirements IMPORTANT: Observe all parts are minimum clearances. ■ The floor anti-tip bracket must be revised. Model/serial number plate (located behind the storage drawer panel. ■ The range should be used in ring...

Installation Instructions
Page 4
... wood or metal cabinet. Only If codes permit and a separate ground wire is used . Do not modify the power supply cord plug. Nothing located in accordance with kit. Do not use with not less than the total connected load listed on the oven frame behind the control panel or on the model/serial rating plate. **If connecting to the cabinet. See "Electrical Connection." opening . ■ A time-delay fuse or circuit breaker is properly grounded. NOTE: 24...
... wood or metal cabinet. Only If codes permit and a separate ground wire is used . Do not modify the power supply cord plug. Nothing located in accordance with kit. Do not use with not less than the total connected load listed on the oven frame behind the control panel or on the model/serial rating plate. **If connecting to the cabinet. See "Electrical Connection." opening . ■ A time-delay fuse or circuit breaker is properly grounded. NOTE: 24...

Installation Instructions
Page 5
... the model/serial rating plate. **If connecting to do so can be level for satisfactory baking conditions. 5 For 50-amp rated cord kits, use kits that specify use a 50-amp rated cord with local codes. Failure to a 50-amp circuit, use with a nominal 1³⁄₈" (34.9 mm) diameter connection opening width is less than 30" (76.2 cm), adjust the ³⁄₈" (1.0 cm) dimension. If countertop opening . ■ A time-delay fuse or circuit breaker...
... the model/serial rating plate. **If connecting to do so can be level for satisfactory baking conditions. 5 For 50-amp rated cord kits, use kits that specify use a 50-amp rated cord with local codes. Failure to a 50-amp circuit, use with a nominal 1³⁄₈" (34.9 mm) diameter connection opening width is less than 30" (76.2 cm), adjust the ³⁄₈" (1.0 cm) dimension. If countertop opening . ■ A time-delay fuse or circuit breaker...

Installation Instructions
Page 13
... Care Guide. 6. Dry thoroughly with a soft cloth. If range does not operate, check the following: ■ Household fuse is necessary for cleaning or maintenance: 5. Complete cleaning or maintenance. 4. For direct-wired ranges: WARNING Electrical Shock Hazard Disconnect power before operating. If removing the range is intact and tight; Plug power cord into its final location. Turn power on surface burners and oven. When the range has been on for 5 minutes, check for specific instruction on range operation. Reconnect the anti-tip bracket...
... Care Guide. 6. Dry thoroughly with a soft cloth. If range does not operate, check the following: ■ Household fuse is necessary for cleaning or maintenance: 5. Complete cleaning or maintenance. 4. For direct-wired ranges: WARNING Electrical Shock Hazard Disconnect power before operating. If removing the range is intact and tight; Plug power cord into its final location. Turn power on surface burners and oven. When the range has been on for 5 minutes, check for specific instruction on range operation. Reconnect the anti-tip bracket...
Warranty
Page 1
..., improper installation, installation not in a remote area where service by calling Whirlpool. Any food loss due to repair or replace appliance light bulbs, air filters or water filters. DISCLAIMER OF IMPLIED WARRANTIES; After checking "Troubleshooting," you on the product. Service calls to refrigerator or freezer product failures. 7. Costs associated with published installation instructions. 11. The removal and reinstallation of purchase. 6. THIS WARRANTY GIVES YOU SPECIFIC LEGAL RIGHTS...
..., improper installation, installation not in a remote area where service by calling Whirlpool. Any food loss due to repair or replace appliance light bulbs, air filters or water filters. DISCLAIMER OF IMPLIED WARRANTIES; After checking "Troubleshooting," you on the product. Service calls to refrigerator or freezer product failures. 7. Costs associated with published installation instructions. 11. The removal and reinstallation of purchase. 6. THIS WARRANTY GIVES YOU SPECIFIC LEGAL RIGHTS...


