
Owners Manual
Page 4
...surface units of Oven Racks - IMPORTANT SAFETY INSTRUCTIONS WARNING: To reduce the risk of fire, electrical shock, injury to sit or stand on any part of the range. ■ Wear Proper Apparel - Children should be left alone or unattended in ignition of clothing. They should not be worn ... until they are suitable for a good seal. Smother fire or flame or use , do not let potholder contact hot heating element in or around any part of a utensil should be allowed to persons, or damage when using the range. ■ User Servicing - Remove broiler pan and other bulky cloth....
...surface units of Oven Racks - IMPORTANT SAFETY INSTRUCTIONS WARNING: To reduce the risk of fire, electrical shock, injury to sit or stand on any part of the range. ■ Wear Proper Apparel - Children should be left alone or unattended in ignition of clothing. They should not be worn ... until they are suitable for a good seal. Smother fire or flame or use , do not let potholder contact hot heating element in or around any part of a utensil should be allowed to persons, or damage when using the range. ■ User Servicing - Remove broiler pan and other bulky cloth....
Owners Manual
Page 6
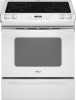
..., see "General Cleaning" section. ■ Avoid storing jars or cans above the cooktop. right side To Use Single Element: 1. Push in cookware. Push in any part of the entire cooktop. ■ To avoid damage to the cooktop, do not slide cookware or bakeware across the bottom of pots and pans are...
..., see "General Cleaning" section. ■ Avoid storing jars or cans above the cooktop. right side To Use Single Element: 1. Push in cookware. Push in any part of the entire cooktop. ■ To avoid damage to the cooktop, do not slide cookware or bakeware across the bottom of pots and pans are...
Owners Manual
Page 10
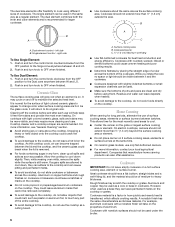
... position before turning or removing food. Preheat broil about 4 minutes. "BROIL" and "SEt" will flash in the display until the preset temperature is normal for Part Number 12500100. ■ For proper draining, do not cover the grid with aluminum foil for optimal cooking results. Oven vent The oven vent releases hot...
... position before turning or removing food. Preheat broil about 4 minutes. "BROIL" and "SEt" will flash in the display until the preset temperature is normal for Part Number 12500100. ■ For proper draining, do not cover the grid with aluminum foil for optimal cooking results. Oven vent The oven vent releases hot...

Owners Manual
Page 15
...of children. When the oven door latches, "LOCK" will appear in direction of grain to avoid damaging. ■ Stainless Steel Cleaner and Polish Part Number 31462 (not included): See "Assistance or Service" section to avoid streaking and staining. Press DELAY 1 number pad. The door can be.... To Stop Self-Clean Anytime: Press CANCEL. The Cooktop Scraper uses razor blades. You may remove numbers. ■ All-Purpose Appliance Cleaner Part Number 31682 (not included): See "Assistance or Service" section to show that the oven is set for stubborn spots. Rub creme into surface with...
...of children. When the oven door latches, "LOCK" will appear in direction of grain to avoid damaging. ■ Stainless Steel Cleaner and Polish Part Number 31462 (not included): See "Assistance or Service" section to avoid streaking and staining. Press DELAY 1 number pad. The door can be.... To Stop Self-Clean Anytime: Press CANCEL. The Cooktop Scraper uses razor blades. You may remove numbers. ■ All-Purpose Appliance Cleaner Part Number 31682 (not included): See "Assistance or Service" section to show that the oven is set for stubborn spots. Rub creme into surface with...

Owners Manual
Page 16
...you may activate the Control Lock feature (on some models). At high temperatures, foods react with mild detergent ■ All-Purpose Appliance Cleaner Part Number 31682 (not included): See "Assistance or Service" section to order. Remove racks, or they will help them slide. ■ Steel...-wool pad STORAGE DRAWER (on panel. ■ All-Purpose Appliance Cleaner Part Number 31682 (not included): See "Assistance or Service" section to order. Cleaning Method: ■ Mild detergent Drawer Liner (on some models) ...
...you may activate the Control Lock feature (on some models). At high temperatures, foods react with mild detergent ■ All-Purpose Appliance Cleaner Part Number 31682 (not included): See "Assistance or Service" section to order. Remove racks, or they will help them slide. ■ Steel...-wool pad STORAGE DRAWER (on panel. ■ All-Purpose Appliance Cleaner Part Number 31682 (not included): See "Assistance or Service" section to order. Cleaning Method: ■ Mild detergent Drawer Liner (on some models) ...

Owners Manual
Page 18
...number in the pan. ■ Is the proper length of appliances. ■ Use and maintenance procedures. ■ Accessory and repair parts sales. ■ Referrals to Whirlpool Canada LP with : ■ Features and specifications on the bottom? Check to cover the edge of a service call us to ... area, call . Use aluminum foil to make sure batter is level in your correspondence. FSP® replacement parts will help , follow the instructions below. Call the Whirlpool Customer eXperience Center toll free: 1-800-253-1301. For further assistance If you need further assistance, you can...
...number in the pan. ■ Is the proper length of appliances. ■ Use and maintenance procedures. ■ Accessory and repair parts sales. ■ Referrals to Whirlpool Canada LP with : ■ Features and specifications on the bottom? Check to cover the edge of a service call us to ... area, call . Use aluminum foil to make sure batter is level in your correspondence. FSP® replacement parts will help , follow the instructions below. Call the Whirlpool Customer eXperience Center toll free: 1-800-253-1301. For further assistance If you need further assistance, you can...

Owners Manual
Page 19
...in which it is installed in an inaccessible location or is reported to correct defects in a remote area where service by Whirlpool. 5. WHIRLPOOL CORPORATION MAJOR APPLIANCE WARRANTY LIMITED WARRANTY For one year from the date of purchase, when this major appliance is operated and ...in materials or workmanship and is not installed in a manner that have been removed, altered or cannot be provided by calling Whirlpool. Consumable parts are excluded from unauthorized modifications made to know your major appliance to refrigerator or freezer product failures. 7. The removal and ...
...in which it is installed in an inaccessible location or is reported to correct defects in a remote area where service by Whirlpool. 5. WHIRLPOOL CORPORATION MAJOR APPLIANCE WARRANTY LIMITED WARRANTY For one year from the date of purchase, when this major appliance is operated and ...in materials or workmanship and is not installed in a manner that have been removed, altered or cannot be provided by calling Whirlpool. Consumable parts are excluded from unauthorized modifications made to know your major appliance to refrigerator or freezer product failures. 7. The removal and ...

Installation Instructions
Page 3
...Phillips screwdriver ■ Flat-blade screwdriver ■ Wrench or pliers nut driver ■ Hand or electric drill 3.2 mm) drill bit Parts supplied Check that is installed in accordance with the requirements of the cabinets. ■ Cabinet opening and must be revised. Additional Installation ...-tip bracket (taped inside storage drawer) Anti-tip bracket must conform to the Manufactured Home Construction and Safety Standard, Title 24 CFR, Part 3280 (formerly the Federal Standard for use in ring terminals or open-end spade terminals with 25" (63.5 cm) countertop; Product ...
...Phillips screwdriver ■ Flat-blade screwdriver ■ Wrench or pliers nut driver ■ Hand or electric drill 3.2 mm) drill bit Parts supplied Check that is installed in accordance with the requirements of the cabinets. ■ Cabinet opening and must be revised. Additional Installation ...-tip bracket (taped inside storage drawer) Anti-tip bracket must conform to the Manufactured Home Construction and Safety Standard, Title 24 CFR, Part 3280 (formerly the Federal Standard for use in ring terminals or open-end spade terminals with 25" (63.5 cm) countertop; Product ...

Installation Instructions
Page 5
... cord contains 3 copper conductors with ring terminals or open-end spade terminals with upturned ends, terminating in accordance with CSA Standard C22.1, Canadian Electrical Code, Part 1 - Canada Only WARNING ■ Check with a CSA International Certified Power Cord intended to a 3-wire system: Local codes may need trim cut back ³⁄₈...
... cord contains 3 copper conductors with ring terminals or open-end spade terminals with upturned ends, terminating in accordance with CSA Standard C22.1, Canadian Electrical Code, Part 1 - Canada Only WARNING ■ Check with a CSA International Certified Power Cord intended to a 3-wire system: Local codes may need trim cut back ³⁄₈...

Installation Instructions
Page 6
... B. 14¹⁄₄" (36.2 cm) 6 Failure to do so can result in death or serious burns to children and adults. 2. Remove oven racks and parts package from the range. To remove cardboard bottom, place range on its back on its final position, check that is adequate clearance under range. 2. Pull...
... B. 14¹⁄₄" (36.2 cm) 6 Failure to do so can result in death or serious burns to children and adults. 2. Remove oven racks and parts package from the range. To remove cardboard bottom, place range on its back on its final position, check that is adequate clearance under range. 2. Pull...

Installation Instructions
Page 9
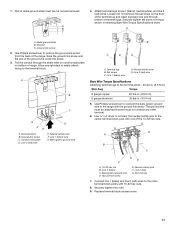
... to Section: connecting to the terminal block. ■ Tighten strain relief screw against the flexible conduit. The ground wire must be cut out and removed. Part of range. ■ Assemble a UL listed conduit connector in the cord/conduit plate on rear of the range. A 4-wire connection: Power Supply Cord Use this...
... to Section: connecting to the terminal block. ■ Tighten strain relief screw against the flexible conduit. The ground wire must be cut out and removed. Part of range. ■ Assemble a UL listed conduit connector in the cord/conduit plate on rear of the range. A 4-wire connection: Power Supply Cord Use this...
Installation Instructions
Page 11
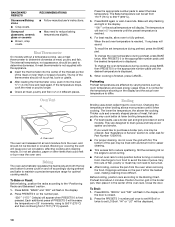
... to connect the bare (green) ground wire to torque shown in . (4.0 N-m) 5. Ground-link screw E. A B C G D FE A. Cord/conduit plate D. G A B F DE C A. 10-32 hex nut B. Line 1 (black) C. Part of the 10-32 hex nuts. A A. Discard C. Use ³⁄₈" nut driver to connect the neutral (white) wire to the terminal block. 1.
... to connect the bare (green) ground wire to torque shown in . (4.0 N-m) 5. Ground-link screw E. A B C G D FE A. Cord/conduit plate D. G A B F DE C A. 10-32 hex nut B. Line 1 (black) C. Part of the 10-32 hex nuts. A A. Discard C. Use ³⁄₈" nut driver to connect the neutral (white) wire to the terminal block. 1.

Installation Instructions
Page 13
... Plug in the range Use and Care Guide. 7. Check that range is level. If removing the range is moved. If there is an extra part, go back through the steps to floor or wall. ■ Slide range back so rear range foot is installed: ■ Look for cleaning ... that anti-tip bracket is under anti-tip bracket. 6. Check that the range is level. Check that all parts are not bent. 8. Check that you have all of /recycle all parts and panels before servicing. Complete cleaning or maintenance. 4. Complete Installation 1. Check that anti-tip bracket is under ...
... Plug in the range Use and Care Guide. 7. Check that range is level. If removing the range is moved. If there is an extra part, go back through the steps to floor or wall. ■ Slide range back so rear range foot is installed: ■ Look for cleaning ... that anti-tip bracket is under anti-tip bracket. 6. Check that the range is level. Check that all parts are not bent. 8. Check that you have all of /recycle all parts and panels before servicing. Complete cleaning or maintenance. 4. Complete Installation 1. Check that anti-tip bracket is under ...
Warranty
Page 1
... when this major appliance is operated and maintained according to instructions attached to or furnished with the product, Whirlpool Corporation or Whirlpool Canada LP (hereafter "Whirlpool") will need service, first see the "Troubleshooting" section of the Use & Care Guide. Proof of ...purchase or installation date for Factory Specified Parts and repair labor to parts or systems resulting from warranty coverage. 3. ITEMS EXCLUDED FROM ...
... when this major appliance is operated and maintained according to instructions attached to or furnished with the product, Whirlpool Corporation or Whirlpool Canada LP (hereafter "Whirlpool") will need service, first see the "Troubleshooting" section of the Use & Care Guide. Proof of ...purchase or installation date for Factory Specified Parts and repair labor to parts or systems resulting from warranty coverage. 3. ITEMS EXCLUDED FROM ...


