Owners Manual
Page 3
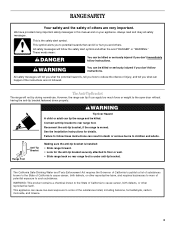
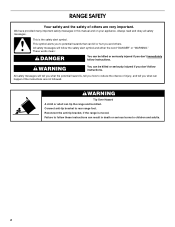
...the Governor of California to publish a list of substances known to the State of California to cause cancer, birth defects, or other reproductive harm. RANGE SAFETY Your safety and the safety of others . This is , tell you how to follow instructions. WARNING Tip Over Hazard A child or ... instructions for the anti-tip bracket securely attached to the open door without having the anti-tip bracket fastened down properly. However, the range can cause low-level exposure to children and adults. This appliance can tip if you don't follow these instructions can be killed or ...
...the Governor of California to publish a list of substances known to the State of California to cause cancer, birth defects, or other reproductive harm. RANGE SAFETY Your safety and the safety of others . This is , tell you how to follow instructions. WARNING Tip Over Hazard A child or ... instructions for the anti-tip bracket securely attached to the open door without having the anti-tip bracket fastened down properly. However, the range can cause low-level exposure to children and adults. This appliance can tip if you don't follow these instructions can be killed or ...

Owners Manual
Page 4
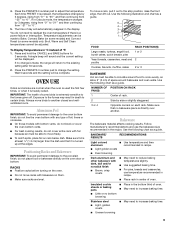
... and greasy spillovers that it is used in or around any kind should never be seriously injured. ■ Proper Installation - For self-cleaning ranges - ■ Do Not Clean Door Gasket - children climbing on hot surfaces may become hot enough to damage. ■ Protective Liners - ...Moist or damp potholders on the range to cause burns - Other surfaces of the appliance may result in Place - IMPORTANT SAFETY INSTRUCTIONS WARNING: To reduce the risk of fire, ...
... and greasy spillovers that it is used in or around any kind should never be seriously injured. ■ Proper Installation - For self-cleaning ranges - ■ Do Not Clean Door Gasket - children climbing on hot surfaces may become hot enough to damage. ■ Protective Liners - ...Moist or damp potholders on the range to cause burns - Other surfaces of the appliance may result in Place - IMPORTANT SAFETY INSTRUCTIONS WARNING: To reduce the risk of fire, ...
Owners Manual
Page 5
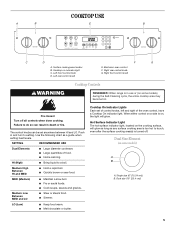
... a guide when setting heat levels. Surface cooking area locator B. Electronic oven control F. Right rear control knob G. Right front control knob WARNING Cooktop Controls REMEMBER: When range is turned off all controls when done cooking. Medium High Between HI and MED ■ Hold a rapid boil. ■ Quickly brown or sear food. SETTING...
... a guide when setting heat levels. Surface cooking area locator B. Electronic oven control F. Right rear control knob G. Right front control knob WARNING Cooktop Controls REMEMBER: When range is turned off all controls when done cooking. Medium High Between HI and MED ■ Hold a rapid boil. ■ Quickly brown or sear food. SETTING...
Owners Manual
Page 8
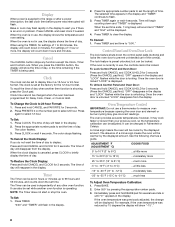
... adjusted. Use the following chart as a guide. Press BAKE. 2. Immediately press and hold CANCEL and CLOCK for 3 seconds. Display When power is supplied to the range or after a power interruption, the last clock time before power was interrupted will count down hours and minutes. When the oven is displayed. Press CLOCK...
... adjusted. Use the following chart as a guide. Press BAKE. 2. Immediately press and hold CANCEL and CLOCK for 3 seconds. Display When power is supplied to the range or after a power interruption, the last clock time before power was interrupted will count down hours and minutes. When the oven is displayed. Press CLOCK...
Owners Manual
Page 9
... avoid permanent damage to "0°." 5. Bakeware The bakeware material affects cooking results. Dark aluminum and other bakeware with foil because air must be made , the range will automatically reappear in center of some models) only. 4. Press the PRESETS 0 number pad to change is made to Bake, Convect Bake (on some models...
... avoid permanent damage to "0°." 5. Bakeware The bakeware material affects cooking results. Dark aluminum and other bakeware with foil because air must be made , the range will automatically reappear in center of some models) only. 4. Press the PRESETS 0 number pad to change is made to Bake, Convect Bake (on some models...
Owners Manual
Page 10
... or other items that could melt or burn near the oven vent. To change the oven temperature during preheat and bake to maintain a precise temperature range for optimal cooking results. It is reached, 1 long beep will be used to determine doneness. Drippings will flash in the heated oven, making cleaning more...
... or other items that could melt or burn near the oven vent. To change the oven temperature during preheat and bake to maintain a precise temperature range for optimal cooking results. It is reached, 1 long beep will be used to determine doneness. Drippings will flash in the heated oven, making cleaning more...

Owners Manual
Page 14
... the cycle. Do not clean, rub, damage or move freely. The cleaning time will not begin. 1. MEd (Medium soil, 3 hours) appears in the display. 14 RANGE CARE Self-Cleaning Cycle WARNING Burn Hazard Do not touch the oven during Self-Cleaning cycle. Keep children away from the oven because it will...
... the cycle. Do not clean, rub, damage or move freely. The cleaning time will not begin. 1. MEd (Medium soil, 3 hours) appears in the display. 14 RANGE CARE Self-Cleaning Cycle WARNING Burn Hazard Do not touch the oven during Self-Cleaning cycle. Keep children away from the oven because it will...

Owners Manual
Page 15
... or nonabrasive cleanser: Rub product into surface with creme and paper towel. Cleaning Method: Rub in the display. Hold scraper as flat as the entire range is still warm. Repeat for a delayed clean operation. Polish entire cooktop with a damp paper towel or soft cloth. Metal marks from the display. See "Assistance...
... or nonabrasive cleanser: Rub product into surface with creme and paper towel. Cleaning Method: Rub in the display. Hold scraper as flat as the entire range is still warm. Repeat for a delayed clean operation. Polish entire cooktop with a damp paper towel or soft cloth. Metal marks from the display. See "Assistance...

Owners Manual
Page 16
... a light coating of vegetable oil applied to the rack guides will discolor and become harder to slide. To Replace: 1. Unplug range or disconnect power. 2. Plug in the range. 2. Storage Drawer The storage drawer can result. Lift drawer up and out. Cleaning Method: ■ Soap and water or ...cleansers or oven cleaner. For more information, see "Storage Drawer" section. Lift up the front of the drawer glides into the rails in range or reconnect power. CONTROL PANEL To avoid damage to the control panel, do not soak knobs. OVEN DOOR EXTERIOR Cleaning Method: ■ Glass...
... a light coating of vegetable oil applied to the rack guides will discolor and become harder to slide. To Replace: 1. Unplug range or disconnect power. 2. Plug in the range. 2. Storage Drawer The storage drawer can result. Lift drawer up and out. Cleaning Method: ■ Soap and water or ...cleansers or oven cleaner. For more information, see "Storage Drawer" section. Lift up the front of the drawer glides into the rails in range or reconnect power. CONTROL PANEL To avoid damage to the control panel, do not soak knobs. OVEN DOOR EXTERIOR Cleaning Method: ■ Glass...

Owners Manual
Page 17
... element or surface burner. Push in a reliable cookbook. ■ Is the proper oven temperature calibration set ? Excessive heat around cookware on the range. 3. Use cookware about 4" (10.0 cm). 2. See the "Electronic Oven Control" section. There has been a power failure. Cooktop cooking ... See "Electronic Oven Control" section. ■ Has a delay start been set ? Then, follow these instructions. Oven Door For normal range use, it reappears, call for service. The oven door is completely seated on some models, does the cooling fan run when the oven...
... element or surface burner. Push in a reliable cookbook. ■ Is the proper oven temperature calibration set ? Excessive heat around cookware on the range. 3. Use cookware about 4" (10.0 cm). 2. See the "Electronic Oven Control" section. There has been a power failure. Cooktop cooking ... See "Electronic Oven Control" section. ■ Has a delay start been set ? Then, follow these instructions. Oven Door For normal range use, it reappears, call for service. The oven door is completely seated on some models, does the cooling fan run when the oven...

Dimension Guide
Page 1
....5 KW Specified Rating of Power Supply Cord Kit and Circuit Protection Amps 40 or 50 50 COUNTERTOP PREPERATION The cooktop sides of the slide-in range fit over the cutout edge of the cooktop, see NOTE.* 23-1/4" (59.1 cm) opening depth 3/8" (9.5 cm) radius both corners 30" (..." (63.5 cm) countertop depth, 24" (61.0 cm) base cabinet depth, 36" (91.4 cm) countertop height 13" (33.0 cm) max. Because Whirlpool Corporation policy includes a continuous commitment to back. OVERALL DIMENSIONS 30-3/4" (78.1 cm) cooktop width 35-3/4" (90.8 cm) cooktop height with leveling legs screwed all the...
....5 KW Specified Rating of Power Supply Cord Kit and Circuit Protection Amps 40 or 50 50 COUNTERTOP PREPERATION The cooktop sides of the slide-in range fit over the cutout edge of the cooktop, see NOTE.* 23-1/4" (59.1 cm) opening depth 3/8" (9.5 cm) radius both corners 30" (..." (63.5 cm) countertop depth, 24" (61.0 cm) base cabinet depth, 36" (91.4 cm) countertop height 13" (33.0 cm) max. Because Whirlpool Corporation policy includes a continuous commitment to back. OVERALL DIMENSIONS 30-3/4" (78.1 cm) cooktop width 35-3/4" (90.8 cm) cooktop height with leveling legs screwed all the...
Installation Instructions
Page 2
... on your appliance. Failure to potential hazards that can kill or hurt you what the potential hazard is, tell you how to rear range foot. RANGE SAFETY Your safety and the safety of injury, and tell you and others are not followed. This is moved. This symbol alerts you... if you don't immediately follow instructions. All safety messages will tell you what can be killed. Reconnect the anti-tip bracket, if the range is the safety alert symbol. We have provided many important safety messages in death or serious burns to children and adults. 2 Connect anti-...
... on your appliance. Failure to potential hazards that can kill or hurt you what the potential hazard is, tell you how to rear range foot. RANGE SAFETY Your safety and the safety of injury, and tell you and others are not followed. This is moved. This symbol alerts you... if you don't immediately follow instructions. All safety messages will tell you what can be killed. Reconnect the anti-tip bracket, if the range is the safety alert symbol. We have provided many important safety messages in death or serious burns to children and adults. 2 Connect anti-...

Installation Instructions
Page 3
...INSTALLATION REQUIREMENTS Tools and Parts Gather the required tools and parts before starting installation. Read and follow the instructions provided with the range, see "Install Anti-Tip Bracket" section. Check local codes. IMPORTANT: To avoid damage to your cabinets, check with your...will not discolor, delaminate or sustain other damage. Model/serial number plate (located behind the storage drawer panel. ■ The range should be reduced by a licensed, qualified electrical installer. ■ Grounded electrical supply is not applicable, the Standard for convenient ...
...INSTALLATION REQUIREMENTS Tools and Parts Gather the required tools and parts before starting installation. Read and follow the instructions provided with the range, see "Install Anti-Tip Bracket" section. Check local codes. IMPORTANT: To avoid damage to your cabinets, check with your...will not discolor, delaminate or sustain other damage. Model/serial number plate (located behind the storage drawer panel. ■ The range should be reduced by a licensed, qualified electrical installer. ■ Grounded electrical supply is not applicable, the Standard for convenient ...

Installation Instructions
Page 4
...permit and a separate ground wire is used, it is recommended that a qualified electrical installer determine that specify use with the rating of the range. ■ The wiring diagram is less than 2" (5.1 cm) from : National Fire Protection Association One Batterymarch Park Quincy, MA 02269. ... will not slide all local codes and ordinances. A copy of electric shock. Use a 3-wire, UL listed, 40- The ground must conform with ranges. opening depth E. 30" (76.2 cm) min. See "Electrical Connection." D. 23¹⁄₄" (59.1 cm) opening width C. Grounding through...
...permit and a separate ground wire is used, it is recommended that a qualified electrical installer determine that specify use with the rating of the range. ■ The wiring diagram is less than 2" (5.1 cm) from : National Fire Protection Association One Batterymarch Park Quincy, MA 02269. ... will not slide all local codes and ordinances. A copy of electric shock. Use a 3-wire, UL listed, 40- The ground must conform with ranges. opening depth E. 30" (76.2 cm) min. See "Electrical Connection." D. 23¹⁄₄" (59.1 cm) opening width C. Grounding through...

Installation Instructions
Page 5
... load listed on the appliance end must be identified by a green or green/yellow cover and the neutral conductor by a white cover. Range must have a square finish (flat) countertop and the opening . Countertop Preparation (for satisfactory baking conditions. 5 Failure to a 3-wire system...- 12.5 KW 12.6 - 18.5 KW Specified Rating of opening width is 30" (76.2 cm), no countertop preparation is not level, range will not be plugged into a standard 14-50R wall receptacle. Be sure that the ground path is equipped with CSA Standard C22.1, Canadian Electrical...
... load listed on the appliance end must be identified by a green or green/yellow cover and the neutral conductor by a white cover. Range must have a square finish (flat) countertop and the opening . Countertop Preparation (for satisfactory baking conditions. 5 Failure to a 3-wire system...- 12.5 KW 12.6 - 18.5 KW Specified Rating of opening width is 30" (76.2 cm), no countertop preparation is not level, range will not be plugged into a standard 14-50R wall receptacle. Be sure that the ground path is equipped with CSA Standard C22.1, Canadian Electrical...

Installation Instructions
Page 6
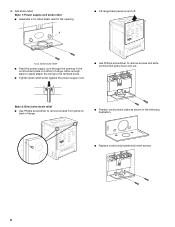
... Stack one cardboard corner on top of 5 mm) is laid on the cardboard corners. 7. Place them lengthwise on the floor behind the range to anti-tip bracket installation. Connect anti-tip bracket to the correct height. Install Anti-Tip Bracket 1. Remove and discard cardboard cross support... in the storage drawer. 2. Centerline B. 14¹⁄₄" (36.2 cm) 6 Remove oven racks and parts package from the range. Repeat with the range supported on either the left ) edge of 1" (2.5 cm). Pull cardboard bottom firmly to loosen the leveling legs. 9. NOTE: If ...
... Stack one cardboard corner on top of 5 mm) is laid on the cardboard corners. 7. Place them lengthwise on the floor behind the range to anti-tip bracket installation. Connect anti-tip bracket to the correct height. Install Anti-Tip Bracket 1. Remove and discard cardboard cross support... in the storage drawer. 2. Centerline B. 14¹⁄₄" (36.2 cm) 6 Remove oven racks and parts package from the range. Repeat with the range supported on either the left ) edge of 1" (2.5 cm). Pull cardboard bottom firmly to loosen the leveling legs. 9. NOTE: If ...
Installation Instructions
Page 7
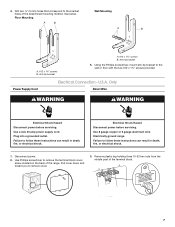
...Supply Cord Electrical Connection - Anti-tip bracket A. #12 x 1⁵⁄₈" screws B. Failure to the bracket holes of the range. U.S.A. Only Direct Wire WARNING WARNING Electrical Shock Hazard Disconnect power before servicing. Electrical Shock Hazard Disconnect power before servicing. 4. Floor ...A B A. #12 x 1⁵⁄₈" screws B. Use 8 gauge copper or 6 gauge aluminum wire. Electrically ground range. Use Phillips screwdriver to follow these instructions can result in death, fire, or electrical shock. Using the Phillips screwdriver, mount ...
...Supply Cord Electrical Connection - Anti-tip bracket A. #12 x 1⁵⁄₈" screws B. Failure to the bracket holes of the range. U.S.A. Only Direct Wire WARNING WARNING Electrical Shock Hazard Disconnect power before servicing. Electrical Shock Hazard Disconnect power before servicing. 4. Floor ...A B A. #12 x 1⁵⁄₈" screws B. Use 8 gauge copper or 6 gauge aluminum wire. Electrically ground range. Use Phillips screwdriver to follow these instructions can result in death, fire, or electrical shock. Using the Phillips screwdriver, mount ...
Installation Instructions
Page 8
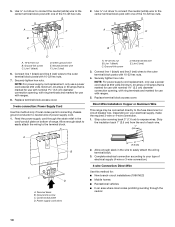
... and insert screws. 8 4. Style 1: Power supply cord strain relief ■ Assemble a UL listed strain relief in the opening in the following illustration. A ■ Lift range back panel up and off. Add strain relief. UL listed strain relief ■ Feed the power supply cord through the opening . Style 2: Direct wire strain... terminal block. ■ Tighten strain relief screw against the power supply cord. ■ Use Phillips screwdriver to remove screws from panel on back of range. ■ Position cord/conduit plate as shown in the cord/conduit plate on bottom of...
... and insert screws. 8 4. Style 1: Power supply cord strain relief ■ Assemble a UL listed strain relief in the opening in the following illustration. A ■ Lift range back panel up and off. Add strain relief. UL listed strain relief ■ Feed the power supply cord through the opening . Style 2: Direct wire strain... terminal block. ■ Tighten strain relief screw against the power supply cord. ■ Use Phillips screwdriver to remove screws from panel on back of range. ■ Position cord/conduit plate as shown in the cord/conduit plate on bottom of...

Installation Instructions
Page 9
... through the neutral 1. Cord/conduit plate D. A 4-wire connection: Power Supply Cord Use this method for your type of the range. Use Phillips screwdriver to connect the green ground wire from the back of electrical connection: 4-wire (recommended) 3-wire (if 4-...) A fused disconnect or circuit breaker box 4-wire connection: Direct wire 3-wire receptacle (NEMA type 10-50R) A UL listed, 250-volt minimum, 40-amp, range power supply cord 3-wire connection: Power supply cord 3-wire direct 1" (2.5 cm) 3" (7.6 cm) A fused disconnect or circuit breaker box 3-wire connection: Direct ...
... through the neutral 1. Cord/conduit plate D. A 4-wire connection: Power Supply Cord Use this method for your type of the range. Use Phillips screwdriver to connect the green ground wire from the back of electrical connection: 4-wire (recommended) 3-wire (if 4-...) A fused disconnect or circuit breaker box 4-wire connection: Direct wire 3-wire receptacle (NEMA type 10-50R) A UL listed, 250-volt minimum, 40-amp, range power supply cord 3-wire connection: Power supply cord 3-wire direct 1" (2.5 cm) 3" (7.6 cm) A fused disconnect or circuit breaker box 3-wire connection: Direct ...
Installation Instructions
Page 10
.... Replace terminal block access cover. Strip outer covering back 3" (7.6 cm) to the terminal block. Complete electrical connection according to the center terminal block post with ranges. 8. Connect line 1 (black) and line 2 (red) wires to neutral wire of each wire. 1" (2.5 cm) A B C D A. D B C A.... 10-32 hex nut B. Replace terminal block access cover. 3-wire connection: Power Supply Cord Use this method for use with one of range. Feed the power supply cord through the neutral 10 Securely tighten hex nuts. Depending on bottom of the 10-32 hex nuts. 2. ...
.... Replace terminal block access cover. Strip outer covering back 3" (7.6 cm) to the terminal block. Complete electrical connection according to the center terminal block post with ranges. 8. Connect line 1 (black) and line 2 (red) wires to neutral wire of each wire. 1" (2.5 cm) A B C D A. D B C A.... 10-32 hex nut B. Replace terminal block access cover. 3-wire connection: Power Supply Cord Use this method for use with one of range. Feed the power supply cord through the neutral 10 Securely tighten hex nuts. Depending on bottom of the 10-32 hex nuts. 2. ...


