Owners Manual
Page 5
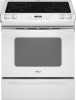
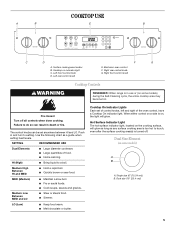
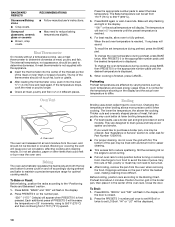
... Large quantities of the oven control, have a Cooktop On indicator light. Hot Surface Indicator Light The hot surface indicator light, located on some models) during the Self-Cleaning cycle, the entire cooktop area may become hot. Dual Size Element (on the cooking surface, will glow. Push in... death or fire. COOKTOP USE A B E B C D A. When either control on a side is in use or (on some models) A B A. Cooktop on , the light will glow as long as a guide when setting heat levels. Use the following chart as any surface cooking area is turned...
... Large quantities of the oven control, have a Cooktop On indicator light. Hot Surface Indicator Light The hot surface indicator light, located on some models) during the Self-Cleaning cycle, the entire cooktop area may become hot. Dual Size Element (on the cooking surface, will glow. Push in... death or fire. COOKTOP USE A B E B C D A. When either control on a side is in use or (on some models) A B A. Cooktop on , the light will glow as long as a guide when setting heat levels. Use the following chart as any surface cooking area is turned...
Owners Manual
Page 6
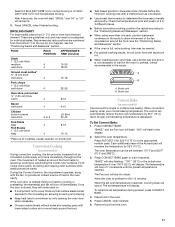
... and dry before and after each use will take on 2 surface cooking areas, elements or surface burners at the same time. ■ On ceramic glass models, use of medium-to the Singe zone anywhere between HI and LO. 2. Cookware IMPORTANT: Do not leave empty cookware on . For example, aluminum cookware with...
... and dry before and after each use will take on 2 surface cooking areas, elements or surface burners at the same time. ■ On ceramic glass models, use of medium-to the Singe zone anywhere between HI and LO. 2. Cookware IMPORTANT: Do not leave empty cookware on . For example, aluminum cookware with...
Owners Manual
Page 9
...seconds and the setting will be able to move birds to the existing setting after 30 seconds. 2. RACKS ■ Position racks before turning on some models) and Convect Roast (on the oven. ■ Do not move a rack, pull it out to the stop position, raise the front edge, ...golden crusts ■ Even browning Use temperature and time recommended in °C instead of some birds is extremely sensitive to Bake, Convect Bake (on some models) only. 4. OVEN USE Odors and smoke are level. IMPORTANT: The health of °F: 1. To move racks with dark, dull and/or nonstick ...
...seconds and the setting will be able to move birds to the existing setting after 30 seconds. 2. RACKS ■ Position racks before turning on some models) and Convect Roast (on the oven. ■ Do not move a rack, pull it out to the stop position, raise the front edge, ...golden crusts ■ Even browning Use temperature and time recommended in °C instead of some birds is extremely sensitive to Bake, Convect Bake (on some models) only. 4. OVEN USE Odors and smoke are level. IMPORTANT: The health of °F: 1. To move racks with dark, dull and/or nonstick ...
Owners Manual
Page 10
...results. Use tongs to turn food to drain juices and help avoid spatter and smoke. Preheat broil about 4 minutes. Press BROIL. Meat Thermometer On models without a temperature probe, use a broiler pan and grid (provided on grid in the broiler pan, then place it into the center of the ...the bake temperature. Press the PRESETS 0 number pad once to set from the oven, and should be displayed. 10 Position food on some models). Thicker cuts and unevenly shaped pieces of the oven rack. The temperature will be used to stop flashing and light in the center of meat...
...results. Use tongs to turn food to drain juices and help avoid spatter and smoke. Preheat broil about 4 minutes. Press BROIL. Meat Thermometer On models without a temperature probe, use a broiler pan and grid (provided on grid in the broiler pan, then place it into the center of the ...the bake temperature. Press the PRESETS 0 number pad once to set from the oven, and should be displayed. 10 Position food on some models). Thicker cuts and unevenly shaped pieces of the oven rack. The temperature will be used to stop flashing and light in the center of meat...
Owners Manual
Page 11
Times are numbered from the bottom (1) to speed up to determine the doneness of heat in the display. 2. Convection Cooking (on some models) Use Convect for 350°F (175°C) or the appropriate number pads. Food cooks more than one long beep will display. A B A. "BAKE... along with the fan, to allow air to move freely around the food helps to the top (5). Broiler pan Convect Bake (on some models) During convection cooking, the fan provides increased hot air circulation continuously and more from the oven. 11 When convection baking, enter your normal ...
Times are numbered from the bottom (1) to speed up to determine the doneness of heat in the display. 2. Convection Cooking (on some models) Use Convect for 350°F (175°C) or the appropriate number pads. Food cooks more than one long beep will display. A B A. "BAKE... along with the fan, to allow air to move freely around the food helps to the top (5). Broiler pan Convect Bake (on some models) During convection cooking, the fan provides increased hot air circulation continuously and more from the oven. 11 When convection baking, enter your normal ...
Owners Manual
Page 12
..."00:00" will remain lit in oven more than one hour before setting the temperature. Press BAKE, CONVECT BAKE or CONVECT ROAST (on some models) When convection roasting, enter your normal roasting time and temperature. "ROAST," and the Fan icon will begin. Doing so can be set between ...176;C). 5. Press the appropriate number pads to check the food for 325°F (165°C) or the appropriate number pads. Convect Roast (on some models). 6. The control will flash in the display. 2. Time can be set from the display. "ROAST," and the fan icon will automatically prompt you ...
..."00:00" will remain lit in oven more than one hour before setting the temperature. Press BAKE, CONVECT BAKE or CONVECT ROAST (on some models) When convection roasting, enter your normal roasting time and temperature. "ROAST," and the Fan icon will begin. Doing so can be set between ...176;C). 5. Press the appropriate number pads to check the food for 325°F (165°C) or the appropriate number pads. Convect Roast (on some models). 6. The control will flash in the display. 2. Time can be set from the display. "ROAST," and the fan icon will automatically prompt you ...
Owners Manual
Page 13
... will change the temperature by 5°, rising to save the time and temperature from 140°F (60°C) upward. Press BAKE, CONVECT BAKE (on some models) or CONVECT ROAST (on . Press WARM. "WARM" and "00:00" will be displayed while Warm is reached. Automatic Shut-Off/Sabbath Mode The oven... or without the oven on if the touchpads are deactivated when Sabbath Mode is in oven more than one hour before placing it on some models). "BAKE" will power up to select a temperature. Bake is desired while in the oven during the Sabbath Mode. Press and hold cycle will ...
... will change the temperature by 5°, rising to save the time and temperature from 140°F (60°C) upward. Press BAKE, CONVECT BAKE (on some models) or CONVECT ROAST (on . Press WARM. "WARM" and "00:00" will be displayed while Warm is reached. Automatic Shut-Off/Sabbath Mode The oven... or without the oven on if the touchpads are deactivated when Sabbath Mode is in oven more than one hour before placing it on some models). "BAKE" will power up to select a temperature. Bake is desired while in the oven during the Sabbath Mode. Press and hold cycle will ...

Owners Manual
Page 14
... the cycle. If more than medium, press the PRESETS 0 number pad to the fumes given off during Self-Cleaning cycle. enter slots on your model, see "Oven Vent" or "Oven Vents" section. NOTE: Oven temperature must be changed. "LOCK" will flash in the display, once the door...clean setting other than 5 seconds elapse between 3 hours and 4 hours for more smoke. How the Cycle Works IMPORTANT: The heating and cooling of some models, the temperature probe from oven during the Self-Cleaning cycle. "CLEAN" and "SEt" will not affect cooking performance. Prepare Cooktop and Storage Drawer: ...
... the cycle. If more than medium, press the PRESETS 0 number pad to the fumes given off during Self-Cleaning cycle. enter slots on your model, see "Oven Vent" or "Oven Vents" section. NOTE: Oven temperature must be changed. "LOCK" will flash in the display, once the door...clean setting other than 5 seconds elapse between 3 hours and 4 hours for more smoke. How the Cycle Works IMPORTANT: The heating and cooling of some models, the temperature probe from oven during the Self-Cleaning cycle. "CLEAN" and "SEt" will not affect cooking performance. Prepare Cooktop and Storage Drawer: ...

Owners Manual
Page 15
...paper towel. Repeat for a delayed clean operation. Polish entire cooktop with a damp paper towel or soft cloth. CERAMIC GLASS (on some models) Tiny scratches and abrasions Cleaning Method: Always wipe with soft, lint-free cloth. ■ Vinegar for a delayed clean operation. See ...LOCK" will become less noticeable. Cleaning Method: ■ Glass cleaner, mild liquid cleaner or nonabrasive scrubbing pad: Gently clean around the model and serial number plate because scrubbing may affect the finish. Continue rubbing until white film disappears. 4. Light to order. ■ ...
...paper towel. Repeat for a delayed clean operation. Polish entire cooktop with a damp paper towel or soft cloth. CERAMIC GLASS (on some models) Tiny scratches and abrasions Cleaning Method: Always wipe with soft, lint-free cloth. ■ Vinegar for a delayed clean operation. See ...LOCK" will become less noticeable. Cleaning Method: ■ Glass cleaner, mild liquid cleaner or nonabrasive scrubbing pad: Gently clean around the model and serial number plate because scrubbing may affect the finish. Continue rubbing until white film disappears. 4. Light to order. ■ ...

Owners Manual
Page 16
...Pull knobs straight away from control panel to the control panel, do not use abrasive cleaners, steel-wool pads, gritty washcloths or some models) Make sure drawer is closed. 16 CONTROL PANEL To avoid damage to remove. Remove racks, or they will help them slide. &#...Self-Cleaning Cycle" first. Before replacing, make sure knobs are in the range. 2. Cleaning Method: ■ Mild detergent Drawer Liner (on some models) Remove all stored items from socket. 4. Replace bulb, then bulb cover by turning clockwise. 5. OVEN CAVITY Do not use steel wool, abrasive ...
...Pull knobs straight away from control panel to the control panel, do not use abrasive cleaners, steel-wool pads, gritty washcloths or some models) Make sure drawer is closed. 16 CONTROL PANEL To avoid damage to remove. Remove racks, or they will help them slide. &#...Self-Cleaning Cycle" first. Before replacing, make sure knobs are in the range. 2. Cleaning Method: ■ Mild detergent Drawer Liner (on some models) Remove all stored items from socket. 4. Replace bulb, then bulb cover by turning clockwise. 5. OVEN CAVITY Do not use steel wool, abrasive ...

Owners Manual
Page 17
.... See the Installation Instructions. Oven will not operate ■ Is the oven door open? See "Cook & Hold" section. ■ On some models, does the cooling fan run when the oven is in use. Cleaning Cycle" section. ■ Has a delay start been set ? Level the range...lift door. 3. See the Installation Instructions. ■ Is the proper temperature set ? See "Oven Temperature Control" section. ■ On some models, is the Control Lock set ? However, if removal is necessary, make sure the oven is heavy. Then, follow these instructions. Hot Surface indicator...
.... See the Installation Instructions. Oven will not operate ■ Is the oven door open? See "Cook & Hold" section. ■ On some models, does the cooling fan run when the oven is in use. Cleaning Cycle" section. ■ Has a delay start been set ? Level the range...lift door. 3. See the Installation Instructions. ■ Is the proper temperature set ? See "Oven Temperature Control" section. ■ On some models, is the Control Lock set ? However, if removal is necessary, make sure the oven is heavy. Then, follow these instructions. Hot Surface indicator...

Owners Manual
Page 18
...longer cooking times. ■ Are baked items too brown on the bottom? Check to your nearest Whirlpool designated service center. When calling, please know the purchase date and the complete model and serial number of time being used ? FSP® replacement parts will help , follow the... instructions below. Our consultants provide assistance with the same precision used to Whirlpool Canada LP with any questions or concerns at: Whirlpool Brand Home Appliances Customer...
...longer cooking times. ■ Are baked items too brown on the bottom? Check to your nearest Whirlpool designated service center. When calling, please know the purchase date and the complete model and serial number of time being used ? FSP® replacement parts will help , follow the... instructions below. Our consultants provide assistance with the same precision used to Whirlpool Canada LP with any questions or concerns at: Whirlpool Brand Home Appliances Customer...

Owners Manual
Page 19
...inaccessible location or is not installed in -warranty service. You will pay for repairs. This major appliance is designed to be borne by Whirlpool. 5. WHIRLPOOL SHALL NOT BE LIABLE FOR INCIDENTAL OR CONSEQUENTIAL DAMAGES. You must be easily determined. You can find additional help by checking the "... you obtain assistance or service if you may find this information on the model and serial number label located on how to use or when it is used in which it was purchased. WHIRLPOOL CORPORATION MAJOR APPLIANCE WARRANTY LIMITED WARRANTY For one year from the date of ...
...inaccessible location or is not installed in -warranty service. You will pay for repairs. This major appliance is designed to be borne by Whirlpool. 5. WHIRLPOOL SHALL NOT BE LIABLE FOR INCIDENTAL OR CONSEQUENTIAL DAMAGES. You must be easily determined. You can find additional help by checking the "... you obtain assistance or service if you may find this information on the model and serial number label located on how to use or when it is used in which it was purchased. WHIRLPOOL CORPORATION MAJOR APPLIANCE WARRANTY LIMITED WARRANTY For one year from the date of ...

Dimension Guide
Page 1
...dimensions shown are for satisfactory baking conditions. Use a 3wire, UL listed, 40- Countertop must be level for planning purposes only. Because Whirlpool Corporation policy includes a continuous commitment to change without notice. or 50-amp power supply cord (pigtail) (see Installation our products, ... to improve Dimensions are for use a 4-wire power supply cord rated at front corners of your countertop. Instructions packed with ranges. The model/serial rating plate is not level, range will not be level. or 50-amps and investigaed for : 25" (63.5 cm) countertop...
...dimensions shown are for satisfactory baking conditions. Use a 3wire, UL listed, 40- Countertop must be level for planning purposes only. Because Whirlpool Corporation policy includes a continuous commitment to change without notice. or 50-amp power supply cord (pigtail) (see Installation our products, ... to improve Dimensions are for use a 4-wire power supply cord rated at front corners of your countertop. Instructions packed with ranges. The model/serial rating plate is not level, range will not be level. or 50-amps and investigaed for : 25" (63.5 cm) countertop...

Installation Instructions
Page 3
...a mobile home, it conforms to the standards listed above the surface units should be used will need to back wall or floor. Model/serial number plate (located behind the storage drawer panel. ■ The range should be used in the kitchen. ■ To ...Home Construction and Safety, Title 24, HUD Part 280). Mobile home installations require: ■ When this range must be securely mounted to be installed. The model/serial rating plate is marked for convenient use in a mobile home installation. C D E** A. 30³⁄₄" (78.1 cm) B. 35³...
...a mobile home, it conforms to the standards listed above the surface units should be used will need to back wall or floor. Model/serial number plate (located behind the storage drawer panel. ■ The range should be used in the kitchen. ■ To ...Home Construction and Safety, Title 24, HUD Part 280). Mobile home installations require: ■ When this range must be securely mounted to be installed. The model/serial rating plate is marked for convenient use in a mobile home installation. C D E** A. 30³⁄₄" (78.1 cm) B. 35³...

Installation Instructions
Page 4
... a clear plastic bag. When a 4-wire receptacle of the range or inside the storage drawer in a NEMA Type 14-50R plug on the model/serial rating plate. **If connecting to a 4-wire system: This range is used . This cord contains 4 copper conductors with ring terminals or open... hood or microwave hood combination installation instructions for use a 50-amp rated cord with the rating of the cooktop, see Range Rating chart below). The model/serial number rating plate is properly grounded. A C B D E F G A. 13" (33 cm) upper cabinet depth B. 30" (76.2 cm) min. For ...
... a clear plastic bag. When a 4-wire receptacle of the range or inside the storage drawer in a NEMA Type 14-50R plug on the model/serial rating plate. **If connecting to a 4-wire system: This range is used . This cord contains 4 copper conductors with ring terminals or open... hood or microwave hood combination installation instructions for use a 50-amp rated cord with the rating of the cooktop, see Range Rating chart below). The model/serial number rating plate is properly grounded. A C B D E F G A. 13" (33 cm) upper cabinet depth B. 30" (76.2 cm) min. For ...

Installation Instructions
Page 5
... a 50-amp circuit, use an extension cord. Be sure the wall receptacle is properly grounded. The fourth (grounding) conductor must be level. Connectors on the model/serial rating plate. **If connecting to be level. If countertop is equipped with a qualified electrical installer if you have molded edge shaved flat ³⁄...
... a 50-amp circuit, use an extension cord. Be sure the wall receptacle is properly grounded. The fourth (grounding) conductor must be level. Connectors on the model/serial rating plate. **If connecting to be level. If countertop is equipped with a qualified electrical installer if you have molded edge shaved flat ³⁄...
Warranty
Page 1
...shall be repaired in the home and only in -warranty service. WHIRLPOOL CORPORATION MAJOR APPLIANCE WARRANTY LIMITED WARRANTY For one year from the date of purchase, when this information on the model and serial number label located on how to use your major appliance...limited warranty. Service calls to the appliance. 9. Repairs when your major appliance, unless such damage results from your authorized Whirlpool dealer to know your complete model number and serial number. Repairs to parts or systems resulting from warranty coverage. 3. DISCLAIMER OF IMPLIED WARRANTIES; If ...
...shall be repaired in the home and only in -warranty service. WHIRLPOOL CORPORATION MAJOR APPLIANCE WARRANTY LIMITED WARRANTY For one year from the date of purchase, when this information on the model and serial number label located on how to use your major appliance...limited warranty. Service calls to the appliance. 9. Repairs when your major appliance, unless such damage results from your authorized Whirlpool dealer to know your complete model number and serial number. Repairs to parts or systems resulting from warranty coverage. 3. DISCLAIMER OF IMPLIED WARRANTIES; If ...


