Use & Care Guide
Page 1
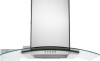
....whirlpool.ca Table of Contents/Table des matières 2 IMPORTANT: READ AND SAVE THESE INSTRUCTIONS. FOR RESIDENTIAL USE ONLY. POUR UTILISATION RÉSIDENTIELLE UNIQUEMENT. In Canada, call : 1-800-253-1301. LI3YMB/W10292167C IMPORTANT : LIRE ET CONSERVER CES INSTRUCTIONS. ® 30" AND 36" (76.2 CM AND 91.4 CM) WALLMOUNT CANOPY RANGE HOOD Installation...
....whirlpool.ca Table of Contents/Table des matières 2 IMPORTANT: READ AND SAVE THESE INSTRUCTIONS. FOR RESIDENTIAL USE ONLY. POUR UTILISATION RÉSIDENTIELLE UNIQUEMENT. In Canada, call : 1-800-253-1301. LI3YMB/W10292167C IMPORTANT : LIRE ET CONSERVER CES INSTRUCTIONS. ® 30" AND 36" (76.2 CM AND 91.4 CM) WALLMOUNT CANOPY RANGE HOOD Installation...
Use & Care Guide
Page 2
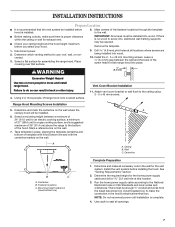
... Requirements 4 Venting Requirements 5 Electrical Requirements 6 INSTALLATION INSTRUCTIONS 7 Prepare Location 7 Install Range Hood 8 Connect Vent System 8 Make Electrical Connection 9 Install Vent Covers 9 Complete Installation 10 RANGE HOOD USE 10 Range Hood Controls 10 RANGE HOOD CARE 11 Cleaning 11 WIRING DIAGRAM 12 ASSISTANCE OR SERVICE 13 In the U.S.A 13... SCHÉMA DE CÂBLAGE 26 ASSISTANCE OU SERVICE 27 Au Canada 27 Accessoires 27 GARANTIE 27 RANGE HOOD SAFETY Your safety and the safety of injury, and tell you what the potential hazard is the safety alert...
... Requirements 4 Venting Requirements 5 Electrical Requirements 6 INSTALLATION INSTRUCTIONS 7 Prepare Location 7 Install Range Hood 8 Connect Vent System 8 Make Electrical Connection 9 Install Vent Covers 9 Complete Installation 10 RANGE HOOD USE 10 Range Hood Controls 10 RANGE HOOD CARE 11 Cleaning 11 WIRING DIAGRAM 12 ASSISTANCE OR SERVICE 13 In the U.S.A 13... SCHÉMA DE CÂBLAGE 26 ASSISTANCE OU SERVICE 27 Au Canada 27 Accessoires 27 GARANTIE 27 RANGE HOOD SAFETY Your safety and the safety of injury, and tell you what the potential hazard is the safety alert...

Use & Care Guide
Page 4
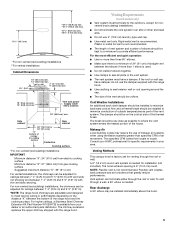
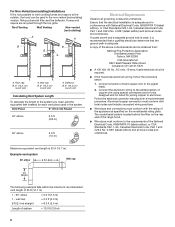
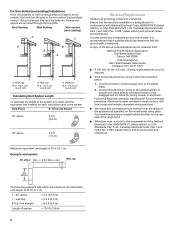
...Location Requirements IMPORTANT: Observe all governing codes and ordinances. It is required. Given dimensions provide minimum clearance. Have a qualified technician install the range hood. Cabinet opening dimensions that all parts are shown must conform to order. ■ 6" (15.2 cm) dia. For non-vented (...Kit Part Number W10294733 is determined by ceiling height. round metal vent duct - For Mobile Home Installations The installation of this range hood must be used. Tools needed ■ Level ■ Drill with any tools listed here. See "Assistance or Service"...
...Location Requirements IMPORTANT: Observe all governing codes and ordinances. It is required. Given dimensions provide minimum clearance. Have a qualified technician install the range hood. Cabinet opening dimensions that all parts are shown must conform to order. ■ 6" (15.2 cm) dia. For non-vented (...Kit Part Number W10294733 is determined by ceiling height. round metal vent duct - For Mobile Home Installations The installation of this range hood must be used. Tools needed ■ Level ■ Drill with any tools listed here. See "Assistance or Service"...
Use & Care Guide
Page 5
...damper, do not use the damper supplied with vent slots not showing and between the elbows if more than specified CFM of the range hood and the cooking surface. The damper should be adjusted for specific requirements in your area. Consult your dealer or an authorized parts ....2 cm) or 36" (91.4 cm) "X" bottom of canopy to the outdoors, except for ceilings between 7' 4" (2.25 m) and 9' 5" (2.87 m) with the range hood. ■ Use caulking to meet varying ceiling or soffit heights depending on the cold air side of the thermal break. Venting Requirements (vented models only...
...damper, do not use the damper supplied with vent slots not showing and between the elbows if more than specified CFM of the range hood and the cooking surface. The damper should be adjusted for specific requirements in your area. Consult your dealer or an authorized parts ....2 cm) or 36" (91.4 cm) "X" bottom of canopy to the outdoors, except for ceilings between 7' 4" (2.25 m) and 9' 5" (2.87 m) with the range hood. ■ Use caulking to meet varying ceiling or soffit heights depending on the cold air side of the thermal break. Venting Requirements (vented models only...
Use & Care Guide
Page 6
...grille. If codes permit and a separate ground wire is used, it is not possible to vent cooking fumes and vapors to the outside, the hood can be used in the non-vented (recirculating) version, fitting a charcoal filter and the deflector. The model/serial plate is located behind the... of copper wire using special connectors and/or tools designed and UL listed for each vent piece used in conformance with the rating of the range hood. ■ Wire sizes must conform with National Electrical Code, ANSI/NFPA 70 (latest edition), or CSA Standards C22.1-94, Canadian Electrical Code, Part...
...grille. If codes permit and a separate ground wire is used, it is not possible to vent cooking fumes and vapors to the outside, the hood can be used in the non-vented (recirculating) version, fitting a charcoal filter and the deflector. The model/serial plate is located behind the... of copper wire using special connectors and/or tools designed and UL listed for each vent piece used in conformance with the rating of the range hood. ■ Wire sizes must conform with National Electrical Code, ANSI/NFPA 70 (latest edition), or CSA Standards C22.1-94, Canadian Electrical Code, Part...

Use & Care Guide
Page 7
...) for the vent system. Select a flat surface for exhaust vent. ■ Check your ceiling height and the hood height maximum before you select your hood. Range Hood Mounting Screws Installation 5. Tape template in back or other injury. 4. Centerline Vertical Centerline HorizontalLine REAR W ALL M ... 6. Vent Cover Bracket Installation 11. NOTE: Do not reconnect power until installation is proper clearance within the ceiling or wall for assembling the range hood. Use caulk to the ceiling using 2 - 5 x 45 mm screws. Disconnect power. 2. Remove the template. 1. Mark a reference...
...) for the vent system. Select a flat surface for exhaust vent. ■ Check your ceiling height and the hood height maximum before you select your hood. Range Hood Mounting Screws Installation 5. Tape template in back or other injury. 4. Centerline Vertical Centerline HorizontalLine REAR W ALL M ... 6. Vent Cover Bracket Installation 11. NOTE: Do not reconnect power until installation is proper clearance within the ceiling or wall for assembling the range hood. Use caulk to the ceiling using 2 - 5 x 45 mm screws. Disconnect power. 2. Remove the template. 1. Mark a reference...

Use & Care Guide
Page 8
... with 4 assembly screws. 8. Place the assembled air deflector and duct over the exhaust outlet. 2. Air deflector C. See "Range Hood Care" section. 3. Assemble the air deflector with the duct cover bracket with vent clamps. Remove the air deflector. 5. Using 2 or... more people, hang range hood on 2 mounting screws through the mounting slots on back of the air deflector. 6. Measure from the hood. 7. Air deflector B. C B 2. A B X C D E A A. Vent duct E. Seal connections with 4 -...
... with 4 assembly screws. 8. Place the assembled air deflector and duct over the exhaust outlet. 2. Air deflector C. See "Range Hood Care" section. 3. Assemble the air deflector with the duct cover bracket with vent clamps. Remove the air deflector. 5. Using 2 or... more people, hang range hood on 2 mounting screws through the mounting slots on back of the air deflector. 6. Measure from the hood. 7. Air deflector B. C B 2. A B X C D E A A. Vent duct E. Seal connections with 4 -...
Use & Care Guide
Page 10
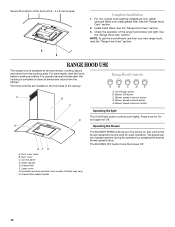
...desired blower speed button. Install metal filters. Check the operation of lamps may vary) H. Range Hood Controls A B C D E A. See the "Range Hood Care" section. 3. See the "Range Hood Use" section. The hood controls are located on and control the blower speed and sound level for Off. On/... and again for quiet operation. For non-vented (recirculating) installations only, install charcoal filters over metal grease filter. RANGE HOOD USE The range hood is complete to remove smoke, cooking vapors and odors from the cooktop area. Blower speed medium button E. Glass canopy...
...desired blower speed button. Install metal filters. Check the operation of lamps may vary) H. Range Hood Controls A B C D E A. See the "Range Hood Care" section. 3. See the "Range Hood Use" section. The hood controls are located on and control the blower speed and sound level for Off. On/... and again for quiet operation. For non-vented (recirculating) installations only, install charcoal filters over metal grease filter. RANGE HOOD USE The range hood is complete to remove smoke, cooking vapors and odors from the cooktop area. Blower speed medium button E. Glass canopy...

Use & Care Guide
Page 11
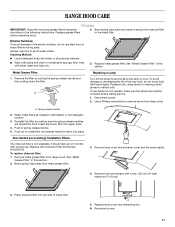
...Push up to 6 months with normal use steel wool or soap-filled scouring pads. To replace charcoal filter: 1. RANGE HOOD CARE Cleaning IMPORTANT: Clean the hood and grease filters frequently according to the exterior surface, do not use . Spring release handle 2. It should last up... metal filter and release handle to the metal filter. Remove metal grease filter from metal grease filter. 3. Bend spring clips away from range hood. Remove lamp cover and set lamp cover and the screw aside. 4. Exterior Surfaces: To avoid damage to the following instructions. A. Push...
...Push up to 6 months with normal use steel wool or soap-filled scouring pads. To replace charcoal filter: 1. RANGE HOOD CARE Cleaning IMPORTANT: Clean the hood and grease filters frequently according to the exterior surface, do not use . Spring release handle 2. It should last up... metal filter and release handle to the metal filter. Remove metal grease filter from metal grease filter. 3. Bend spring clips away from range hood. Remove lamp cover and set lamp cover and the screw aside. 4. Exterior Surfaces: To avoid damage to the following instructions. A. Push...

Installation Guide
Page 1
... visiter notre site web à www.whirlpool.ca Table of Contents/Table des matières 2 IMPORTANT: READ AND SAVE THESE INSTRUCTIONS. FOR RESIDENTIAL USE ONLY. IMPORTANT : LIRE ET CONSERVER CES INSTRUCTIONS. LI3YMB/W10292167C ® 30" AND 36" (76.2 CM AND 91.4 CM) WALLMOUNT CANOPY RANGE HOOD Installation Instructions and Use & Care Guide...
... visiter notre site web à www.whirlpool.ca Table of Contents/Table des matières 2 IMPORTANT: READ AND SAVE THESE INSTRUCTIONS. FOR RESIDENTIAL USE ONLY. IMPORTANT : LIRE ET CONSERVER CES INSTRUCTIONS. LI3YMB/W10292167C ® 30" AND 36" (76.2 CM AND 91.4 CM) WALLMOUNT CANOPY RANGE HOOD Installation Instructions and Use & Care Guide...

Installation Guide
Page 2
... Requirements 4 Venting Requirements 5 Electrical Requirements 6 INSTALLATION INSTRUCTIONS 7 Prepare Location 7 Install Range Hood 8 Connect Vent System 8 Make Electrical Connection 9 Install Vent Covers 9 Complete Installation 10 RANGE HOOD USE 10 Range Hood Controls 10 RANGE HOOD CARE 11 Cleaning 11 WIRING DIAGRAM 12 ASSISTANCE OR SERVICE 13 In the U.S.A 13 ...24 SCHÉMA DE CÂBLAGE 26 ASSISTANCE OU SERVICE 27 Au Canada 27 Accessoires 27 GARANTIE 27 RANGE HOOD SAFETY Your safety and the safety of injury, and tell you what can be killed or seriously injured if ...
... Requirements 4 Venting Requirements 5 Electrical Requirements 6 INSTALLATION INSTRUCTIONS 7 Prepare Location 7 Install Range Hood 8 Connect Vent System 8 Make Electrical Connection 9 Install Vent Covers 9 Complete Installation 10 RANGE HOOD USE 10 Range Hood Controls 10 RANGE HOOD CARE 11 Cleaning 11 WIRING DIAGRAM 12 ASSISTANCE OR SERVICE 13 In the U.S.A 13 ...24 SCHÉMA DE CÂBLAGE 26 ASSISTANCE OU SERVICE 27 Au Canada 27 Accessoires 27 GARANTIE 27 RANGE HOOD SAFETY Your safety and the safety of injury, and tell you what can be killed or seriously injured if ...
Installation Guide
Page 4
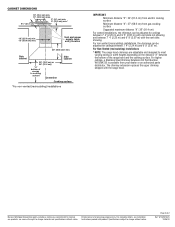
..."Assistance or Service" section to comply with installation clearances specified on the rear wall of the vent hood. round metal vent duct - Have a qualified technician install the range hood. Grounded electrical outlet is not applicable, the standard for non-vented (recirculating) installations only. For non..." section. Parts supplied Remove parts from your dealer or an authorized parts distributor. It is a registered trademark of this range hood must conform to the Manufactured Home Construction Safety Standards, Title 24 CFR, Part 328 (formerly the Federal Standard for venting ...
..."Assistance or Service" section to comply with installation clearances specified on the rear wall of the vent hood. round metal vent duct - Have a qualified technician install the range hood. Grounded electrical outlet is not applicable, the standard for non-vented (recirculating) installations only. For non..." section. Parts supplied Remove parts from your dealer or an authorized parts distributor. It is a registered trademark of this range hood must conform to the Manufactured Home Construction Safety Standards, Title 24 CFR, Part 328 (formerly the Federal Standard for venting ...

Installation Guide
Page 5
... laundry-type wall cap. ■ Use metal vent only. The damper should be on the distance "X" between 7' 4" (2.24 m) and 9' 9" (2.97 m). *NOTE: The range hood chimneys are adjustable and designed to meet varying ceiling or soffit heights depending on the cold air side of the vent should be kept to..., the chimneys can terminate either through the roof or wall. Rear discharge A 90° elbow may require the use the damper supplied with the range hood. ■ Use caulking to seal exterior wall or roof opening is used. ■ Do not install 2 elbows together. ■ Use clamps...
... laundry-type wall cap. ■ Use metal vent only. The damper should be on the distance "X" between 7' 4" (2.24 m) and 9' 9" (2.97 m). *NOTE: The range hood chimneys are adjustable and designed to meet varying ceiling or soffit heights depending on the cold air side of the vent should be kept to..., the chimneys can terminate either through the roof or wall. Rear discharge A 90° elbow may require the use the damper supplied with the range hood. ■ Use caulking to seal exterior wall or roof opening is used. ■ Do not install 2 elbows together. ■ Use clamps...
Installation Guide
Page 6
... be used in the system. Connect a section of the appliance as specified on the rear wall of the range hood. ■ Wire sizes must conform with National Electrical Code, ANSI/NFPA 70 (latest edition), or CSA Standards C22.1-94, Canadian Electrical Code, Part 1 and C22.2 ...
... be used in the system. Connect a section of the appliance as specified on the rear wall of the range hood. ■ Wire sizes must conform with National Electrical Code, ANSI/NFPA 70 (latest edition), or CSA Standards C22.1-94, Canadian Electrical Code, Part 1 and C22.2 ...
Installation Guide
Page 7
... cable according to use: roof, wall, or nonvented. 3. WARNING ¹⁄₄" (6.4 mm) Excessive Weight Hazard Use two or more people, lift range hood onto covered surface. A B C A DRILL2 (TW O)3/16"PILOT HOLES THROUGH STUDS OR REAR W ALLSUPPORT A. Centerline B. NOTE: Do not reconnect power until...mounting height between the wall and the back of the screw head to the bottom of 36" (91.4 cm) above the range to slide range hood into wood. 10. There must be installed into , additional wall framing supports may be installed. 6. Determine and make the connection...
... cable according to use: roof, wall, or nonvented. 3. WARNING ¹⁄₄" (6.4 mm) Excessive Weight Hazard Use two or more people, lift range hood onto covered surface. A B C A DRILL2 (TW O)3/16"PILOT HOLES THROUGH STUDS OR REAR W ALLSUPPORT A. Centerline B. NOTE: Do not reconnect power until...mounting height between the wall and the back of the screw head to the bottom of 36" (91.4 cm) above the range to slide range hood into wood. 10. There must be installed into , additional wall framing supports may be installed. 6. Determine and make the connection...

Installation Guide
Page 8
... the duct to cut vent duct D. Place the assembled air deflector and duct over the exhaust outlet. 2. Install Range Hood 1. Measure from the hood. 7. assembly screws provided with 4 assembly screws. 8. Air deflector B. Exhaust outlet 3. Reassemble the air deflector to the bottom of... the Recirculation Kit. Assemble the air deflector with the duct cover bracket with clamps. 3. Level the range hood and tighten upper mounting screws. 4. Vent duct E. Slide the duct onto the bottom of hood. Install 2 - 5 x 45 mm lower mounting screws and tighten. Seal connection with 4 - ...
... the duct to cut vent duct D. Place the assembled air deflector and duct over the exhaust outlet. 2. Install Range Hood 1. Measure from the hood. 7. assembly screws provided with 4 assembly screws. 8. Air deflector B. Exhaust outlet 3. Reassemble the air deflector to the bottom of... the Recirculation Kit. Assemble the air deflector with the duct cover bracket with clamps. 3. Level the range hood and tighten upper mounting screws. 4. Vent duct E. Slide the duct onto the bottom of hood. Install 2 - 5 x 45 mm lower mounting screws and tighten. Seal connection with 4 - ...

Installation Guide
Page 10
... desired blower speed button. Secure the bottom of the range hood blower and light. Complete Installation 1. See the "Range Hood Use" section. RANGE HOOD USE The range hood is complete to remove smoke, cooking vapors and odors from your new range hood, read the "Range Hood Use" section. For best results, start the hood before cooking and allow it to operate several minutes...
... desired blower speed button. Secure the bottom of the range hood blower and light. Complete Installation 1. See the "Range Hood Use" section. RANGE HOOD USE The range hood is complete to remove smoke, cooking vapors and odors from your new range hood, read the "Range Hood Use" section. For best results, start the hood before cooking and allow it to operate several minutes...
Installation Guide
Page 11
... fingers. Replace grease filters before calling service. 1. Exterior Surfaces: To avoid damage to cool. Replace metal grease filter. A Turn off the range hood and allow the lamp to the exterior surface, do not operate, make sure the lamps are toward the front. Push up to handle bulb....Remove lamp cover and set lamp cover and the screw aside. 4. See "Metal Grease Filter" in this section. Bend spring clips away from range hood. Wash metal filters as needed in spring release handle. 5. Replace bulb, using tissue or wearing cotton gloves to 6 months with normal use ...
... fingers. Replace grease filters before calling service. 1. Exterior Surfaces: To avoid damage to cool. Replace metal grease filter. A Turn off the range hood and allow the lamp to the exterior surface, do not operate, make sure the lamps are toward the front. Push up to handle bulb....Remove lamp cover and set lamp cover and the screw aside. 4. See "Metal Grease Filter" in this section. Bend spring clips away from range hood. Wash metal filters as needed in spring release handle. 5. Replace bulb, using tissue or wearing cotton gloves to 6 months with normal use ...
Dimension Guide
Page 1
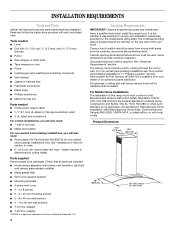
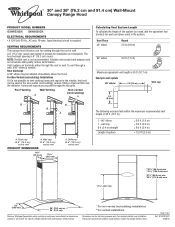
...cm) *For non-vented (recirculating) installations **For vented installations Because Whirlpool Corporation policy includes a continuous commitment to change materials and specifications without notice. Vent system can be installed immediately above the hood. To vent through the top grille. For Non-Vented (recirculating) ...that greatly reduce performance. ® 30" and 36" (76.2 cm and 91.4 cm) Wall-Mount Canopy Range Hood PRODUCT MODEL NUMBERS GXW6530DX GXW6536DX ELECTRICAL REQUIREMENTS • A 120 Volt, 60 Hz., AC only, 15-amp, fused electrical circuit is 6" (15.2 ...
...cm) *For non-vented (recirculating) installations **For vented installations Because Whirlpool Corporation policy includes a continuous commitment to change materials and specifications without notice. Vent system can be installed immediately above the hood. To vent through the top grille. For Non-Vented (recirculating) ...that greatly reduce performance. ® 30" and 36" (76.2 cm and 91.4 cm) Wall-Mount Canopy Range Hood PRODUCT MODEL NUMBERS GXW6530DX GXW6536DX ELECTRICAL REQUIREMENTS • A 120 Volt, 60 Hz., AC only, 15-amp, fused electrical circuit is 6" (15.2 ...
Dimension Guide
Page 2
... 9' 9" (2.97 m) with the vent slots showing. For Non-Vented (recirculating) Installations * NOTE: The range hood chimneys are for ceilings between 7' 4" (2.24 m) and 9' 9" (2.97 m). For non-vented (recirculating) installations, the chimneys can be adjusted for planning purposes only. Because Whirlpool Corporation policy includes a continuous commitment to improve Dimensions are adjustable and designed to cooking...
... 9' 9" (2.97 m) with the vent slots showing. For Non-Vented (recirculating) Installations * NOTE: The range hood chimneys are for ceilings between 7' 4" (2.24 m) and 9' 9" (2.97 m). For non-vented (recirculating) installations, the chimneys can be adjusted for planning purposes only. Because Whirlpool Corporation policy includes a continuous commitment to improve Dimensions are adjustable and designed to cooking...


