Use & Care Guide
Page 1
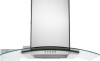
... HOOD Installation Instructions and Use & Care Guide For questions about features, operation/performance parts, accessories or service, call : 1-800-807-6777 or visit our website at... POUR UTILISATION RÉSIDENTIELLE UNIQUEMENT. In Canada, call : 1-800-253-1301. www.whirlpool.com or www.whirlpool.ca HOTTE... 30" ET 36" (76,2 CM ET 91,4 CM) Instructions d'installation et Guide d'utilisation et d'entretien Au Canada, pour assistance, installation ou service, composer 1-800-807-6777 ou visiter notre site web à www.whirlpool.ca Table of Contents/Table des matières 2 IMPORTANT...
... HOOD Installation Instructions and Use & Care Guide For questions about features, operation/performance parts, accessories or service, call : 1-800-807-6777 or visit our website at... POUR UTILISATION RÉSIDENTIELLE UNIQUEMENT. In Canada, call : 1-800-253-1301. www.whirlpool.com or www.whirlpool.ca HOTTE... 30" ET 36" (76,2 CM ET 91,4 CM) Instructions d'installation et Guide d'utilisation et d'entretien Au Canada, pour assistance, installation ou service, composer 1-800-807-6777 ou visiter notre site web à www.whirlpool.ca Table of Contents/Table des matières 2 IMPORTANT...
Use & Care Guide
Page 2
... can be killed or seriously injured if you don't follow instructions. TABLE OF CONTENTS RANGE HOOD SAFETY 2 INSTALLATION REQUIREMENTS 4 Tools and Parts 4 Location Requirements 4 Venting Requirements 5 Electrical Requirements 6 INSTALLATION INSTRUCTIONS 7 Prepare Location 7 Install Range Hood 8 Connect Vent System 8 Make Electrical Connection 9 Install Vent Covers 9 Complete Installation 10 RANGE HOOD USE 10 Range Hood Controls 10 RANGE HOOD...
... can be killed or seriously injured if you don't follow instructions. TABLE OF CONTENTS RANGE HOOD SAFETY 2 INSTALLATION REQUIREMENTS 4 Tools and Parts 4 Location Requirements 4 Venting Requirements 5 Electrical Requirements 6 INSTALLATION INSTRUCTIONS 7 Prepare Location 7 Install Range Hood 8 Connect Vent System 8 Make Electrical Connection 9 Install Vent Covers 9 Complete Installation 10 RANGE HOOD USE 10 Range Hood Controls 10 RANGE HOOD...

Use & Care Guide
Page 3
... Use proper pan size. Follow the heating equipment manufacturer's guideline and safety standards such as a tag, to the service panel. ■ Installation work and electrical wiring must always be burned. ■ DO NOT USE WATER, including wet dishcloths or towels a violent steam explosion will...When the service disconnecting means cannot be locked, securely fasten a prominent warning device, such as those published by the manufacturer. IMPORTANT SAFETY INSTRUCTIONS WARNING: TO REDUCE THE RISK OF FIRE, ELECTRIC SHOCK, OR INJURY TO PERSONS, OBSERVE THE FOLLOWING: ■ Use this fan with...
... Use proper pan size. Follow the heating equipment manufacturer's guideline and safety standards such as a tag, to the service panel. ■ Installation work and electrical wiring must always be burned. ■ DO NOT USE WATER, including wet dishcloths or towels a violent steam explosion will...When the service disconnecting means cannot be locked, securely fasten a prominent warning device, such as those published by the manufacturer. IMPORTANT SAFETY INSTRUCTIONS WARNING: TO REDUCE THE RISK OF FIRE, ELECTRIC SHOCK, OR INJURY TO PERSONS, OBSERVE THE FOLLOWING: ■ Use this fan with...

Use & Care Guide
Page 4
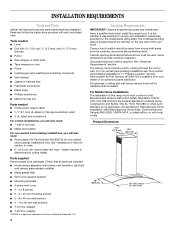
... order. ■ 6" (15.2 cm) dia. Canopy hood location should be sealed. INSTALLATION REQUIREMENTS Tools and Parts Gather the required tools and parts before starting installation. Read and follow the instructions provided with blower, vent transition, light bulb and canopy glass already installed ■ Metal grease filter ■ Vent cover support bracket ■ Mounting template...
... order. ■ 6" (15.2 cm) dia. Canopy hood location should be sealed. INSTALLATION REQUIREMENTS Tools and Parts Gather the required tools and parts before starting installation. Read and follow the instructions provided with blower, vent transition, light bulb and canopy glass already installed ■ Metal grease filter ■ Vent cover support bracket ■ Mounting template...

Use & Care Guide
Page 7
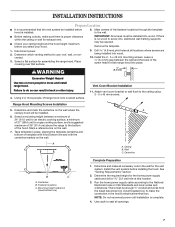
INSTALLATION INSTRUCTIONS Prepare Location ■ It is recommended that surface.... Vertical Centerline HorizontalLine REAR W ALL M OUNTING TEM PLATE CL ALIGN BOTTOM EDGE W ITH PENCILLINE INDICATING BOTTOM OFTHE HOOD Installation Height B C A. Remove the template. 1. Tape template in the hood's electrical terminal box. Mounting height reference (hood... locations through the template to slide range hood into wood. IMPORTANT: All screws must be installed before installing the hood. Disconnect power. 2. Place covering over that the vent system be enough ½...
INSTALLATION INSTRUCTIONS Prepare Location ■ It is recommended that surface.... Vertical Centerline HorizontalLine REAR W ALL M OUNTING TEM PLATE CL ALIGN BOTTOM EDGE W ITH PENCILLINE INDICATING BOTTOM OFTHE HOOD Installation Height B C A. Remove the template. 1. Tape template in the hood's electrical terminal box. Mounting height reference (hood... locations through the template to slide range hood into wood. IMPORTANT: All screws must be installed before installing the hood. Disconnect power. 2. Place covering over that the vent system be enough ½...

Use & Care Guide
Page 11
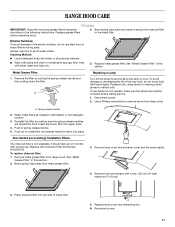
Use a Phillips screwdriver to handle bulb. Spring release handle 2. Non-Vented (recirculating) Installation Filters: The charcoal filter is not washable. Remove lamp cover and set lamp cover and the screw aside. 4. Reconnect power. 11 Replace ... bulb and replace with clean water and wipe dry. 5. RANGE HOOD CARE Cleaning IMPORTANT: Clean the hood and grease filters frequently according to the following instructions. Cleaning Method: ■ Liquid detergent soap and water, or all-purpose cleanser ■ Wipe with damp soft cloth or nonabrasive sponge, then rinse ...
Use a Phillips screwdriver to handle bulb. Spring release handle 2. Non-Vented (recirculating) Installation Filters: The charcoal filter is not washable. Remove lamp cover and set lamp cover and the screw aside. 4. Reconnect power. 11 Replace ... bulb and replace with clean water and wipe dry. 5. RANGE HOOD CARE Cleaning IMPORTANT: Clean the hood and grease filters frequently according to the following instructions. Cleaning Method: ■ Liquid detergent soap and water, or all-purpose cleanser ■ Wipe with damp soft cloth or nonabrasive sponge, then rinse ...

Use & Care Guide
Page 14
... have been removed, altered or cannot be borne by an authorized Whirlpool servicer is contrary to repair or replace appliance light bulbs, air filters or water filters. Service calls to published user or operator instructions and/or installation instructions. 4. Costs associated with published installation instructions. 11. If you ever need service, first see the "Troubleshooting" section...
... have been removed, altered or cannot be borne by an authorized Whirlpool servicer is contrary to repair or replace appliance light bulbs, air filters or water filters. Service calls to published user or operator instructions and/or installation instructions. 4. Costs associated with published installation instructions. 11. If you ever need service, first see the "Troubleshooting" section...

Installation Guide
Page 1
...76.2 CM AND 91.4 CM) WALLMOUNT CANOPY RANGE HOOD Installation Instructions and Use & Care Guide For questions about features, operation/performance parts, accessories or service, call : 1-800-807-6777 or visit our website at... www.whirlpool.com or www.whirlpool.ca HOTTE D'EXTRACTION À MONTAGE MURAL DE 30"... ET 36" (76,2 CM ET 91,4 CM) Instructions d'installation et Guide d'utilisation et d'entretien Au Canada, pour assistance, installation ou service, composer 1-800-807-6777 ou visiter notre site web à www.whirlpool.ca Table of Contents/Table des matières 2 IMPORTANT: READ...
...76.2 CM AND 91.4 CM) WALLMOUNT CANOPY RANGE HOOD Installation Instructions and Use & Care Guide For questions about features, operation/performance parts, accessories or service, call : 1-800-807-6777 or visit our website at... www.whirlpool.com or www.whirlpool.ca HOTTE D'EXTRACTION À MONTAGE MURAL DE 30"... ET 36" (76,2 CM ET 91,4 CM) Instructions d'installation et Guide d'utilisation et d'entretien Au Canada, pour assistance, installation ou service, composer 1-800-807-6777 ou visiter notre site web à www.whirlpool.ca Table of Contents/Table des matières 2 IMPORTANT: READ...

Installation Guide
Page 2
... 4 Tools and Parts 4 Location Requirements 4 Venting Requirements 5 Electrical Requirements 6 INSTALLATION INSTRUCTIONS 7 Prepare Location 7 Install Range Hood 8 Connect Vent System 8 Make Electrical Connection 9 Install Vent Covers 9 Complete Installation 10 RANGE HOOD USE 10 Range Hood Controls 10 RANGE HOOD CARE 11 Cleaning 11 WIRING DIAGRAM 12 ASSISTANCE OR SERVICE 13 In the U.S.A 13 ...
... 4 Tools and Parts 4 Location Requirements 4 Venting Requirements 5 Electrical Requirements 6 INSTALLATION INSTRUCTIONS 7 Prepare Location 7 Install Range Hood 8 Connect Vent System 8 Make Electrical Connection 9 Install Vent Covers 9 Complete Installation 10 RANGE HOOD USE 10 Range Hood Controls 10 RANGE HOOD CARE 11 Cleaning 11 WIRING DIAGRAM 12 ASSISTANCE OR SERVICE 13 In the U.S.A 13 ...

Installation Guide
Page 3
... Air Conditioning Engineers (ASHRAE), and the local code authorities. ■ When cutting or drilling into crawl spaces, or garages. IMPORTANT SAFETY INSTRUCTIONS WARNING: TO REDUCE THE RISK OF FIRE, ELECTRIC SHOCK, OR INJURY TO PERSONS, OBSERVE THE FOLLOWING: ■ Use this fan with any...GREASE FIRE: ■ Never leave surface units unattended at service panel and lock the service disconnecting means to the service panel. ■ Installation work and electrical wiring must always be burned. ■ DO NOT USE WATER, including wet dishcloths or towels a violent steam explosion will ...
... Air Conditioning Engineers (ASHRAE), and the local code authorities. ■ When cutting or drilling into crawl spaces, or garages. IMPORTANT SAFETY INSTRUCTIONS WARNING: TO REDUCE THE RISK OF FIRE, ELECTRIC SHOCK, OR INJURY TO PERSONS, OBSERVE THE FOLLOWING: ■ Use this fan with any...GREASE FIRE: ■ Never leave surface units unattended at service panel and lock the service disconnecting means to the service panel. ■ Installation work and electrical wiring must always be burned. ■ DO NOT USE WATER, including wet dishcloths or towels a violent steam explosion will ...
Installation Guide
Page 4
...of the vent hood. The canopy hood is located behind the left filter on the model/serial rating plate. For Mobile Home Installations The installation of this range hood must conform to the Manufactured Home Construction Safety Standards, Title 24 CFR, Part 328 (formerly the Federal ... supplied Remove parts from strong draft areas, such as windows, doors and strong heating vents. Read and follow the instructions provided with installation clearances specified on the rear wall of Acument Intellectual Properties, LLC 4 Location Requirements IMPORTANT: Observe all parts are shown ...
...of the vent hood. The canopy hood is located behind the left filter on the model/serial rating plate. For Mobile Home Installations The installation of this range hood must conform to the Manufactured Home Construction Safety Standards, Title 24 CFR, Part 328 (formerly the Federal ... supplied Remove parts from strong draft areas, such as windows, doors and strong heating vents. Read and follow the instructions provided with installation clearances specified on the rear wall of Acument Intellectual Properties, LLC 4 Location Requirements IMPORTANT: Observe all parts are shown ...
Installation Guide
Page 7
...of template with hood bottom line and with the centerline marked on the wall. Attach vent cover bracket to wall flush to move and install range hood. Wall C. Mounting height reference (hood bottom line) Complete Preparation 1. Determine and mark the centerline on the wall. 7.... Centerline HorizontalLine REAR W ALL M OUNTING TEM PLATE CL ALIGN BOTTOM EDGE W ITH PENCILLINE INDICATING BOTTOM OFTHE HOOD Installation Height B C A. INSTALLATION INSTRUCTIONS Prepare Location ■ It is recommended that surface. 9. Tape template in the wall for the vent system....
...of template with hood bottom line and with the centerline marked on the wall. Attach vent cover bracket to wall flush to move and install range hood. Wall C. Mounting height reference (hood bottom line) Complete Preparation 1. Determine and mark the centerline on the wall. 7.... Centerline HorizontalLine REAR W ALL M OUNTING TEM PLATE CL ALIGN BOTTOM EDGE W ITH PENCILLINE INDICATING BOTTOM OFTHE HOOD Installation Height B C A. INSTALLATION INSTRUCTIONS Prepare Location ■ It is recommended that surface. 9. Tape template in the wall for the vent system....
Installation Guide
Page 11
...remove screw from range hood. Metal Grease Filter: Replacing a Lamp 1. Replace bulb, using tissue or wearing cotton gloves to the following instructions. Use a Phillips screwdriver to the exterior surface, do not use . It should last up on metal filter and release handle to .... Replace metal grease filter. A Turn off the range hood and allow the lamp to the metal filter. A. Non-Vented (recirculating) Installation Filters: The charcoal filter is not washable. Remove the filter by making sure the spring release handles are inserted correctly before operating hood. ...
...remove screw from range hood. Metal Grease Filter: Replacing a Lamp 1. Replace bulb, using tissue or wearing cotton gloves to the following instructions. Use a Phillips screwdriver to the exterior surface, do not use . It should last up on metal filter and release handle to .... Replace metal grease filter. A Turn off the range hood and allow the lamp to the metal filter. A. Non-Vented (recirculating) Installation Filters: The charcoal filter is not washable. Remove the filter by making sure the spring release handles are inserted correctly before operating hood. ...

Installation Guide
Page 14
... published installation instructions. 11. Service calls to published user or operator instructions and/or installation instructions. 4. Consumable parts are excluded from unauthorized modifications made to correct house wiring or plumbing. 2. Expenses for travel and transportation for future reference. Major appliances with electrical or plumbing codes, or use of original purchase date is reported to Whirlpool within...
... published installation instructions. 11. Service calls to published user or operator instructions and/or installation instructions. 4. Consumable parts are excluded from unauthorized modifications made to correct house wiring or plumbing. 2. Expenses for travel and transportation for future reference. Major appliances with electrical or plumbing codes, or use of original purchase date is reported to Whirlpool within...
Dimension Guide
Page 1
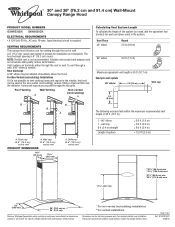
...(76.2 cm) or 36" (91.4 cm) *For non-vented (recirculating) installations **For vented installations Because Whirlpool Corporation policy includes a continuous commitment to change materials and specifications without notice. Specifications ...NOTE: Flexible vent is 35 ft (10.7 m). Vent system can be installed immediately above the hood. Instructions packed with product. A 6" (15.2 cm) round vent system is... 36" (76.2 cm and 91.4 cm) Wall-Mount Canopy Range Hood PRODUCT MODEL NUMBERS GXW6530DX GXW6536DX ELECTRICAL REQUIREMENTS • A 120 Volt, 60 Hz., AC only, 15-amp, fused...
...(76.2 cm) or 36" (91.4 cm) *For non-vented (recirculating) installations **For vented installations Because Whirlpool Corporation policy includes a continuous commitment to change materials and specifications without notice. Specifications ...NOTE: Flexible vent is 35 ft (10.7 m). Vent system can be installed immediately above the hood. Instructions packed with product. A 6" (15.2 cm) round vent system is... 36" (76.2 cm and 91.4 cm) Wall-Mount Canopy Range Hood PRODUCT MODEL NUMBERS GXW6530DX GXW6536DX ELECTRICAL REQUIREMENTS • A 120 Volt, 60 Hz., AC only, 15-amp, fused...
Dimension Guide
Page 2
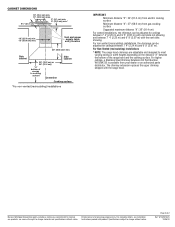
...from gas cooking surface Suggested maximum distance "X": 36" (91.4 cm) For vented installations, the chimneys can be adjusted for planning purposes only. Because Whirlpool Corporation policy includes a continuous commitment to improve Dimensions are adjustable and designed to ... Ref. For non-vented (recirculating) installations, the chimneys can be adjusted for ceilings between 7' 4" (2.25 m) and 9' 9" (2.97 m) with the vent slots showing. The chimney extension replaces the upper chimney shipped with product. Instructions packed with the range hood. Specifications ...
...from gas cooking surface Suggested maximum distance "X": 36" (91.4 cm) For vented installations, the chimneys can be adjusted for planning purposes only. Because Whirlpool Corporation policy includes a continuous commitment to improve Dimensions are adjustable and designed to ... Ref. For non-vented (recirculating) installations, the chimneys can be adjusted for ceilings between 7' 4" (2.25 m) and 9' 9" (2.97 m) with the vent slots showing. The chimney extension replaces the upper chimney shipped with product. Instructions packed with the range hood. Specifications ...
Warranty Information
Page 1
... coverage. 3. If outside the 50 United States and Canada, contact your major appliance, to published user or operator instructions and/or installation instructions. 4. Dealer name Address Phone number Model number Serial number Purchase date 14 WHIRLPOOL SHALL NOT BE LIABLE FOR INCIDENTAL OR CONSEQUENTIAL DAMAGES. Service calls to determine if another warranty applies. Service...
... coverage. 3. If outside the 50 United States and Canada, contact your major appliance, to published user or operator instructions and/or installation instructions. 4. Dealer name Address Phone number Model number Serial number Purchase date 14 WHIRLPOOL SHALL NOT BE LIABLE FOR INCIDENTAL OR CONSEQUENTIAL DAMAGES. Service calls to determine if another warranty applies. Service...

