Whirlpool UXT5230BD Support and Manuals
Get Help and Manuals for this Whirlpool item

View All Support Options Below
Free Whirlpool UXT5230BD manuals!
Problems with Whirlpool UXT5230BD?
Ask a Question
Free Whirlpool UXT5230BD manuals!
Problems with Whirlpool UXT5230BD?
Ask a Question
Popular Whirlpool UXT5230BD Manual Pages
Installation Instructions - Page 1

... you and others are not followed.
30" (76.2 CM) AND 36" (91.4 CM) RANGE HOOD
Installation Instructions and Use & Care Guide
For questions about features, operation/performance, parts, accessories or service, call: 1-800-253-1301 or visit our website at www.whirlpool.com
In Canada, for assistance, installation and service, call 1-800-807-6777 or visit our website at www...
Installation Instructions - Page 2
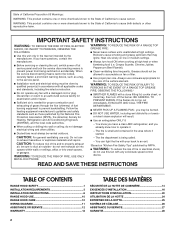
... explosive materials and vapors.
You can fight the fire with a damaged cord or plug. READ AND SAVE THESE INSTRUCTIONS
TABLE OF CONTENTS
RANGE HOOD SAFETY 1 INSTALLATION REQUIREMENTS 3 INSTALLATION INSTRUCTIONS 6 RANGE HOOD USE 10 RANGE HOOD CARE 10 WIRING DIAGRAM 11 ASSISTANCE OR SERVICE 12 WARRANTY 12
TABLE DES MATIÈRES
SÉCURITÉ DE LA HOTTE DE CUISINIÈRE...
Installation Instructions - Page 3
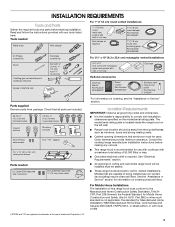
... Standard for Mobile Home Construction and Safety, title 24, HUD, Part 280) or when such standard is located inside the range hood on the model/serial rating plate. Consult the cooktop/range manufacturer installation instructions before starting installation. Check that are shown must be used. Models that all governing codes and ordinances. ■ It is required. Tools needed
UL...
Installation Instructions - Page 4
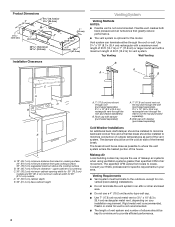
... Local building codes may require ...movement. The break should be as close as part of 35 ft (10.7 m) or 7"... installations.
■ Do not terminate the vent system in your HVAC professional for specific ...8309;⁄₈"
(47.3 cm)
Installation Clearances
Venting System
Venting Methods NOTES:
■ Flexible vent is optional for this model. Vent system can terminate either through...
Installation Instructions - Page 5

... Code, ANSI/NFPA 70 (latest edition), or CSA Standards C22.1-94, Canadian Electrical Code, Part ...install 2 elbows together.
■ Use clamps or duct tape to the pigtail leads.
2. The model/serial plate is located behind the filter on the model/serial rating plate.
Calculating Vent System Length To calculate the length of the appliance as specified on the rear wall of the range hood...
Installation Instructions - Page 6
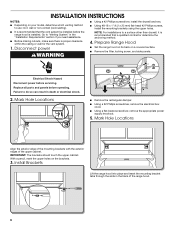
... mounting brackets with the exterior edges of the range hood.
6 Install Brackets
Lift the range hood into place and insert the mounting bracket tabs through the slots in the back of the upper cabinet. INSTALLATION INSTRUCTIONS
NOTES: ■ Depending on your model, determine which venting method
to "Venting System" in the "Installation Requirements" section if you need assistance.
■...
Installation Instructions - Page 7

...bit, drill the hole in the dot marked previously at the power supply knockout (B).
For a top vented installation: Mark the 4 vent hole locations (C) on either the wall or upper cabinet. Position the edge of ... hole and edge of the plate with one hand and bend each mounting tab.
Remove the range hood and set it aside.
6.
OPTIONAL: Using a ¹⁄₈" (3 mm) drill bit, drill...
Installation Instructions - Page 8

... the screws approximately 2 turns into the mounting tab (F) on ordering, see the "Assistance or Service" section.
■ If installing the optional round damper, position it interferes with the rectangular damper, remove the rectangular damper flap.
■ Lift the range hood into the top mounting tabs and bend the tabs against the cabinet side walls...
Installation Instructions - Page 9
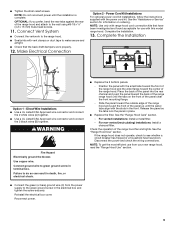
... with this model range hood. Power Cord Kit Installations
For optional power cord kit installations, follow the instructions supplied with the small tabs toward the front of the range hood and the wide flange toward the outside edge of the range hood and push the front of the panel clear the front mounting flange.
- See the "Assistance or Service" section for...
Installation Instructions - Page 10
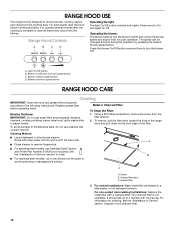
...non-vented (recirculating) installations: Replace the metal filter with a soft, lint-free cloth. The charcoal filter is not washable. Dispose of the filter. Range Hood Controls
A
B
CD...instructions. Blower On/Off and minimum speed button C. Blower medium speed button D. To remove, pull the filter latch toward the front of the range
hood and pull down on ordering, see the "Assistance or Service...
Installation Instructions - Page 11
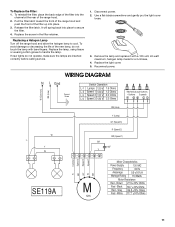
... front of the new lamp, do not operate, make sure the lamps are inserted correctly before calling service.
1. Release the filter latch. Replacing a Halogen Lamp Turn off the range hood and allow the halogen lamp to cool. Replace the screw in the filter retainer. Reconnect power. Gray 86.8 ±10% Ohms Red -
White 117.7 ±...
Installation Instructions - Page 12

..., or to Whirlpool Canada LP with : ■ Features and specifications on our full line of original purchase date is used for Factory Specified Parts and repair labor to local dealers, repair parts distributors, and service companies. To locate factory specified replacement parts in materials or workmanship and is installed, operated and maintained according to instructions attached to or...
Installation Instructions - Page 13
... location or is not installed in -home service is designed to you need for service or repair of this warranty.
8. Removal or replacement of the Use & Care Guide.
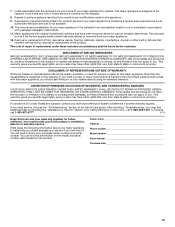
EXCLUSION OF INCIDENTAL AND CONSEQUENTIAL DAMAGES
YOUR SOLE AND EXCLUSIVE REMEDY UNDER THIS LIMITED WARRANTY SHALL BE PRODUCT REPAIR AS PROVIDED HEREIN. This warranty gives you specific legal rights, and...
Dimension Guide - Page 1
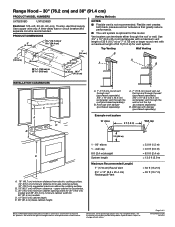
Range Hood - 30" (76.2 cm) and 36" (91.4 cm)
PRODUCT MODEL NUMBERS
UXT5230BD
UXT5236BD
Electrical: 120-volt, 60-Hz, AC-only, 15-amp. Top Venting
Wall Venting
B
A
A
B
29 76.0 cm) or 35 91.0 cm)
1¹⁄₂" (3.8 cm) 18⁵⁄₈"
(47.3 cm)
INSTALLATION... = 35 ft (10.7 m)
Because Whirlpool Corporation policy includes a continuous commitment to ...Specifications...
Dimension Guide - Page 2

For complete details, see Installation Instructions packed with product. Specifications subject to change without notice. Dimensions are for each ... to 7" (17.8 cm) (1.4 m)
31/4" x 10" (8.3 cm x
5.0 ft
25.4 cm) to 7" (17.8 cm) (1.5 m)
90° elbow
Because Whirlpool Corporation policy includes a continuous commitment to improve our products, we reserve the right to change materials and...
Whirlpool UXT5230BD Reviews
We have not received any reviews for Whirlpool yet.