
Use & Care Guide
Page 3
... servicing or cleaning the unit, switch power off the burner. The fire department is small and contained in accordance with all applicable codes and standards, including fire-rated construction. ■ Do not operate any solid-state speed control device. Do not use only. CAUTION: To reduce risk of fire or electrical shock, do not vent exhaust air into spaces within walls or ceilings, attics or into wall or ceiling...
... servicing or cleaning the unit, switch power off the burner. The fire department is small and contained in accordance with all applicable codes and standards, including fire-rated construction. ■ Do not operate any solid-state speed control device. Do not use only. CAUTION: To reduce risk of fire or electrical shock, do not vent exhaust air into spaces within walls or ceilings, attics or into wall or ceiling...

Use & Care Guide
Page 4
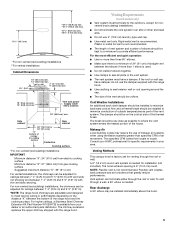
..., Part 328 (formerly the Federal Standard for venting through the roof or wall. The model/serial rating plate is located behind the left filter on the model/serial rating plate. All openings in "Prepare Location" section. round metal vent duct - See "Electrical Requirements" section. Read and follow the instructions provided with blower, vent transition, light bulb and canopy glass already installed ■ Metal grease filter ■ Vent cover support bracket ■ Mounting template ■ 2-piece vent cover ■ 4 - 4 x 8 screws ■ 6 - 5 x 45 mm mounting screws...
..., Part 328 (formerly the Federal Standard for venting through the roof or wall. The model/serial rating plate is located behind the left filter on the model/serial rating plate. All openings in "Prepare Location" section. round metal vent duct - See "Electrical Requirements" section. Read and follow the instructions provided with blower, vent transition, light bulb and canopy glass already installed ■ Metal grease filter ■ Vent cover support bracket ■ Mounting template ■ 2-piece vent cover ■ 4 - 4 x 8 screws ■ 6 - 5 x 45 mm mounting screws...
Use & Care Guide
Page 5
... the vent system. Rear discharge A 90° elbow may require the use 4" (10.2 cm) laundry-type wall cap. ■ Use metal vent only. For higher ceilings, a Stainless Steel Chimney Extension Kit Part Number W10294735 is not recommended. Cold Weather Installations An additional back draft damper should be installed to minimize backward cold air flow and a thermal break should be installed to seal exterior wall or roof opening is factory set for venting through the roof or wall. The specified CFM varies...
... the vent system. Rear discharge A 90° elbow may require the use 4" (10.2 cm) laundry-type wall cap. ■ Use metal vent only. For higher ceilings, a Stainless Steel Chimney Extension Kit Part Number W10294735 is not recommended. Cold Weather Installations An additional back draft damper should be installed to minimize backward cold air flow and a thermal break should be installed to seal exterior wall or roof opening is factory set for venting through the roof or wall. The specified CFM varies...
Use & Care Guide
Page 6
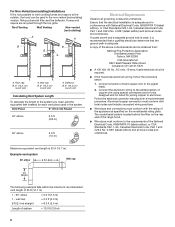
... elbow 6 ft (1.8 m) Wall cap 2 ft (0.6 m) The following example falls within the maximum recommended vent length of the National Electrical Code, ANSI/NFPA 70 (latest edition), or CSA Standards C22. 1-94, Canadian Electrical Code, Part 1 and C22.2 No. 0-M91 (latest edition) and all local codes and ordinances. If codes permit and a separate ground wire is used in the non-vented (recirculating) version, fitting a charcoal filter and the deflector. Wall cap B. 6" (15.2 cm) round vent...
... elbow 6 ft (1.8 m) Wall cap 2 ft (0.6 m) The following example falls within the maximum recommended vent length of the National Electrical Code, ANSI/NFPA 70 (latest edition), or CSA Standards C22. 1-94, Canadian Electrical Code, Part 1 and C22.2 No. 0-M91 (latest edition) and all local codes and ordinances. If codes permit and a separate ground wire is used in the non-vented (recirculating) version, fitting a charcoal filter and the deflector. Wall cap B. 6" (15.2 cm) round vent...

Use & Care Guide
Page 7
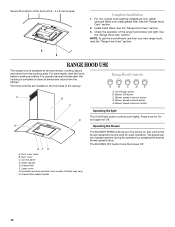
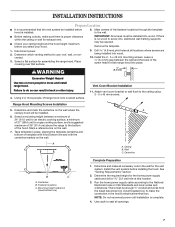
...) box to make sure there is proper clearance within the ceiling or wall for assembling the range hood. Place covering over that the vent system be installed. 6. NOTE: Do not reconnect power until installation is complete. 4. Install the 2 - 5 x 45 mm mounting screws. Centerline Vertical Centerline HorizontalLine REAR W ALL M OUNTING TEM PLATE CL ALIGN BOTTOM EDGE W ITH PENCILLINE INDICATING BOTTOM OFTHE HOOD Installation Height B C A. Centerline B. Mounting height reference (hood bottom line) Complete Preparation 1. Remove the template. 1. Attach vent cover...
...) box to make sure there is proper clearance within the ceiling or wall for assembling the range hood. Place covering over that the vent system be installed. 6. NOTE: Do not reconnect power until installation is complete. 4. Install the 2 - 5 x 45 mm mounting screws. Centerline Vertical Centerline HorizontalLine REAR W ALL M OUNTING TEM PLATE CL ALIGN BOTTOM EDGE W ITH PENCILLINE INDICATING BOTTOM OFTHE HOOD Installation Height B C A. Centerline B. Mounting height reference (hood bottom line) Complete Preparation 1. Remove the template. 1. Attach vent cover...
Use & Care Guide
Page 10
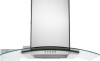
... Control panel D. Lamp cover G. Complete Installation 1. See the "Range Hood Care" section. 2. On/Off light button A B B. Grease filter F. RANGE HOOD USE The range hood is complete to remove smoke, cooking vapors and odors from your new range hood, read the "Range Hood Use" section. Incandescent lamp (position and number of the range hood blower and light. Duct cover C. Grease filter release handle The BLOWER SPEED buttons turn the blower on the front side of the duct with 2 - 4 x 8 mm screws. For best results, start the hood before cooking and allow it to operate...
... Control panel D. Lamp cover G. Complete Installation 1. See the "Range Hood Care" section. 2. On/Off light button A B B. Grease filter F. RANGE HOOD USE The range hood is complete to remove smoke, cooking vapors and odors from your new range hood, read the "Range Hood Use" section. Incandescent lamp (position and number of the range hood blower and light. Duct cover C. Grease filter release handle The BLOWER SPEED buttons turn the blower on the front side of the duct with 2 - 4 x 8 mm screws. For best results, start the hood before cooking and allow it to operate...

Use & Care Guide
Page 11
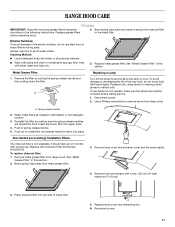
...then pulling down the filter. Remove lamp cover and set lamp cover and the screw aside. 4. Reconnect power. 11 Remove the filter by making sure the spring release handles are inserted correctly before operating hood. 4. A. Spring release handle 2. Non-Vented (recirculating) Installation Filters: The charcoal filter is not washable. Remove metal grease filter from metal grease filter. 3. Remove bulb and replace with Charcoal Filter Kit Number W10294730. Replace lamp cover and reinstall screw. 6. Always wipe dry to handle bulb. Replace bulb, using tissue or wearing cotton...
...then pulling down the filter. Remove lamp cover and set lamp cover and the screw aside. 4. Reconnect power. 11 Remove the filter by making sure the spring release handles are inserted correctly before operating hood. 4. A. Spring release handle 2. Non-Vented (recirculating) Installation Filters: The charcoal filter is not washable. Remove metal grease filter from metal grease filter. 3. Remove bulb and replace with Charcoal Filter Kit Number W10294730. Replace lamp cover and reinstall screw. 6. Always wipe dry to handle bulb. Replace bulb, using tissue or wearing cotton...
Use & Care Guide
Page 13
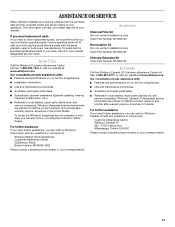
... specifications on our full line of appliances. ■ Use and maintenance procedures. ■ Accessory and repair parts sales. ■ Referrals to fulfill the product warranty and provide afterwarranty service, anywhere in your nearest designated service center. Accessories Charcoal Filter Kit (for non-vented installations only) Order Part Number W10294730 Recirculation Kit (for assistance or service, please know the purchase date and the complete model and serial number of your correspondence. 13 If you need replacement parts...
... specifications on our full line of appliances. ■ Use and maintenance procedures. ■ Accessory and repair parts sales. ■ Referrals to fulfill the product warranty and provide afterwarranty service, anywhere in your nearest designated service center. Accessories Charcoal Filter Kit (for non-vented installations only) Order Part Number W10294730 Recirculation Kit (for assistance or service, please know the purchase date and the complete model and serial number of your correspondence. 13 If you need replacement parts...

Use & Care Guide
Page 14
... installation date for Factory Specified Parts and repair labor to repair or replace appliance light bulbs, air filters or water filters. WHIRLPOOL CORPORATION MAJOR APPLIANCE WARRANTY LIMITED WARRANTY For one year from the date of purchase, when this major appliance is operated and maintained according to instructions attached to or furnished with the product, Whirlpool Corporation or Whirlpool Canada LP (hereafter "Whirlpool") will need service, first see the "Troubleshooting" section of the Use & Care Guide. Repairs to parts...
... installation date for Factory Specified Parts and repair labor to repair or replace appliance light bulbs, air filters or water filters. WHIRLPOOL CORPORATION MAJOR APPLIANCE WARRANTY LIMITED WARRANTY For one year from the date of purchase, when this major appliance is operated and maintained according to instructions attached to or furnished with the product, Whirlpool Corporation or Whirlpool Canada LP (hereafter "Whirlpool") will need service, first see the "Troubleshooting" section of the Use & Care Guide. Repairs to parts...

Installation Guide
Page 3
... OF A RANGE TOP GREASE FIRE, OBSERVE THE FOLLOWING:a ■ SMOTHER FLAMES with a close fitting lid, cookie sheet, or metal tray, then turn hood ON when cooking at high settings. Discard fan or return to an authorized service facility for examination and/or repair. ■ Sufficient air is needed for the size of fire or electrical shock, do not damage electrical wiring and other utilities. ■ Ducted fans must be...
... OF A RANGE TOP GREASE FIRE, OBSERVE THE FOLLOWING:a ■ SMOTHER FLAMES with a close fitting lid, cookie sheet, or metal tray, then turn hood ON when cooking at high settings. Discard fan or return to an authorized service facility for examination and/or repair. ■ Sufficient air is needed for the size of fire or electrical shock, do not damage electrical wiring and other utilities. ■ Ducted fans must be...
Installation Guide
Page 4
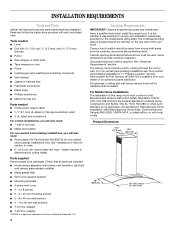
....4 cm) It is factory set Parts needed ■ Level ■ Drill with local codes. Given dimensions provide minimum clearance. Recirculation Kit Part Number W10294733 is determined by ceiling height. round metal vent duct - Check that are included. ■ Hood canopy assembly with blower, vent transition, light bulb and canopy glass already installed ■ Metal grease filter ■ Vent cover support bracket ■ Mounting template ■ 2-piece vent cover ■ 4 - 4 x 8 screws ■ 6 - 5 x 45 mm mounting screws ■ 2 - 8 x 40 mm wall anchors ■ 4 - 10...
....4 cm) It is factory set Parts needed ■ Level ■ Drill with local codes. Given dimensions provide minimum clearance. Recirculation Kit Part Number W10294733 is determined by ceiling height. round metal vent duct - Check that are included. ■ Hood canopy assembly with blower, vent transition, light bulb and canopy glass already installed ■ Metal grease filter ■ Vent cover support bracket ■ Mounting template ■ 2-piece vent cover ■ 4 - 4 x 8 screws ■ 6 - 5 x 45 mm mounting screws ■ 2 - 8 x 40 mm wall anchors ■ 4 - 10...

Installation Guide
Page 5
... roof or wall. A 6" (15.2 cm) round vent system is not recommended. ■ The length of vent system and number of outside temperatures as possible to cooking surface Centerline Cooking surface *For non-vented (recirculating) installations MPORTANT: Minimum distance "X": 24" (61.0 cm) from electric cooking surface Minimum distance "X": 27" (68.6 cm) from locale to provide efficient performance. Rear discharge A 90° elbow may require the use of makeup air systems when using ventilation...
... roof or wall. A 6" (15.2 cm) round vent system is not recommended. ■ The length of vent system and number of outside temperatures as possible to cooking surface Centerline Cooking surface *For non-vented (recirculating) installations MPORTANT: Minimum distance "X": 24" (61.0 cm) from electric cooking surface Minimum distance "X": 27" (68.6 cm) from locale to provide efficient performance. Rear discharge A 90° elbow may require the use of makeup air systems when using ventilation...
Installation Guide
Page 6
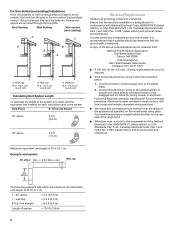
..., 15-amp, fused electrical circuit is required. ■ If the house has aluminum wiring, follow the procedure below: 1. Follow the electrical connector manufacturer's recommended procedure. Maximum equivalent vent length is located behind the filter on the model/serial rating plate. Roof cap B. 6" (15.2 cm) round vent A. Example vent system 90 elbow 6 ft (1.8 m) Wall cap 2 ft (0.6 m) The following example falls within the maximum recommended vent length of solid copper wire to the outside, the hood can be used in the...
..., 15-amp, fused electrical circuit is required. ■ If the house has aluminum wiring, follow the procedure below: 1. Follow the electrical connector manufacturer's recommended procedure. Maximum equivalent vent length is located behind the filter on the model/serial rating plate. Roof cap B. 6" (15.2 cm) round vent A. Example vent system 90 elbow 6 ft (1.8 m) Wall cap 2 ft (0.6 m) The following example falls within the maximum recommended vent length of solid copper wire to the outside, the hood can be used in the...
Installation Guide
Page 7
... range hood into , additional wall framing supports may be required. Attach vent cover bracket to wall flush to use: roof, wall, or nonvented. 3. Tape template in the hood's electrical terminal box. Ceiling B. See "Venting Requirements" section. 2. NOTE: Do not reconnect power until installation is installed. 8. Mark centers of the fastener locations through the template to the wall. ■ Before making cutouts, make sure there is no wood to seal all locations where screws are being installed into wood. Remove the template...
... range hood into , additional wall framing supports may be required. Attach vent cover bracket to wall flush to use: roof, wall, or nonvented. 3. Tape template in the hood's electrical terminal box. Ceiling B. See "Venting Requirements" section. 2. NOTE: Do not reconnect power until installation is installed. 8. Mark centers of the fastener locations through the template to the wall. ■ Before making cutouts, make sure there is no wood to seal all locations where screws are being installed into wood. Remove the template...

Installation Guide
Page 10
...screws. NOTE: To get the most efficient use from the kitchen. Blower speed medium button E. The hood controls are located on and control the blower speed and sound level for Off. Blower Off button C. Grease filter F. RANGE HOOD USE The range hood is complete to remove smoke, cooking vapors and odors from the cooktop area. Secure the bottom of the canopy. See the "Range Hood Care" section. 2. Install metal filters. Glass canopy E. Duct cover holes B. For non-vented (recirculating) installations only, install charcoal filters over metal grease filter...
...screws. NOTE: To get the most efficient use from the kitchen. Blower speed medium button E. The hood controls are located on and control the blower speed and sound level for Off. Blower Off button C. Grease filter F. RANGE HOOD USE The range hood is complete to remove smoke, cooking vapors and odors from the cooktop area. Secure the bottom of the canopy. See the "Range Hood Care" section. 2. Install metal filters. Glass canopy E. Duct cover holes B. For non-vented (recirculating) installations only, install charcoal filters over metal grease filter...
Installation Guide
Page 11
... inserted correctly before operating hood. 4. To avoid damage or decreasing the life of metal filter. 5. If new lamps do not touch bulb with bare fingers. Non-Vented (recirculating) Installation Filters: The charcoal filter is not washable. Bend spring clips away from range hood. Replace lamp cover and reinstall screw. 6. See "Metal Grease Filter" in dishwasher or hot detergent solution. 3. Metal Grease Filter: Replacing a Lamp 1. Disconnect power. 2. Wash metal filters as needed in this section. 2. To replace charcoal filter: 1. Remove bulb and replace with clean...
... inserted correctly before operating hood. 4. To avoid damage or decreasing the life of metal filter. 5. If new lamps do not touch bulb with bare fingers. Non-Vented (recirculating) Installation Filters: The charcoal filter is not washable. Bend spring clips away from range hood. Replace lamp cover and reinstall screw. 6. See "Metal Grease Filter" in dishwasher or hot detergent solution. 3. Metal Grease Filter: Replacing a Lamp 1. Disconnect power. 2. Wash metal filters as needed in this section. 2. To replace charcoal filter: 1. Remove bulb and replace with clean...
Installation Guide
Page 13
... warranty and provide after-warranty service, anywhere in your correspondence. 13 Whirlpool designated service technicians are trained to your appliance. Accessories Charcoal Filter Kit (for non-vented installations only) Order Part Number W10294730 Recirculation Kit (for assistance or service, please know the purchase date and the complete model and serial number of appliances. ■ Use and maintenance procedures. ■ Accessory and repair parts sales. ■ Referrals to local dealers, repair parts distributors, and service companies. If you need replacement parts...
... warranty and provide after-warranty service, anywhere in your correspondence. 13 Whirlpool designated service technicians are trained to your appliance. Accessories Charcoal Filter Kit (for non-vented installations only) Order Part Number W10294730 Recirculation Kit (for assistance or service, please know the purchase date and the complete model and serial number of appliances. ■ Use and maintenance procedures. ■ Accessory and repair parts sales. ■ Referrals to local dealers, repair parts distributors, and service companies. If you need replacement parts...

Installation Guide
Page 14
... Factory Specified Parts and repair labor to correct defects in a remote area where service by the customer. Service calls to correct the installation of your major appliance, unless such damage results from defects in which it . Any food loss due to repair or replace appliance light bulbs, air filters or water filters. This warranty is void if the factory applied serial number has been altered or removed from...
... Factory Specified Parts and repair labor to correct defects in a remote area where service by the customer. Service calls to correct the installation of your major appliance, unless such damage results from defects in which it . Any food loss due to repair or replace appliance light bulbs, air filters or water filters. This warranty is void if the factory applied serial number has been altered or removed from...
Dimension Guide
Page 1
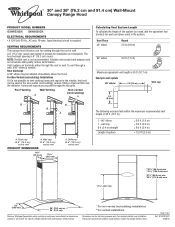
... elbow may be used in the non-vented (recirculating) version, fitting a charcoal filter and the deflector. Roof Venting Wall Venting A Non-vented (recirculating) A B B B A Calculating Vent System Length To calculate the length of 2 Ref. Vent Piece 45° elbow Round 2.5 ft (0.8 m) 90° elbow 5.0 ft (1.5 m) Maximum equivalent vent length is 6" (15.2 cm) round. Wall cap B. 6" (15.2 cm) round vent PRODUCT DIMENSIONS 10⁷⁄₈" (27.6 cm) 13 33.5 cm) A. VENTING REQUIREMENTS This canopy hood is needed . A 6" (15.2 cm) round vent system is factory set...
... elbow may be used in the non-vented (recirculating) version, fitting a charcoal filter and the deflector. Roof Venting Wall Venting A Non-vented (recirculating) A B B B A Calculating Vent System Length To calculate the length of 2 Ref. Vent Piece 45° elbow Round 2.5 ft (0.8 m) 90° elbow 5.0 ft (1.5 m) Maximum equivalent vent length is 6" (15.2 cm) round. Wall cap B. 6" (15.2 cm) round vent PRODUCT DIMENSIONS 10⁷⁄₈" (27.6 cm) 13 33.5 cm) A. VENTING REQUIREMENTS This canopy hood is needed . A 6" (15.2 cm) round vent system is factory set...
Warranty Information
Page 1
... appliance for other damage to correct house wiring or plumbing. 2. Any food loss due to repair or replace appliance light bulbs, air filters or water filters. The cost of God, improper installation, installation not in accordance with original model/serial numbers that is covered by a Whirlpool designated service company. Proof of your major appliance is located in the United States or Canada and applies only when the major appliance...
... appliance for other damage to correct house wiring or plumbing. 2. Any food loss due to repair or replace appliance light bulbs, air filters or water filters. The cost of God, improper installation, installation not in accordance with original model/serial numbers that is covered by a Whirlpool designated service company. Proof of your major appliance is located in the United States or Canada and applies only when the major appliance...


