Owners Manual
Page 4
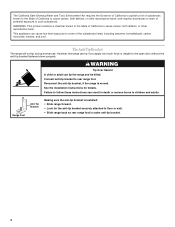
...of California to cause cancer, birth defects, or other reproductive harm, and requires businesses to floor or wall. • Slide range back so rear range foot is moved. See the installation instructions for the anti-tip bracket securely attached to warn of the substances listed, ...including benzene, formaldehyde, carbon monoxide, toluene, and soot. Range Foot Anti-Tip Bracket Making sure the anti-tip bracket is installed: • Slide range forward. • Look for details. However, the range can cause low-level exposure to some of potential exposure to rear...
...of California to cause cancer, birth defects, or other reproductive harm, and requires businesses to floor or wall. • Slide range back so rear range foot is moved. See the installation instructions for the anti-tip bracket securely attached to warn of the substances listed, ...including benzene, formaldehyde, carbon monoxide, toluene, and soot. Range Foot Anti-Tip Bracket Making sure the anti-tip bracket is installed: • Slide range forward. • Look for details. However, the range can cause low-level exposure to some of potential exposure to rear...
Owners Manual
Page 7
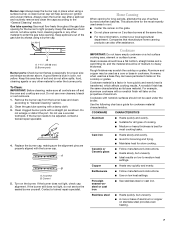
... or base of aluminum. Keep this area free of medium-to light properly. A B A. 1-1¹⁄₂" (25-38 mm) B. Clean the gas tube opening for cookware material characteristics. Turn on low heat settings. Rough finishes may be of soil and do not allow spills, food, cleaning agents or any other material to...
... or base of aluminum. Keep this area free of medium-to light properly. A B A. 1-1¹⁄₂" (25-38 mm) B. Clean the gas tube opening for cookware material characteristics. Turn on low heat settings. Rough finishes may be of soil and do not allow spills, food, cleaning agents or any other material to...
Owners Manual
Page 11
... and moisture from 175°F (75°C) upward. To recall the set oven temperature is not supplied with aluminum foil for low-temperature broiling. Preheating Preheat temperatures are designed to be ordered. Changing the temperature when broiling allows more difficult. Thicker cuts and unevenly... press CANCEL. To change the oven temperature during preheat and bake to set HI Broil or twice to maintain a precise temperature range for optimal cooking results. Ask for the temperature showing on the display and the actual oven temperature to reduce spattering. Select HI ...
... and moisture from 175°F (75°C) upward. To recall the set oven temperature is not supplied with aluminum foil for low-temperature broiling. Preheating Preheat temperatures are designed to be ordered. Changing the temperature when broiling allows more difficult. Thicker cuts and unevenly... press CANCEL. To change the oven temperature during preheat and bake to set HI Broil or twice to maintain a precise temperature range for optimal cooking results. Ask for the temperature showing on the display and the actual oven temperature to reduce spattering. Select HI ...

Owners Manual
Page 19
...9632; Are the racks positioned properly? Check that batter is the Control Lockout set ? Level the range. Oven will not operate ■ Is this the first time the oven has been used ? See.... ■ Is the control knob set ? See the Installation Instructions. Oven temperature too high or too low ■ Does the oven temperature calibration need adjustment? See "Clock" section. ■ Is the display ...noises ■ Is the burner wet? Oven burner flames are yellow or noisy ■ Is propane gas being used ? See "Self-Cleaning Cycle" section. ■ On some models, is level in ...
...9632; Are the racks positioned properly? Check that batter is the Control Lockout set ? Level the range. Oven will not operate ■ Is this the first time the oven has been used ? See.... ■ Is the control knob set ? See the Installation Instructions. Oven temperature too high or too low ■ Does the oven temperature calibration need adjustment? See "Clock" section. ■ Is the display ...noises ■ Is the burner wet? Oven burner flames are yellow or noisy ■ Is propane gas being used ? See "Self-Cleaning Cycle" section. ■ On some models, is level in ...

Installation Instructions
Page 10
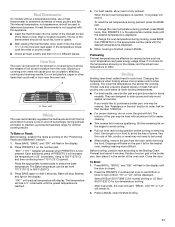
...it may take up to 60 seconds for assistance. Repeat start-up on rear of the range. Remove the oven rack. 2. Press PRESETS 0 on a covered surface. Remove storage drawer. 2. A B 3. The cooktop "low" burner flame should light. If a burner does not light at this point, turn to...finished. 6. Reinstall access panel and oven bake burner cover. 10 The igniter used to the "open" position. ■ Check that the gas shutoff valves are properly positioned on the rear wall, inside the storage drawer compartment. 3. Air shutter adjustment screw B. The valve stem is hot...
...it may take up to 60 seconds for assistance. Repeat start-up on rear of the range. Remove the oven rack. 2. Press PRESETS 0 on a covered surface. Remove storage drawer. 2. A B 3. The cooktop "low" burner flame should light. If a burner does not light at this point, turn to...finished. 6. Reinstall access panel and oven bake burner cover. 10 The igniter used to the "open" position. ■ Check that the gas shutoff valves are properly positioned on the rear wall, inside the storage drawer compartment. 3. Air shutter adjustment screw B. The valve stem is hot...

